AWS DAY 06: A Step-by-Step Guide to ECR, ECS, and Route 53
 Aesha Shah
Introduction:
Today's topic covers three essential AWS services: Amazon Elastic Container Registry (ECR), Amazon Elastic Container Service (ECS), and Amazon Route 53. These services help streamline the process of deploying, managing, and routing your applications. ECR securely stores and manages Docker container images, ECS allows you to run and scale containerized applications with ease, and Route 53 ensures your applications are accessible by translating domain names into IP addresses. Together, these tools simplify cloud application management and improve efficiency.
What is Elastic Container Registry?
Amazon Elastic Container Registry (ECR) is a fully managed Docker container registry service provided by AWS. It is designed to store, manage, and deploy container images securely and at scale. With ECR, you can easily push, pull, and manage Docker images without the need to operate your own container repositories. ECR integrates seamlessly with Amazon Elastic Container Service (ECS), Amazon Elastic Kubernetes Service (EKS), and AWS Fargate, making it simple to deploy applications on AWS. Additionally, ECR provides high availability, scalability, and security features such as image scanning for vulnerabilities, encryption at rest and in transit, and fine-grained access control through AWS Identity and Access Management (IAM).
What is Elastic Container Service?
Amazon Elastic Container Service (ECS) is a fully managed container orchestration service provided by AWS. It enables you to run, manage, and scale Docker container applications on a cluster of Amazon EC2 instances or using AWS Fargate, which provides serverless compute for containers. ECS simplifies the process of deploying containerized applications by handling the underlying infrastructure, scheduling, and scalability. It integrates with other AWS services such as Elastic Load Balancing, AWS Identity and Access Management (IAM), Amazon Virtual Private Cloud (VPC), and Amazon CloudWatch, providing a comprehensive environment for building and running distributed applications. ECS supports various deployment options, including rolling updates and blue/green deployments, ensuring high availability and efficient resource utilization for your containerized workloads.
Task 1 :
Deploy two-tier application on Elastic Container Service (ECS) and configure Elastic Container Registry (ECR) to push docker images.
Step1 : Create ECR Repository
- Nevigate to Amazon ECR in your aws console and click on "Create ECR Repository".
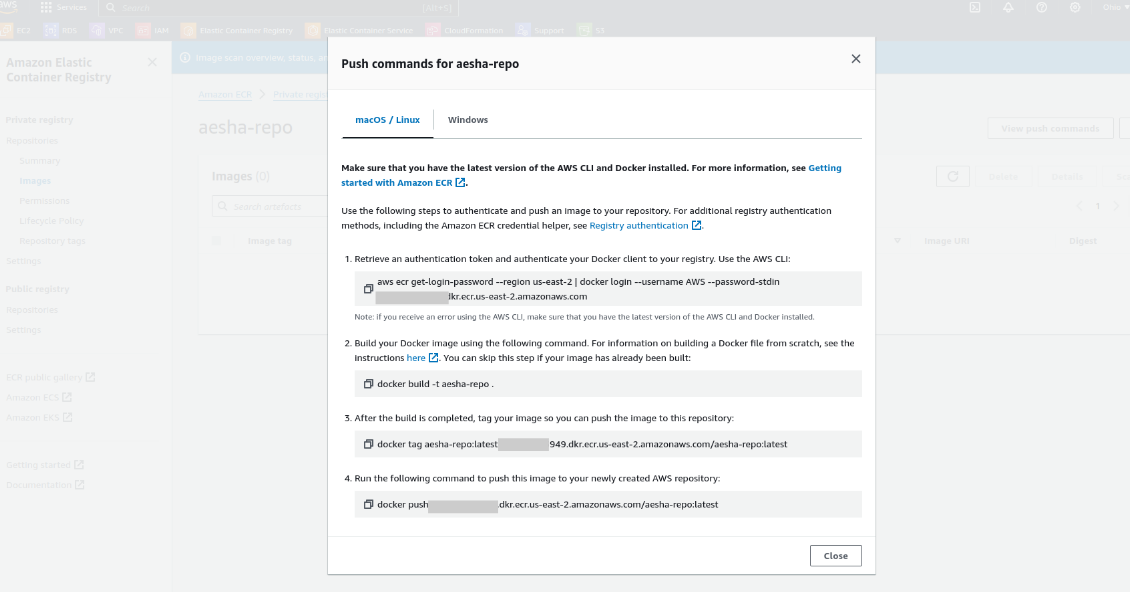
- After creating go to in this repo and click on View push commands.

- Now you have commands to push the images from the local. First, clone your project in local; after that, create a Dockerfile for your project. After that, install and configure AWS CLI on your local machine.

- After configuring aws cli, copy push commands from the aws console and push your image into the repository.
Step 2: Amazon Elastic Container Service (ECS) Configuration.
In the AWS Management Console, navigate to the Amazon ECS service and click on “Create Cluster.”
Give your cluster a name, Check the box for AWS Fargate since we are deploying a serverless architecture. Then click “Create.”
Click on “Task Definitions” in the ECS service, then click “Create a new task definition.”
Update the task definition configuration as shown in the snippets below and ensure that image URI is pointing to the ECR repository we created earlier. Then Click on create .
- After that, create a task definition and create a service. Navigate to the ECS cluster, select the cluster created earlier, and click on create in the services section.
- For the basic ECS configuration, you can follow the details as shown in the snippets below.
- Once all the configuration is done, click on Create Service. The service will create a task; you can check it by going to “Task” and clicking on the task ID. The service will also create a load balancer and a target group.
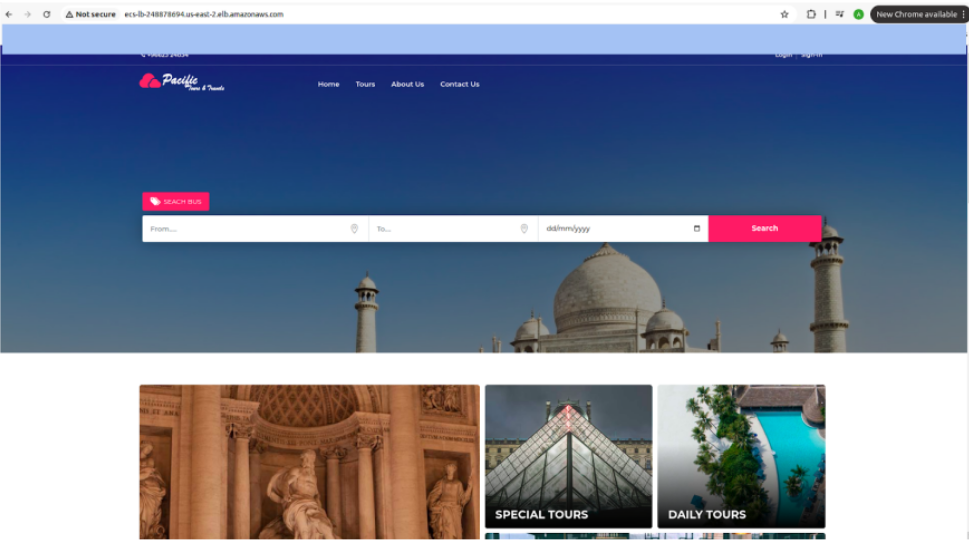
- At this point, your website is deployed to AWS ECS. You can access it through the ALB's DNS endpoint.

What is Route53?
Route 53 is a fundamental service offered by Amazon Web Services (AWS) that plays a critical role in directing internet traffic to your applications and websites. But what exactly is Route 53, and how can it benefit you? This blog dives deep into the world of Route 53, exploring its functionalities, key features, and the advantages it brings to your cloud infrastructure.
Understanding the DNS Landscape:
Before delving into Route 53, let's establish a common ground. The Domain Name System (DNS) acts like the internet's phonebook. When you type a domain name (like [invalid URL removed]) into your browser, DNS translates it into the corresponding IP address, directing you to the website's location.

Route 53: Taking Control of Your DNS Traffic
This is where Route 53 comes in. It's a highly available and scalable DNS service from AWS that empowers you to manage your domain names and route traffic efficiently. Here's a breakdown of its key functionalities:
Domain Registration and Management: Route 53 eliminates the need for separate domain registrars. You can register new domains or transfer existing ones directly within the AWS console, streamlining domain management.
DNS Record Types: Route 53 supports a wide variety of DNS record types, including A records (maps domain names to IP addresses), CNAME records (aliases for other domains), and MX records (directs email traffic). This flexibility allows you to configure how your domain name translates to various resources.
Traffic Routing: Route 53 provides granular control over how you direct traffic to your resources. You can implement features like weighted routing to distribute traffic across multiple servers or leverage latency-based routing to ensure users connect to the geographically closest server.
Health Checks: Route 53 actively monitors the health of your resources using health checks. If a health check fails, Route 53 can automatically route traffic away from unhealthy resources, ensuring high availability and a seamless user experience.
Route 53 Traffic Management: This advanced feature enables sophisticated traffic routing scenarios. You can create failover routing to automatically switch to healthy resources during outages or implement geo-location routing to deliver content based on user location.
Task 2 :
Create an EC2 instance with apache webserver Create a CloudFront distribution and attach to EC2 instance to access the apache webpage.
First, we learned about cloudfront and what cloudfront caching is.
- CloudFront is a content delivery network (CDN) service offered by Amazon Web Services (AWS). It's essentially a network of geographically distributed servers that cache your website's static content, such as HTML files, images, CSS, and JavaScript. When a user requests content from your website, CloudFront delivers it from the closest edge location, significantly reducing latency and improving website loading times.
Understanding Caching in CloudFront
Caching is the cornerstone of how CloudFront accelerates content delivery. Here's how it works:
Origin Storage: Your website's content resides in an origin server, which could be an S3 bucket, a web server running on EC2, or any other source.
Content Distribution: CloudFront fetches the content from your origin server and stores copies across its global network of edge locations.
User Request: When a user visits your website, their request is routed to the closest CloudFront edge location.
Cached Content Delivery: If the requested content is available in the edge location's cache, CloudFront delivers it directly to the user, significantly reducing the time it takes to download the content.
Cache Invalidation: If the content on your origin server changes, CloudFront's cache is invalidated, and the updated content is fetched and distributed to the edge locations.
Step 1: Create an EC2 Instance with Apache Web Server
Launch an EC2 Instance
Navigate to the EC2 Dashboard.
Click on "Launch Instance."
Choose an Amazon Machine Image (AMI). For this tutorial, select the "Amazon Linux 2 AMI."
Choose an Instance Type (e.g.,
t2.microwhich is free-tier eligible).Configure the instance details as needed.
Configure the security group to allow HTTP traffic on port 80 and SSH on port 22.
Review and launch the instance. Ensure you have a key pair to access the instance.
Install Apache Web Server
SSH into your EC2 instance using the key pair.
Update the package index and install Apache:
  sudo apt update
  sudo apt install apache2
For more configuration for apache click on here.
Step 2: Creating CloudFront Distribution
Create Distribution:
Navigate to CloudFront in the AWS Console.
Create a new web distribution.
Choose your ec2 instance which have apache server
After creating distribution, create a new policy for cache.
Navigate to the policies section and click on Create Policy, then give the name of your police and add the information that is given in the below images.
- After creating cache policies Go to your distribution dashboard, click on the distribution you created, scroll down the page, and click on Create staging distribution. Add /* in the object path, then click on Create invalidation.
- Now in the details section, you found the distribution domain name. Copy this and paste it into your browser, and you have successfully created it.

Conclusion:
In this journey, we delved into the powerful capabilities of AWS to deploy a containerized web application, combining the use of Amazon ECR, ECS, and Fargate. We built a Docker image, pushed it to ECR, and orchestrated it seamlessly with ECS and Fargate, showcasing how these tools simplify and enhance deployment, scalability, and management. By following these steps, you've tapped into AWS's potential to transform your application infrastructure, unlocking new levels of efficiency and reliability. Embrace this knowledge as a stepping stone to harness the full power of cloud technology and drive your projects to new heights..✨✨
Subscribe to my newsletter
Read articles from Aesha Shah directly inside your inbox. Subscribe to the newsletter, and don't miss out.
Written by
