Simple Guide to Deploying GKE Cluster with Terraform
 Vaibhav Kaushik
Hello, folks!
Welcome to the step-by-step guide on setting up your own Google Kubernetes Engine (GKE) cluster using Terraform! If you're eager to harness the flexibility and scalability of Kubernetes in the Google Cloud environment, you're in the right place.
This blog will walk you through each essential component and configuration, empowering you to deploy and manage your own Google Kubernetes Engine (GKE) cluster in an automated fashion with Terraform.
Let's get started...
Prerequisites
A free-tier Google Cloud Platform (GCP) account. Check it out here!
Brief idea about Terraform commands & variables
What is Terraform & Why Use It?
Looking at Terraform's definition on their docs website, we get this:
"Terraform is an infrastructure as code tool that lets you build, change, and version infrastructure safely and efficiently."
Alright but what's so efficient with it ? Isn't this something that the people in CloudOps, Infrastructure Teams or SREs do on a regular basis ?
Well yes, but there is more to it ...
Terraform automates the creation, modification and versioning of infrastructure, providing a consistent and reproducible way to manage Cloud/IT infrastructure. This approach enhances collaboration, reduces human error and improves overall infrastructure management efficiency.
Terraform offers several advantages that make it a popular choice for infrastructure provisioning and management:
Infrastructure as Code (IaC): Terraform allows you to define your infrastructure as code using a declarative configuration language. This approach ensures consistency and repeatability in infrastructure deployments.
Multi-Cloud Support: Terraform supports multiple cloud providers (AWS, Azure, Google Cloud, etc.) and even on-premises environments allowing you to manage diverse set of infrastructure from a single tool.
Resource Graph: Terraform builds a dependency graph of your infrastructure resources enabling it to determine the correct order of provisioning and parallelize resource creation when possible, speeding up deployments.
State Management: Terraform keeps track of the state of your infrastructure deployments. This state is used to plan and execute changes to your infrastructure, ensuring that only necessary changes are applied and maintaining consistency across your deployments.
Automation and Consistency: By automating infrastructure provisioning, Terraform reduces the risk of human error and ensures that your infrastructure is deployed consistently according to your defined configurations.
Community and Ecosystem: Terraform has a large and active community, contributing modules, providers and best practices. This ecosystem expands the capabilities of Terraform and provides solutions to common infrastructure challenges.
Google Kubernetes Engine (GKE)
Google Kubernetes Engine is a managed Kubernetes service provided by Google Cloud Platform (GCP). Kubernetes (often abbreviated as K8s) is an open-source platform designed to automate deploying, scaling, and operating application containers. It allows you to deploy, manage, and scale containerized applications using Kubernetes.
Installing Terraform
For this guide, I will be installing Terraform on my system running Pop_OS (Ubuntu based) as the operating system. To install Terraform on your system, configured with a different OS, you can refer to their installation documentation.
In case you have an Ubuntu or Ubuntu-based Linux distro, you can start the installation using the commands below:
wget -O- https://apt.releases.hashicorp.com/gpg | sudo gpg --dearmor -o /usr/share/keyrings/hashicorp-archive-keyring.gpg
echo "deb [signed-by=/usr/share/keyrings/hashicorp-archive-keyring.gpg] https://apt.releases.hashicorp.com $(lsb_release -cs) main" | sudo tee /etc/apt/sources.list.d/hashicorp.list
sudo apt update && sudo apt install terraform
To check if Terraform is correctly installed on your system, simply type terraform in your terminal and execute it. You should see output similar to this:
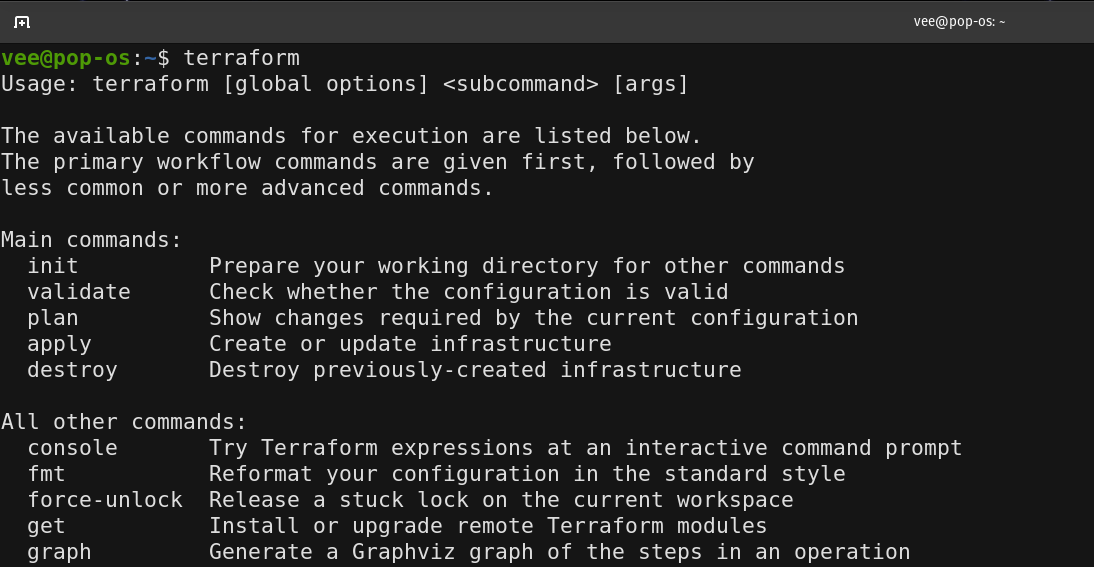
Congratulations on successfully installing Terraform on your system 🎉
Visualizing the Flow
We now have a brief overview of Terraform, its use cases, installation and essential commands. Next, we will set up a Google Kubernetes Engine (GKE) using Terraform's Infrastructure as Code (IaC) capabilities.
Please refer to the diagram below to understand how various entities interact with each other and in what order the infrastructure setup will unfold...
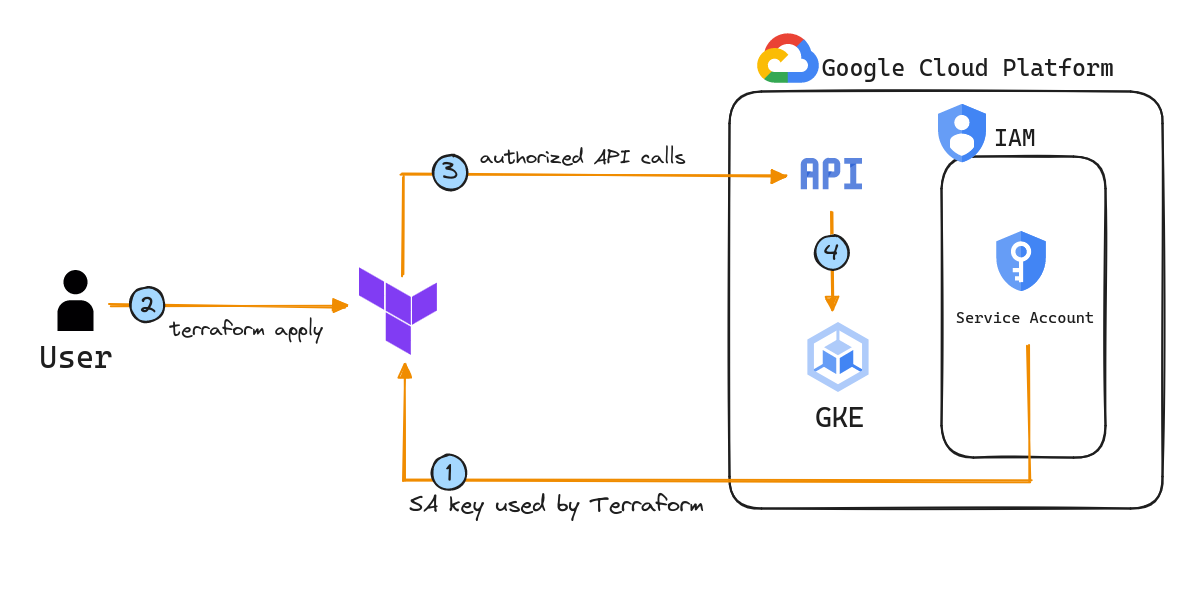
We need to create a Service Account on the Google Cloud Platform (GCP) Console. The keys attached to this Service Account will be used by Terraform.
As we run the command
terraform apply, Terraform will use the Service Account keys (created in the previous step) to make authorized API calls to GCP on our behalf.With the help of authorized API calls, we can then have our Google Kubernetes Engine set up and ready to use.
Let's Get Cracking!
Enable Kubernetes Engine API on GCP
We need to enable the Kubernetes Engine API on GCP Console (if not done already).
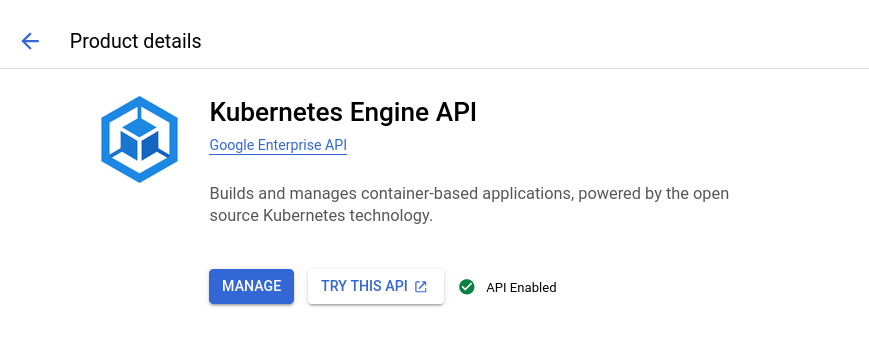
Service Account Setup on GCP Console
Let's log into our Google Cloud Platform (GCP) Console's Project Home and select IAM & Admin > Service Accounts from the left navigation pane
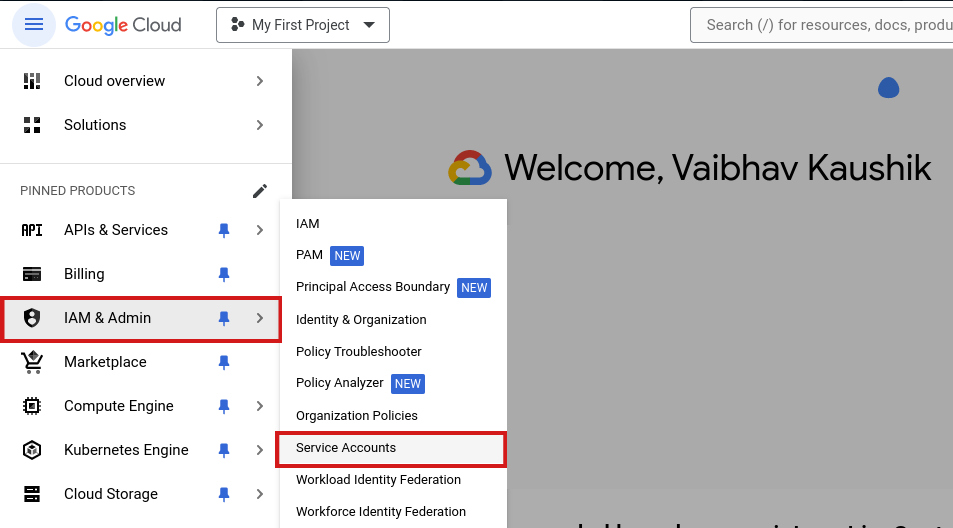
Hit onto the + CREATE SERVICE ACCOUNT at the top of page

Fill in the details as per your need. I am going ahead with the below details
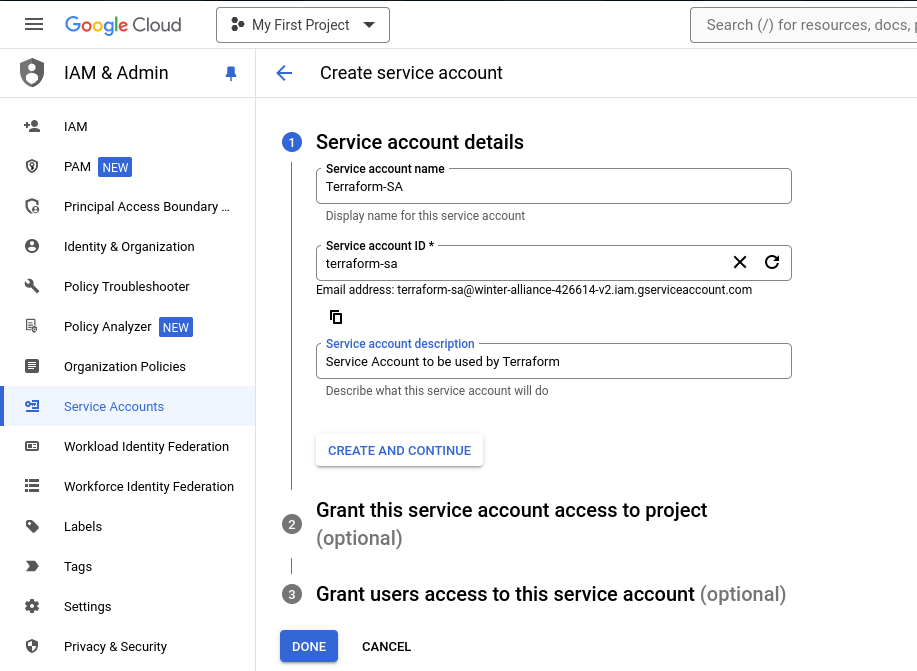
Once you're done, click on CREATE AND CONTINUE
Now we need to choose the level of permissions to assign to this service account. For this tutorial, I will select "Editor" access. In a real-life scenario, we should only grant the minimum necessary permissions to prevent misuse.
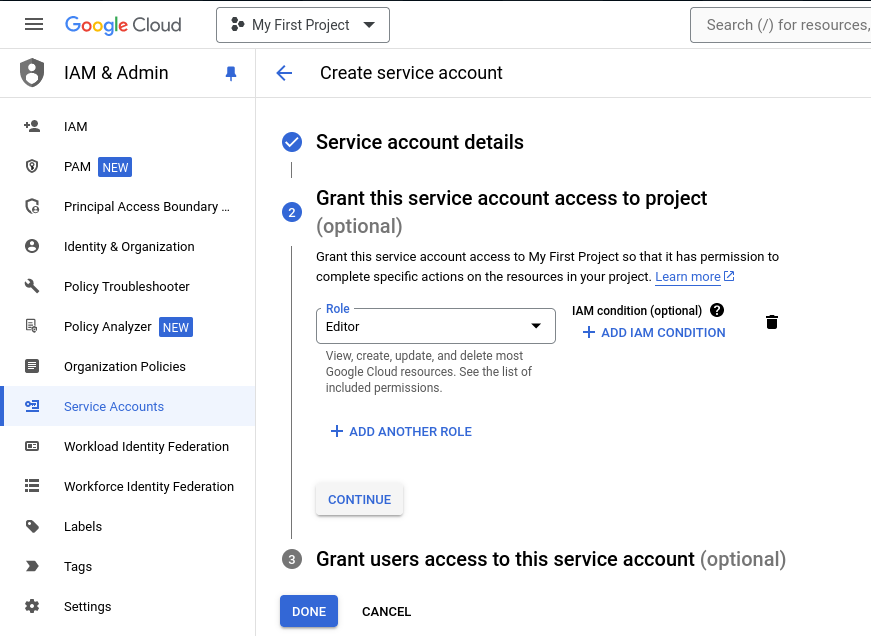
We can leave the next section as blank and click "DONE"
Once you've created your Service Account, you can view it in the Service Account menu. But the Service Account creation is incomplete without it's keys.

Let's setup Keys for our newly created Service Account.
To the extreme right of your Service Account, click on the 'Three-Dots' under the "Actions" Tab > Choose "Manage keys"
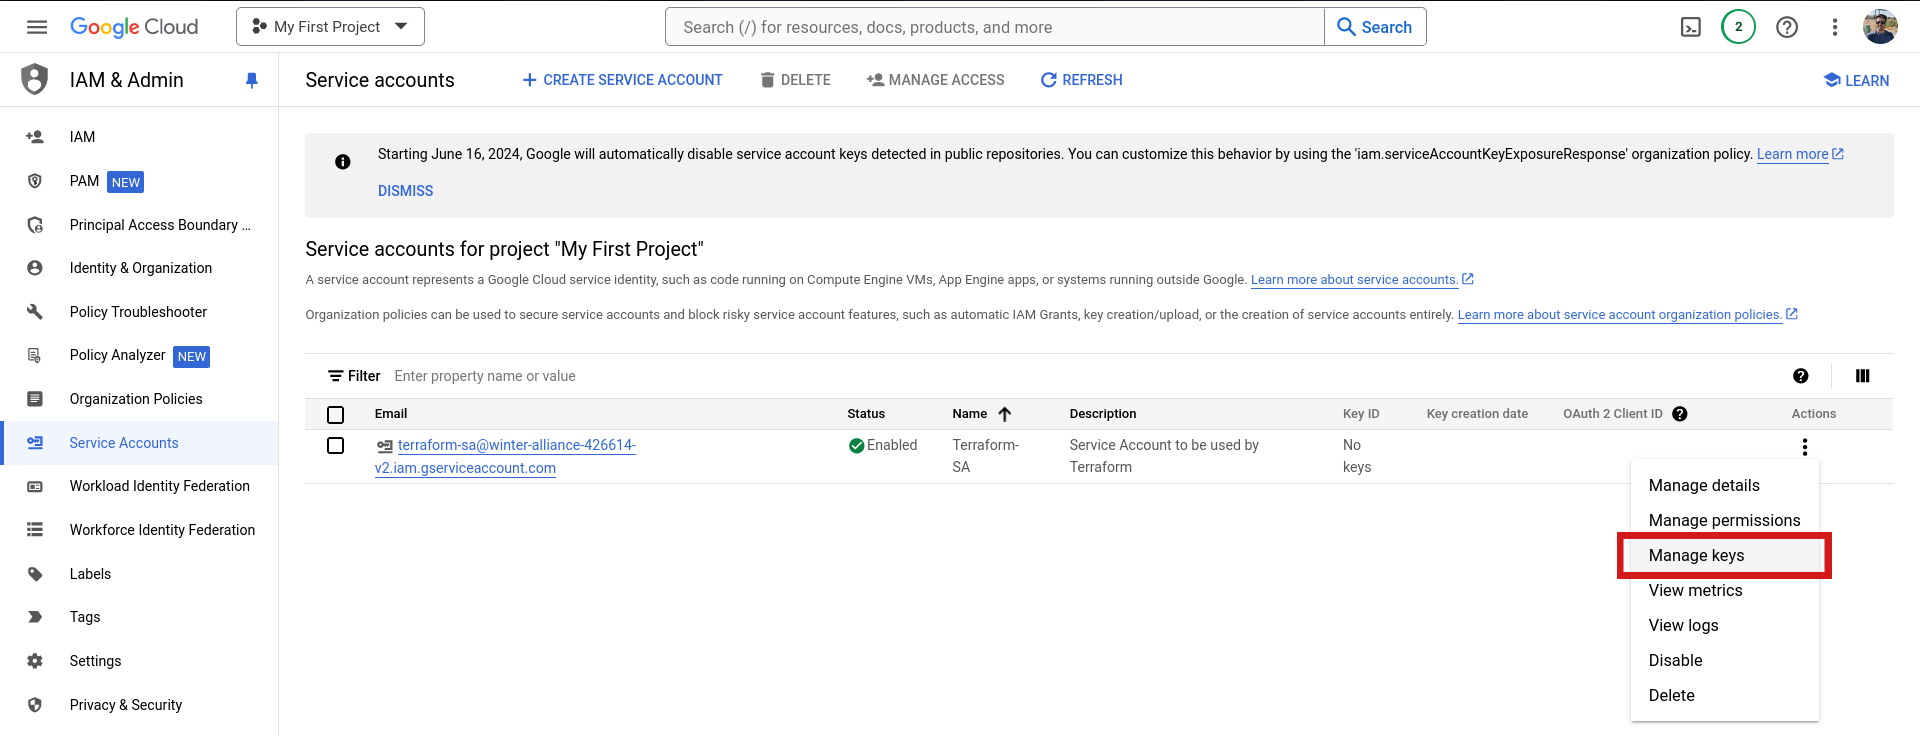
On the next page...
Click on "ADD KEY" > "Create new key"

Choose "JSON" format in the pop-up & click on "CREATE". This will download the private key on your system.

Terraform Basic Setup
Let's create a file main.tf
This file will contain all the major infrastructure configurations related to our GKE cluster.
Let's start by specifying the necessary provider for the Terraform. This is a mandatory block of code that should be present in every main.tf file for any cloud provider. Since we are going to interact with Google Cloud Platform (GCP), so the required_provider for us would be google
terraform{
    required_providers {
      google = {
        source = "hashicorp/google"
        version = "4.51.0"
      }
    }
}
Let us also add the necessary configurations for the provider in our main.tf file
provider "google" {
  credentials = file(var.credentials_file)
  project = "winter-alliance-426614-v2"
  region = "asia-south2"
  zone = "asia-south2-a"
}
Here we have created a variable called credentials_file & specified the google project id as well in the project field. We also have chosen a region & an availability zone as to where our GKE cluster will be created. They are asia-south2 (Delhi) & asia-south2-a respectively.
You should change the project field according to your google project id.
Let's now create a file variables.tf to store all the variable values. Let's create a variable for the location of Service Account private key file. This location could be changing with time so it makes sense to create a variable for it
variable "credentials_file" { }
But the value of the variable credentials_file is empty. Where do we specify the location of our Service Account private key file ?
To solve this problem we are now going to create another file called terraform.tfvars This file will pick up the values of the variable and apply them during the runtime.
# Specify path of service account private-key json file
credentials_file = "~/Downloads/winter-alliance-426614-v2-37d67d432eab.json"
For me the file is kept in my user's Downloads directory. You should change this path accordingly for your system.
So far we have created 3 files namely:
main.tfvariables.tfterraform.tfvars
Adding Configurations for GKE
Let's now switch back to main.tf file & add the configurations for Google Kubernetes Engine (GKE) cluster.
# GKE Cluster Configurations
resource "google_container_cluster" "gke_cluster" {
  name = var.cluster_name
  location = "asia-south2-a"
  remove_default_node_pool = true
  initial_node_count = 1
  ip_allocation_policy {

  }
  private_cluster_config {
    enable_private_nodes = true
    master_ipv4_cidr_block = "172.30.0.0/28"
  }
}
Some key points about the cluster configs:
It's a private zonal cluster, hence the use of
private_cluster_configThe google provider creates a default node pool initially. We have set the
remove_default_node_pool = trueto remove the default node pool as we will use our own custom node pool instead of default one.We only want only 1 node to be present in the default node pool, so we have used
initial_node_count = 1in the config.
Let's now add the variable cluster_name in variables.tf file
variable "cluster_name" {
    default = "testing-cluster"
}
We also need to add the same in terraform.tfvars file
# GKE Cluster Name
cluster_name = "vaibhav-hashnode-demo-cluster"
Adding Configurations for GKE - Node Pool
As we know a GKE cluster is incomplete without a node pool so we will have to add configurations for the same in main.tf
# Node Pool Configurations
resource "google_container_node_pool" "spot_node_pool" {
  name = "custom-node-pool"
  cluster = google_container_cluster.gke_cluster.id
  node_count = var.node_count
  node_config {
    spot = true
    machine_type = "n1-standard-2"
  disk_size_gb = 30
  disk_type = "pd-standard"
  oauth_scopes = [
    "https://www.googleapis.com/auth/cloud-platform"
  ]
  }
}
Some key points about the node-pool configs:
It's a spot node pool, hence the use of
spot = trueinnode_configblockThe machine type is
n1-standard-2with a 30 GB of boot size & standard persistent disk per node
Since we have created a variable for the node count. Let's include the same in variables.tf
variable "node_count" {
    default = "1"
}
Let's do the same for terraform.tfvars
# Number of Nodes
node_count = "1"
This completes the configuration for our GKE cluster. It's time to test these configurations and deploy the infrastructure to cloud.
Rolling With Terraform Commands
Let's initialize Terraform & the required providers with
terraform init
You should see output similar to this
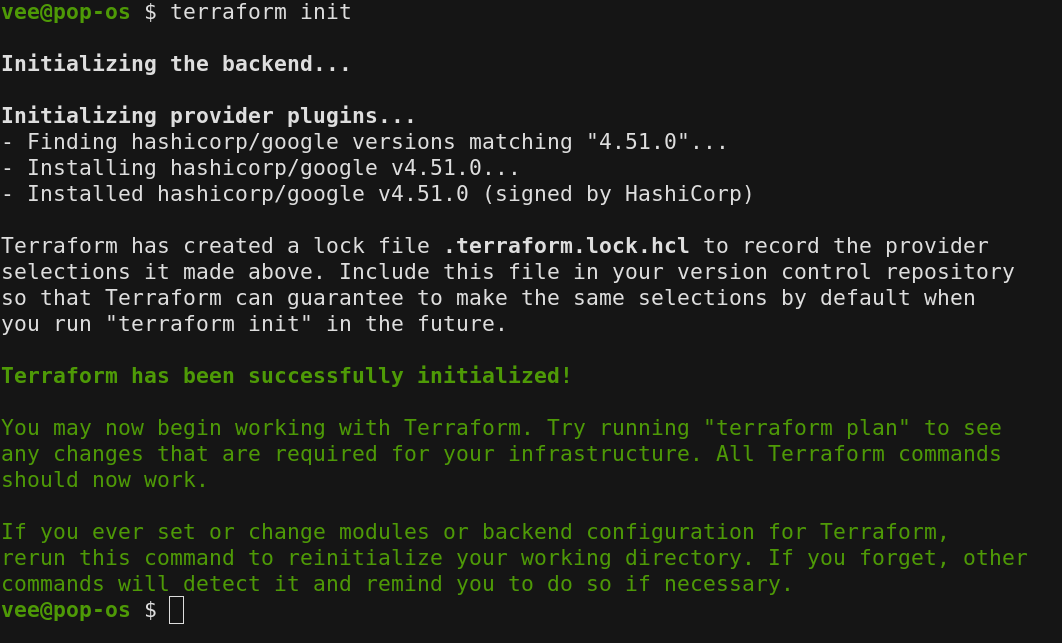
Let's validate configuration syntax using
terraform validate
The output should be similar to this

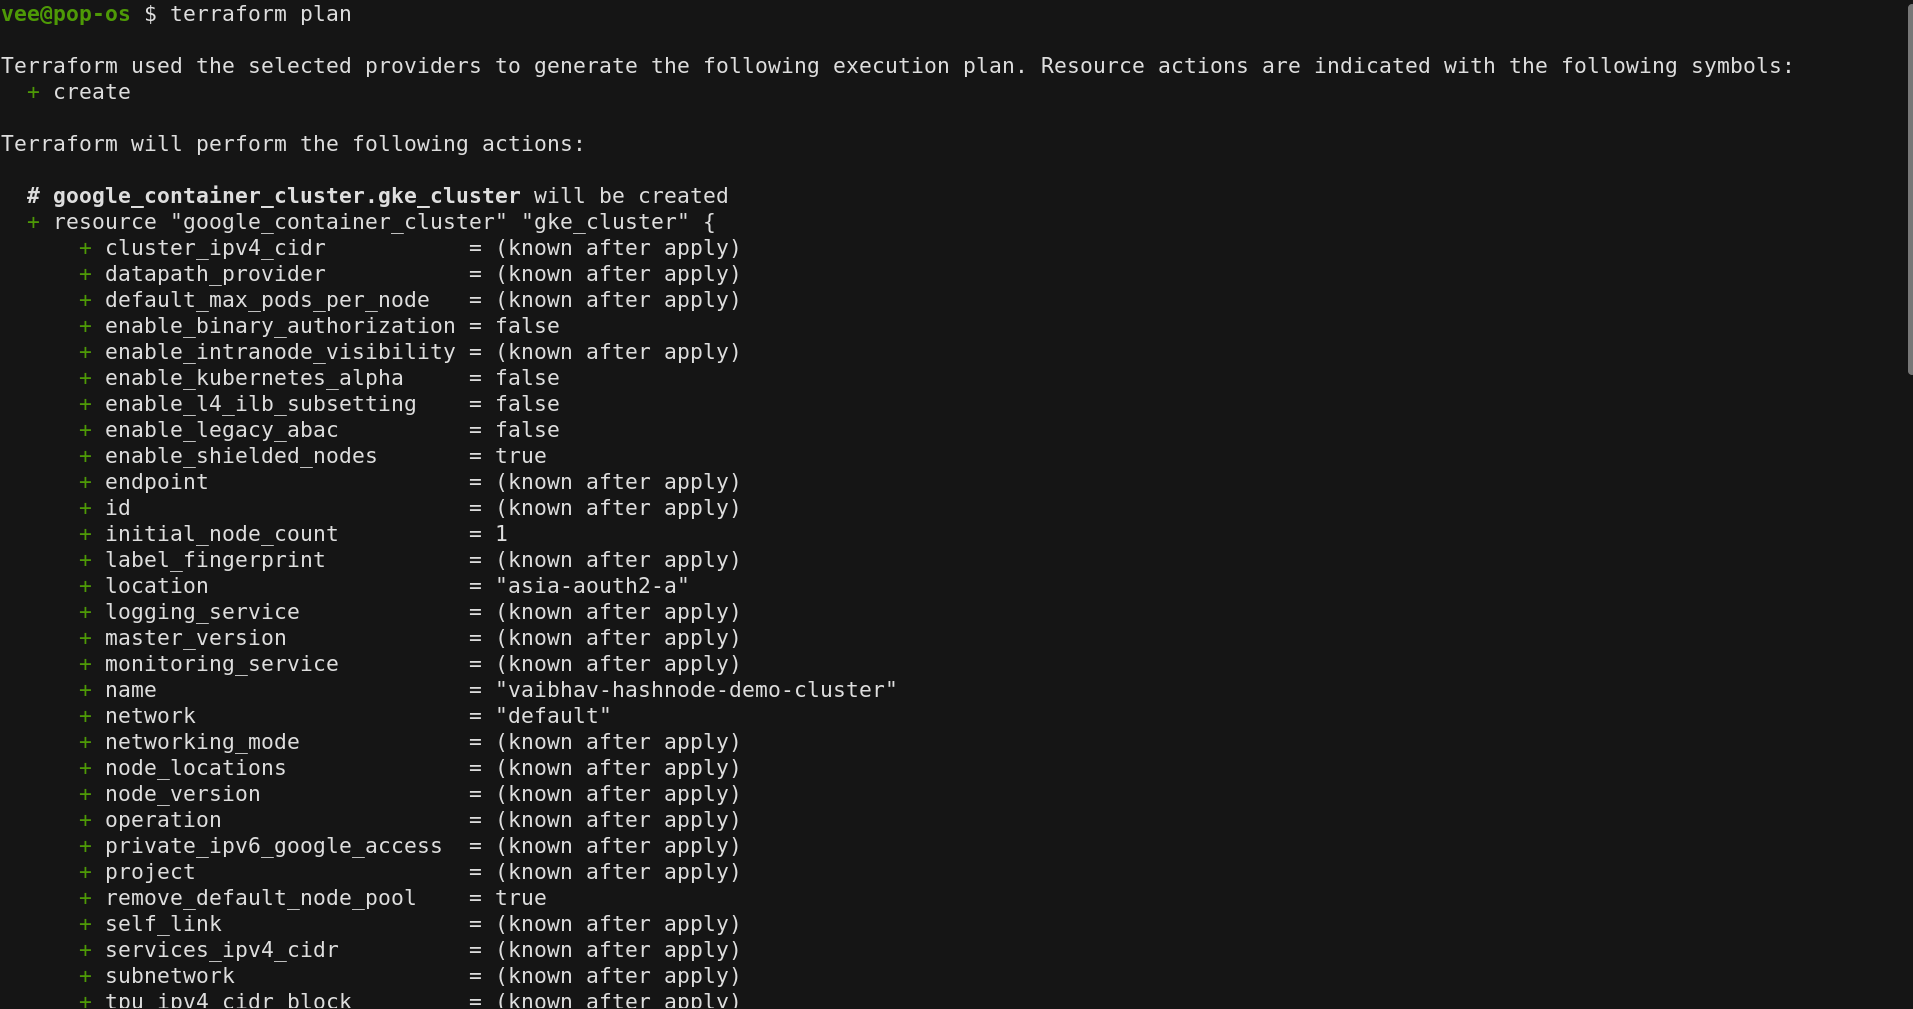
Let's look at a dry run of our configurations using
terraform plan
This will generate a long output similar to this - (Adding only the starting lines and ending lines of the output)

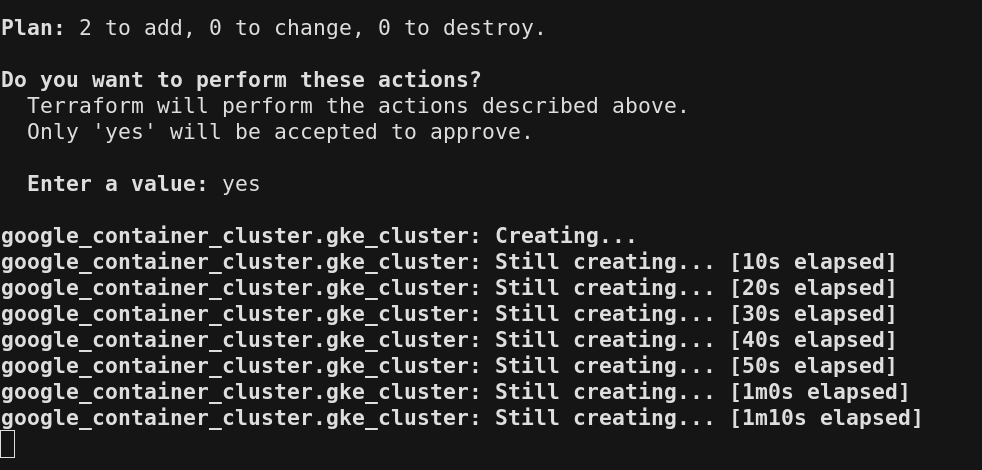
Let's now apply these configurations using
terraform apply
Type in "yes" as confirmation
The output should be similar to this
Let's grab a cup of coffee ☕
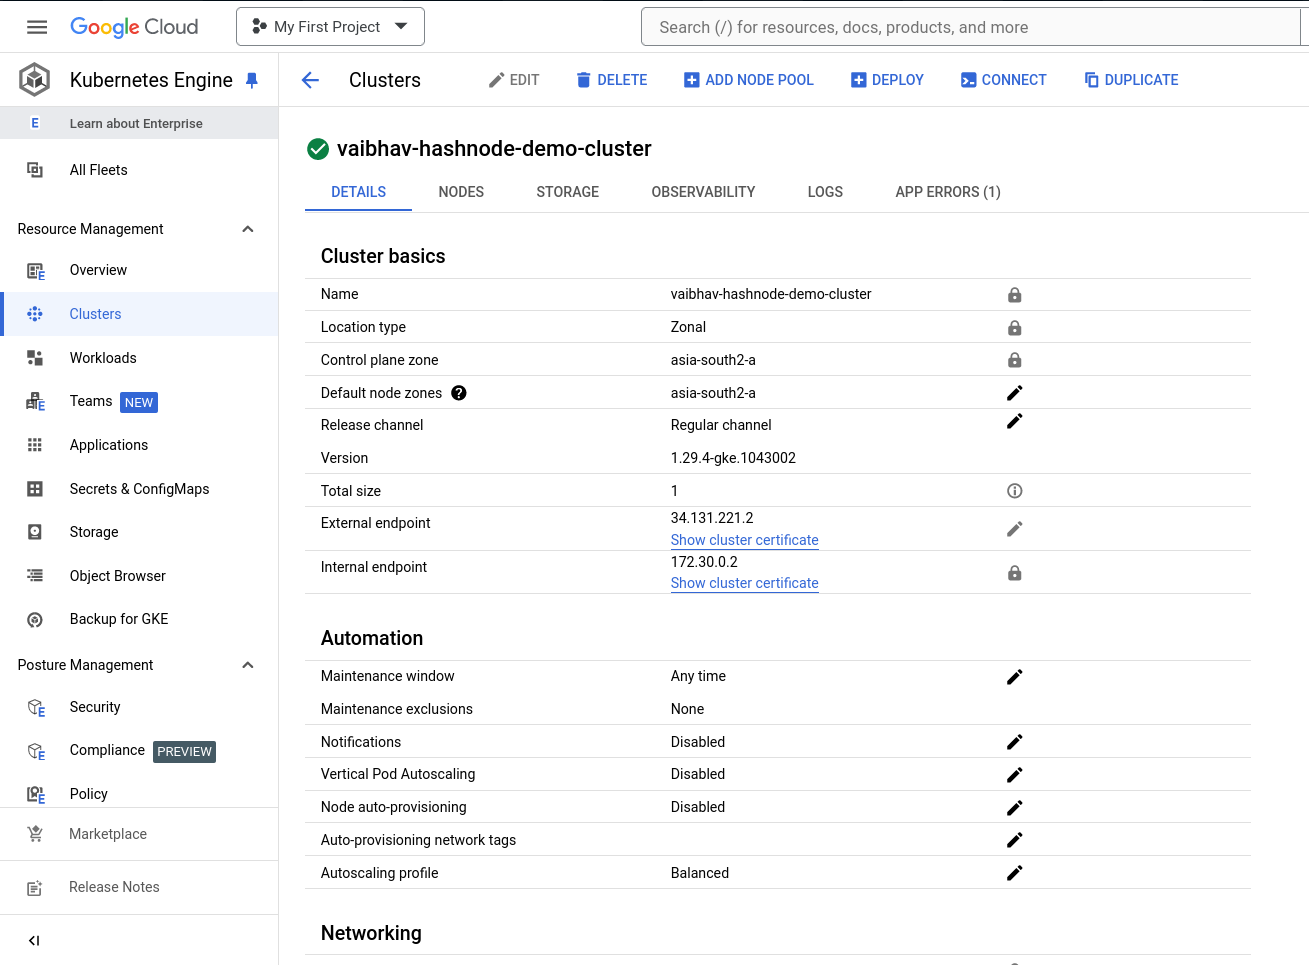
Validating Configurations
The output should be similar to this

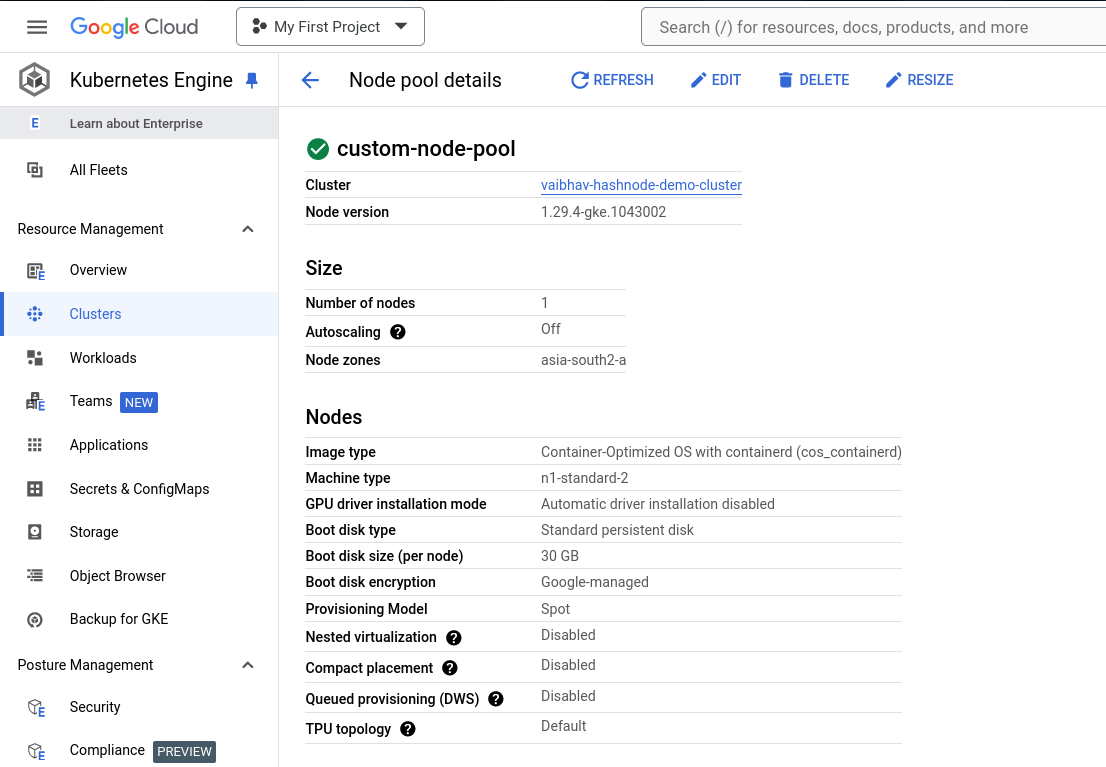
On GCP we can validate the configurations for the GKE Cluster

We can also validate the configurations for the GKE Cluster - Node Pool

Clean Up
It's important to clean-up all cloud resources after any such demo or proof of concept to avoid any unnecessary billings. The best way to clean-up the resources is to reverse our course of actions.
Let's start by getting rid of the infrastructure that we created with Terraform using
terraform destroy
Type in "yes" as the confirmation

After few minutes the infrastructure should be cleaned up by Terraform. Output should be similar to this

As a good security practice we should also remove the Service Account that we created in the beginning of this guide. Select the Service Account and select the DELETE option at the top to Delete the Service Account.
Conclusion
In conclusion, mastering the deployment and management of infrastructure using tools like Terraform and Google Kubernetes Engine (GKE) on Google Cloud Platform (GCP) offers significant advantages in scalability, reliability and cost-efficiency. By following the steps outlined in this guide, users can seamlessly install Terraform, configure a GKE cluster with customized node pools and ensure proper cleanup of resources to optimize usage and avoid unnecessary costs. Embracing these technologies not only enhances technical proficiency but also empowers teams to streamline development processes and deploy applications with greater agility in a cloud-native environment.
Resources
You can checkout my GitHub repository for all the resources / files created in this guide: https://github.com/vaibhavkaushik99/GKE_with_Terraform
Thanks for your time, Ciao!
Subscribe to my newsletter
Read articles from Vaibhav Kaushik directly inside your inbox. Subscribe to the newsletter, and don't miss out.
Written by

Vaibhav Kaushik
Vaibhav Kaushik
I talk about DevOps, SRE & Cloud Computing