Install and Configure Jenkins Master and Jenkins Agent via SSH (Part-02)
 Wai Yan Soe
Part -01 is here :
5. SSH access Master to Agent
5.1 Generate ssh key pair and copy public key to Jenkins agent
part 1 မှာ Jenkins Master Setup လုပ်ပြီးသွားပြီဆိုတော့ Agent နဲ့ SSH connection စပြီးချိတ်ကြည့်ပါမယ်။ အဆင်ပြေရာ host မှာ Generate လုပ်နိုင်ပါတယ်။ ssh-keygen နဲ့ ssh key pair တစ်ခု generate လုပ်လိုက်ပါမယ်။
ssh-keygen -C agent-via-ssh -f agent-via

Private key နဲ့ Public key ရလာပါလိမ့်မယ်။ Public key ကိုတော့ agent ထဲမှာထားရမှာဖြစ်ပြီး Private Key ကိုတော့ Jenkins master မှာ Security Credential တစ်ခုအနေနဲ့ Create လုပ်ပေးရမှာပါ။ အရင်ဆုံး private key ကို Jenkins agent node ရဲ့ agent အနေနဲ့ run မယ့် User ရဲ့ home directory အောက်မှာရှိတဲ့ .ssh/authorized_keys ထဲမှာ ထည့်ပေးလိုက်ရင်ရပါပြီ။
sudo vi ~/.ssh/authorized_keys
👆Public Key ကို ဒီထဲမှာ paste ချလိုက်ရင်ရပါပြီ
notes: ssh-copy-id ဆိုတဲ့ Commands ကိုလည်းသုံးလို့ရပါတယ်။
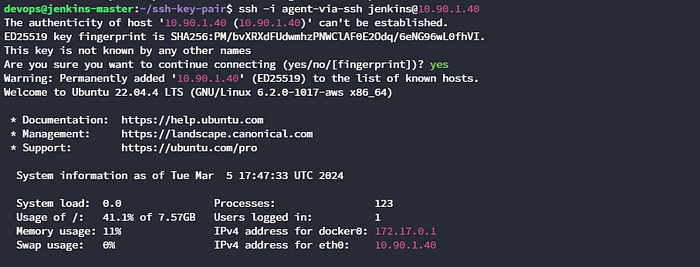
Public key ကို Jenkins Agent ထဲကို ထည့်ပြီးပြီဆိုရင်တော့ private key နဲ့ test လုပ်ကြည့်လို့ရနိုင်ပါတယ်။
ssh -i <ssh-key-name> <agent-ssh-user>@<agent-host-address>
5.2 Create Jenkins Credentials with SSH private key
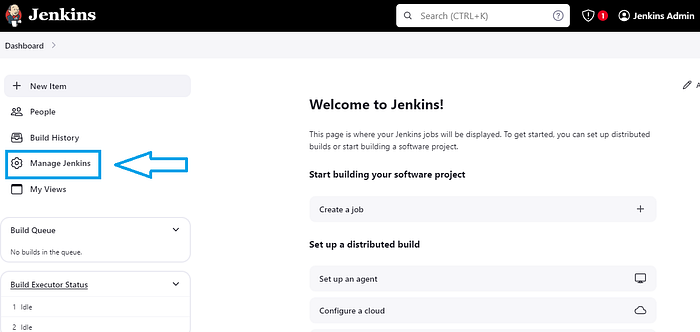
Private key ကိုတော့ Jenkins Master ရဲ့ Management console ထဲမှာ Security Credential တစ်ခု အနေနဲ့ Create လုပ်ပေးရမှာပါ။ jenkins_master_ip:8080 နဲ့ ခေါ်လိုက်ပြီး Login ဝင်ပြီးပြီဆိုတာနဲ့ တွေ့တွေ့ချင်းမှာပဲ Manage Jenkins ထဲကိုသွားလိုက်ပါ။
Jenkins Dashboard > Manage Jenkins
ပြီးရင်တော့ Security session ရဲ့အောက်မှာ Credentials ဆိုပြီးတွေပါလိမ့်မယ်။
Go to Security > Credentials

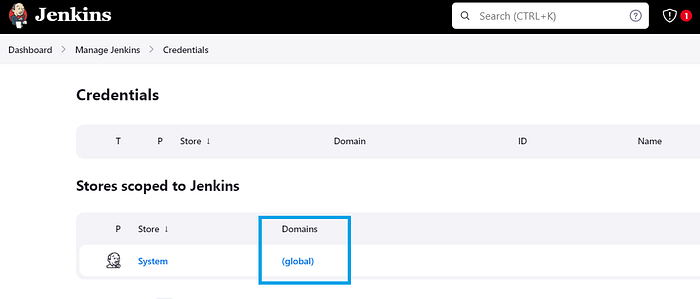
Credentials ထဲကိုရောက်ပြီဆိုတာနဲ့ Global ထဲမှာပဲ Create လုပ်မှာ မလို့ global ကိုပဲနှိပ်ပြီးဝင်လိုက်ပါ။
Click on global (create in global domain)
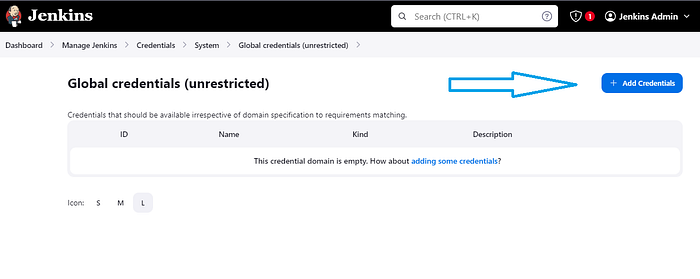
ပြီးရင်တော့ Add Credentials
Add Credentials
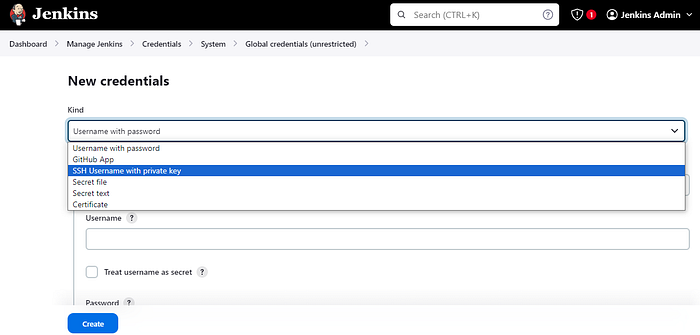
SSH Private ကိုသုံးမှာဖြစ်လို့
Credentials kind ကို SSH Username with private key လို့ရွေးပေးလိုက်ပါ။
Credentials kind > Select SSH Username with private key
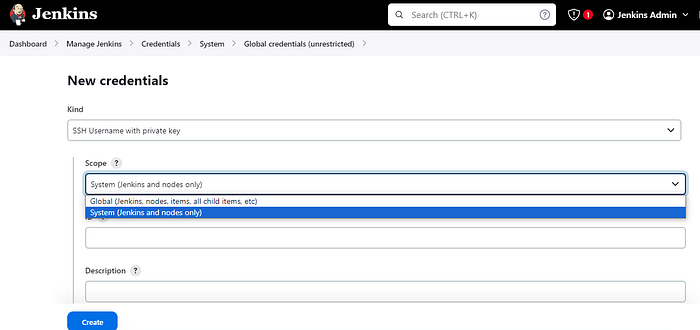
Credentials Scope ကတော့ System (Jenkins and nodes only)
Credentials Scope > Select System (Jenkins and nodes only)
ဒီမှာကတော့ Credential ID နဲ့ Jenkins agent ရဲ့ SSH username ကိုထည့်ပေးရမှာပါ။ ဒီနေရာမှာ ကျွန်တော်ကတော့ Agent ထဲမှာ Jenkins ဆိုတဲ့ username နဲ့ create လုပ်ပြီးသားမို့ jenkins လို့ပဲ ထည့်ပေးလိုက်ပါတယ်။ Credential ID ဆိုတာကတော့ Jenkins Console ရဲ့ တခြားနေရာကနေ ခေါ်သုံးရမယ့် id or name တစ်ခု လို့ မှတ်ယူလို့ရပါတယ်။ ဥပမာ pipeline ထဲမှာ credential တစ်ခုကို ယူသုံးချင်တယ်ဆိုရင် သတ်မှတ်ခဲ့တဲ့ Credential ID ကိုယူသုံးရမှာပါ။
Add Credential id and ssh username

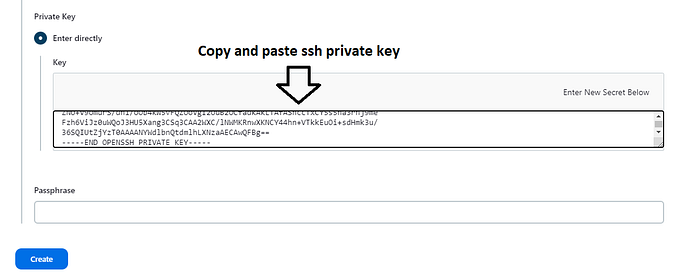
ပြီးရင်တော့ Private Key နေရာမှာ အခုဏ Generate လုပ်ခဲ့တဲ့ SSH Private key ကို ထည့်ပေးရမှာပါ။ Add ကို နှိပ်ပြီ paste ချလိုက်ပါ။
Import SSH Private Key

SSH generate လုပ်တဲ့အခါမှာ passphrase သုံးခဲ့ရင် passphrase ပါ ထည့်ပေးရမှာပါ။ ပြီးရင်တော့ Create လုပ်လိုက်လို့ ရပါပြီ။
အခုဆိုရင်တော့ ကျွန်တော်တို့ Create လုပ်လိုက်တဲ့ Jenkins Credential ကို တွေရမှာပါ။

6. Connect Master to agent
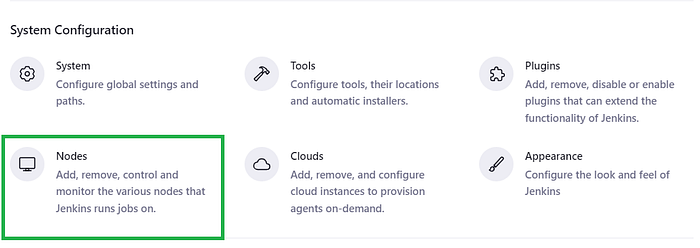
SSH Key pair setup လုပ်ပြီး သွားပြီဆိုရင်တော့ Master ကနေ agent ကို SSH connection ကိုသုံးပြီး Connect လုပ်ကြည့်ပါမယ်။ Manage Jenkins ထဲကို ပြန်သွားလိုက်ပါ System Configuration ရဲ့ အောက်မှာ Nodes ဆိုပြီး တွေ့ပါလိမ့်မယ် အဲ့ထဲကို ဝင်လိုက်ပါ။
Go to Mange Jenkins > System Configuration > Nodes
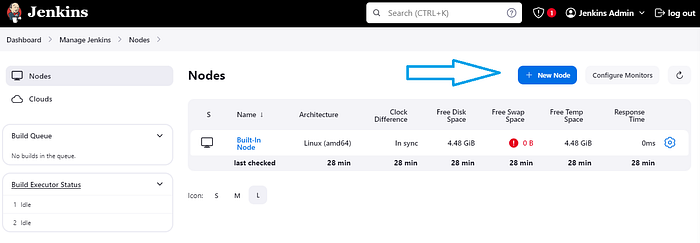
Add New Node ဆိုပြီး အသစ် Add ပါမယ်။
Add New Node
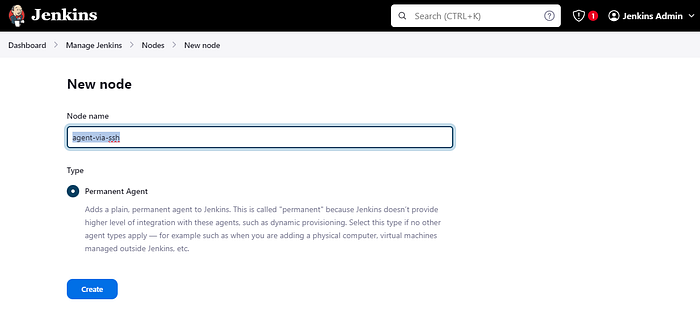
Node Name တစ်ခု ပေးပါမယ်။နှစ်သက်ရာတစ်ခုပေးနိုင်ပါတယ်။ Permanent Agent ကို Select လုပ်ပြီး Create ဆိုပြီးဆက်သွားလိုက်ပါ။
ဒီနေရာမှာ အရင်ဆုံး သတိထားရမယ့်နေရာတွေကတော့
Remote root directory Labels Launch method
ဒီသုံးခုပါ
Remote root directory ကတော့ Jenkins နဲ့ ပတ်သက်တဲ့ process တွေ တွေကိုဘယ်ထဲမှာ run မလဲ တစ်နည်းအားဖြင့် Workspace တွေ Configuration တွေ pipeline တွေ စသဖြင့် ပေါ်ဒီ process တွေကို ဘယ်နေရာမှာ run မလဲ ဆိုတာကိုသတ်မှတ်ပေးရမှာပါ။
Labels ကတော့ Pipeline တစ်ခုကို ဘယ် agent ပေါ်မှာ run မလဲဆိုတာကို သတ်မှတ်တဲ့နေရာမှာသုံးပါတယ်။ Jenkinsfile မှာ Agent ရဲ့ Labels ကို ယူသုံးလိုက်တာနဲ့ အဲ့ဒီ pipeline တစ်ခုလုံးက ယူသုံးလိုက်တဲ့ Labels ရဲ့ ဿက်ဆိုင်ရာ Agent မှာ Run သွားပါတယ်။
Launch method ကတော့ ရှင်းပါတယ်ဒီနေရာမှာ SSH Method ကိုပဲသုံးမှာပါ
ဘေးနားက ? လေးတွေကိုနှိပ်ပြီ Configuration တစ်ခုစီရဲ့ ဘာတွေဆိုလိုလည်းဆိုတာလည်းကြည့်ကြည့်နိုင်ပါတယ်။
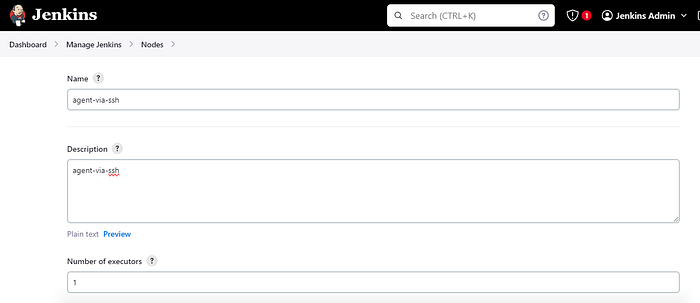
Remote root directory ကတော့ ကျွန်တော် က Jenkins User အောက်မှာ jenkins_agent ဆိုတဲ့ Directory တစ်ခု ဆောက်ပြီး အဲ့ Directory ကိုပဲညွန်းပေးလိုက်ပါတယ်။
Labels ကတော့ နှစ်သက်ရာတစ်ခုခုပေးလိုက်ပါ။
Launch method ကတော့ Lunch agent via SSH ရွေးပေးလိုက်ပါတယ်။
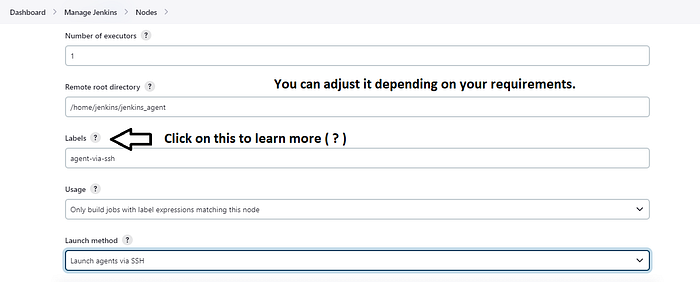
Lunch method SSH ကိုရွေးလိုက်ပြီဆိုရင်တော့သူနဲ့ပတ်သက်တဲ့ Configuration တွေစပါမယ်။
Host နေရာမှာ Jenkins agent ရဲ့ address တစ်ခု ထည့်ရပါမယ်။Master နဲ့ connecton မိနေတဲ့ Private IP Address ဆိုလည်းရပါတယ်။
ပြီးရင်တော့ အပေါ်မှာ Create လုပ်ခဲ့တဲ့ Credential ရဲ့ Credential ID ကို တွေ့ရပါလိမ့်မယ်။ ရွေးလိုက်ပါ။ အောက်ဆုံးမှာကတော့ SSH Host Key Verification ကို non verifying ရွေးထားလိုက်ပါမယ် Production အတွက်ဆိုရင်တော့ Recommend မပေးပါဘူး တခြားနည်းလမ်းသုံးလို့ရပါတယ်။
notes: host key non verifying: not recommend for prod
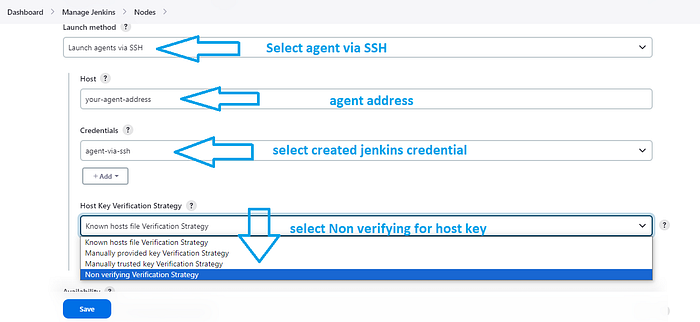
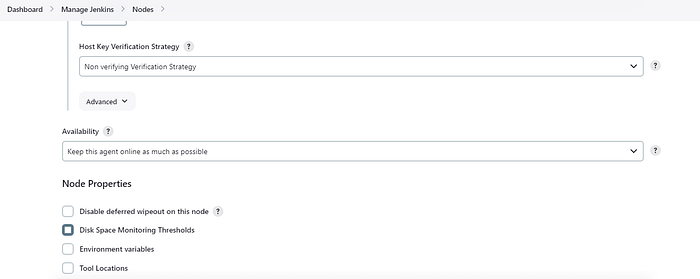
ဒါတွေပြီးသွားပြီဆိုရင်တော့ရပါပြီ တခြား setting တွေ ဆက်လုပ်ချင်လည်းလုပ်နိုင်ပါတယ်။
အားလုံးပြီးလို့ Save ပြီးတာနဲ့ Nodes ဆီကို ပြန်သွားလိုက်ပါ ပြီးရင် Add လိုက်တဲ့ Node ထဲကို ဝင်ကြည့်ပါ
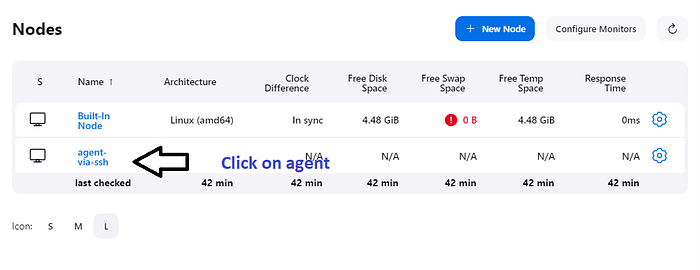
အကယ်၍ Agent က running မဖြစ်နေဘူးဆိုရင်တော့ Lunch agent နှိပ်ပေးလိုက်ပါ။
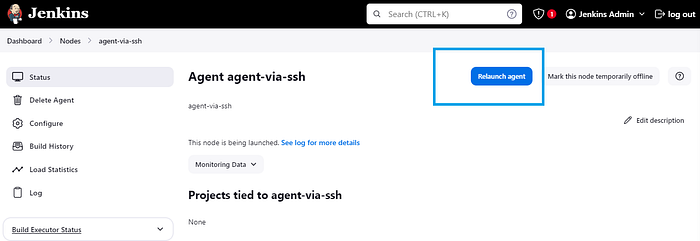
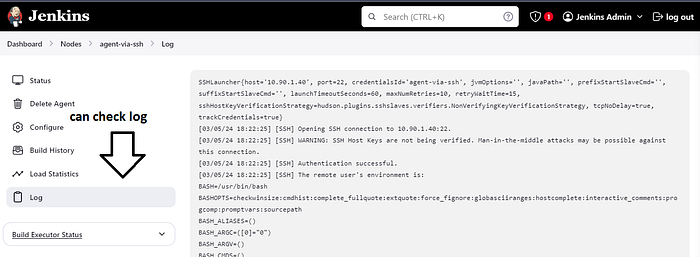
ပြီးရင်တော့ Agent connection logs တွေကို Console logs ကနေ ကြည့်နိုင်ပါတယ်။
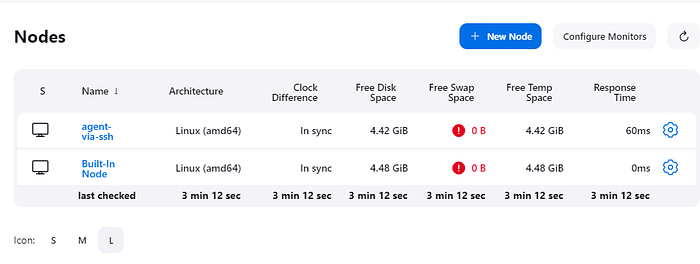
Agent running ဖြစ်နေရင်တော့ ဒီပုံစံအတိုင်းတွေ့ရမှာပါ ။ဒါဆိုရင်တော့ Agent ပေါ် မှာ pipeline job တွေ စ run လို့ရပါပြီ။
အခုဆိုရင်တော့ Jenkins Master နဲ့ Agent ဟာ pipeline job တွေ run ဖို့အတွက် ready ဖြစ်သွားပါပြီ။ အားလုံးပဲ အဆင် Lab လိုက်စမ်းရင်း အဆင်ပြေကြမယ်လို့မျော်လင့်ပါတယ်။
Thank you for taking the time to read this article! Feel free to connect and share your thoughts or questions. I will also share more on the topic of Jenkins.
Subscribe to my newsletter
Read articles from Wai Yan Soe directly inside your inbox. Subscribe to the newsletter, and don't miss out.
Written by
