How to Dockerize Your Application: A Step-by-Step Guide
 Saarthak Maini
Dockerizing your application can significantly streamline the deployment process, ensuring consistency across different environments. In this blog, we'll walk through the steps required to dockerize a typical application, covering the basics from creating a Dockerfile to running your application in a Docker container.
What is Docker?
Docker is a platform that allows you to automate the deployment, scaling, and management of applications in lightweight, portable containers. These containers package an application with its dependencies and configurations, enabling it to run consistently across various environments.
Dockerfile Commands:
WORKDIR: Sets the working directory inside the container, similar to
cd.COPY: Copies files from the local system into the container.
FROM: Specifies the base image with minimal dependencies for the container.
COPY . . : Copies contents from the current directory on the local system to the working directory in the container.
RUN: Executes a command in the container during the build process.
CMD: Specifies the command to run when the container starts.
EXPOSE: Opens a port on the container to enable access to the application.
Step 1: Install Docker
Before starting, ensure Docker is installed on your machine. You can download and install Docker Desktop from Docker's official website. Follow the installation instructions specific to your operating system.
Step 2: Prepare Your Application
For this guide, I would be using an application which I made to manage my tasks and time. I named it DeskDynamo. Add a Dockerfile in your application source code and it should have the exact name 'Dockerfile' which is followed by standard convention.
In the case of DeskDynamo, I added the following Dockerfile:
Dockerfile
FROM nginx:alpine
COPY . /usr/share/nginx/html
EXPOSE 80
CMD ["nginx", "-g", "daemon off;"]
Explaination of Dockerfile
FROM nginx:alpine
This line specifies the base image for your Docker image. In this case, it's using the official NGINX image based on the Alpine Linux distribution. Alpine is a minimal Docker image based on Alpine Linux, which is known for its small size and simplicity, making it a good choice for creating lightweight containers.
COPY . /usr/share/nginx/html
This command copies all the files from the current directory (.) on your host machine to the /usr/share/nginx/html directory in the container. This directory is the default location where NGINX looks for the files to serve as a web server. Essentially, this line is deploying your application (presumably a static website) to be served by NGINX.
EXPOSE 80
The EXPOSE instruction informs Docker that the container will listen on port 80 at runtime. This is the default port for HTTP traffic, so it’s where NGINX will serve your web content. This instruction doesn't actually publish the port; it simply indicates the intended network port for the service. To make the port accessible outside the container, you'd need to use the -p flag with docker run (e.g., docker run -p 80:80 ...).
CMD ["nginx", "-g", "daemon off;"]
The CMD instruction specifies the command to run within the container when it starts. In this case, it starts the NGINX server. The -g "daemon off;" option tells NGINX to run in the foreground (not as a daemon). This is necessary because Docker containers run a single process in the foreground. If the process runs as a daemon (in the background), the container will stop immediately after starting.
Step 3: Build Image using Dockerfile
docker build -t deskdynamo .
Step 4: Run the Docker Container
docker run -p 8080:80 deskdynamo
Step 5: Open Application in Browser
Now, after running the container, we can access the application running in the container by accessing 'localhost:8080' via the browser
Pushing The Image to Docker Hub
Now we have built the image, and it is currently present in our local system. Now, we have to push that image into an image repository such as Docker Hub.
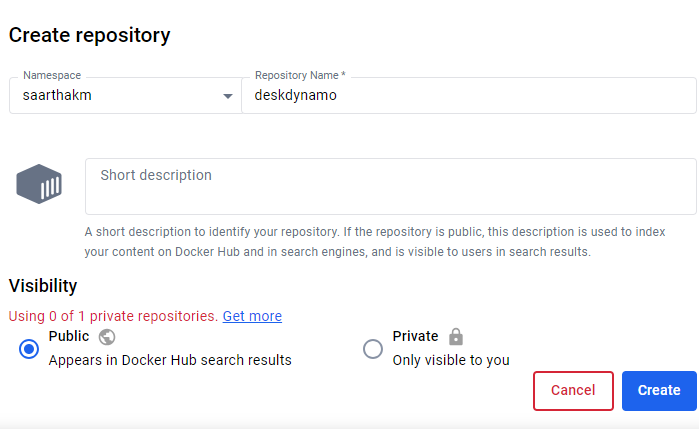
- Create a new repository in your Docker Hub account. In this case, as my image is named deskdynamo, I would be naming the same as well in my docker hub repository. It can be public or private according to your needs

- Now, we have to push the image which we can do via the following commands:
docker tag local-image:tagname new-repo:tagname
docker push new-repo:tagname
In my case, the commands would be:
docker tag deskdynamo:latest saarthakm/deskdynamo:latest
docker login
docker push saarthakm/deskdynamo:latest
Note: During docker login , you have to provide your Docker Hub username and password ( in the form of Access Token which would be generated in Docker Hub itself).
To pull the image into another server or system, we can use the following command:
docker pull saarthakm/deskdynamo:latest
Final Products
Github Link to My DeskDynamo Project : https://github.com/SaarthakMaini/DeskDynamo/
Docker Hub Repository Link:
https://hub.docker.com/repository/docker/saarthakm/deskdynamo/general
Conclusion
By following this guide, you have successfully dockerized your Electron application. Dockerizing your application not only ensures consistency across different environments but also simplifies the deployment process. Now you can easily share and deploy your app anywhere Docker is supported.
Feel free to experiment further with Docker's capabilities to optimize and scale your application.
That's it for now. Did you like this blog? Please let me know.
You can Buy Me a Coffee if you want to and please don't forget to follow me on Youtube, Twitter, and LinkedIn also.
Happy Learning!
#40daysofkubernetes
Subscribe to my newsletter
Read articles from Saarthak Maini directly inside your inbox. Subscribe to the newsletter, and don't miss out.
Written by
