How to Build Your First AWS Continuous Delivery Pipeline: From Code to Deployment - Part 2
 Rishabh Mishra
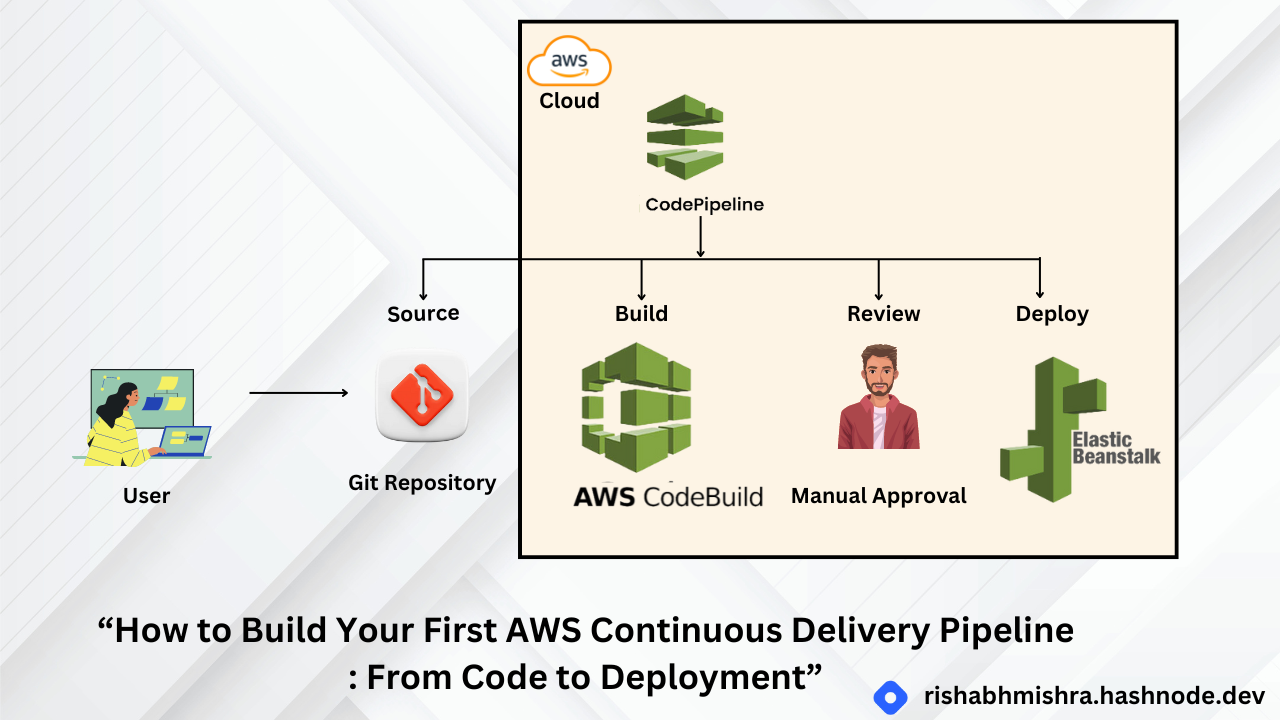
Introduction
In this guide, we will continue setting up a continuous delivery pipeline by creating a build project using AWS CodeBuild. This build project will compile your source code, run tests, and produce software packages ready for deployment. We will also introduce key concepts to help you understand the components involved in this process.
If you have not gone through part 1 of the blog, visit it first, as it is important for you to move forward.
Key Concepts
Build Process
A build process converts source code files into an executable software artifact. It may include compiling source code, running tests, and packaging software for deployment.
Continuous Integration
Continuous integration is a software development practice where developers regularly push changes to a hosted repository. Automated builds and tests are run to ensure code quality.
Build Environment
A build environment represents a combination of the operating system, programming language runtime, and tools that CodeBuild uses to run a build.
Buildspec
A buildspec is a collection of build commands and related settings, in YAML format, that CodeBuild uses to run a build.
Build Project
A build project includes information about how to run a build, including where to get the source code, which build environment to use, which build commands to run, and where to store the build output.
OAuth
OAuth is an open protocol for secure authorization. It enables you to connect your GitHub account to third-party applications, including AWS CodeBuild.
Step 3: Create Build Project
Overview
In this module, you will use AWS CodeBuild to build the source code previously stored in your GitHub repository. AWS CodeBuild is a fully managed continuous integration service that compiles source code, runs tests, and produces software packages ready for deployment.
1. Go to AWS CodeBuild:
Navigate to the AWS Management Console.
Open the CodeBuild service.
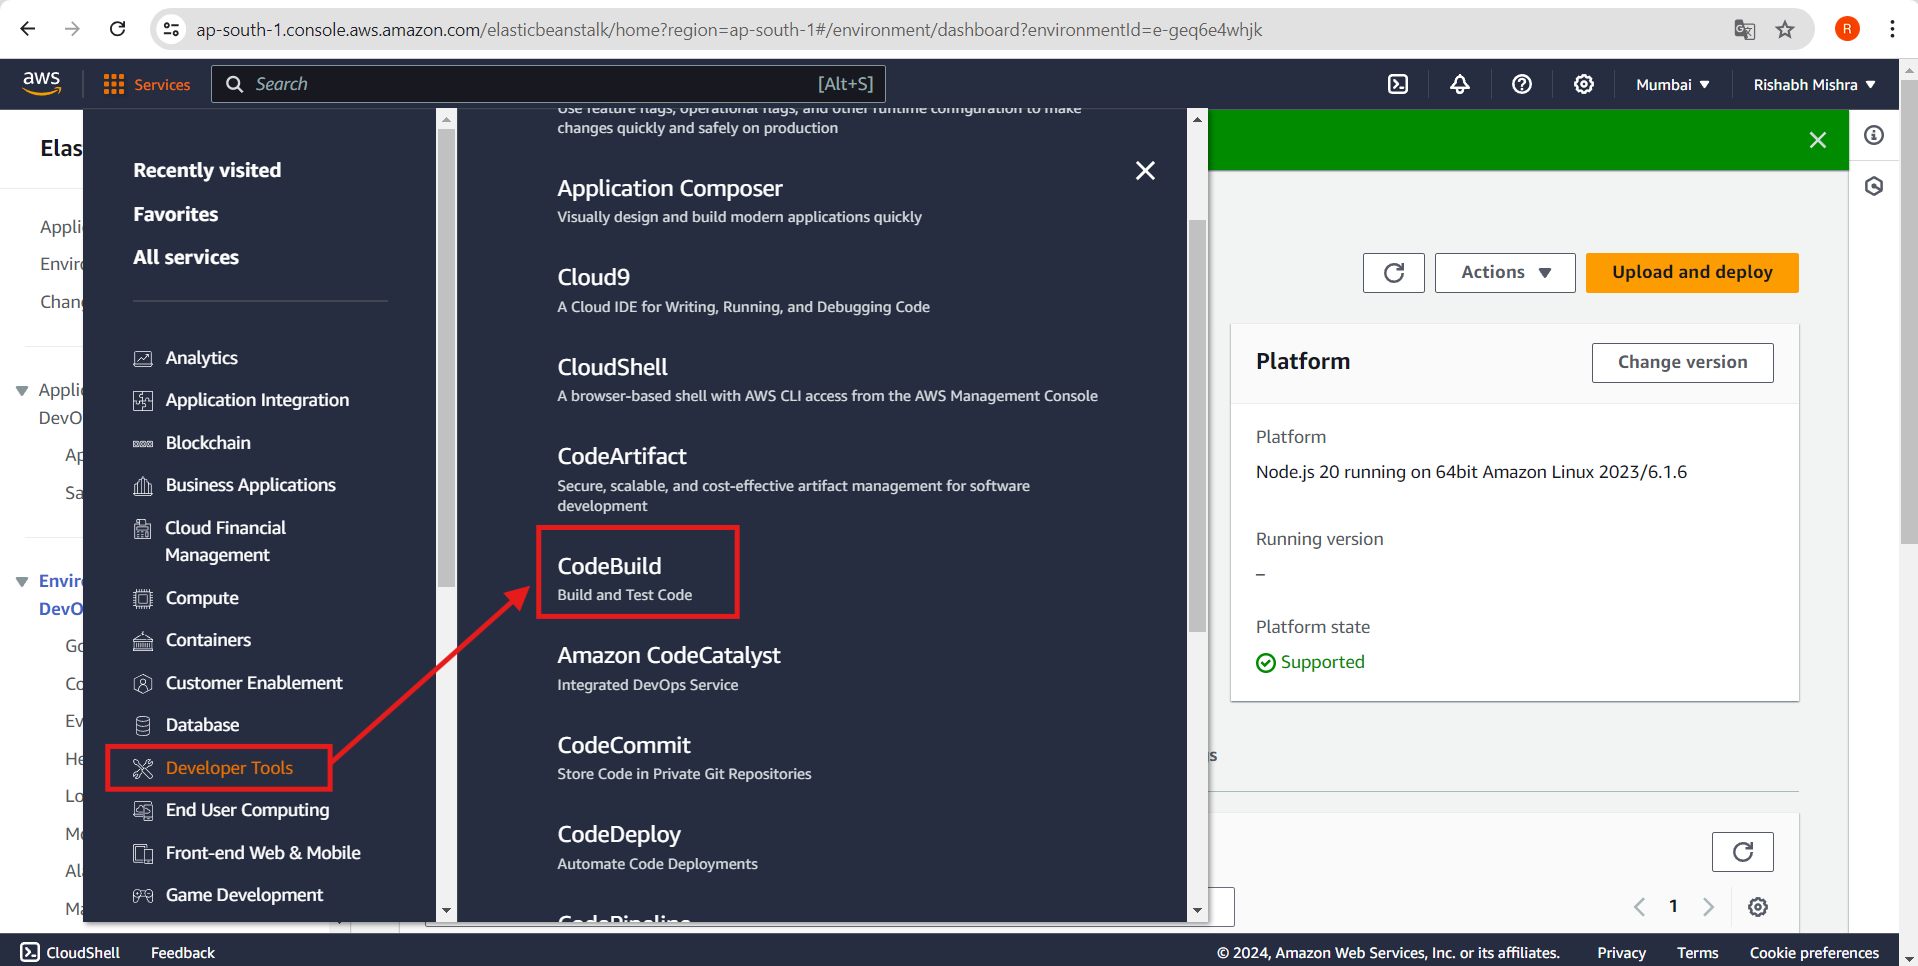
2. Create a New Build Project:
Click on Create build project.
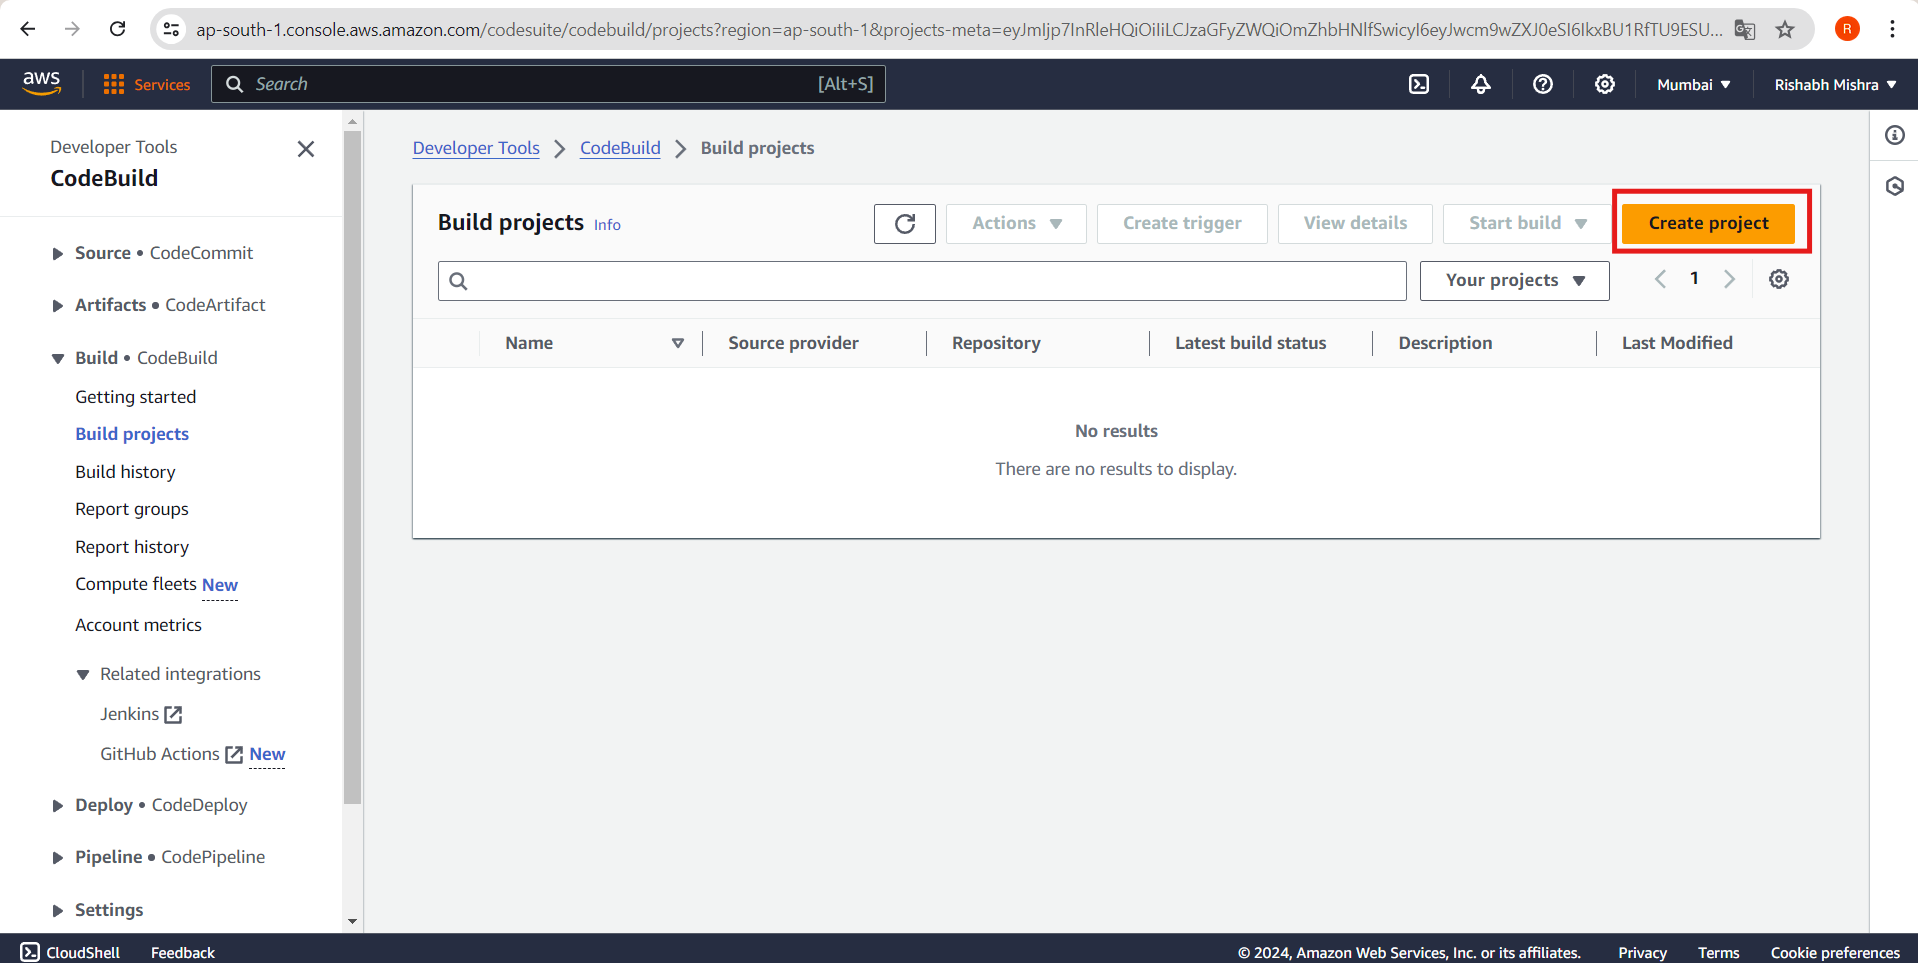
3. Configure Project Settings:
Project name: Enter a unique name for your build project.
Description: Optional, but you can add a brief description.
4. Configure Source:
Source provider: Choose GitHub.
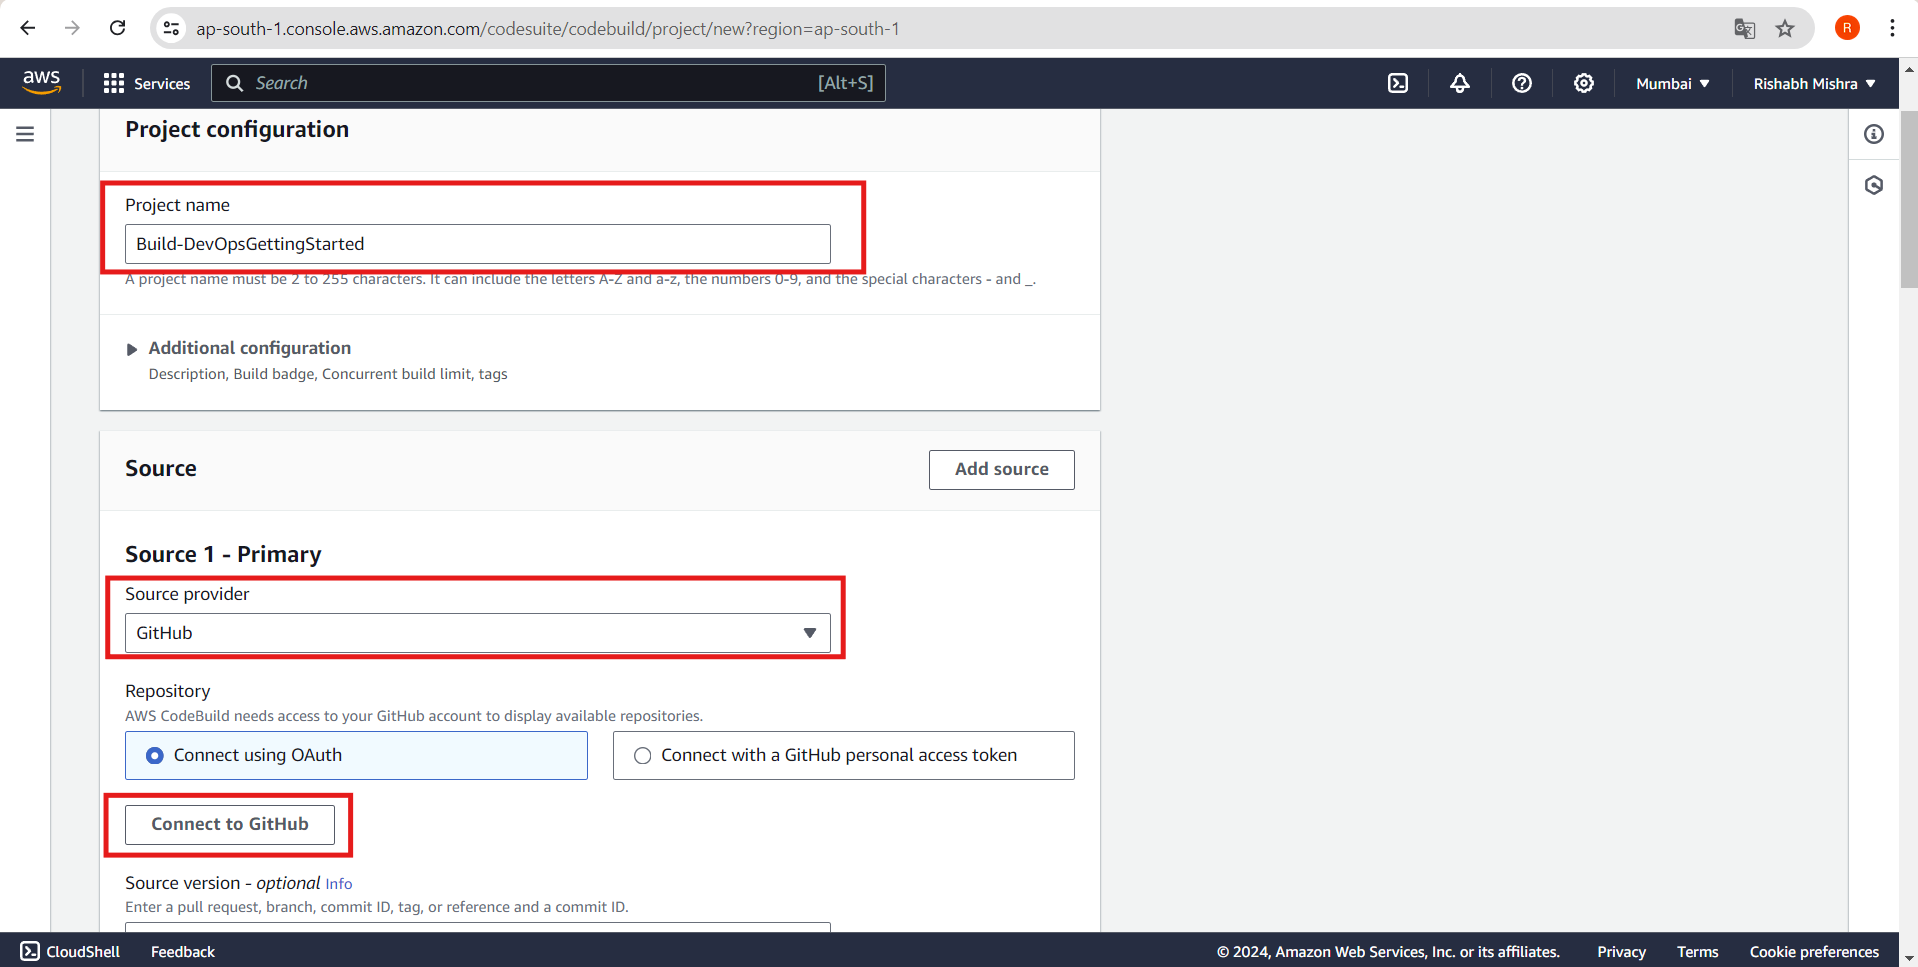
Repository: Connect to your GitHub account and select the repository you created earlier.
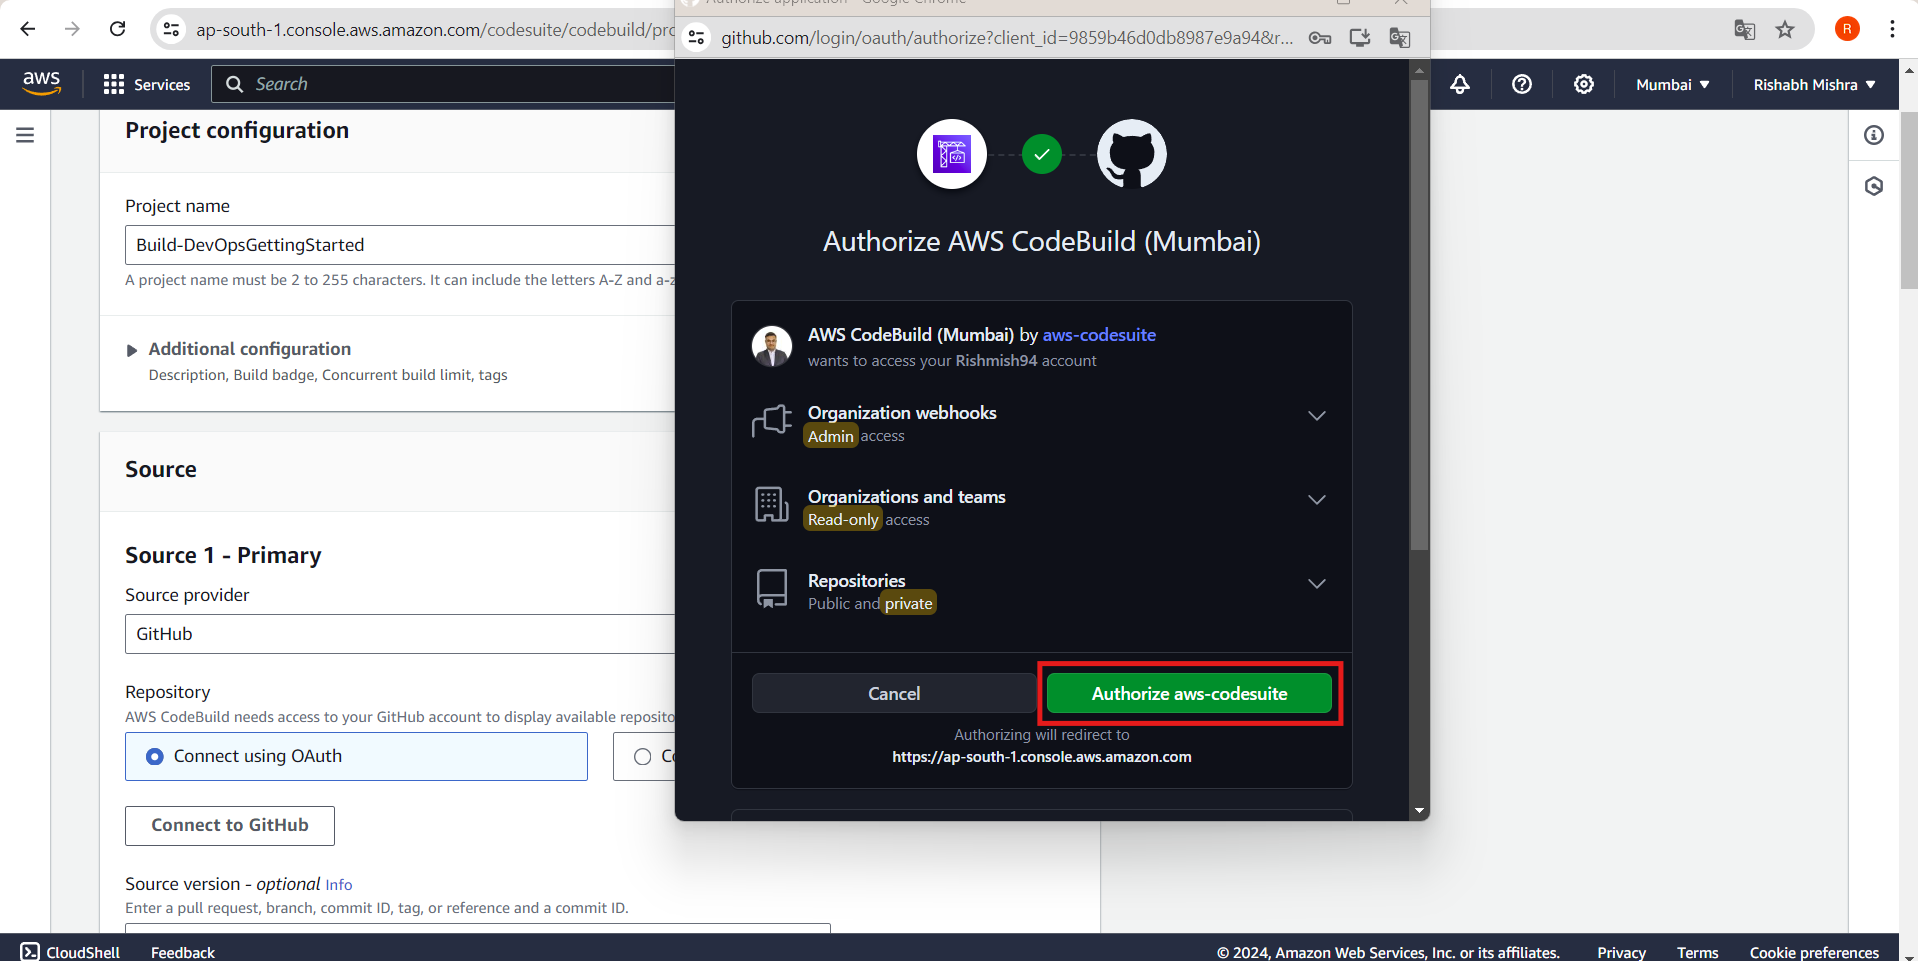
5. Configure Environment:
Environment image: Choose a managed image.
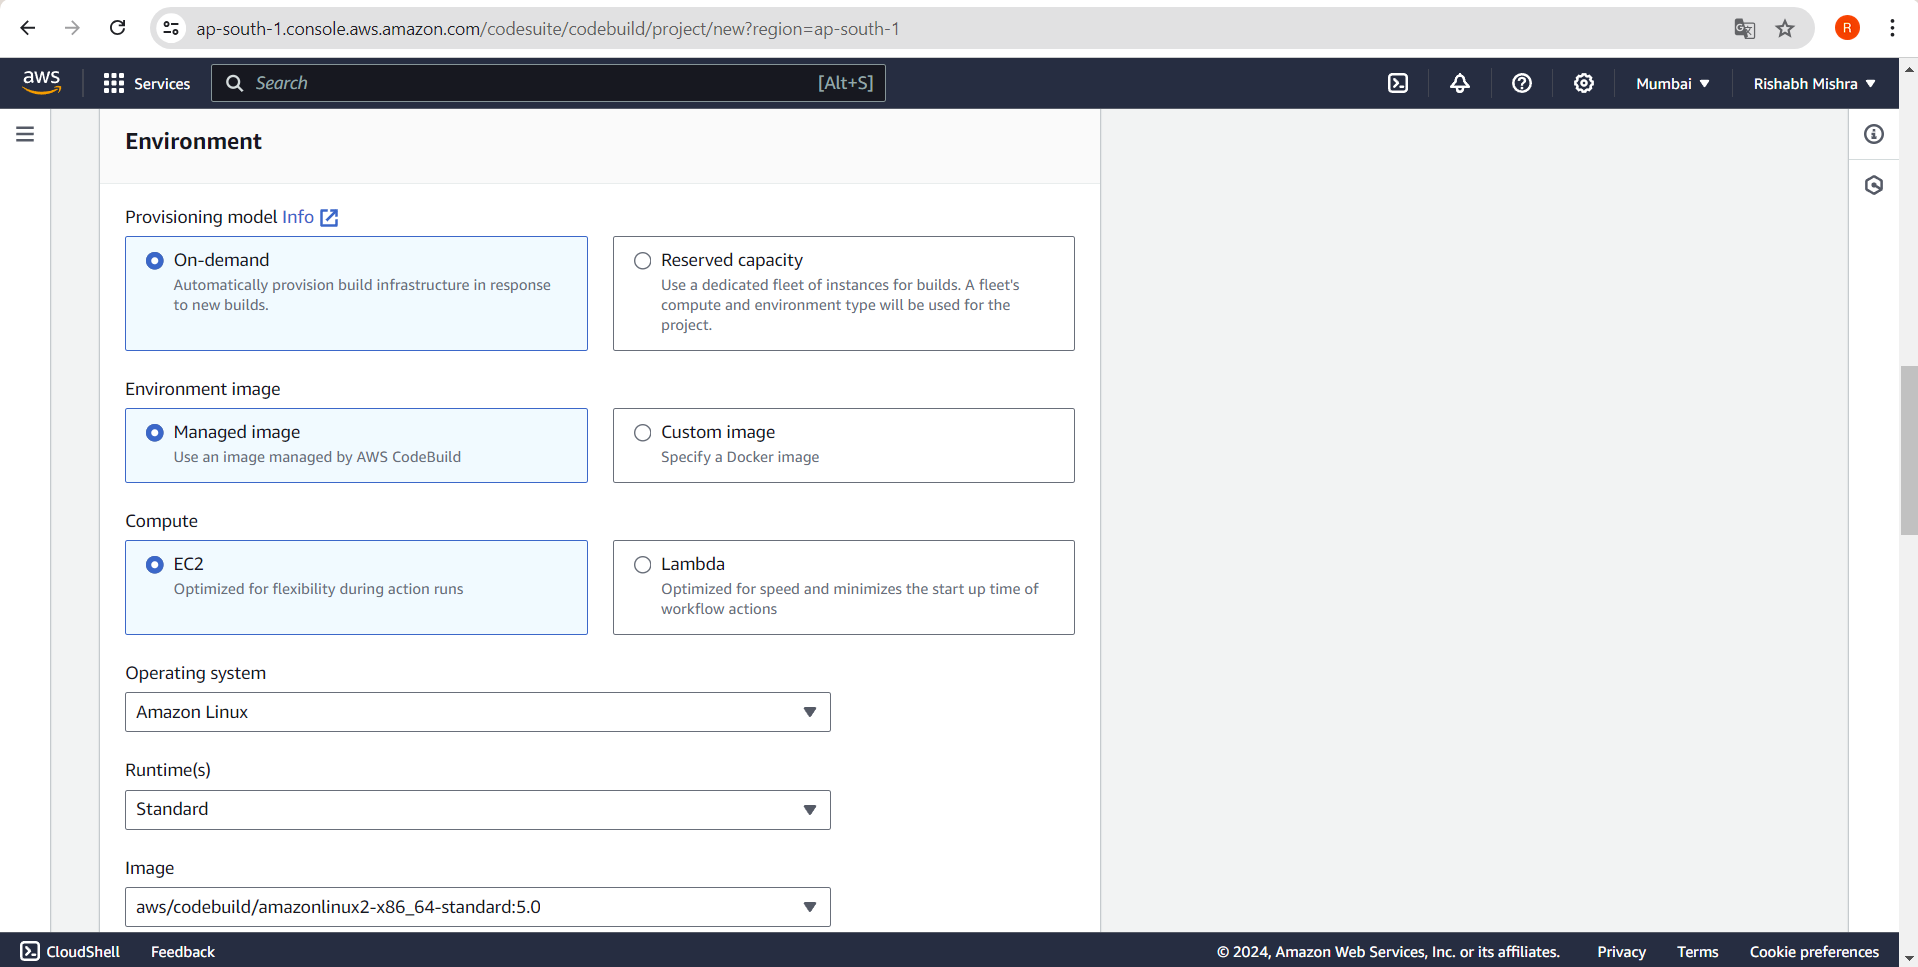
Operating system: Select an appropriate OS (e.g., Amazon Linux).
Runtime(s): Choose the runtime for your project (e.g., Standard).
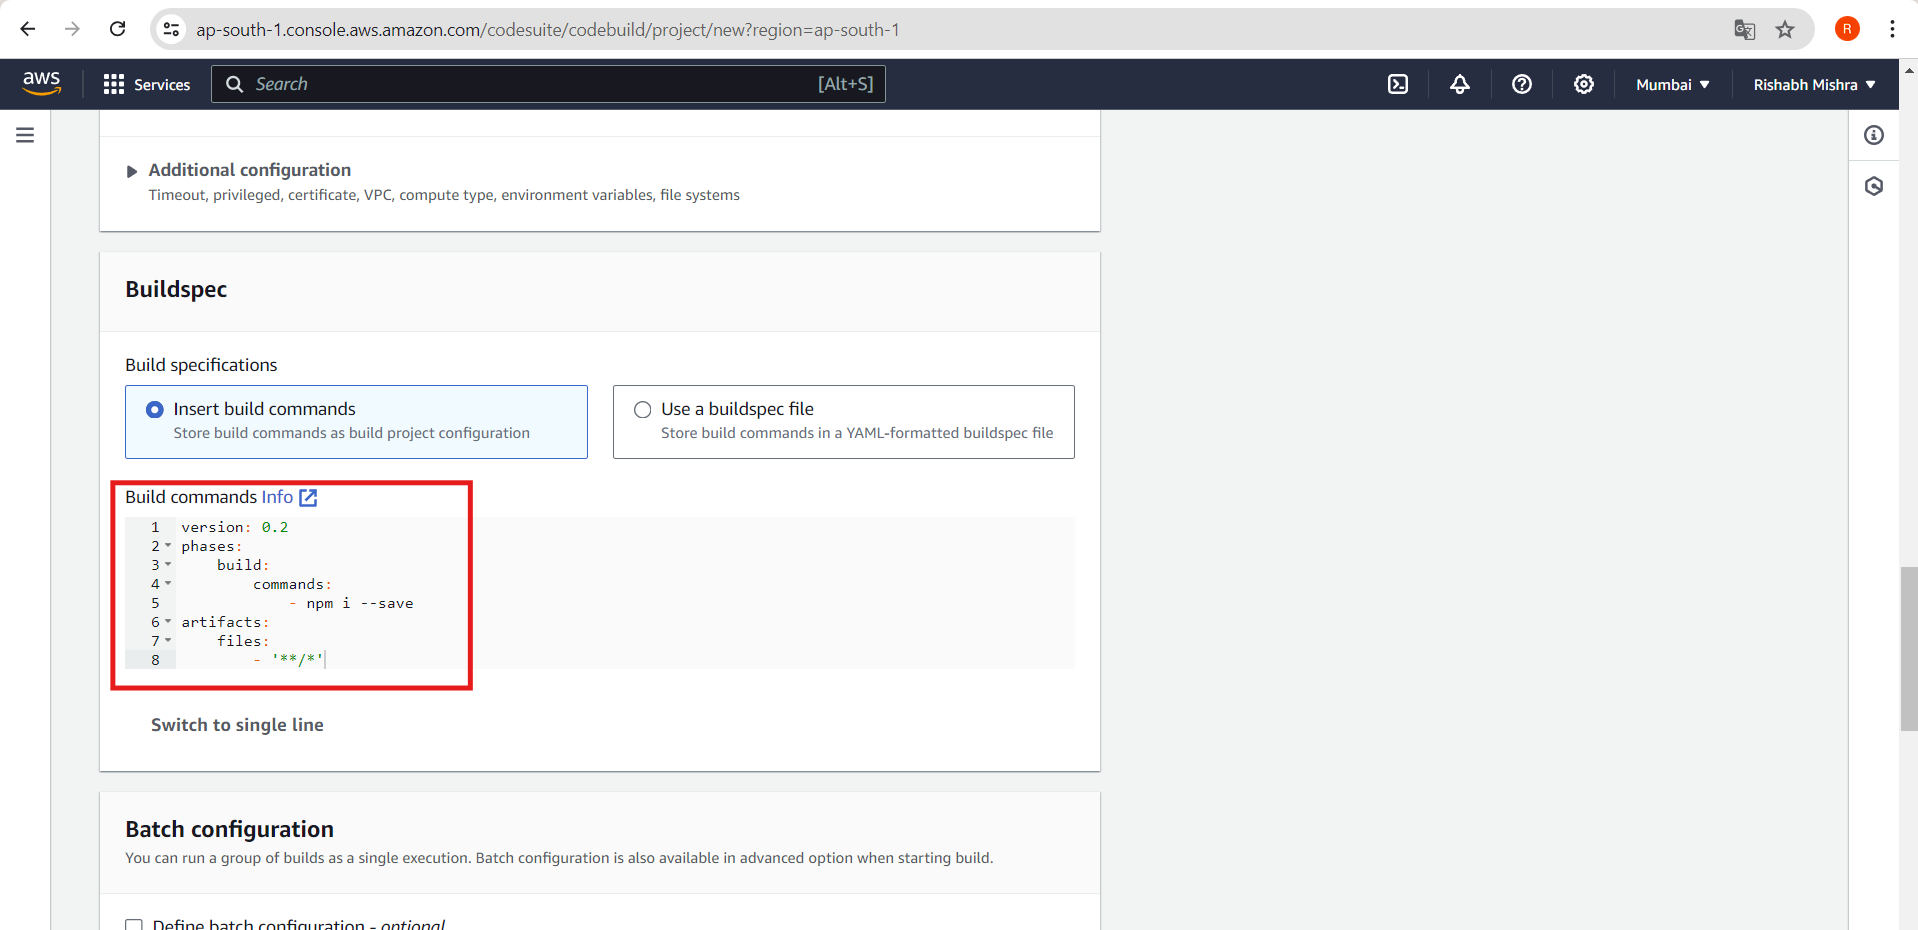
6. Insert Build Commands:
Select Insert build commands.
Choose Switch to editor.
Replace the Buildspec in the editor with the following code:
  yamlCopy codeversion: 0.2
  phases:
      build:
          commands:
              - npm i --save
  artifacts:
      files:
          - '**/*'
7. Create Build Project:
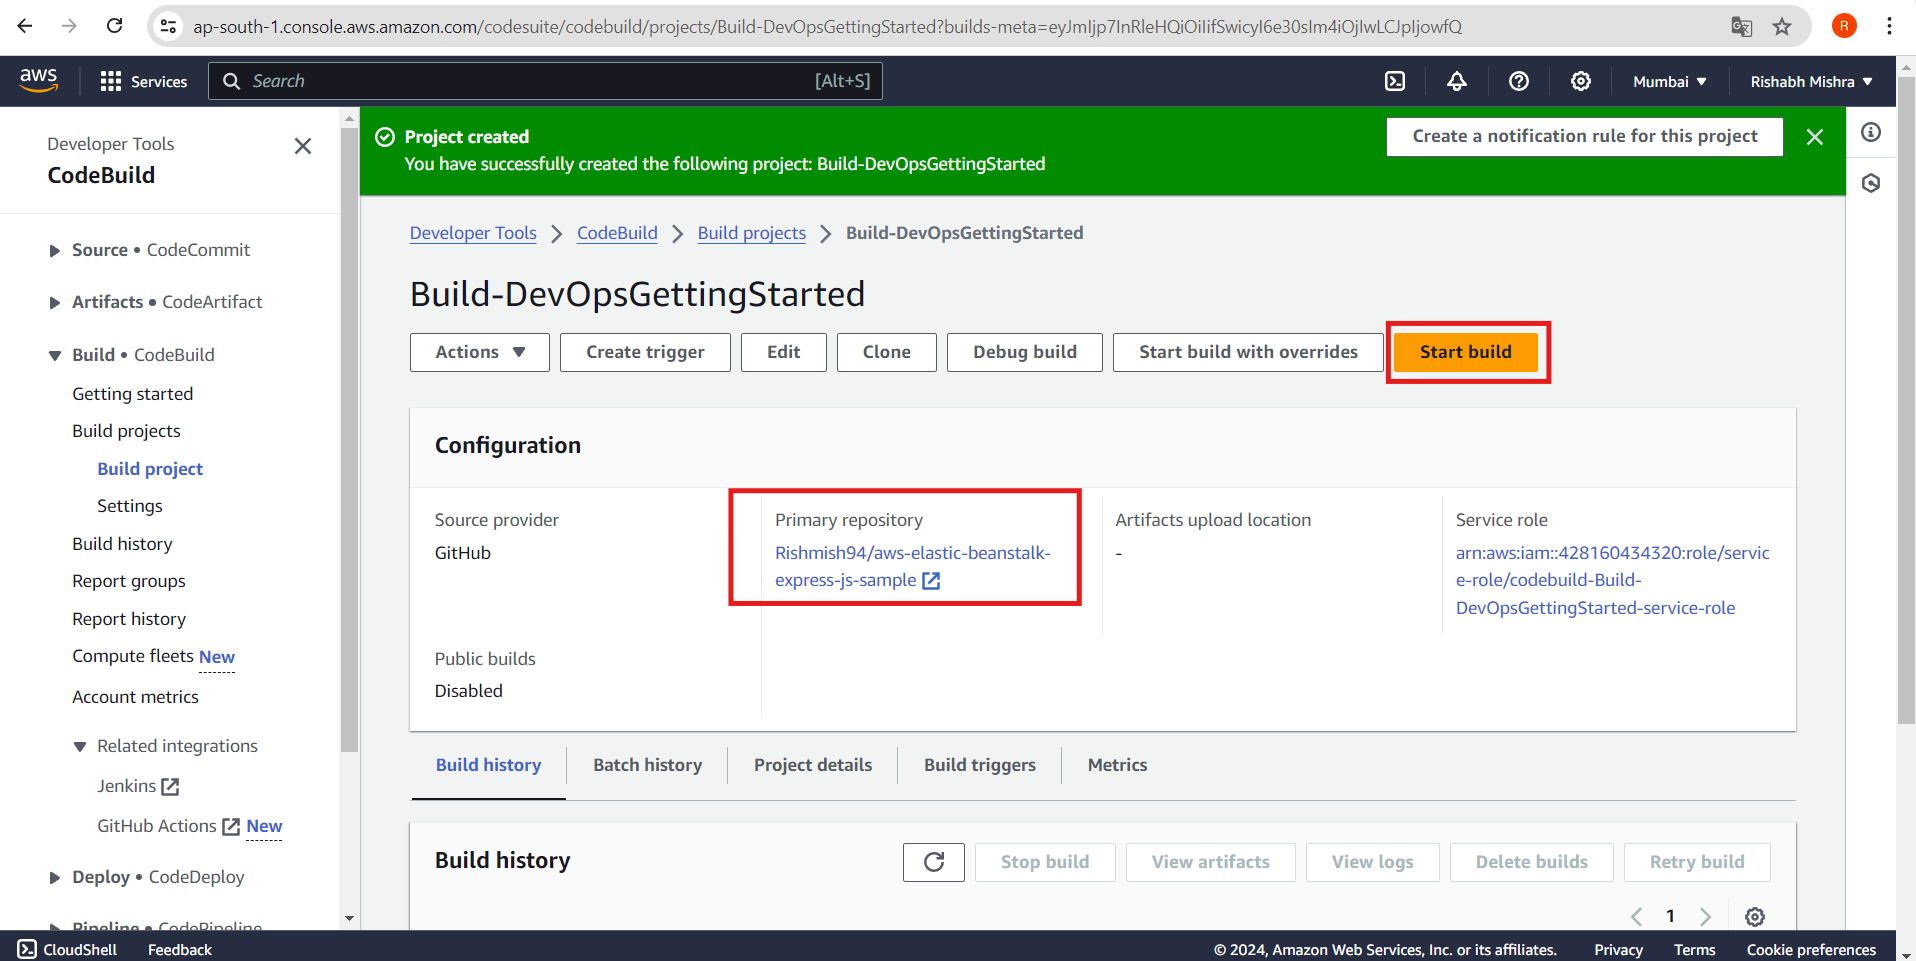
Click the Create build project button.
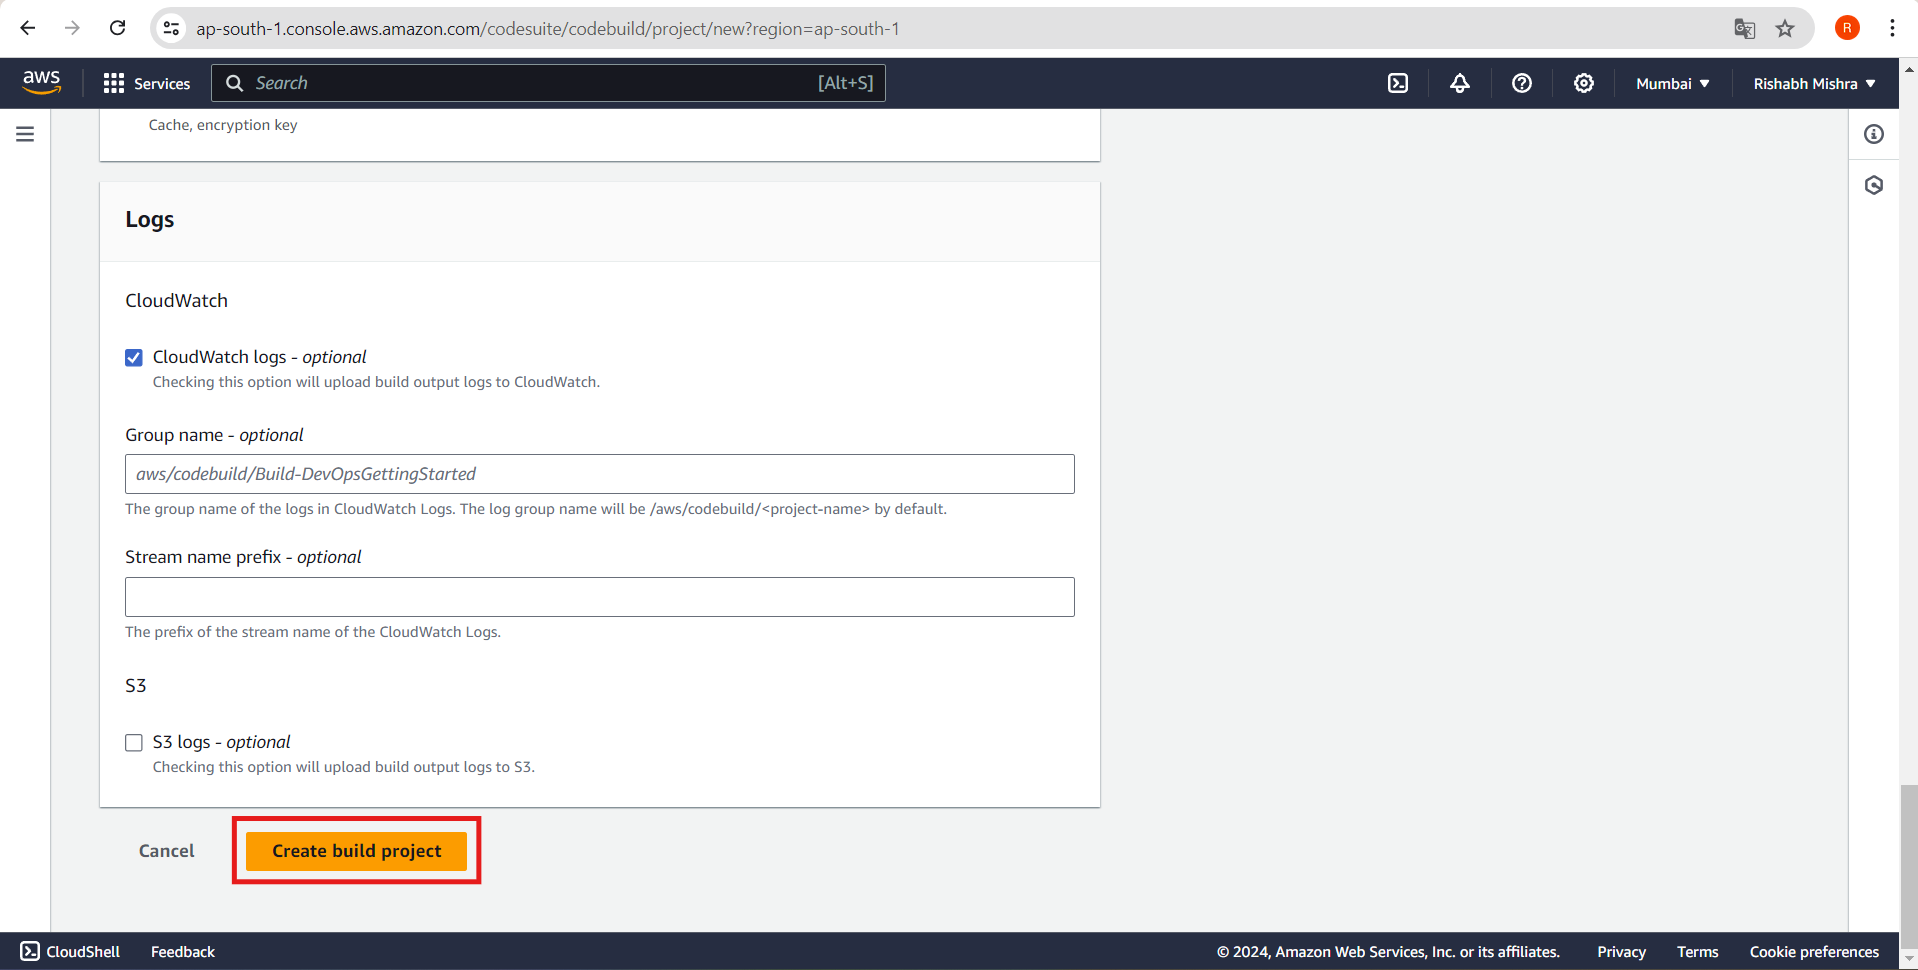
You should now see a dashboard for your project.
Application Architecture
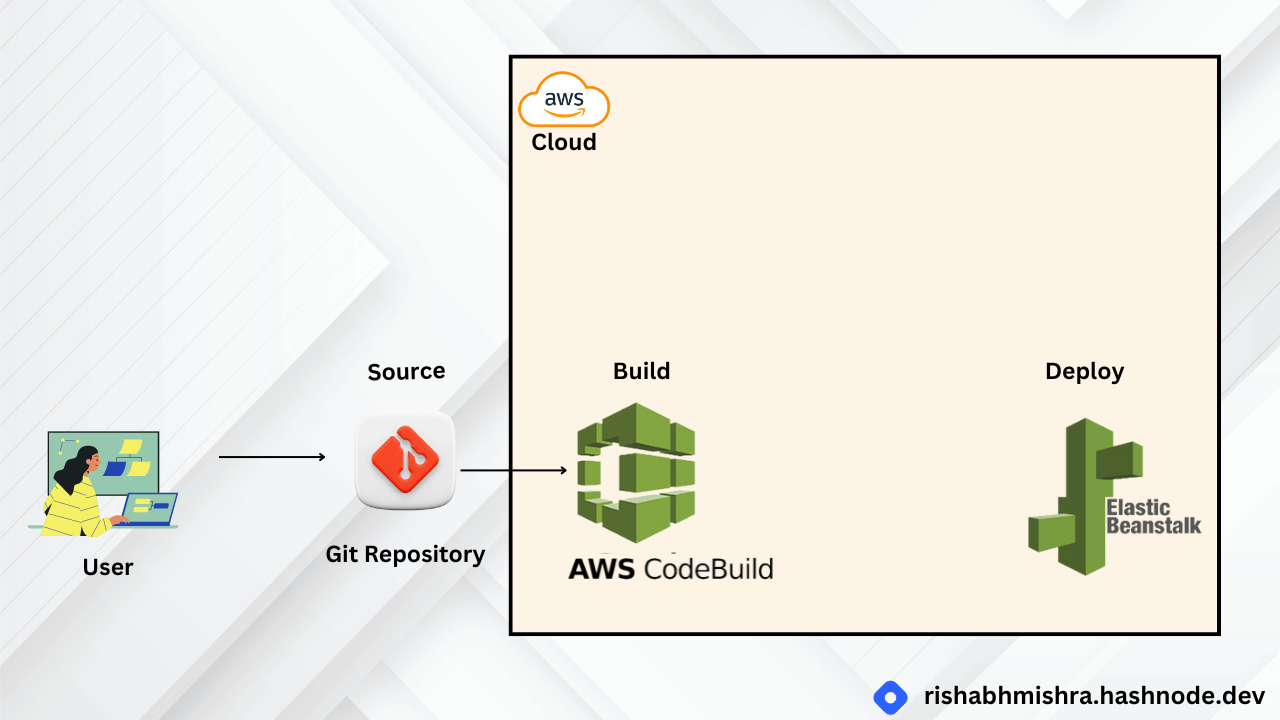
Here's what our architecture looks like now:
We have created a build project on AWS CodeBuild to run the build process of the Hello World! web app from our GitHub repository.
This build project will be used as the build step in our continuous delivery pipeline, which we will create in the next step.
Step 4: Create Delivery Pipeline
Key Concepts
Continuous Delivery: Software development practice that allows developers to release software more quickly by automating the build, test, and deploy processes.
Pipeline: A workflow model that describes how software changes go through the release process. Each pipeline is made up of a series of stages.
Stage: A logical division of a pipeline, where actions are performed. A stage might be a build stage, where the source code is built and tests are run. It can also be a deployment stage, where code is deployed to runtime environments.
Action: A set of tasks performed in a stage of the pipeline. For example, a source action can start a pipeline when source code is updated, and a deploy action can deploy code to a compute service like AWS Elastic Beanstalk.
Step-by-Step Process
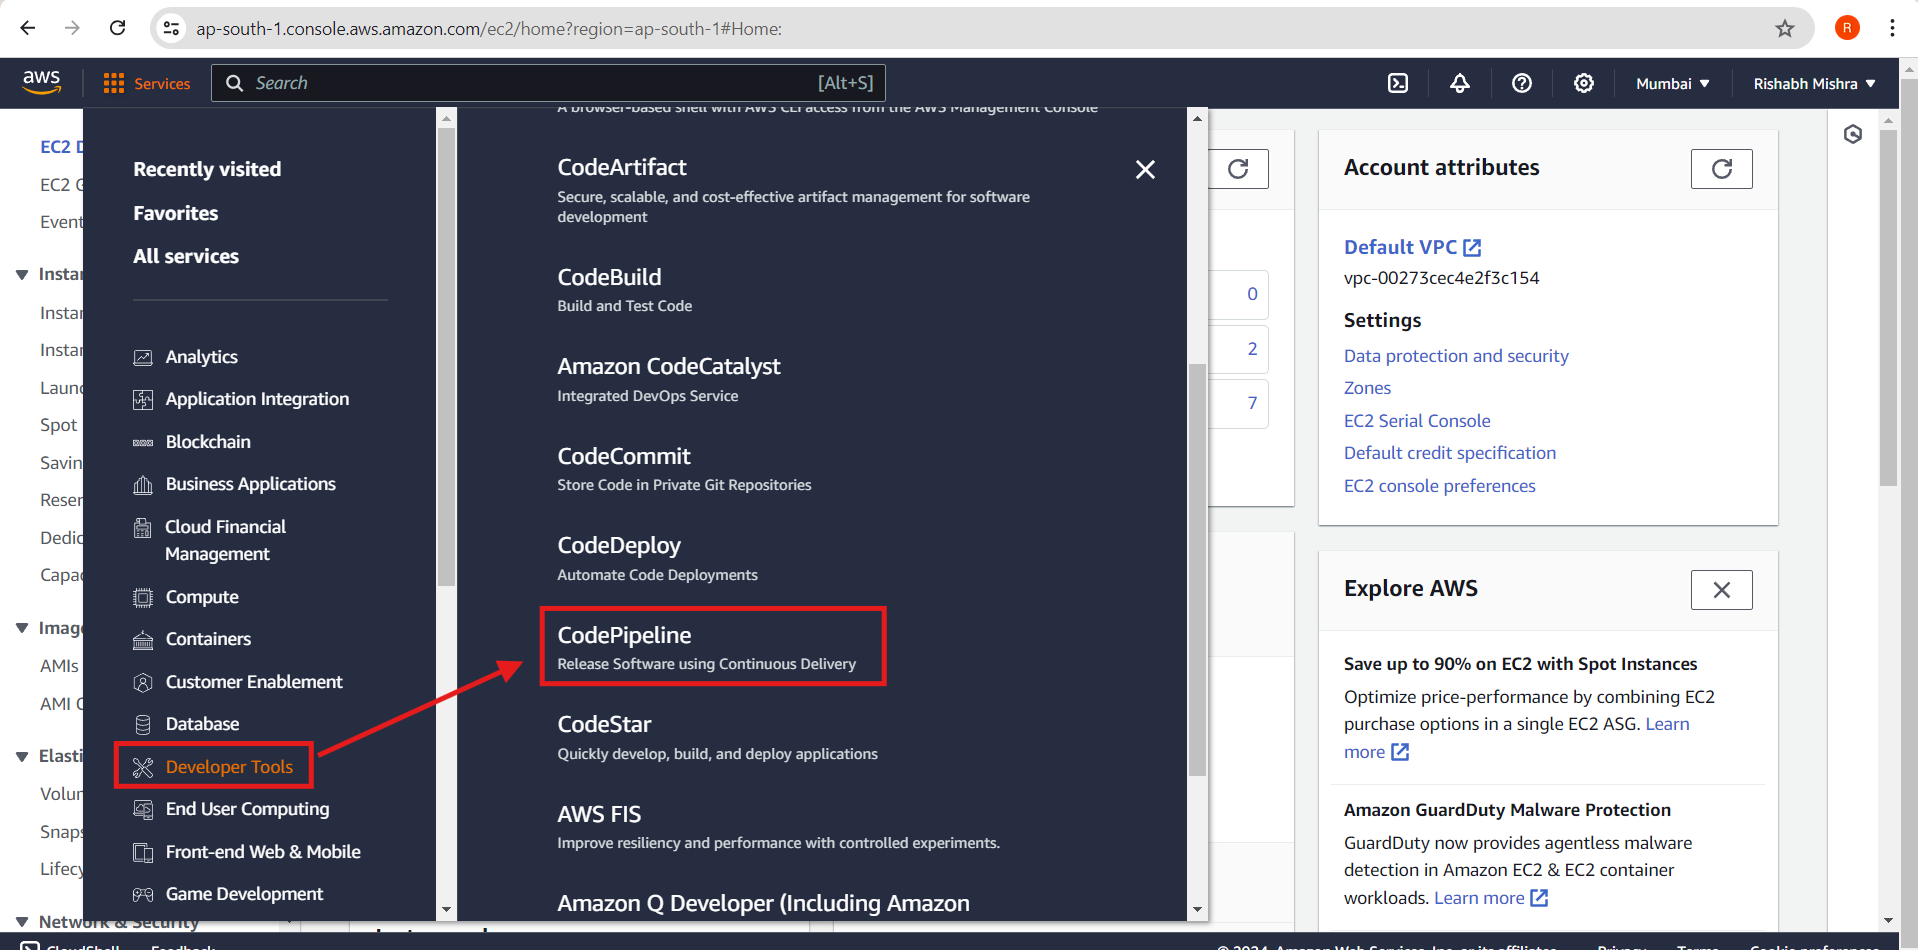
1. Go to AWS CodePipeline:
Navigate to the AWS Management Console.
Open the CodePipeline service.
2. Create a New Pipeline:
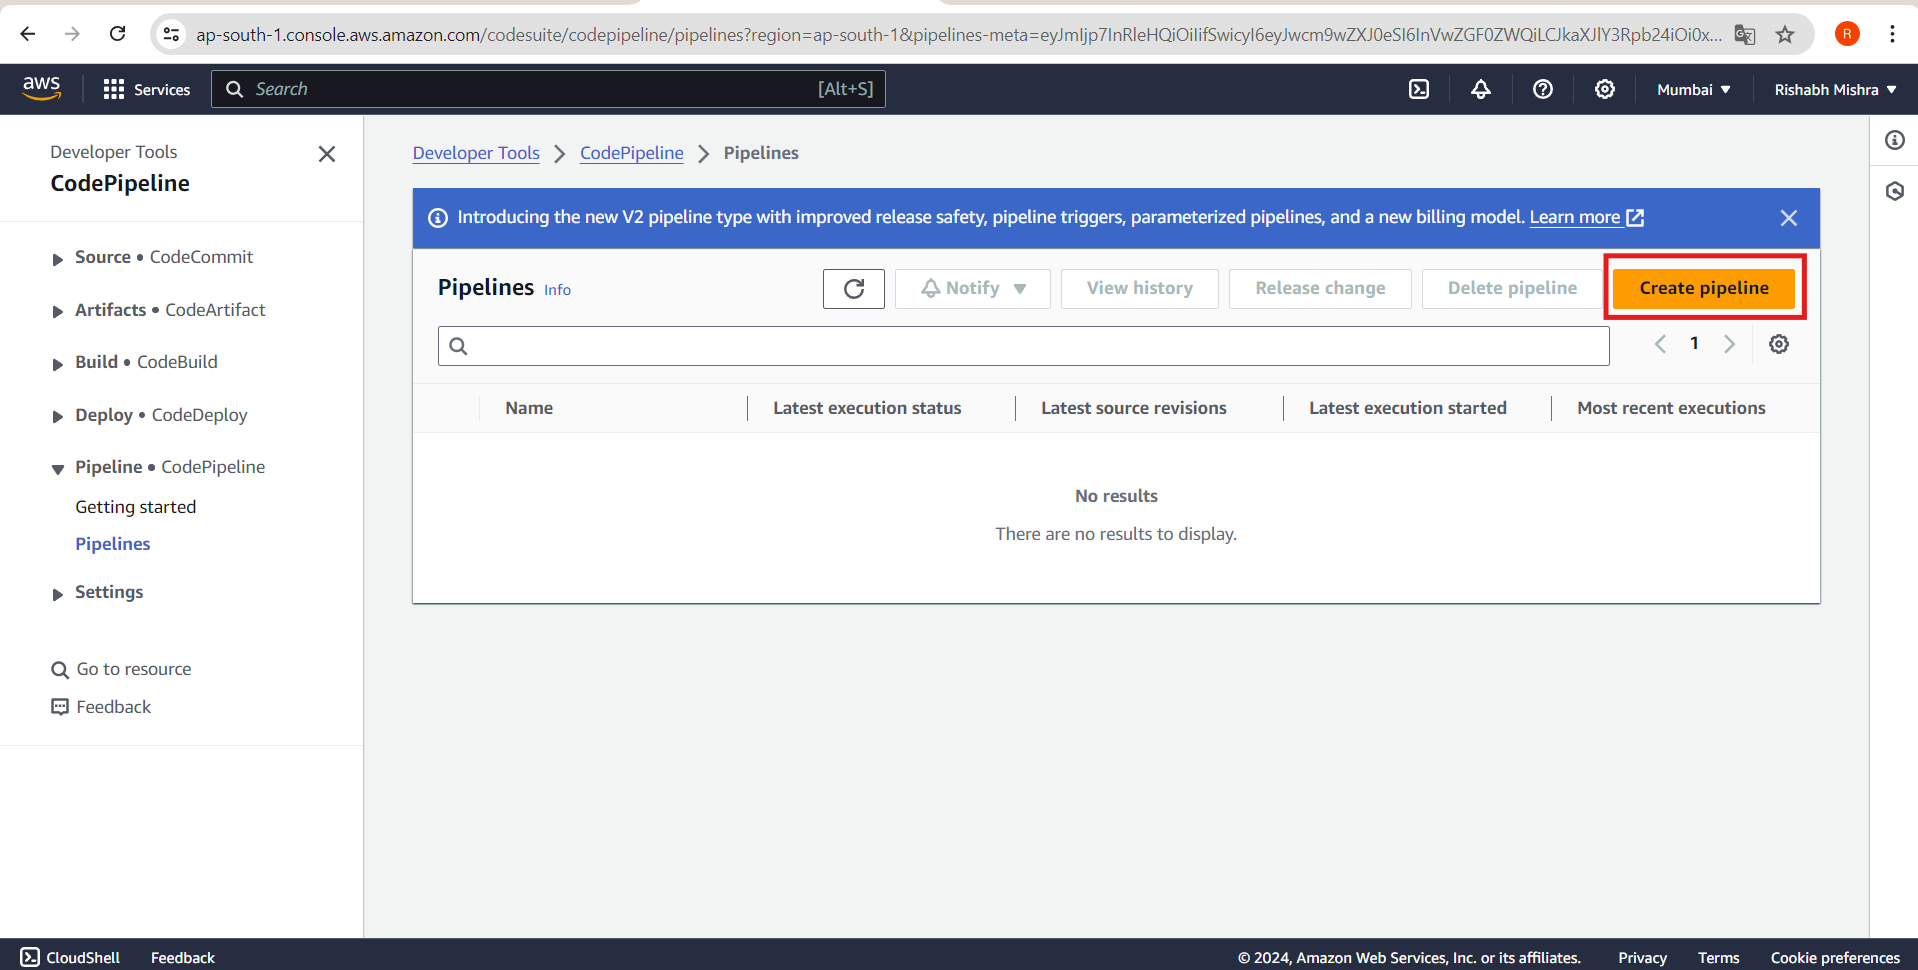
Click on Create pipeline.
3. Configure Pipeline Settings:
Pipeline name: Enter a unique name for your pipeline. Here the name is Pipeline-DevOpsGettingStarted
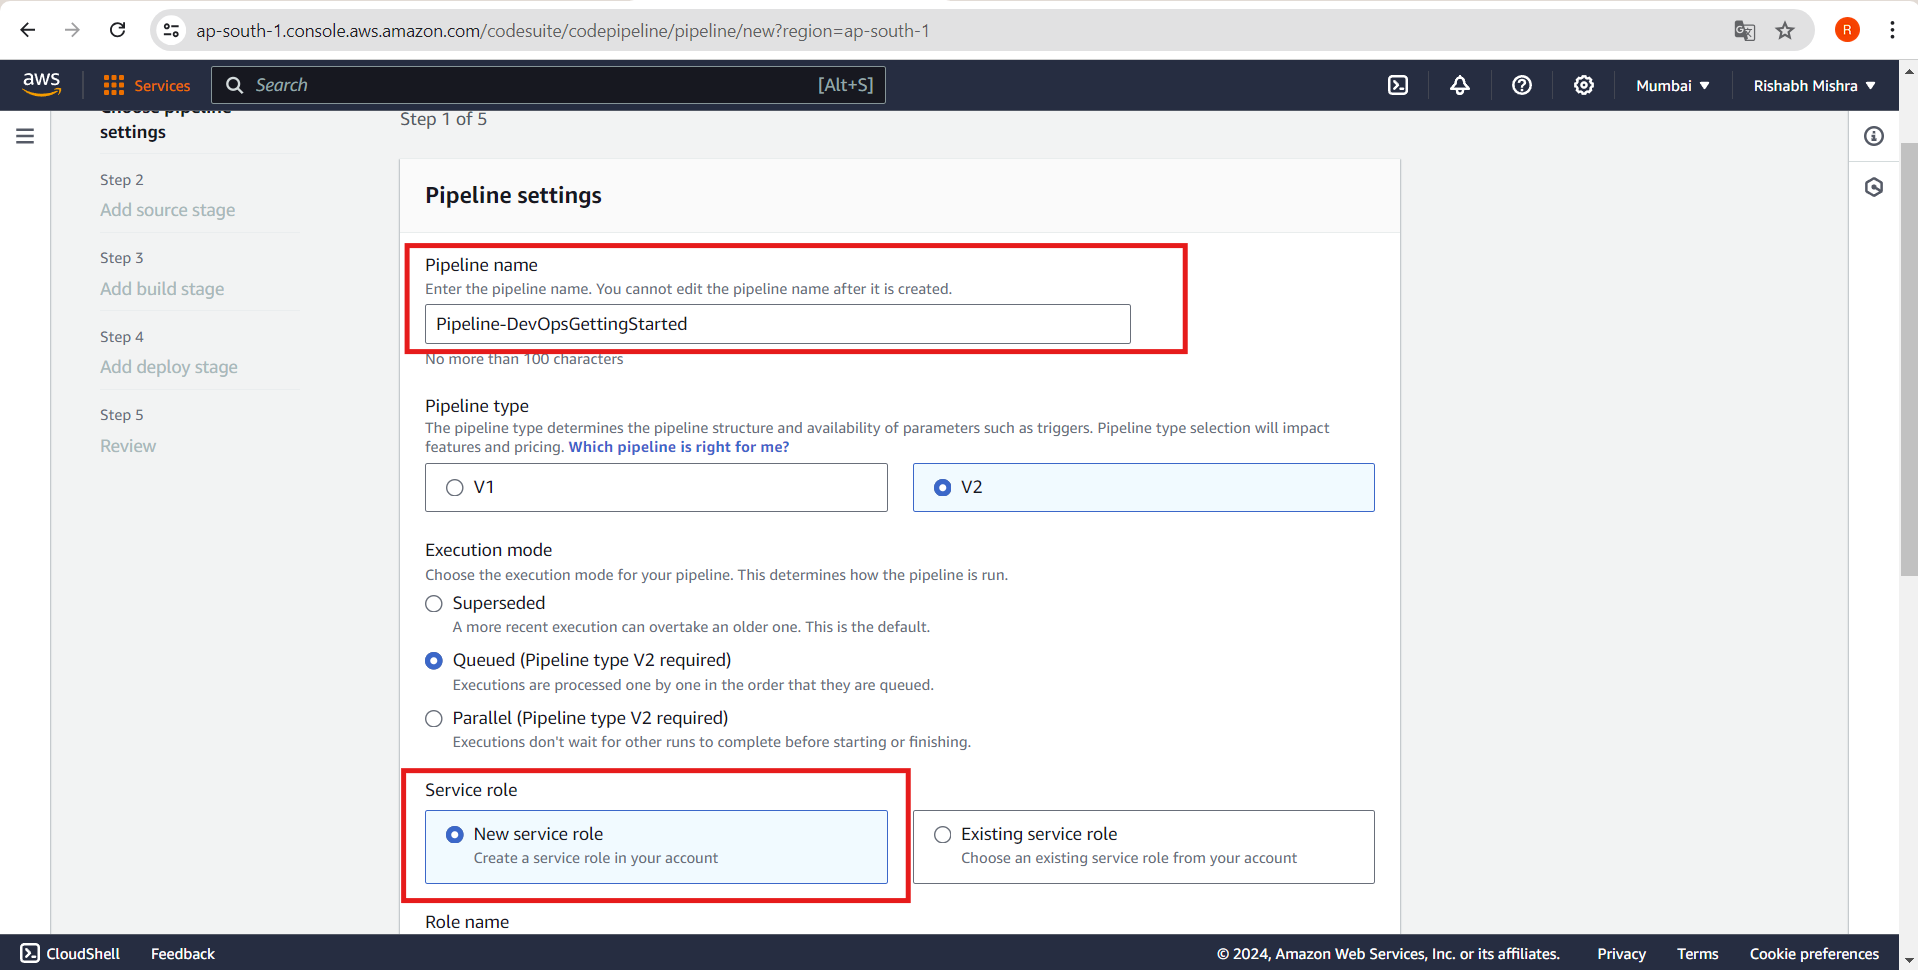
Service role: Make sure that New service Role is selected, then click on Next.
4. Add Source Stage:
Source provider: Choose GitHub.
Repository: Connect to your GitHub account and select the repository you created earlier.
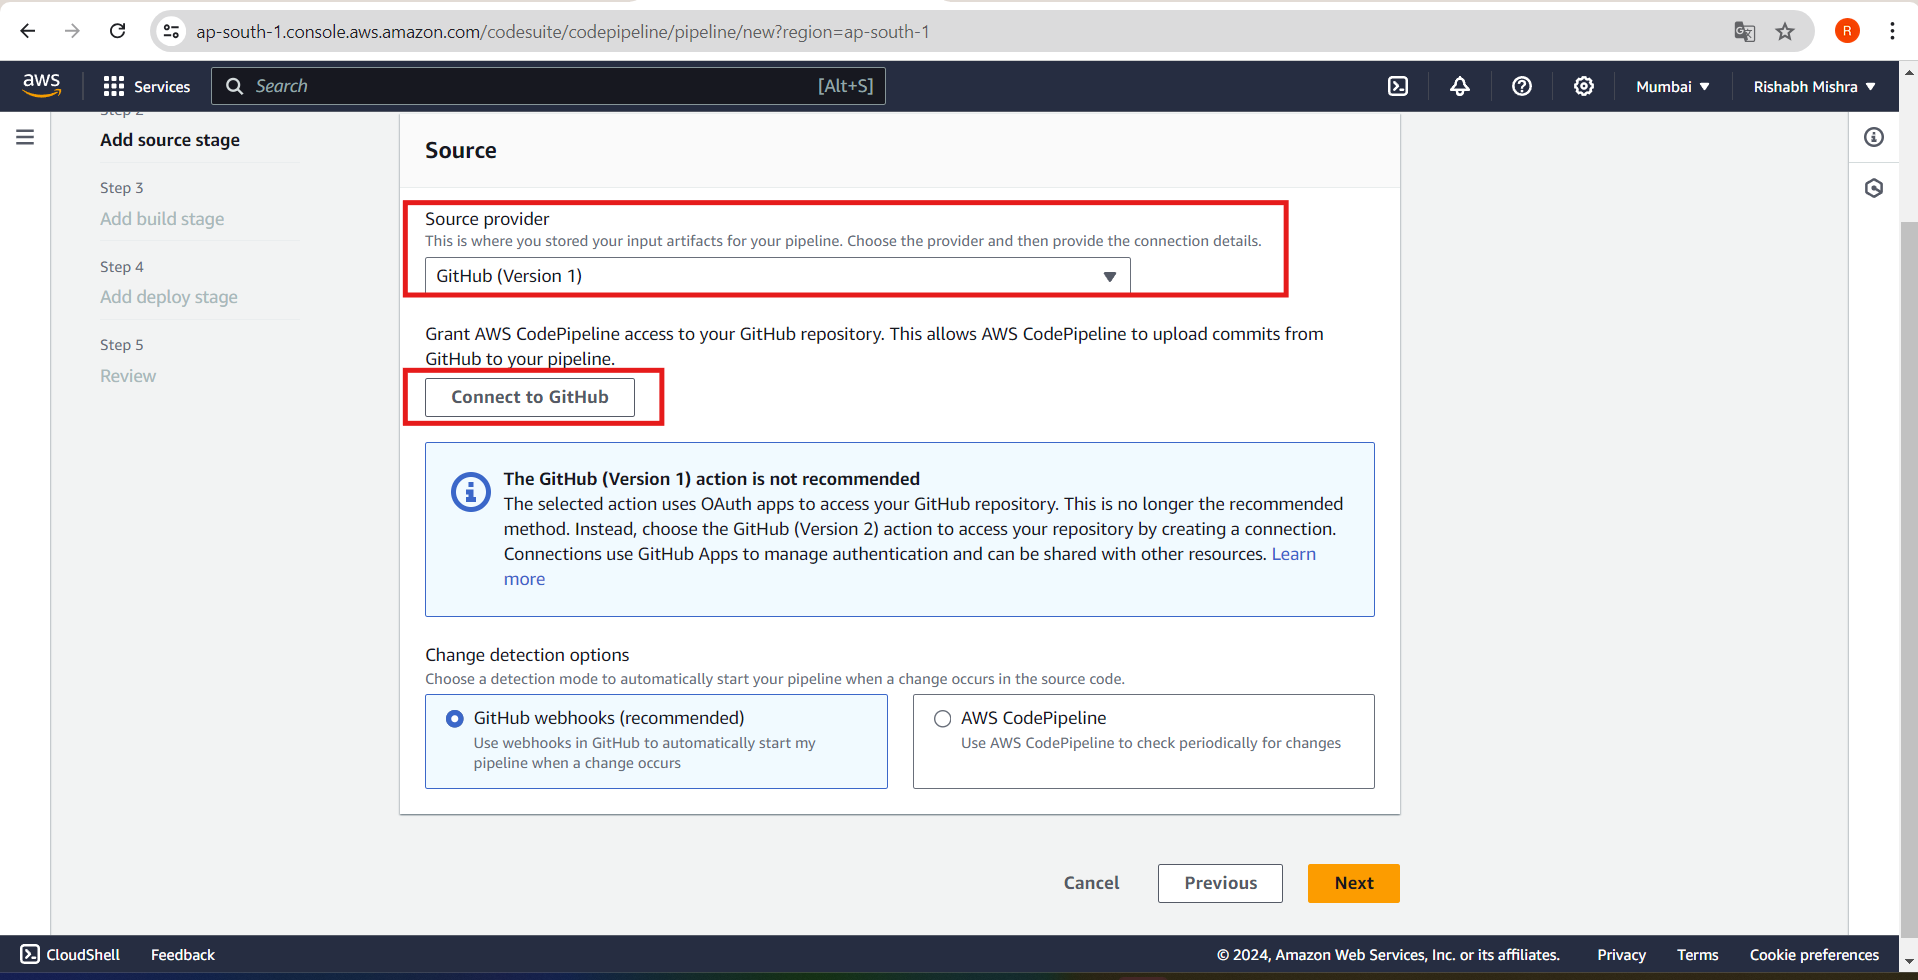
Branch: Choose the branch you want to track (e.g.,
main).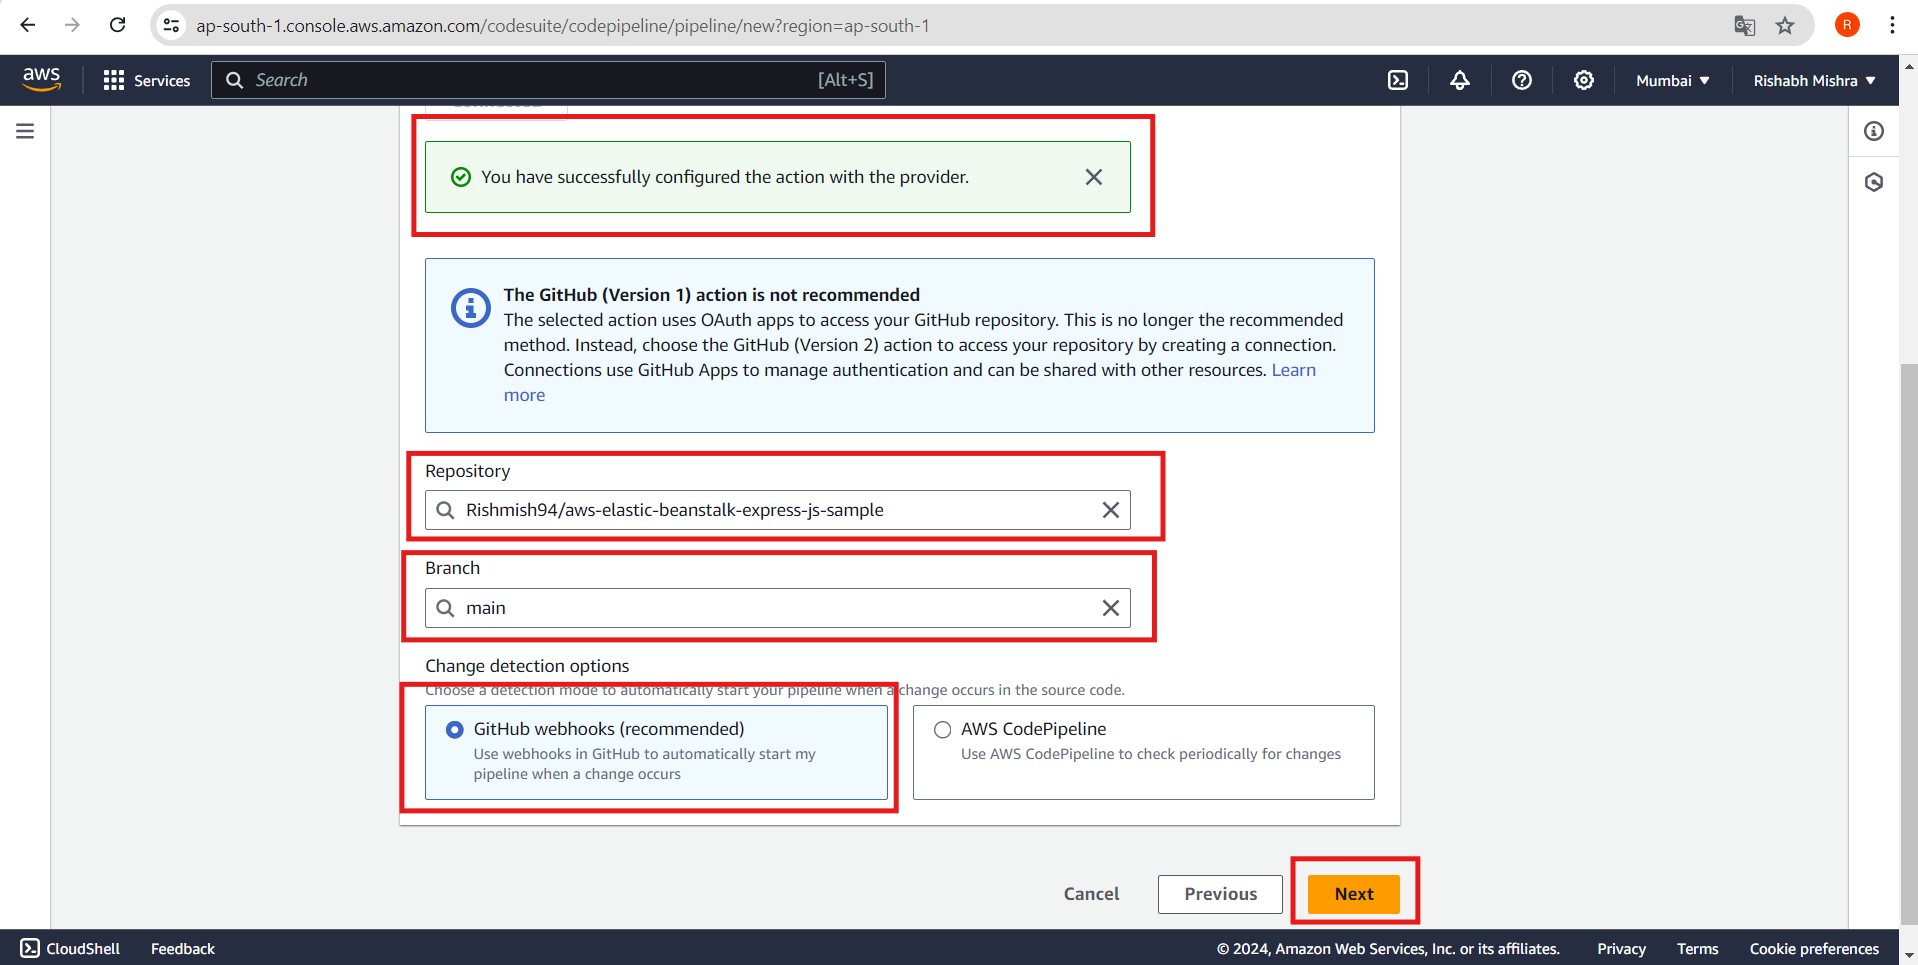
5. Add Build Stage:
Build provider: Choose AWS CodeBuild.
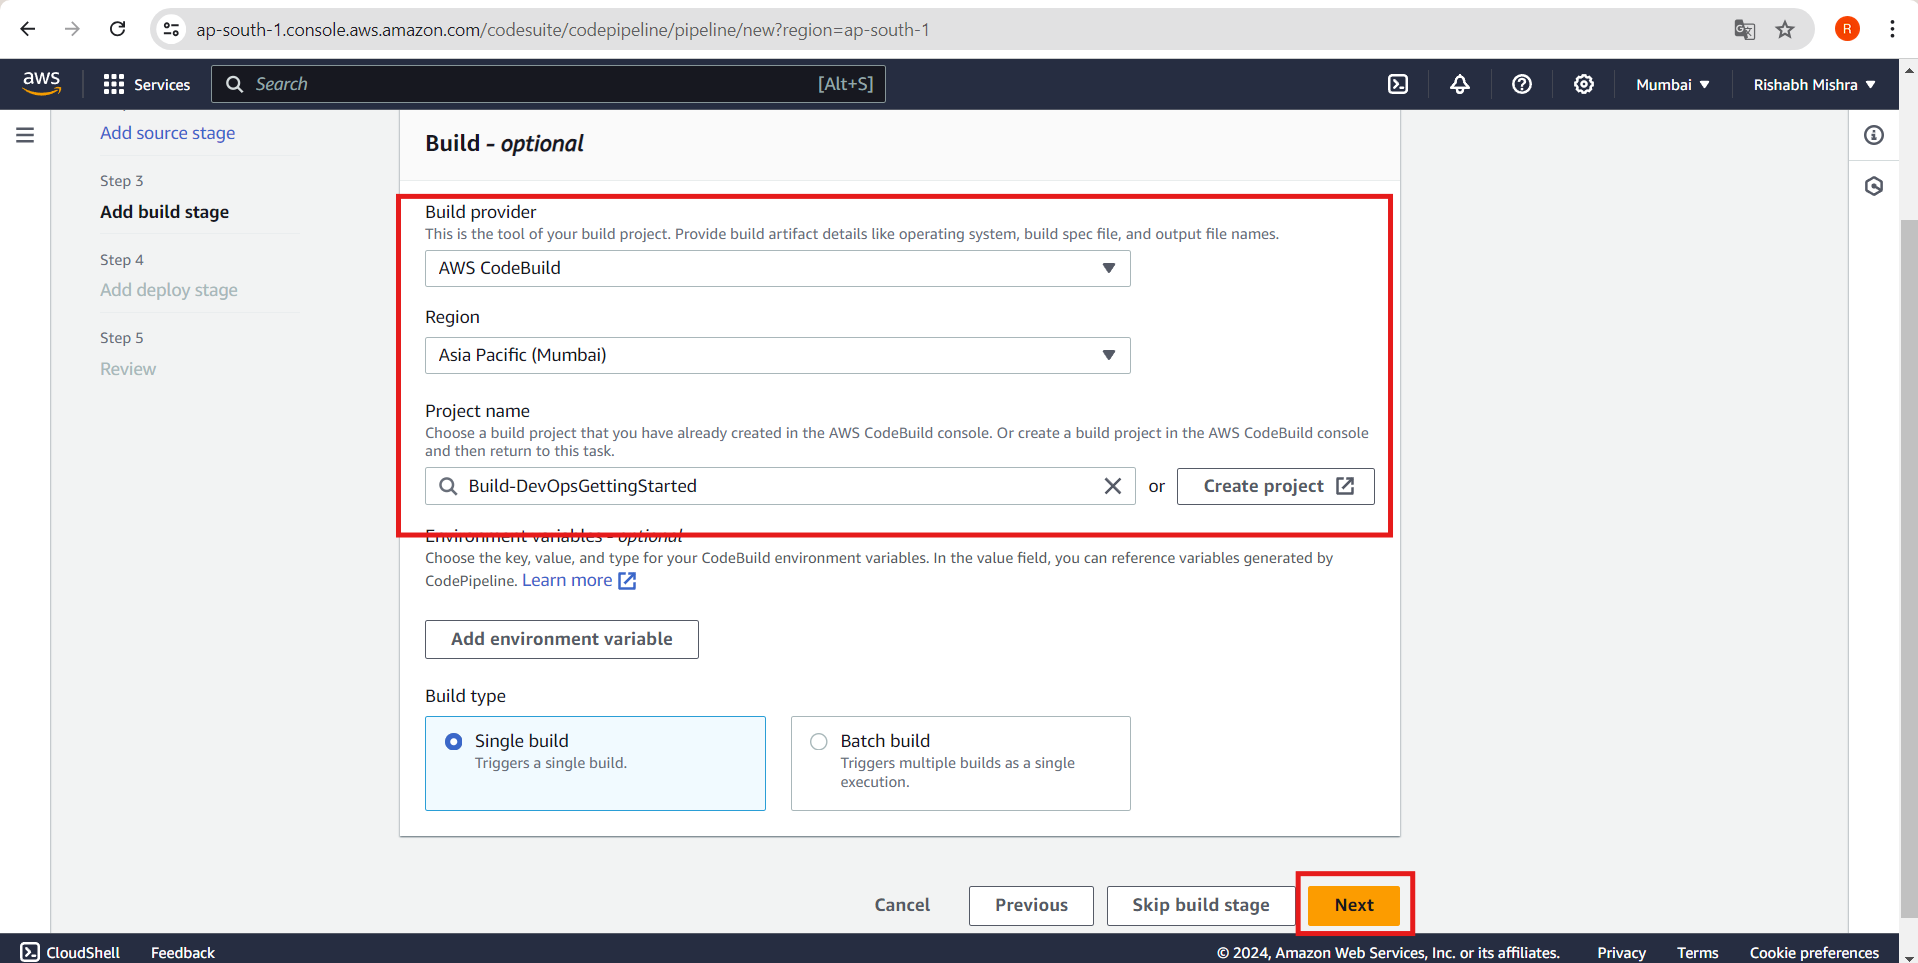
Project name: Select the build project you created in Step 3.
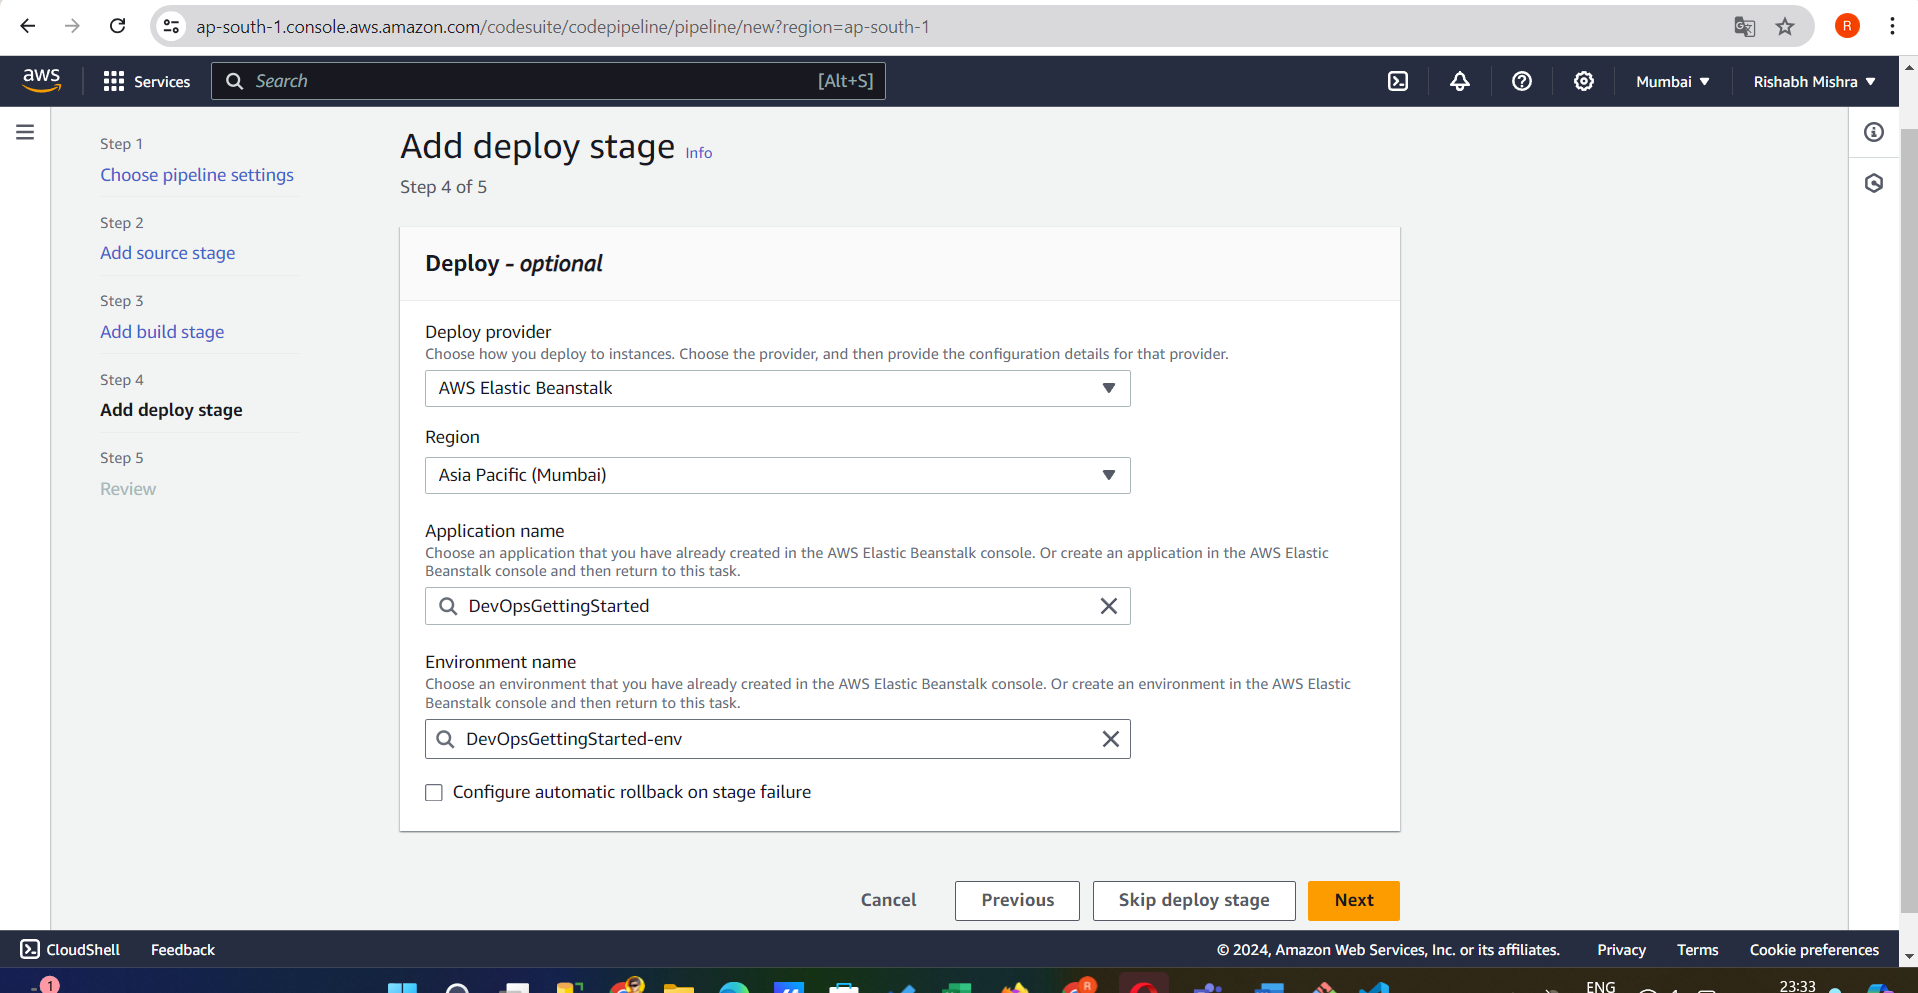
6. Add Deploy Stage:
Deploy provider: Choose AWS Elastic Beanstalk.
Application name: Select your Elastic Beanstalk application.
Environment name: Select the environment you want to deploy to.
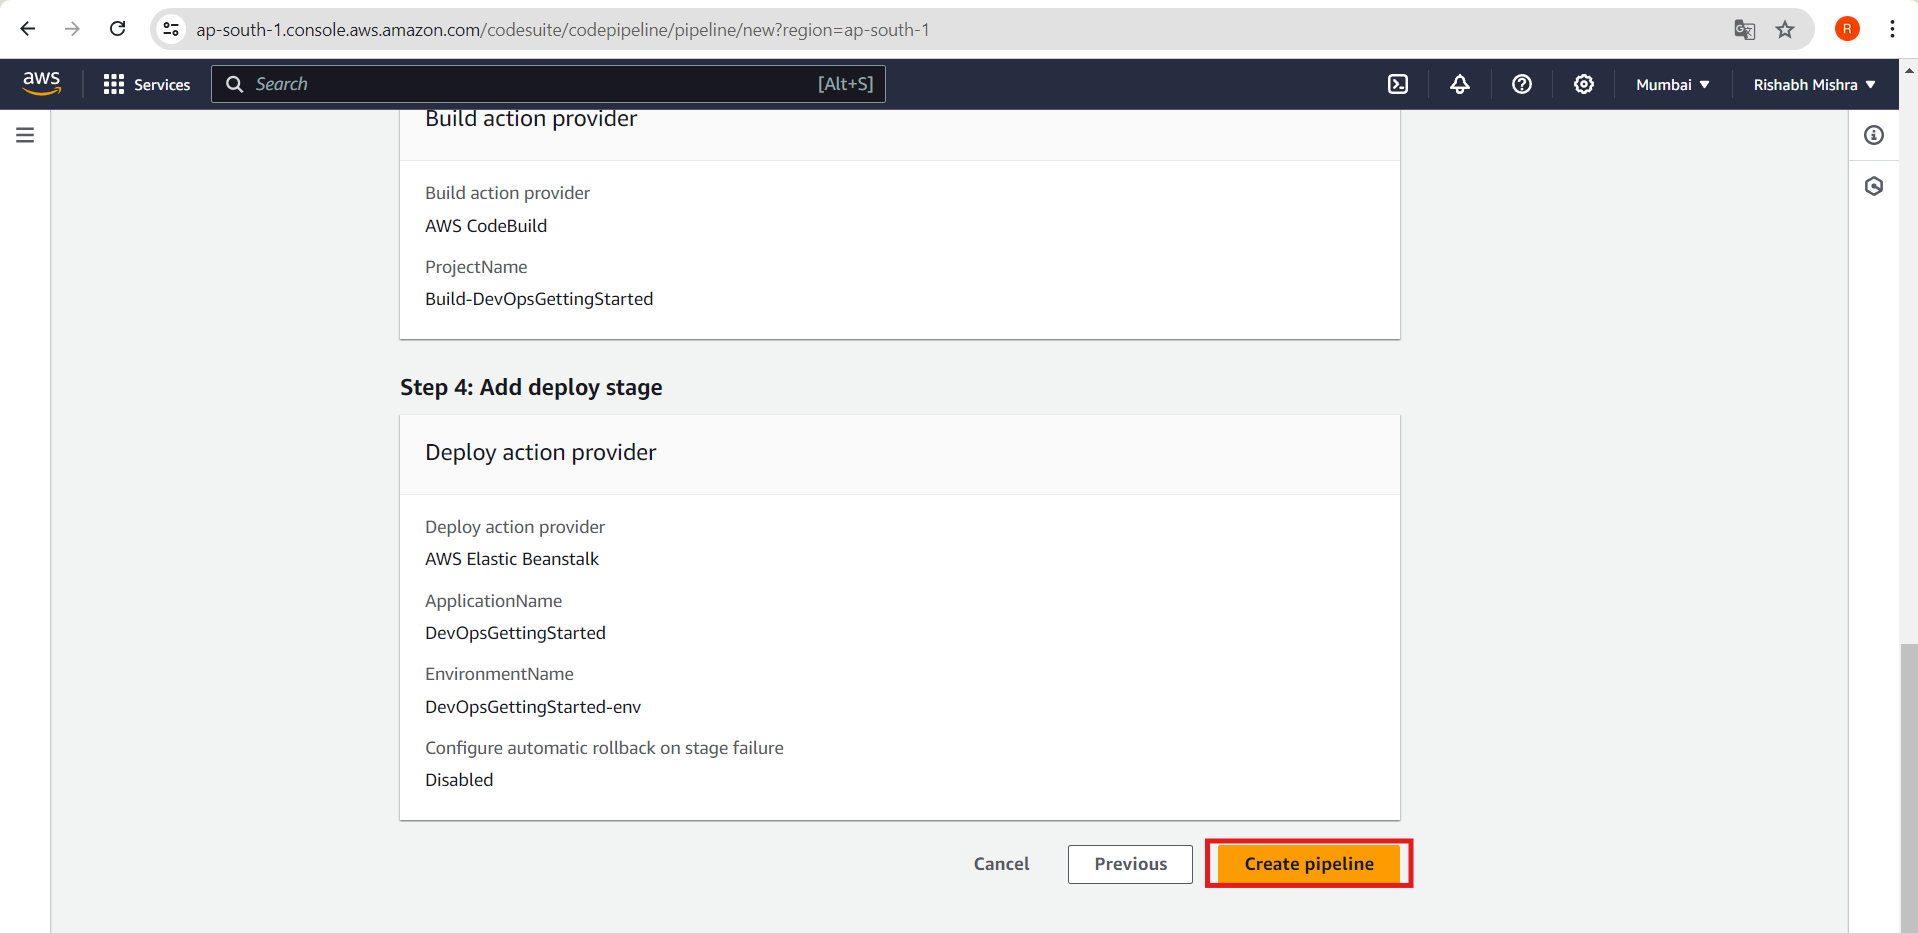
7. Review and Create Pipeline:
Review the stages and settings.
Click Create pipeline to finalize.
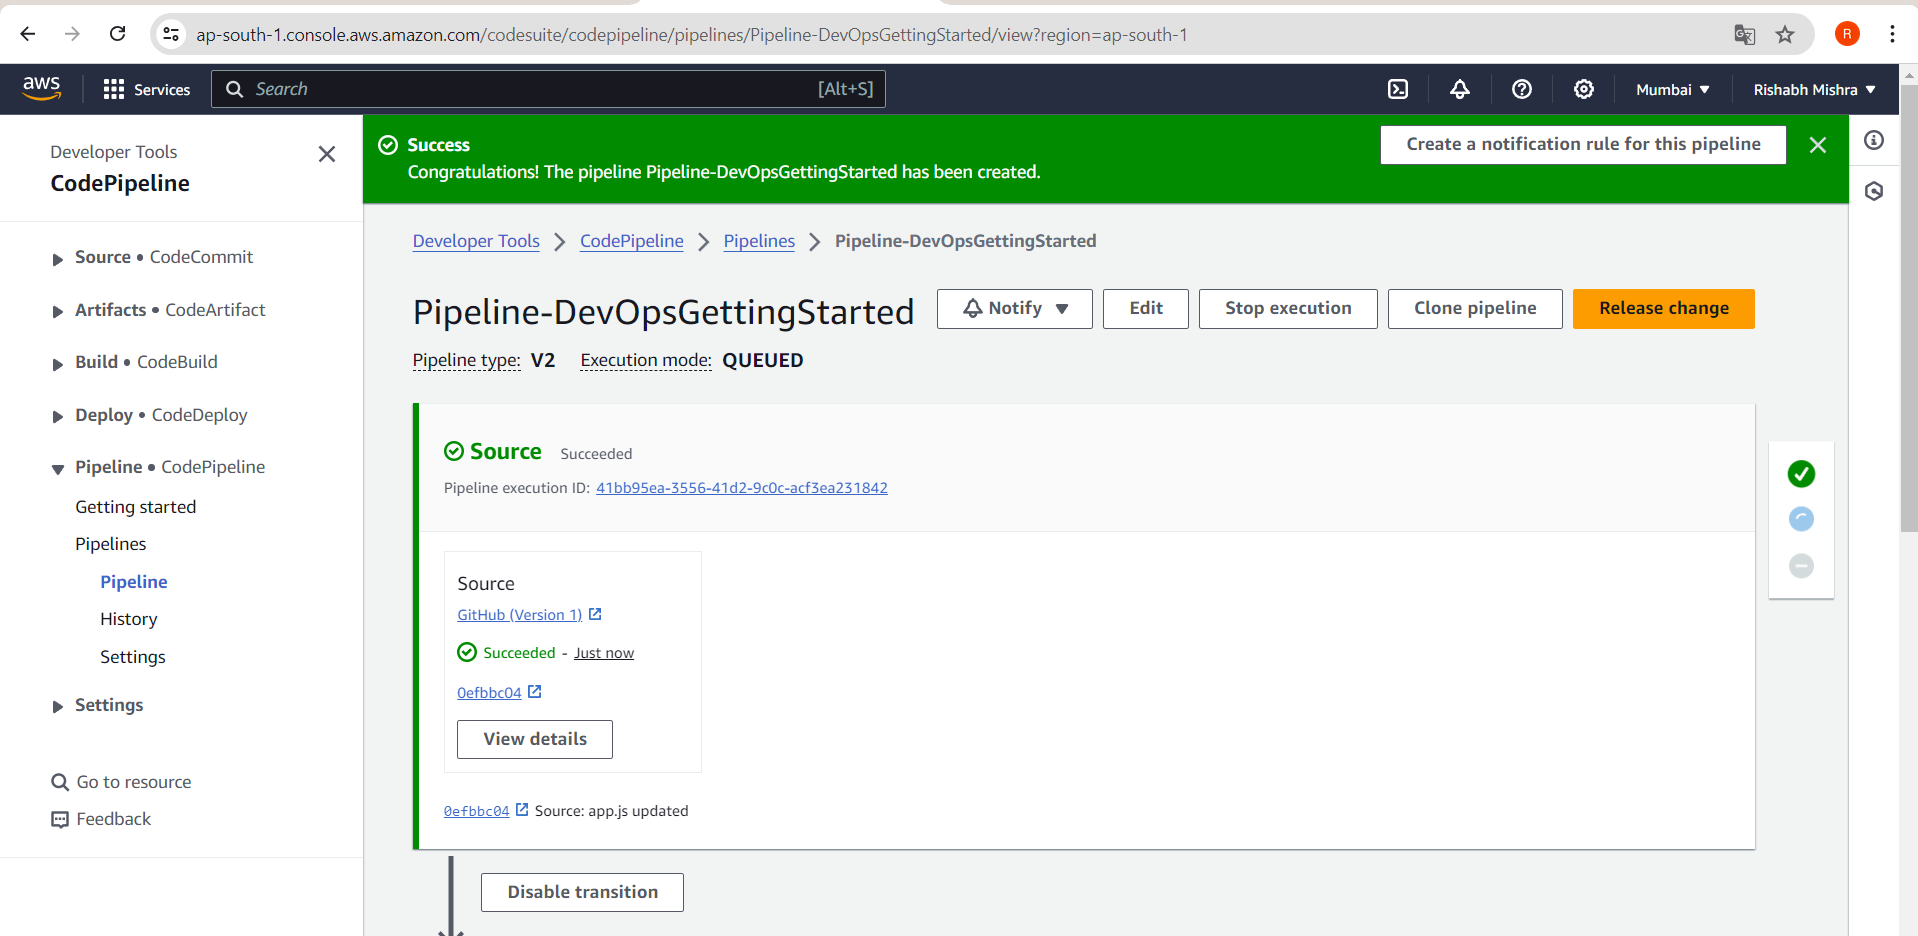
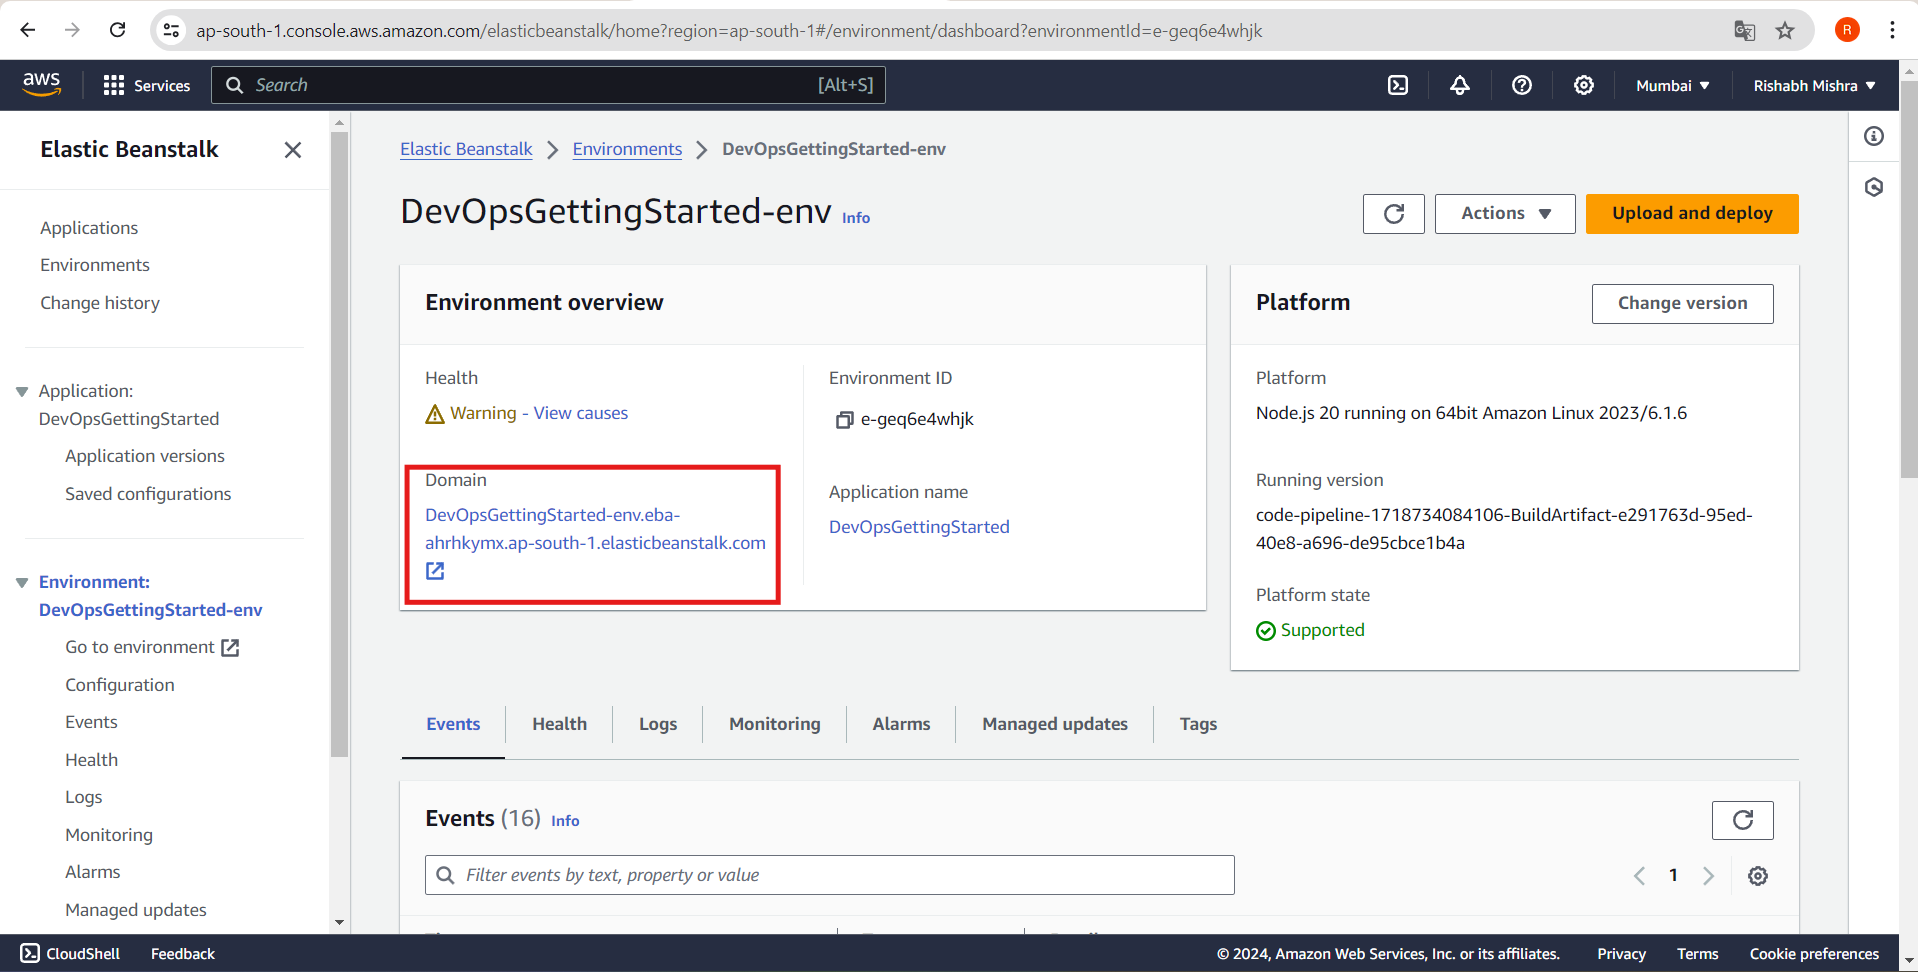
The pipeline is now created, but there is no manual review available at this stage. Any changes made in the repository will directly reflect on the website.
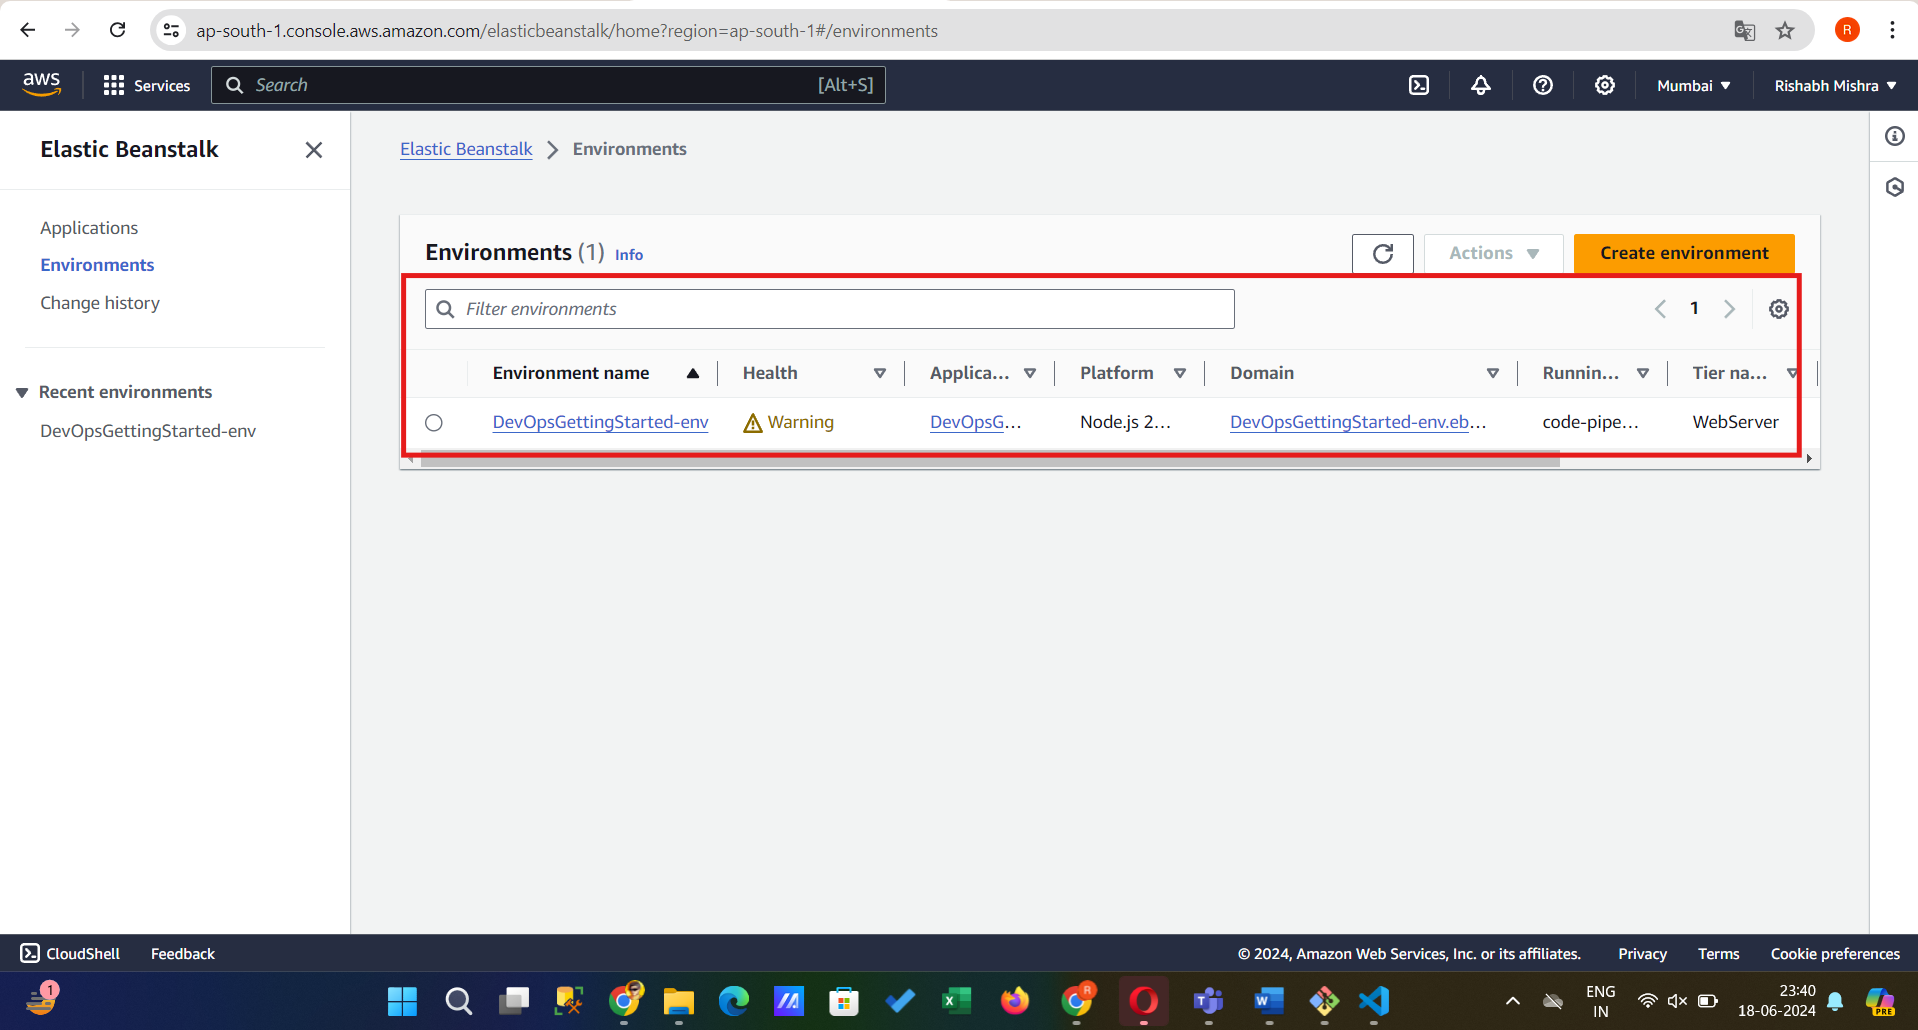
I have made changes to the app.js file, which are now displayed on the website. To see this, go to Elastic Beanstalk, select the environment, and then follow the provided link.

Application Architecture
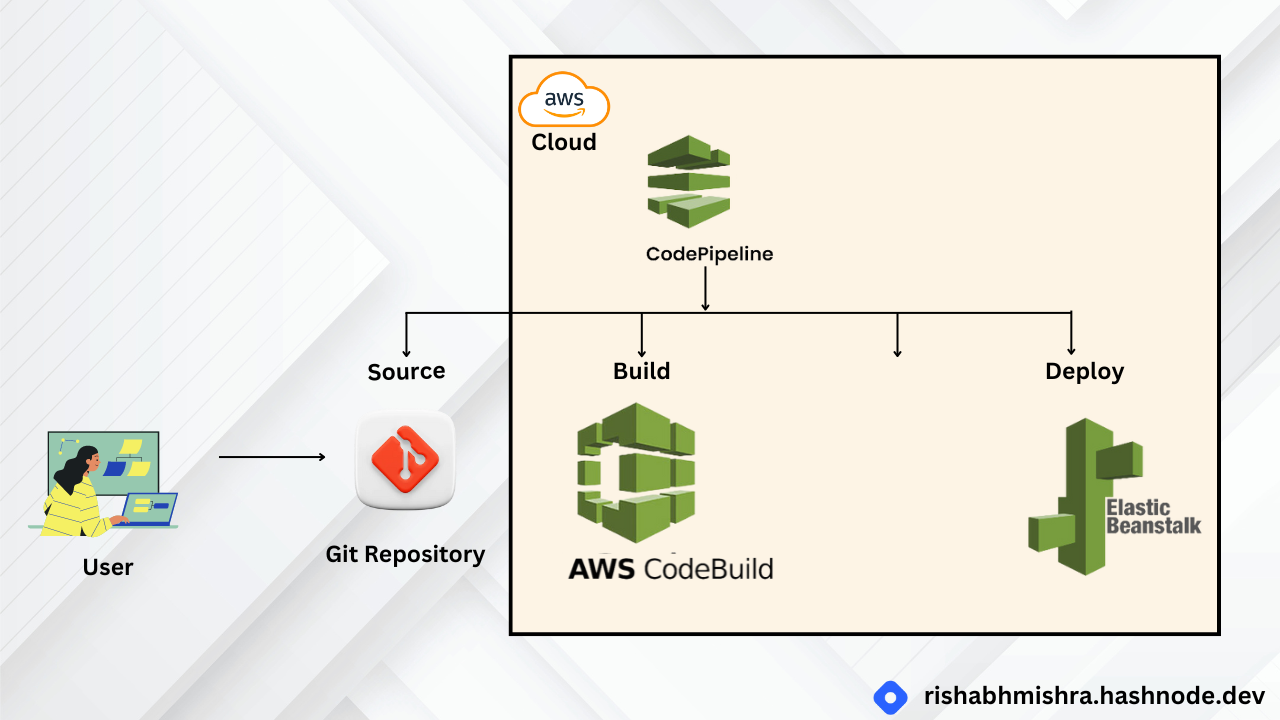
Here's what our architecture looks like now:
We have created a continuous delivery pipeline on AWS CodePipeline with three stages: source, build, and deploy.
The source code from the GitHub repo created in Step 1 is part of the source stage.
That source code is then built by AWS CodeBuild in the build stage.
Finally, the built code is deployed to the AWS Elastic Beanstalk environment created in Step 3.
Step 5: Finalize Pipeline and Test
Key Concepts
Approval Action: A type of pipeline action that stops the pipeline execution until someone approves or rejects it.
Pipeline Execution: The set of changes, such as a merged commit, released by a pipeline. Pipeline executions traverse the pipeline stages in order.
Failed Execution: If an execution fails, it stops and does not completely traverse the pipeline. The pipeline status changes to Failed, and the stage that was processing the execution is unlocked.
Step-by-Step Process
1. Edit Your Pipeline:
Go to your CodePipeline.
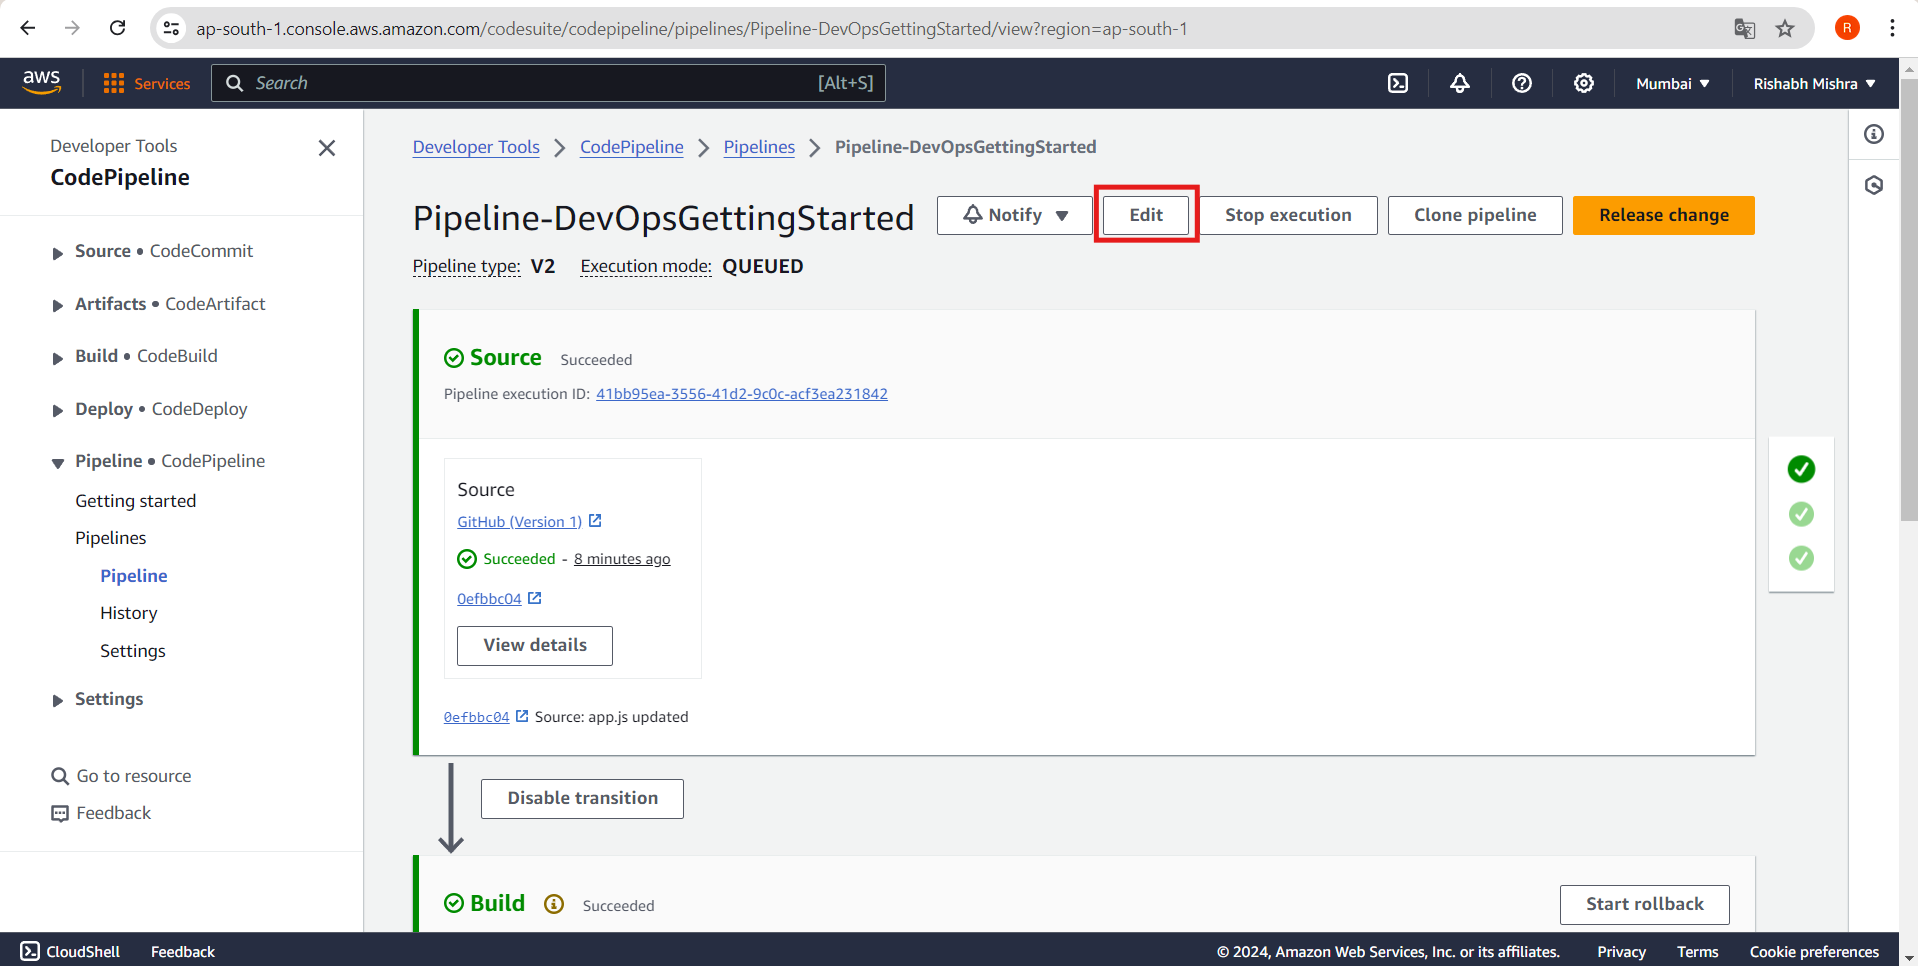
Click on Edit.
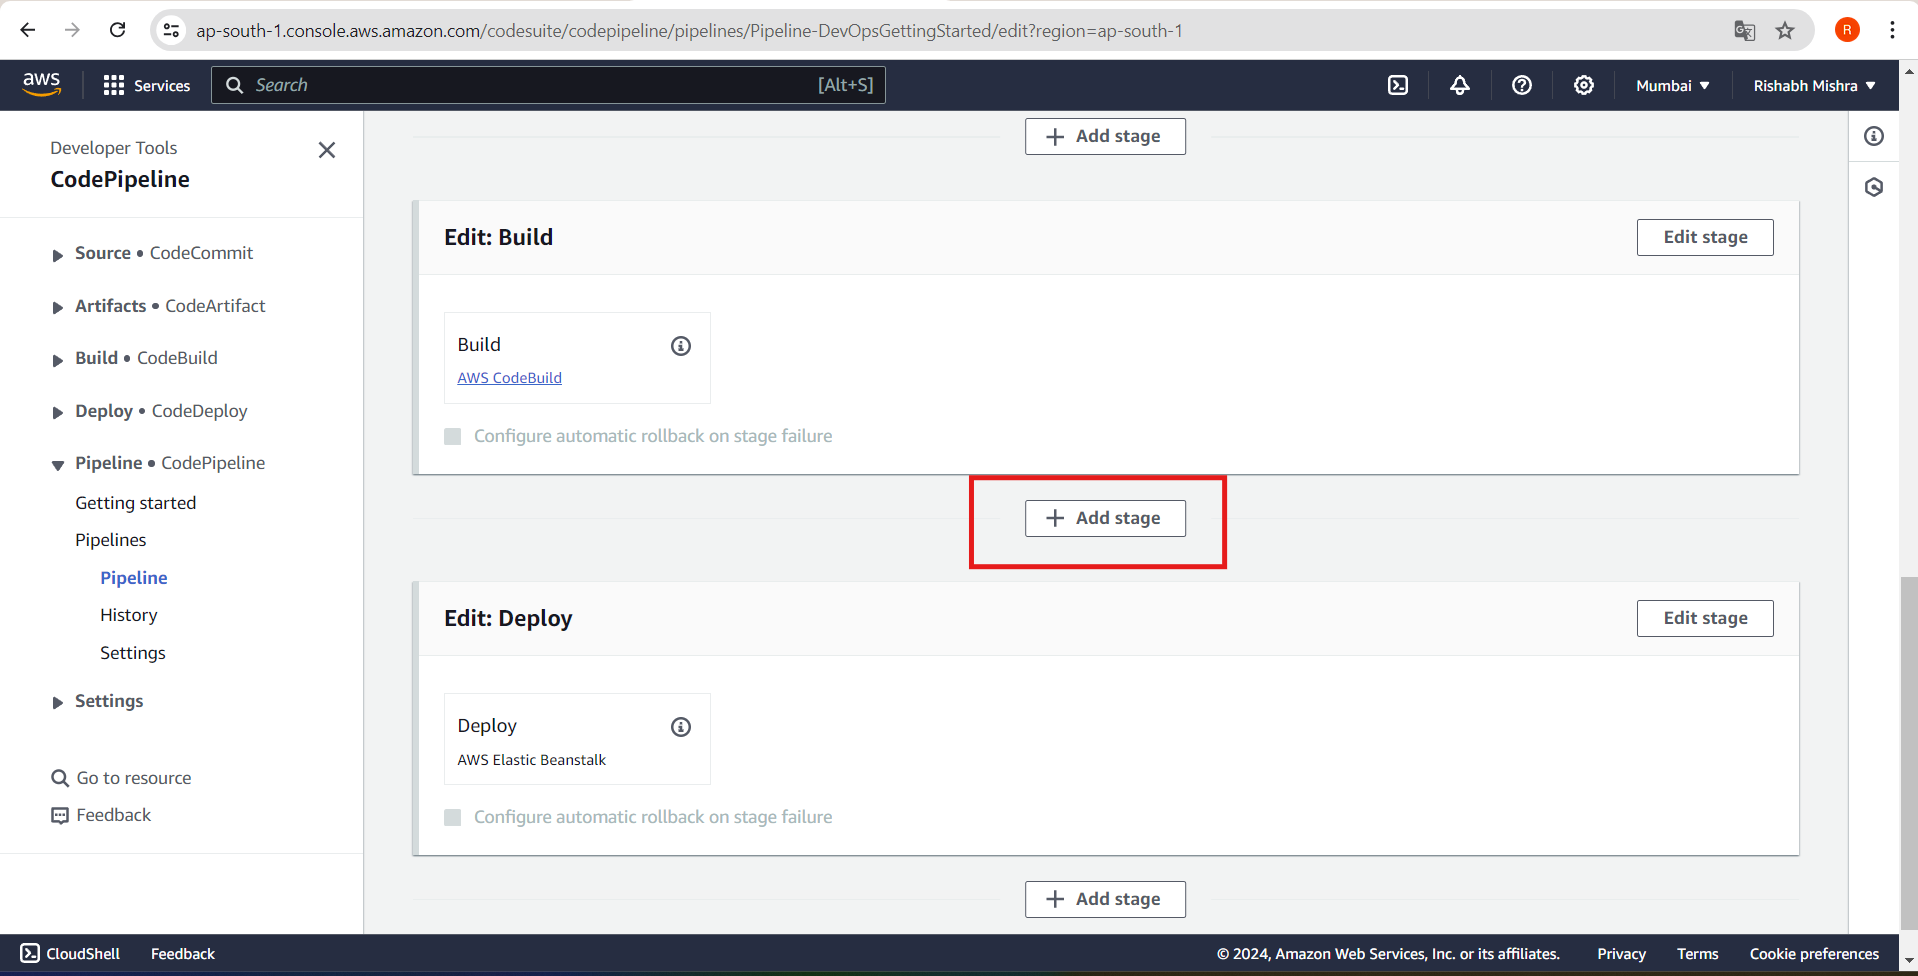
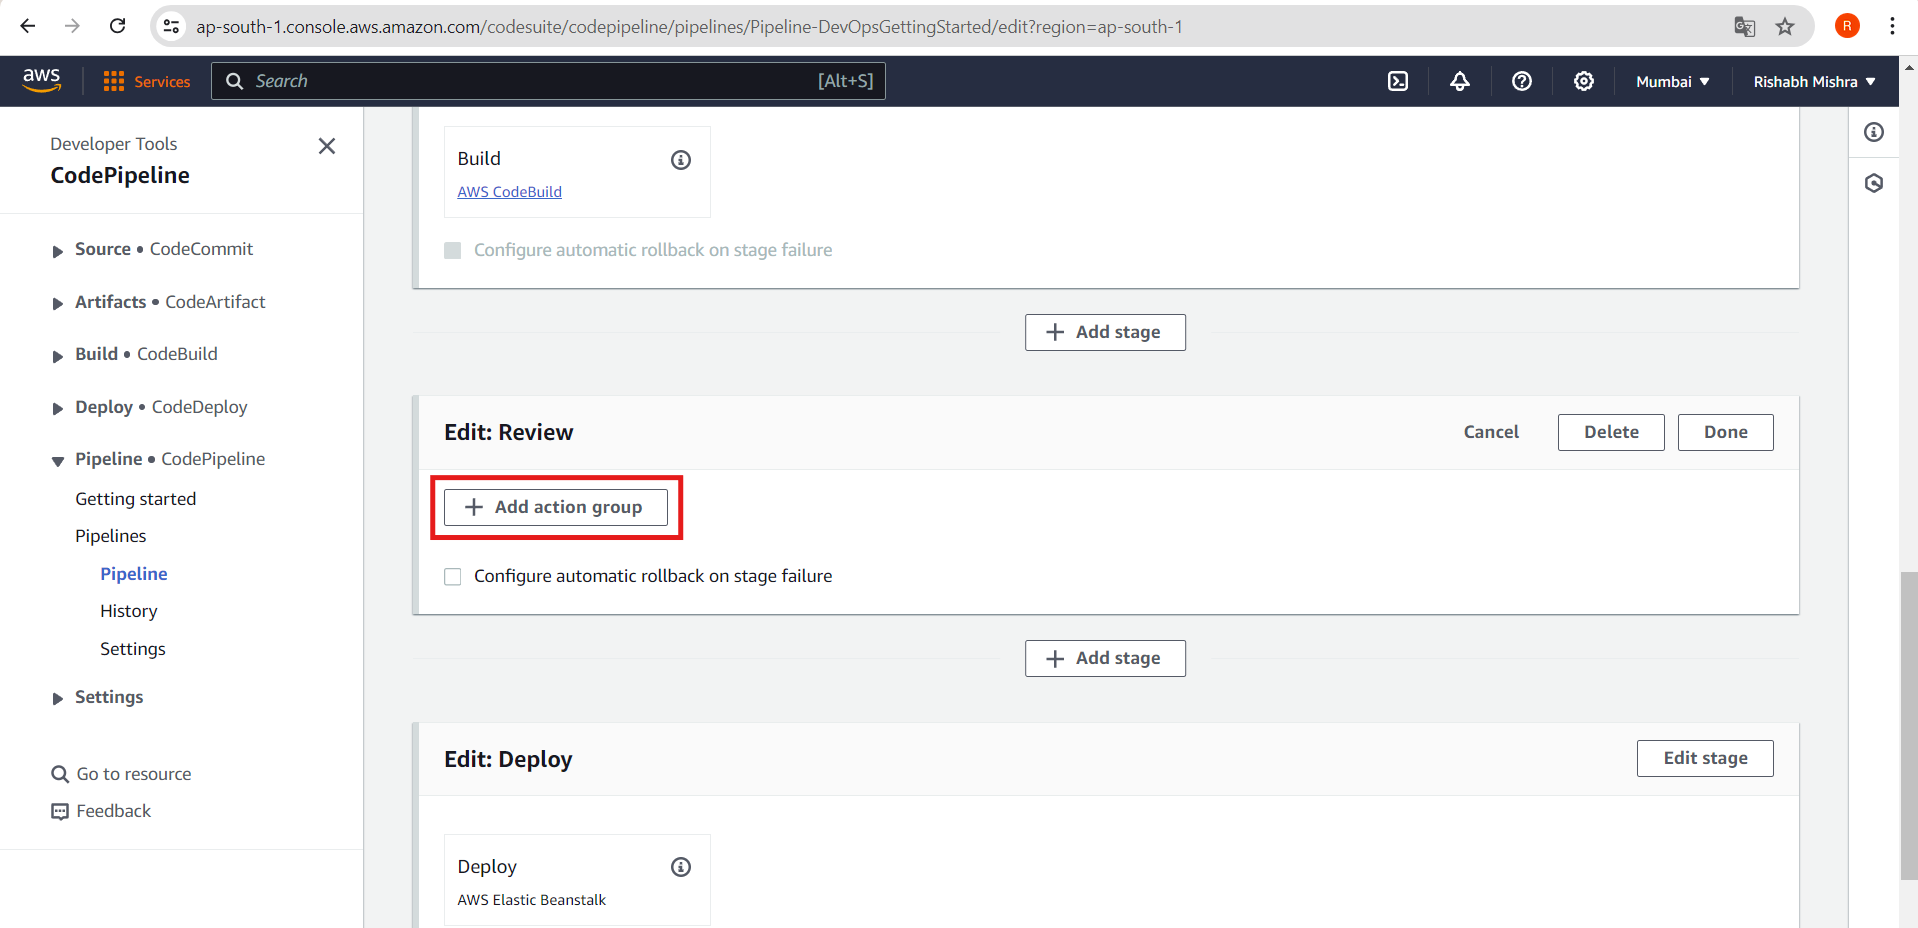
2. Add Review Stage:
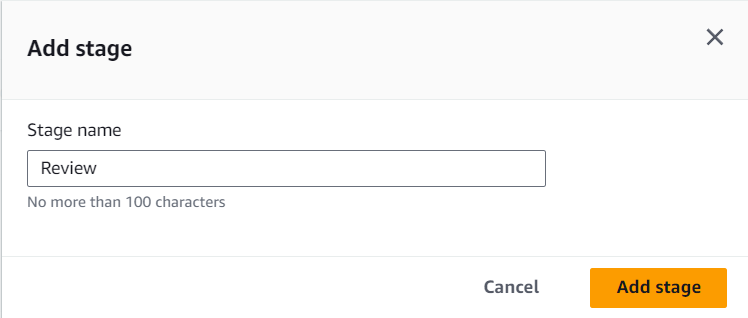
Add a new stage called Review.
Add an action within the Review stage.
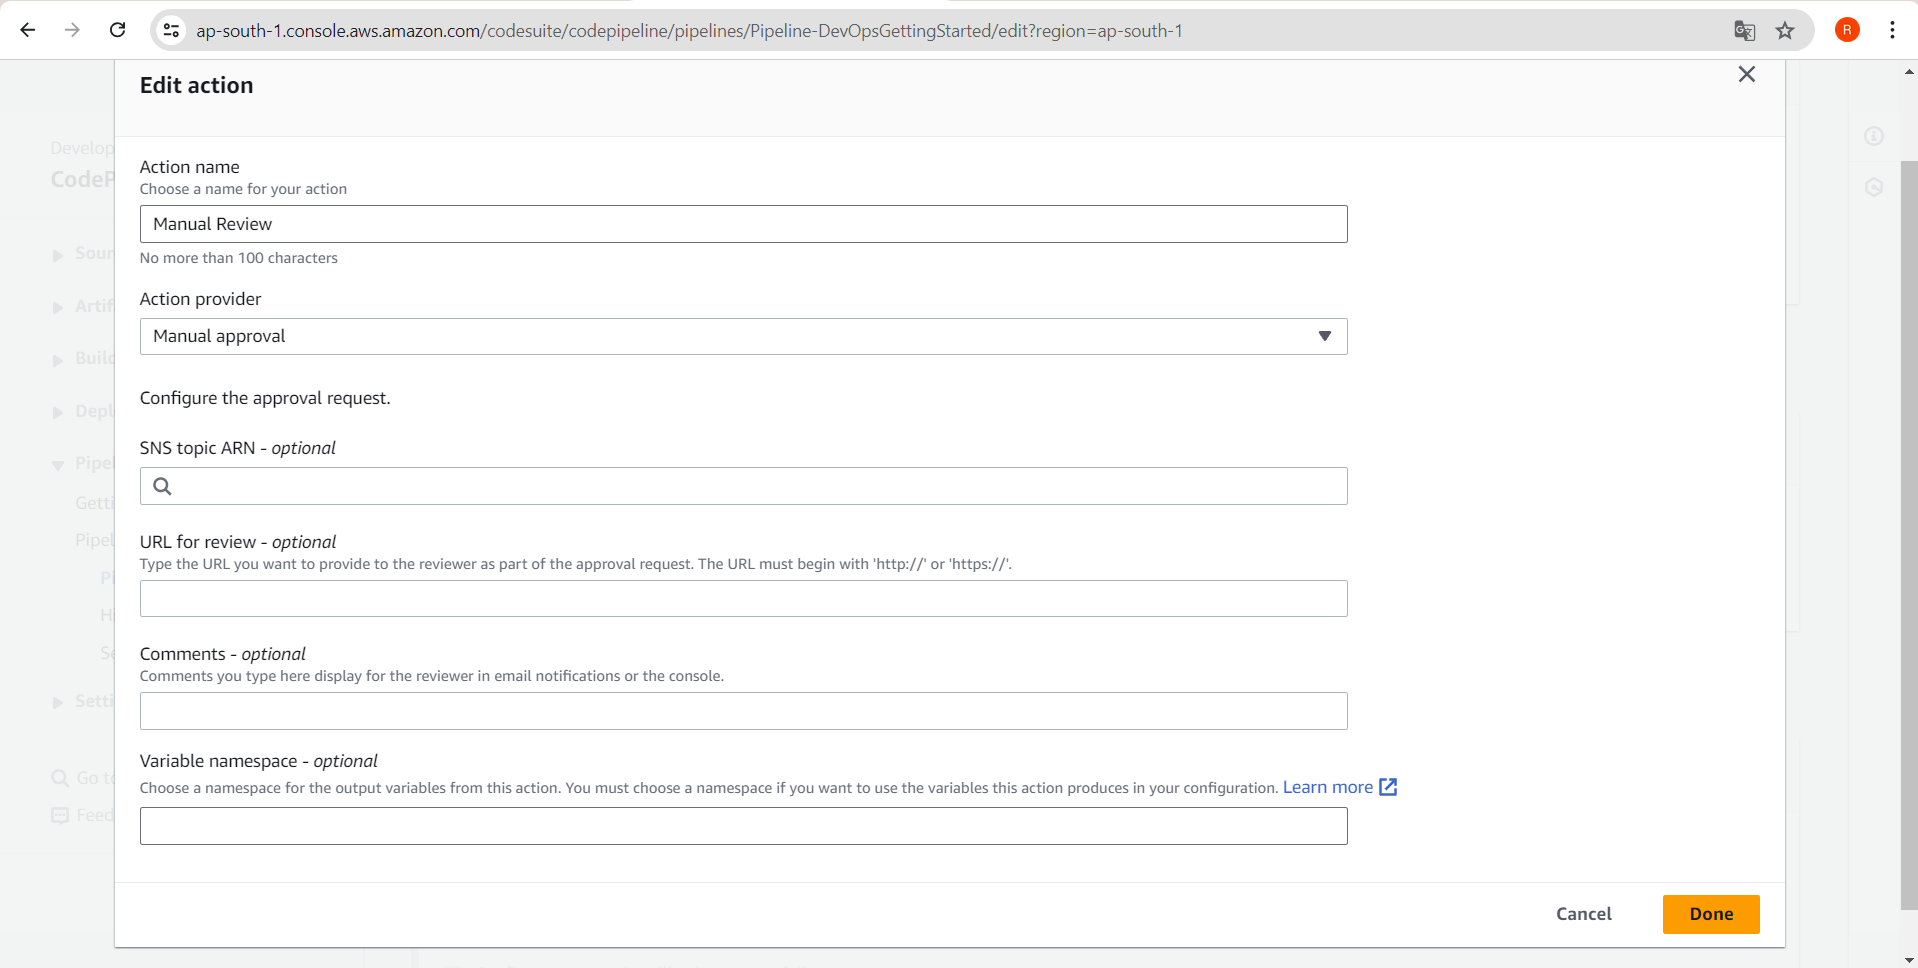
Choose Manual approval as the action provider.
3. Configure Manual Approval:
Action name: Enter a name for the manual approval action.
Reviewers: Optionally, add reviewers who will approve the changes.
4. Save and Deploy:
Save the changes to your pipeline.
Manually trigger a pipeline execution.
5. Approve the Change:
- When the pipeline reaches the Review stage, manually approve the change.
Application Architecture
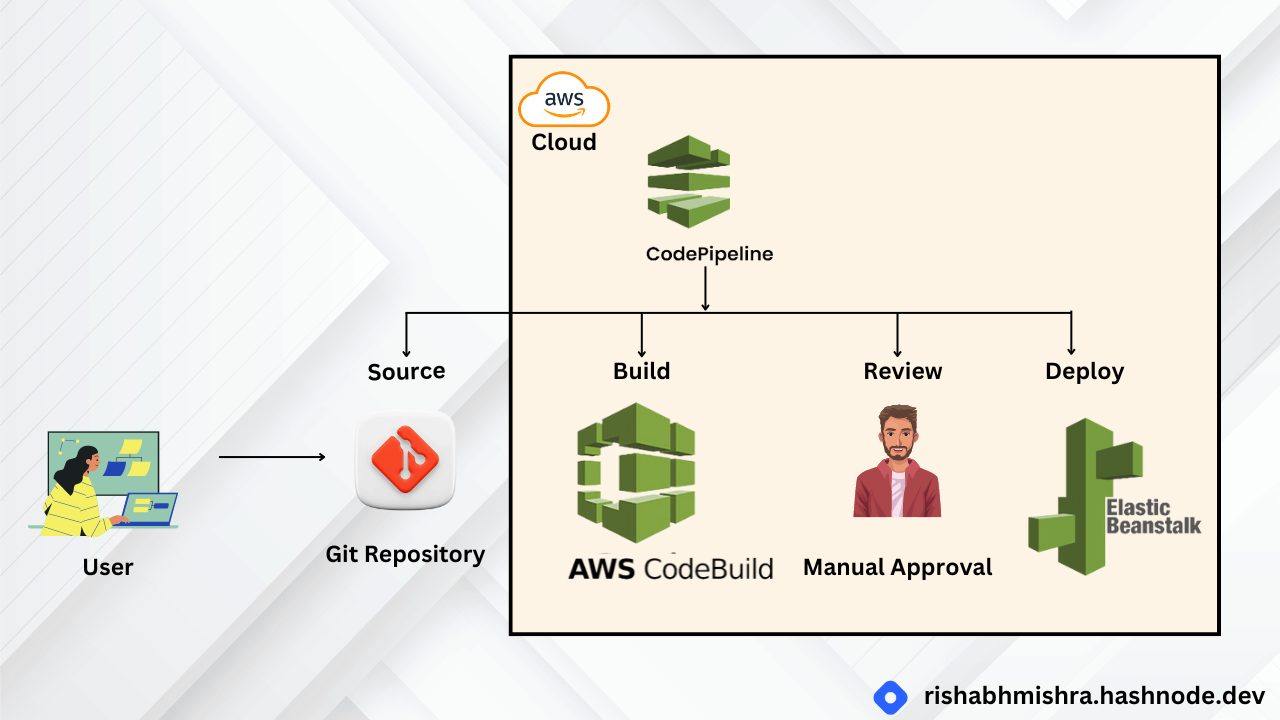
With all steps now completed, here is the architecture of what you built:
We have used AWS CodePipeline to add a review stage with manual approval to our continuous delivery pipeline.
Now, our code changes will have to be reviewed and approved before they are deployed to AWS Elastic Beanstalk.
Congratulations!
You have successfully built a continuous delivery pipeline on AWS! As a great next step, dive deeper into specific AWS technologies and take your application to the next level.
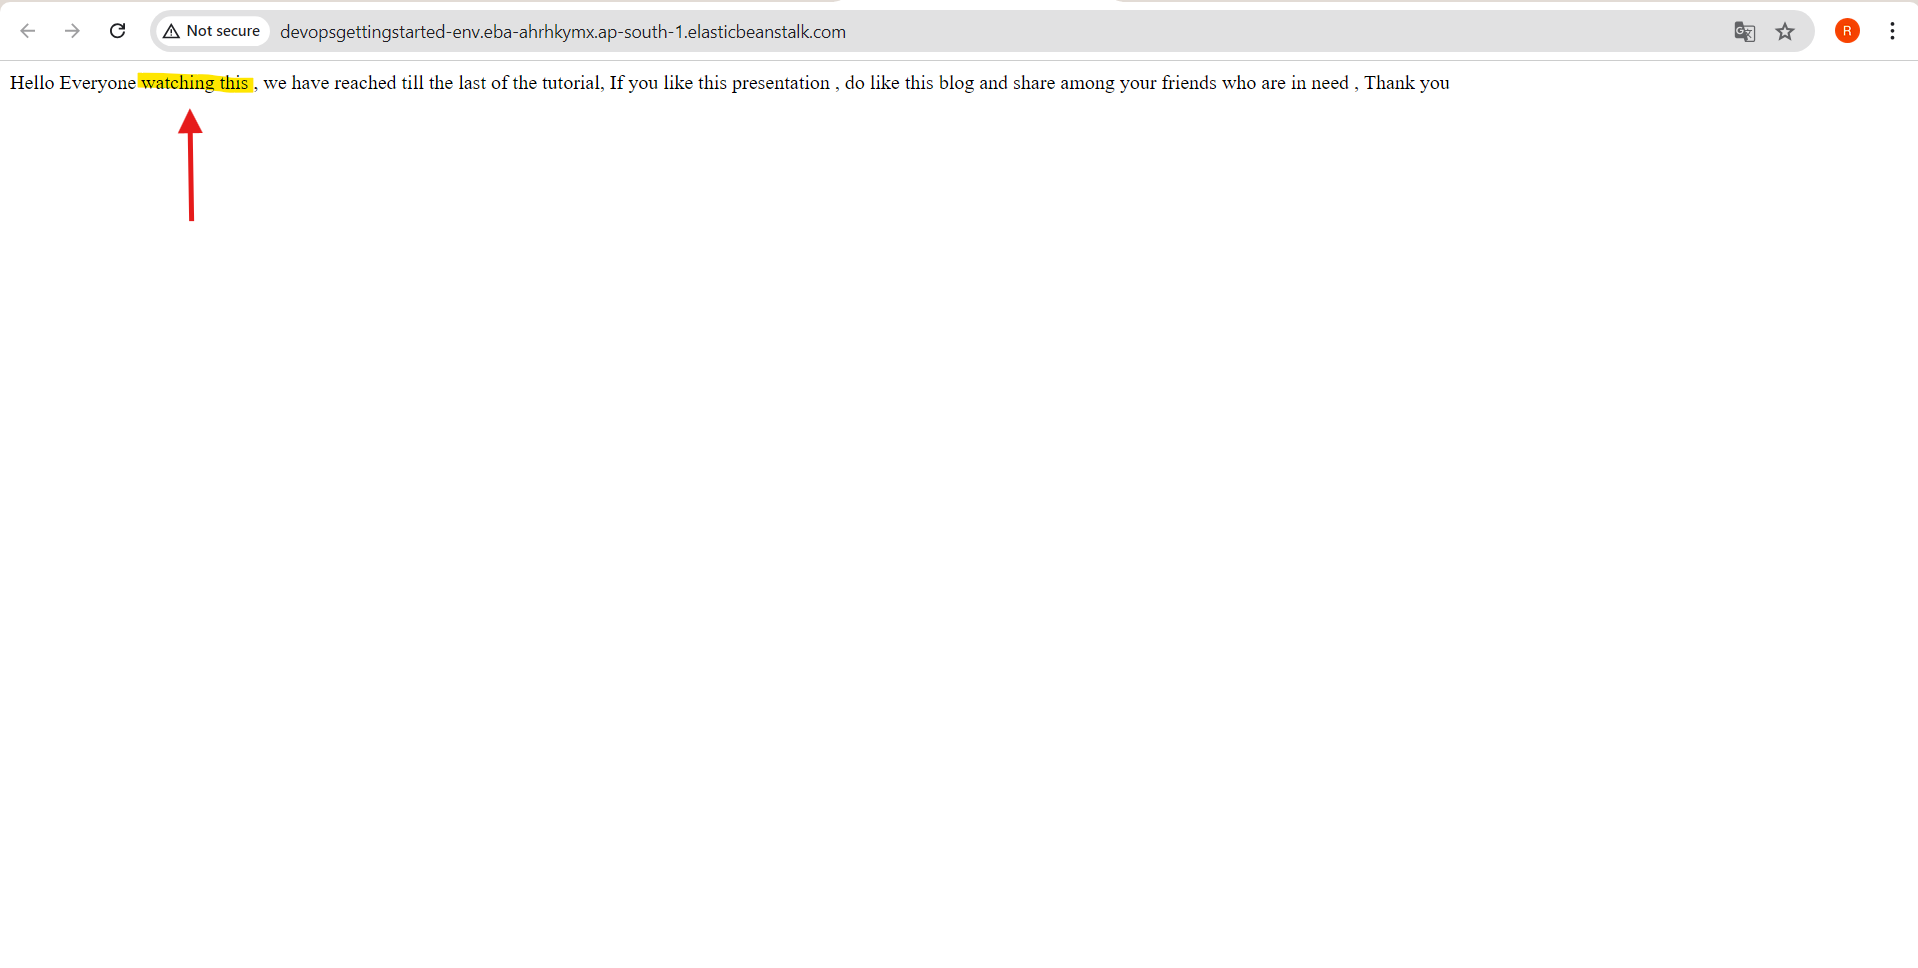
Note: Here, I have updated the code from the app.js file again, and after manually approving it, it is shown on the website.
Clean up resources
After completing the tutorial, you might want to clean up the resources to avoid unnecessary charges. Delete the AWS CodePipeline, CodeBuild projects, and Elastic Beanstalk environments you created.
Subscribe to my newsletter
Read articles from Rishabh Mishra directly inside your inbox. Subscribe to the newsletter, and don't miss out.
Written by

Rishabh Mishra
Rishabh Mishra
I'm Rishabh Mishra, an AWS Cloud and DevOps Engineer with a passion for automation and data analytics. I've honed my skills in AWS services, containerization, CI/CD pipelines, and infrastructure as code. Currently, I'm focused on leveraging my technical expertise to drive innovation and streamline processes. My goal is to share insights, learn from the community, and contribute to impactful projects in the DevOps and cloud domains. Let's connect and collaborate on Hashnode!