Lets Rust Up!
 Sachin Nair
Table of contents

Getting started with Rust
Hey there, future Rustacean! Yess, you heard it right...we have an official title name for the rust developers, and it sound cool too! Ready to dive into the world of Rust? Let's get you set up and writing your first "Hello, World!" program in no time.
Why Rust
Rust has been winning hearts for the past four years, and there's a saying that perfectly captures its essence: "If your program compiles, it will most likely work and do what it's supposed to do." That's a game-changer, especially if you've ever grappled with the memory and pointer woes of C or C++.
Unlike those languages, Rust doesn't let you run wild with memory, sparing you from the headaches of runtime errors and debugging nightmares. But fear not! It still gives you the fine-grained control over memory that makes C and C++ so efficient and fast.
Think of Rust as the perfect blend—it lets you wield power over memory without plunging into the abyss of runtime errors. And trust me, that's not just me saying it; that's the essence of Rust itself, and it does this through its unique concepts of memory management which we will delve into later. Apart from these following can be termed as some of Rust's unique features -
Ownership and Borrowing
Concurrency Without Data Races
Pattern Matching
Traits and Generics
Fearless Concurrency
Zero-Cost Abstractions
Cargo and Crates.io
Community and Documentation
A detailed note on these will be for some other blog, but for now, lets get our hands rusty already!
Setting Up Your Environment
In this blog, we will be delving into how to get the system setup done for getting started in Rust. First things first, let’s get Rust and Cargo installed on your machine. Since I'm on Windows and using Visual Studio Code, I’ll focus on that, but I’ll also give a nod to our friends on other OSes.
Install Rust and Cargo
To get Rust up and running, we’ll use Rustup, the Rust toolchain installer. Pretty easy!
Open PowerShell (run as Administrator if it does not work with normal user).
Enter the following command and hit enter.
curl --proto '=https' --tlsv1.2 -sSf https://sh.rustup.rs | shFollow the on-screen instructions. Rustup will handle the rest, and soon you’ll have Rust and Cargo (Rust’s package manager, just like npm is for Node.js, or Maven in Springboot) installed.
Verify installation
Once Rustup has done its magic, let’s make sure everything’s in place.
Open a new PowerShell window.
Type
rustc --version
If you see the version number(something like this above), congratulations, you’ve got Rust!
Set Up Your IDE or Text Editor
Since you’re rocking Visual Studio Code, let’s get it set up for Rust:
Open Visual Studio Code.
Go to the Extensions view by clicking on the square icon in the sidebar or pressing
Ctrl+Shift+X.Search for "Rust" and install the “rust-analyzer” extension. This gives you awesome features like code completion and inline error messages.
For those on MacOS or Linux, the installation steps are pretty similar. Just open your terminal and run the same Rustup command. And yes, Visual Studio Code works beautifully across all these platforms.
"Hello World!" from Rust
Now, let’s get our hands dirty with some actual coding.
Open Visual Studio Code.
Open the terminal in VS Code (`Ctrl+``).
Create a new directory for your project:
 mkdir hello_rust
 cd hello_rust
Initialize a new Rust project
 cargo new hello_world
 cd hello_world
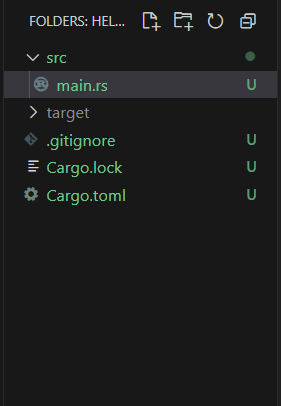
Your project directory should look something like this - src folder, target folder, Cargo.lock and Cargo.toml files.
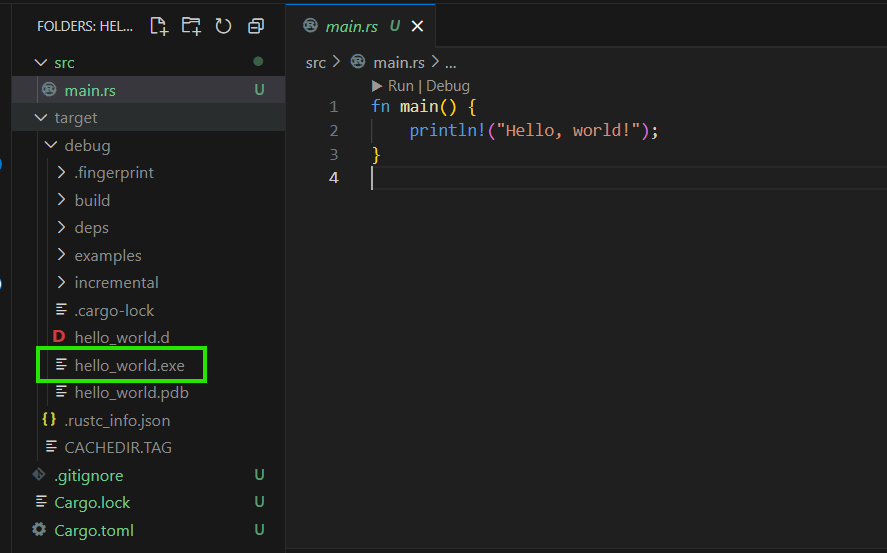
Now, let’s write the classic "Hello, World!" program. Open the main.rs file located in src directory. Replace its contents with:
fn main() {
    println!("Hello, world!");
}
To run your program, simply type:
cargo run
The above command does the following steps -
- Build the Project:
cargo runfirst compiles your Rust project. It goes through your source code, translates it into machine code, and produces an executable binary. This step ensures that any changes you've made to your code are included in the compiled program. The executable is then saved in the target folder in your Rust project directory structure.
- Runs the Executable:
- After building the project, Cargo automatically runs the resulting executable. This saves you from having to manually find and execute the binary file.

So what did we do?
We’ve installed Rust, set up our development environment, and written our first Rust program. Rust is powerful, safe, and a joy to work with(if joy means you being irritated with compilation errors, sure.....jk!). Keep exploring, keep coding, and welcome to the Rustacean community!
Ready to dive deeper? Stick around, and we’ll explore more of Rust’s superpowers in the next posts.
Subscribe to my newsletter
Read articles from Sachin Nair directly inside your inbox. Subscribe to the newsletter, and don't miss out.
Written by

Sachin Nair
Sachin Nair
A computer science enthusiast, pursuing his Masters from IIIT Bangalore