Resource Quotas in Kubernetes with example
 Gaurav Kumar
Introduction
In Kubernetes, efficient resource management is crucial for maintaining a healthy and optimized cluster environment. Resource quotas are a feature in Kubernetes that help us to control resource allocation and ensure fair usage among multiple namespace. In this blog we will understand about resource quotas, how to define that in particular namespace and then how to use resource quota efficiently while deploying pods.
Resource Quotas
Step-by-Step Guide to Implement Resource Quotas
Step-1: Creating a Namespace
We can create namespace by typing below command in Kubernetes cluster.
kubectl create namespace dev
Here we have created namespace named dev.
Step-2: Applying Resource Quotas on the namespace.
We will create resource-quota.yaml file and will paste below code.
apiVersion: v1
kind: ResourceQuota
metadata:
  name: demo-quota
  namespace: dev
spec:
  hard:
    requests.cpu: "1"        # Total CPU request limit
    requests.memory: "1Gi"   # Total memory request limit
    limits.cpu: "2"          # Total CPU limit
    limits.memory: "2Gi"     # Total memory limit
    pods: "10"               # Maximum number of Pods
Here we have applied resource quota on dev namespace where we have defined number of pods as 10. In requests we have CPU as 1, and memory as 1Gi and in limits we have CPU as 2, and memory as 2Gi. Let's understand requests and limits in Kubernetes.
Resource Requests and Limits
Resource Requests
Resource Limits
Default Behavior Without Specified Requests and Limits
No Requests and Limit Defined
Default Limit Ranges
Now we have understood Resource Requests and Resource Limits, let's apply the resource-quota file in dev namespace by below command.
kubectl apply -f resource-quota.yaml
Step-3: Creating Deployment with resource requests and limits.
Now We will create a object named Deployment for nginx container and will apply some resources in that. For that we have to create a dep.yaml file and we will put below code into that.
apiVersion: apps/v1
kind: Deployment
metadata:
  name: nginx-deployment
  namespace: dev
spec:
  replicas: 2
  selector:
    matchLabels:
      app: nginx
  template:
    metadata:
      labels:
        app: nginx
    spec:
      containers:
      - name: nginx
        image: nginx:latest
        resources:
          requests:
            cpu: "200m"      # 200 milliCPU (0.2 CPU cores)
            memory: "100Mi"  # 100 MiB of memory
          limits:
            cpu: "500m"      # 500 milliCPU (0.5 CPU cores)
            memory: "200Mi"  # 200 MiB of memory
Here we have defined a nginx deployment and we have requested 200m as CPU and 100Mi as memory it means it will get this resource when started and here we have mentioned as CPU of 500m and memory of 200Mi in limits so it can get maximum of resources mentioned in limits. These mentioned resources are required for 1 pod, whenever we will increase the number of replicas we can calculate the overall resources consumed by deployment by below formula.
total resources consumed by Deployment= (no of replicas)*(memory/CPU)
Since we have just mentioned 2 replicas here then overall mentioned resources will get double and our deployment will get below resources.
resources:
          requests:
            cpu: "400m"      # 2*200 milliCPU (0.2*2 CPU cores)
            memory: "200Mi"  # 2*100 MiB of memory
          limits:
            cpu: "1000m"      # 2*500 milliCPU (2*0.5 CPU cores)
            memory: "400Mi"  # 2*200 MiB of memory
| Required Resources in Deployment | Available Resources in Namespace | Remaining Resources in Namespace |
| Requests (CPU): 0.4 CPU cores | 1 CPU cores | 0.6 CPU cores |
| Requests (memory): 200Mi | 1Gi | 800Mi |
| Limits (CPU): 1 CPU cores | 2 CPU cores | 1 CPU cores |
| Limits (memory): 400Mi | 2Gi | 1600Mi |
Since we can see in above table that we enough resources available in namespace after getting used by deployments so it will schedule the pod and we can verify this by applying the file.
kubectl apply -f dep.yaml
Now when we can verify that by getting pod details and we need to mention dev namespace as also while getting details otherwise it will show pods available in default namespace.
kubectl get pods -n <namespace-name>

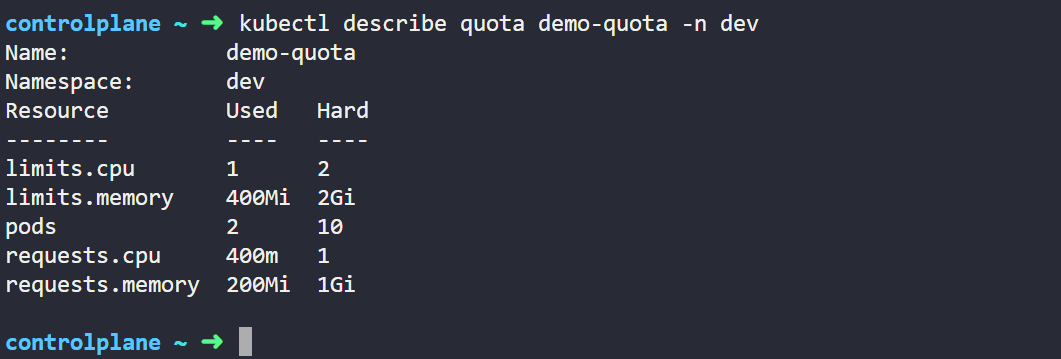
Here by typing below command we can check the used resources from dev namespace.
kubectl describe quota <resource-quota-name> -n <namespace-name>

Step-6: (Verifying the Deployment after increasing Pods)
Now let's increase the pod count to 5 so that it will exceeds the mentioned quota in the namespace and we will verify the behaviour of pods in the namespace.
 resources:
          requests:
            cpu: "1000m"      # 200*5 milliCPU (0.2*5 CPU cores)
            memory: "500Mi"  # 100*5 MiB of memory
          limits:
            cpu: "2500m"      # 500*5 milliCPU (0.5*5 CPU cores)
            memory: "1000Mi"  # 200*5 MiB of memory
| Required Resources in Deployment | Available Resources in Namespace | Remaining Resources in Namespace |
| Requests (CPU): 1 CPU cores | 1 CPU cores | No resources available |
| Requests (memory): 500Mi | 1Gi | 500Mi |
| Limits (CPU): 2.5 CPU cores | 2 CPU cores | exceeded already by 0.5 CPU cores |
| Limits (memory): 1000Mi | 2Gi | 1000Mi available |
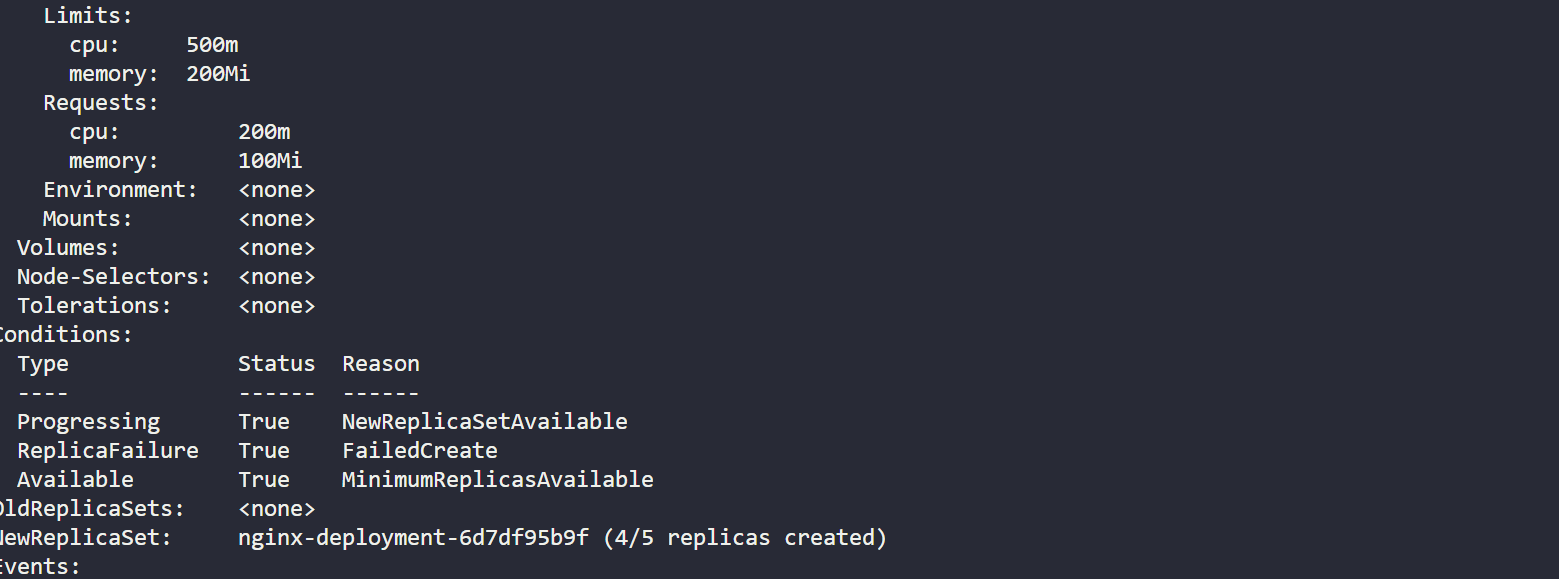
Here in the above case in resources already exhausted so it will not deploy all 5 pods because after 4th pod deployment there is not further resources available for the 5th pod ao that is the reason it can only deploy 4 pod here which we can see in below output also where we have checked the pod status by typing below command.
kubectl get pods -n dev

We can describe the deployment by below command and can check that it has created only 4/5 (4 out of 5 pod) pods.
kubectl describe deployment <deployment-name> -n dev

We can check the resource quota status also to verify that resource quota already exhausted in dev namespace.
kubectl describe quota <resource-quota-name> -n <namespace-name>

Here in above output we can see that limits CPU has equal value in used and hard which is telling that resource quota exhausted.
Note: We need to also make sure that replicas mentioned in deployment should not be more than pod mentioned in Resource Quota. Here in we can deploy maximum of 10 pods in dev namespace but we have only defined 5 in deployment.
Here in the above blogs we have clearly understood about Resource Quotas and how we can use it in deployments.
Subscribe to my newsletter
Read articles from Gaurav Kumar directly inside your inbox. Subscribe to the newsletter, and don't miss out.
Written by

Gaurav Kumar
Gaurav Kumar
I am working as a full time DevOps Engineer at Tata Consultancy Services from past 2.7 yrs, I have very good experience of containerization tools Docker, Kubernetes, OpenShift. I have good experience of using Ansible, Terraform and others.