MongoDB, Mongoose and Mini-project
 Syed Aquib Ali
MongoDB
MongoDB is a rich open-source document-oriented and one of the widely recognised NoSQL database. It is written in C++ programming language.
Important Terms
Database
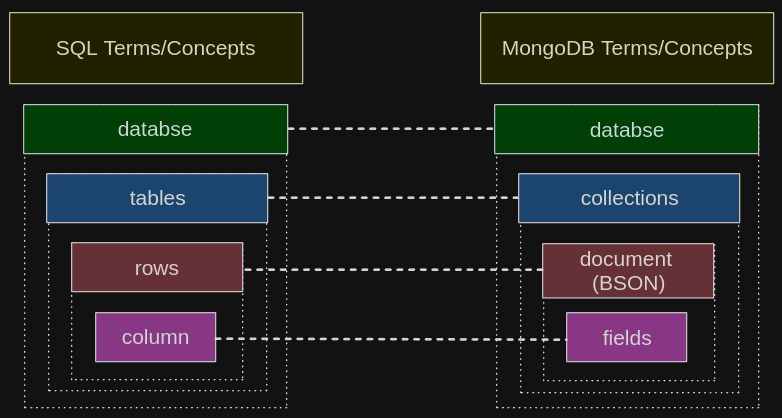
Database is a physical container for collections. Each database gets its own set of files on the file system. A single MongoDB server typically has multiple databases.
Collection
Collection is a group of documents and is similar to an RDBMS (Relational Database Management System) table. A collection exists within a single database. Collections do not enforce a schema. Documents within a collection can have different fields.
Document
A document is a set of key-value pairs. Documents have dynamic schema. Dynamic schema means that documents on the same collection do not need to have the same set of fields or structure, and common fields in a collection's documents may hold different types of data.
Data Types
MongoDB supports many datatypes such as:
String: This is the most commonly used datatype to store the data. String in MongoDB must be UTF-8 valid.
Integer: This type is used to store a numerical value. Integer can be 32 bit or 64 but depending upon your server.
Boolean: This type is used to store a boolean (
true/false) values.Double: This type is used to store floating point values.
Arrays: This type is used to store arrays or list or multiple values into one key.
Timestamp: This can be handy for recording when a document has been modified or added.
Object: This datatype is used for embedded documents.
Null: This type is used to store null value.
Data: This datatype is used to store the current date or time in UNIX time format. You can specify your own date time by creating object of Date and passing day, month, year into it.
Object ID: This datatype is used to store the document's ID
Binary Data: This datatype is used to store the document's ID.
Code: This datatype is used to store JavaScript code into the document.
Regular Expression (regex): This datatype is used to store regular expression.
Create your MongoDB Database Server
We will be using Atlas to build our MongoDB server, Follow these steps to setup a free server.
First visit MongoDB Atlas and signup or login to the website, and choose the free service.
Once you are finished, you will need to create a database -
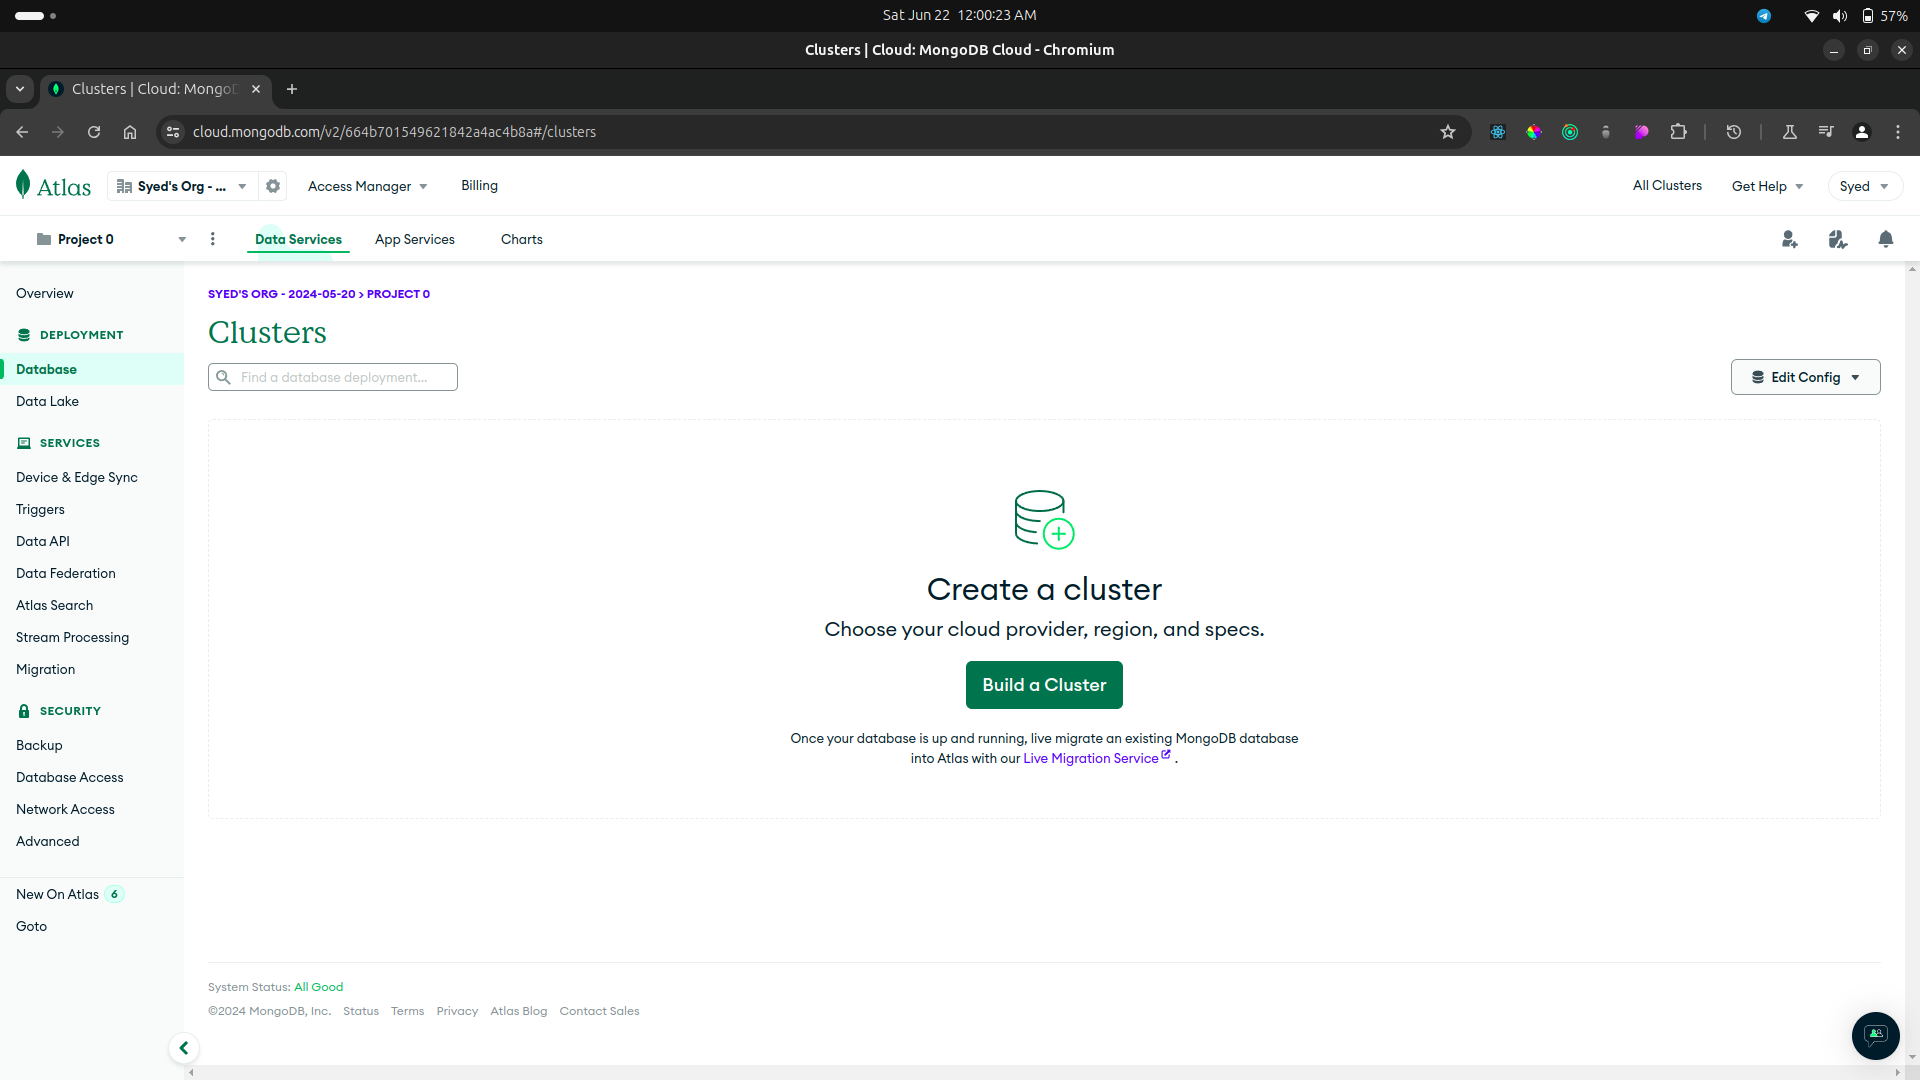
We are on the
databasesection from the sidebar menu. Click onBuild a Clusterbutton.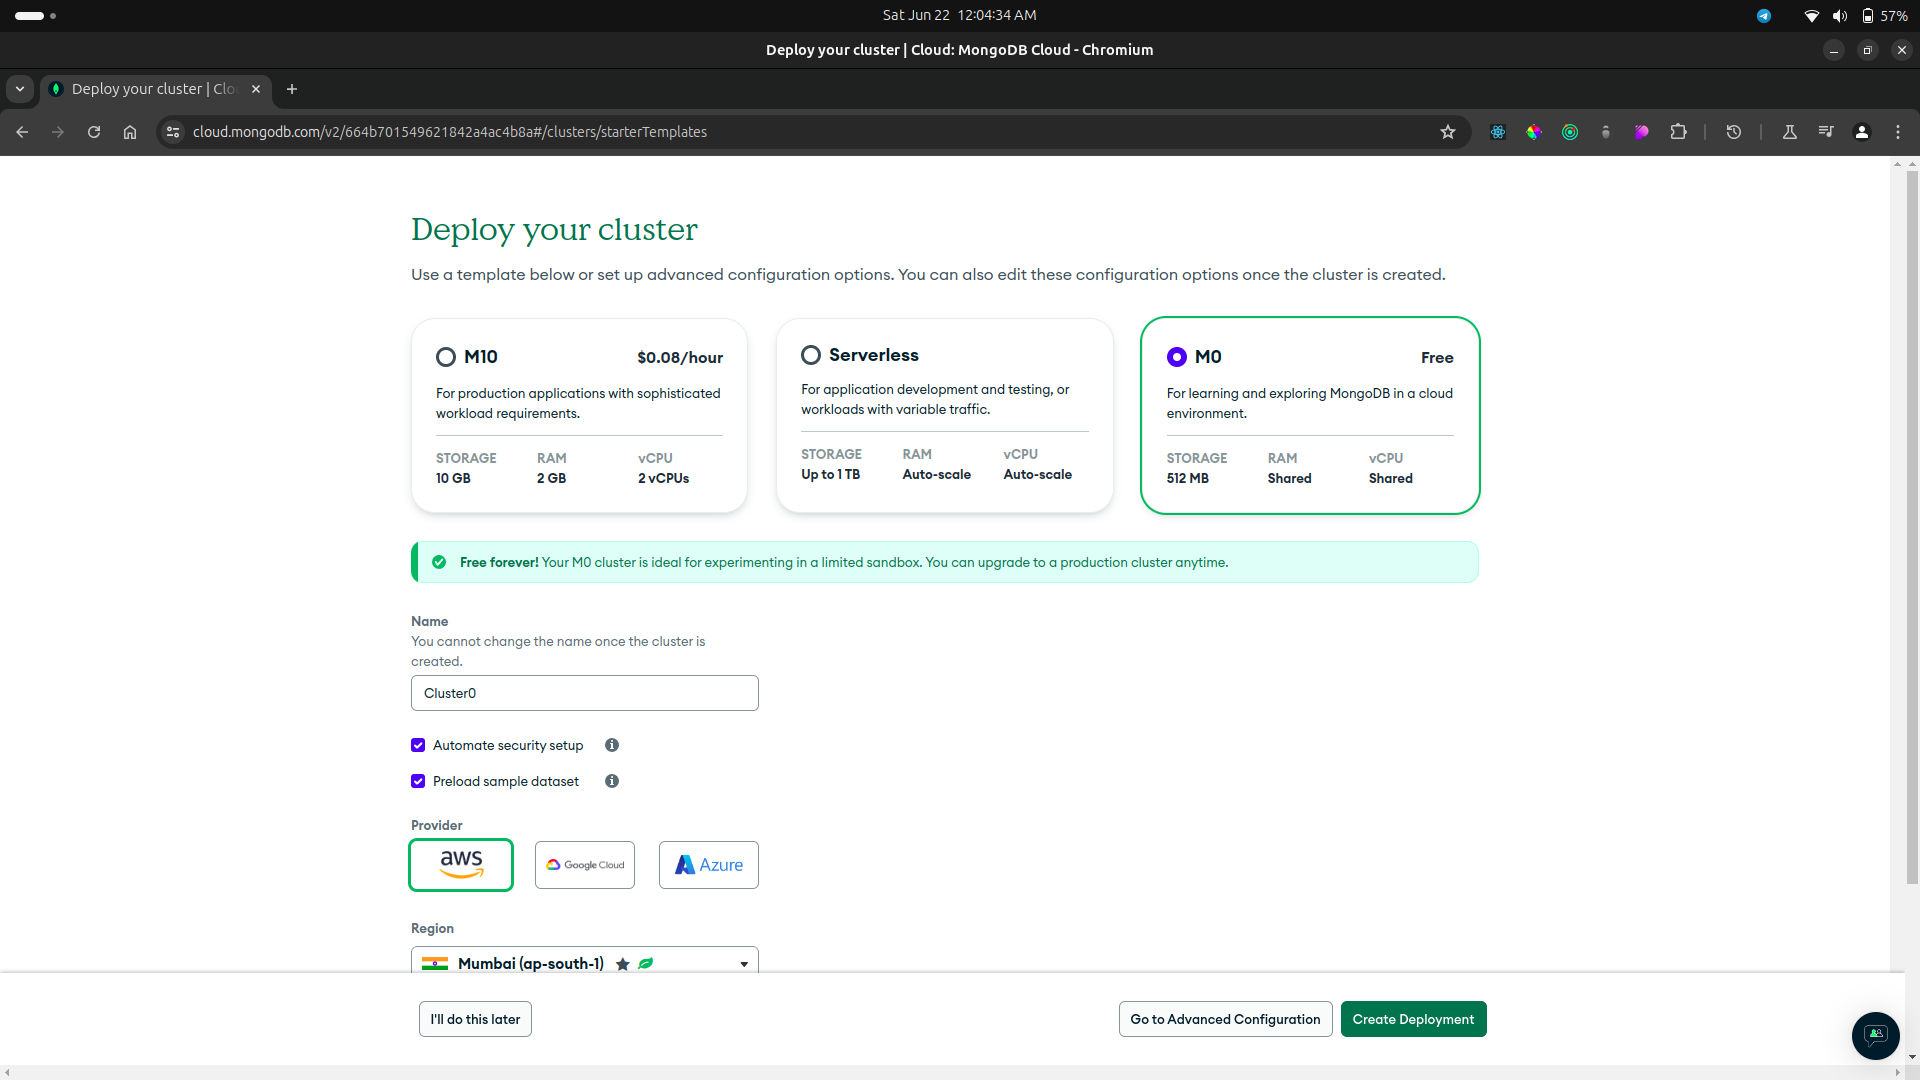
Choose the
M0service which is a free service and gives us developers512mb's for development purposes. Other services are for enterprises. You can give any name to your database onnamefield. Once its done, clickCreate deploymentbutton on bottom right.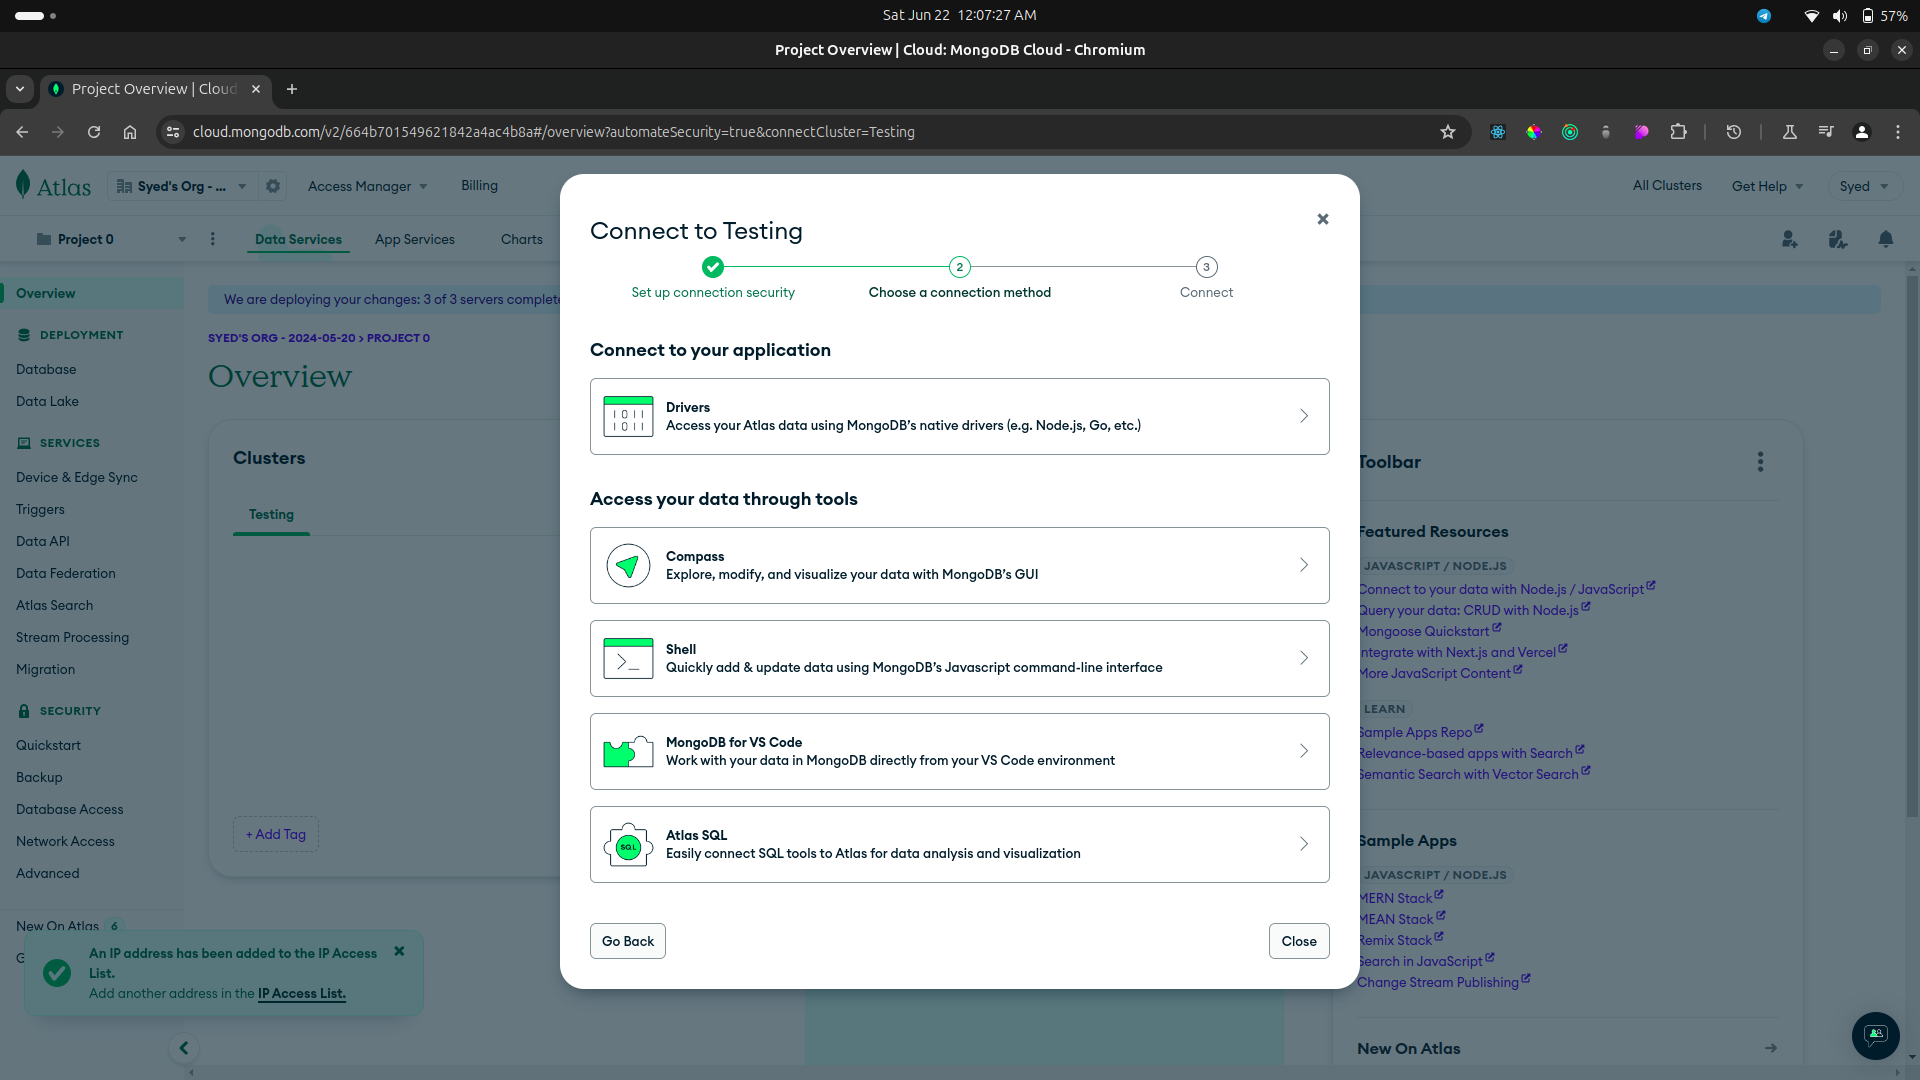
As soon as you are complete from previous page, you will be redirected to here, now only thing left is to connect our Atlas to our code. Choose
Drivers.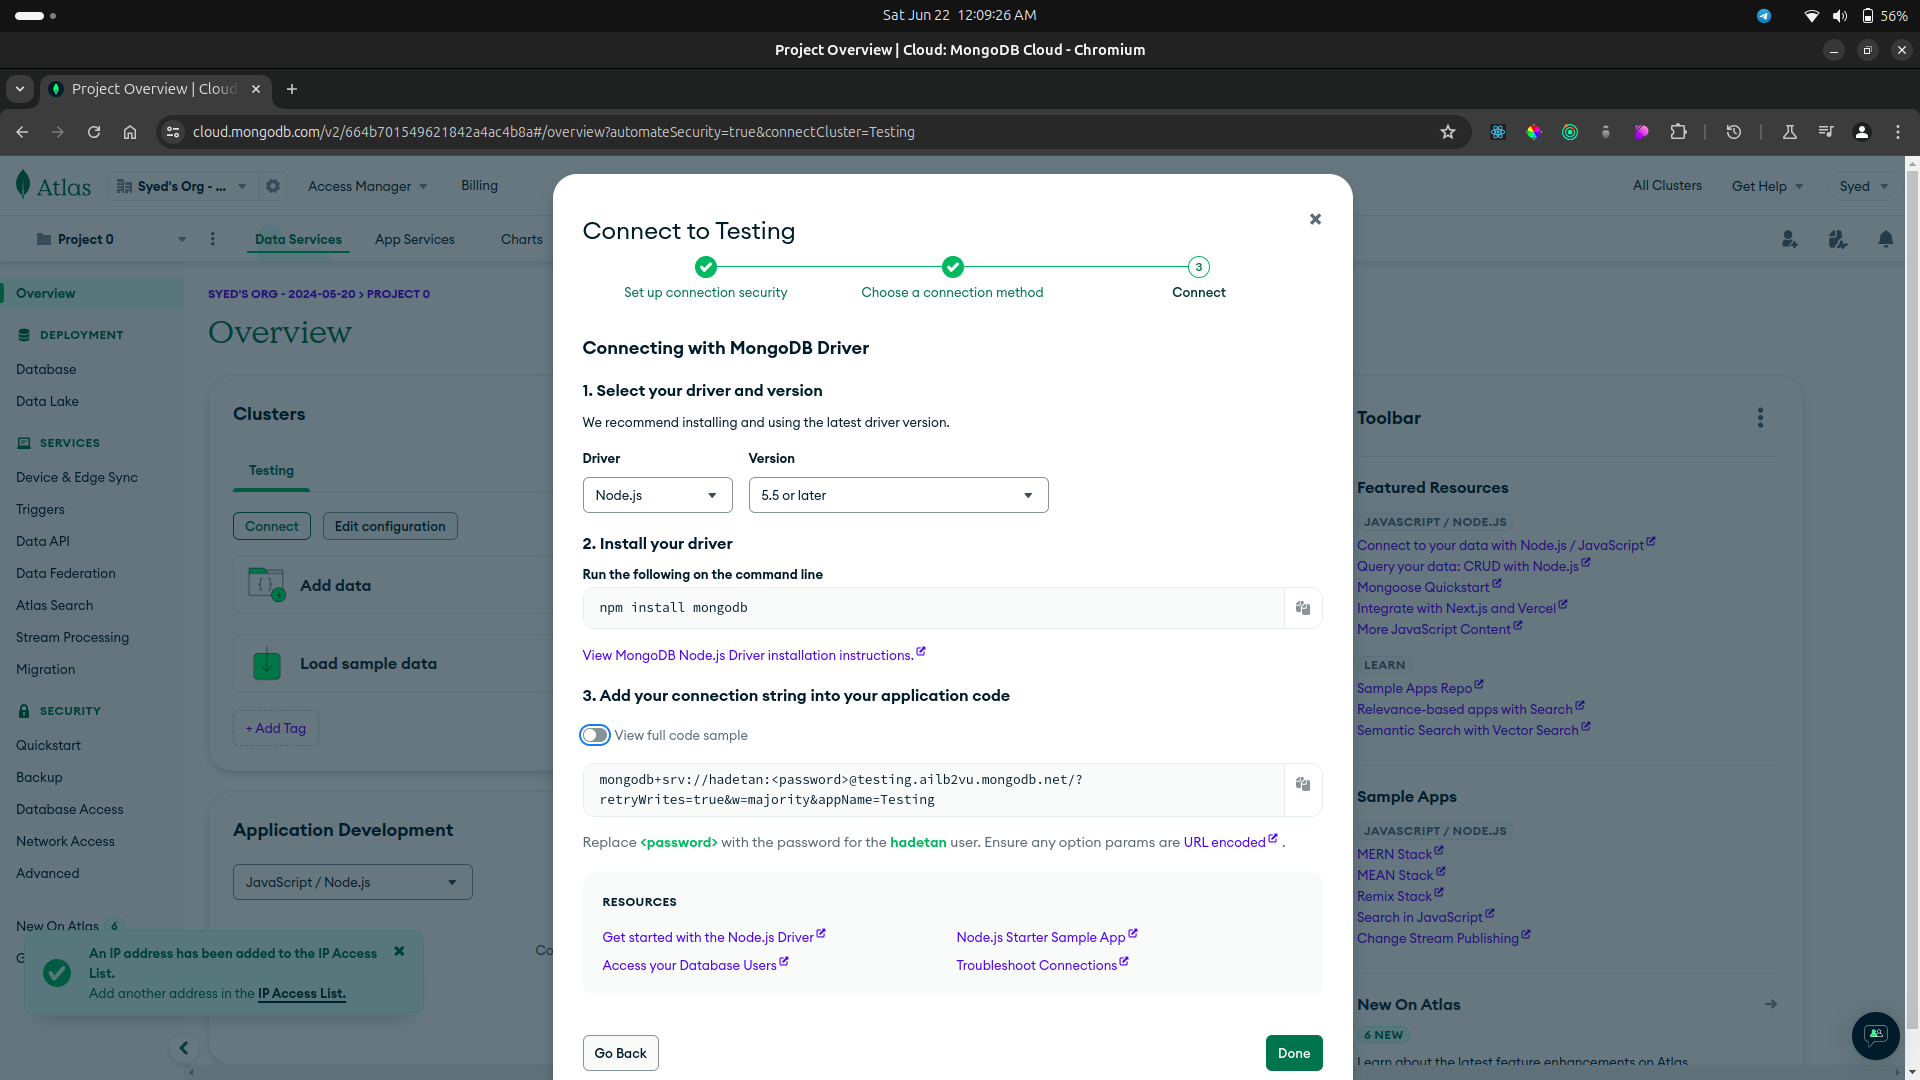
On the step 1, in
Driversection choose the platform you are using, for me itsNodeJS, once you have configured that follow the step 2, copy the command and paste it in your bash where you are creating your project. On step 3, there's a long string given to you, copy it and save it somewhere temporarily for now.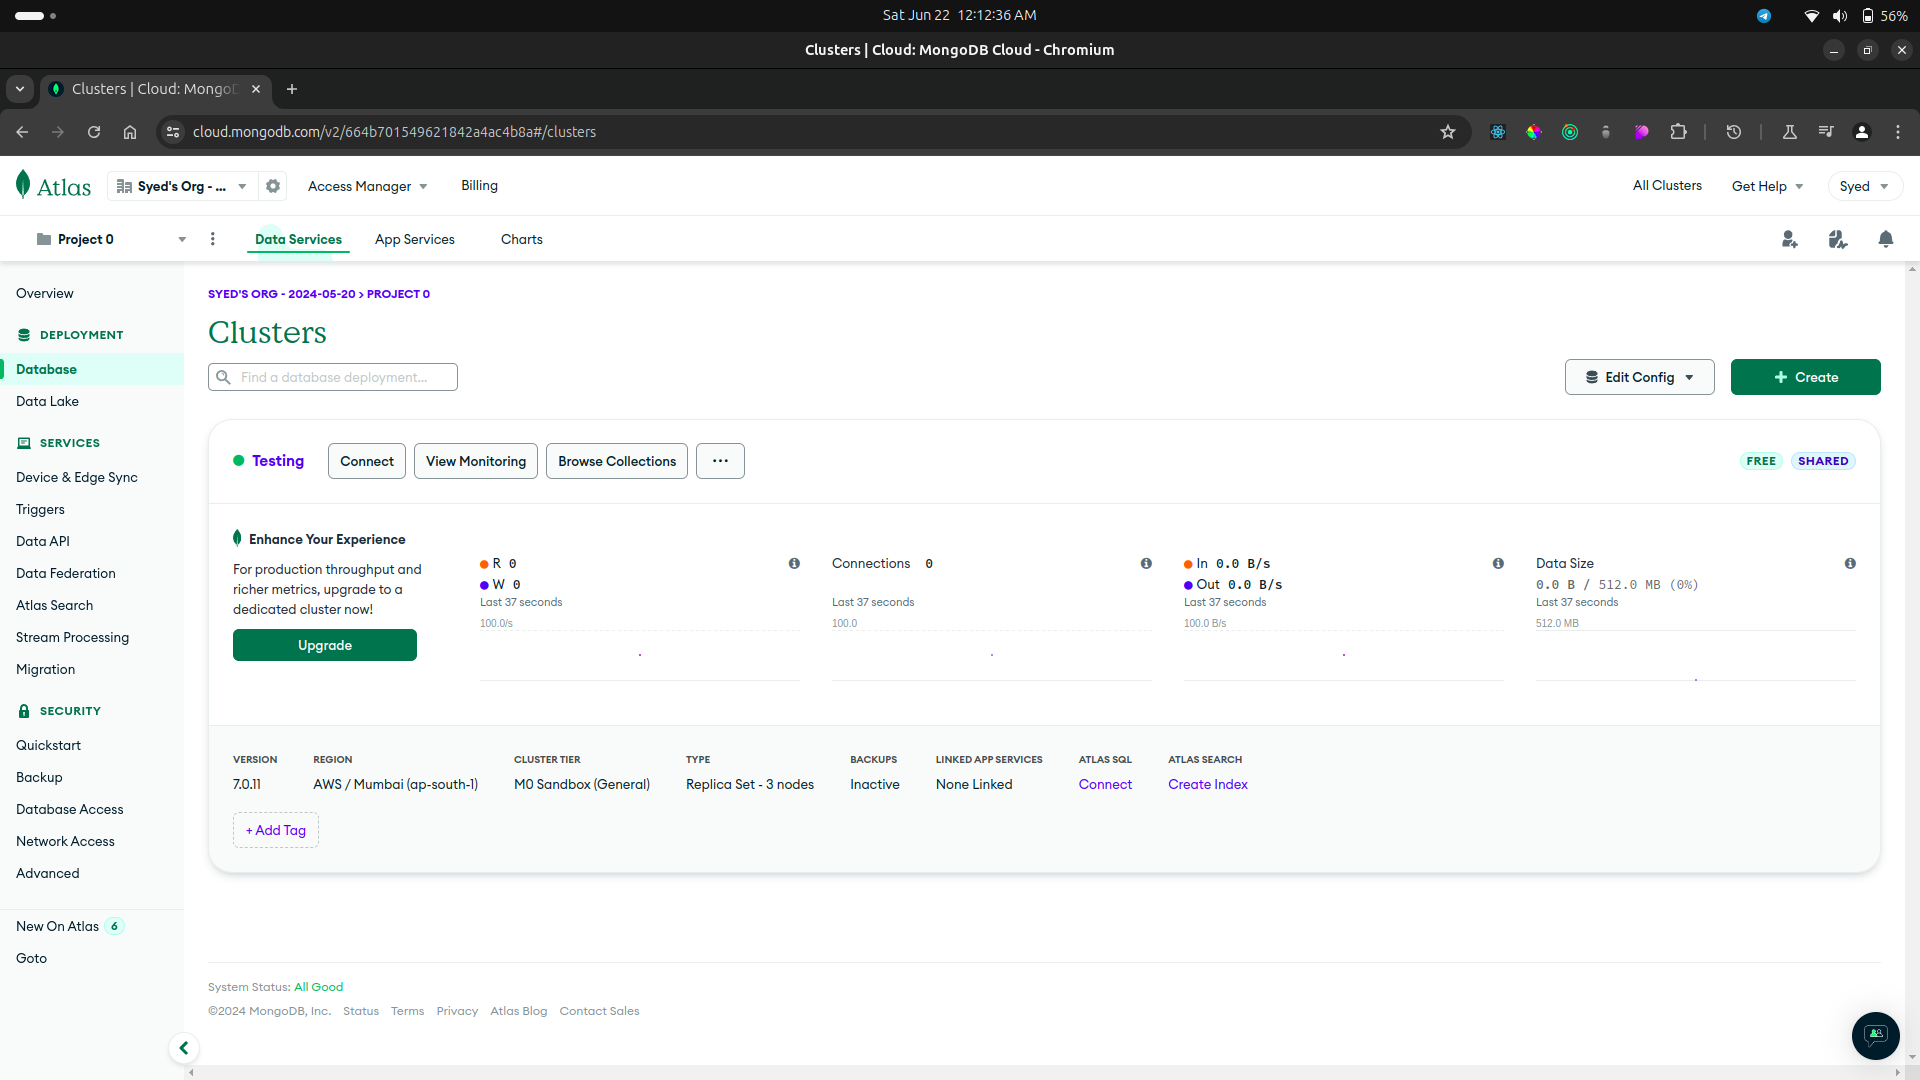
Now you have successfully created a database on Atlas's server.
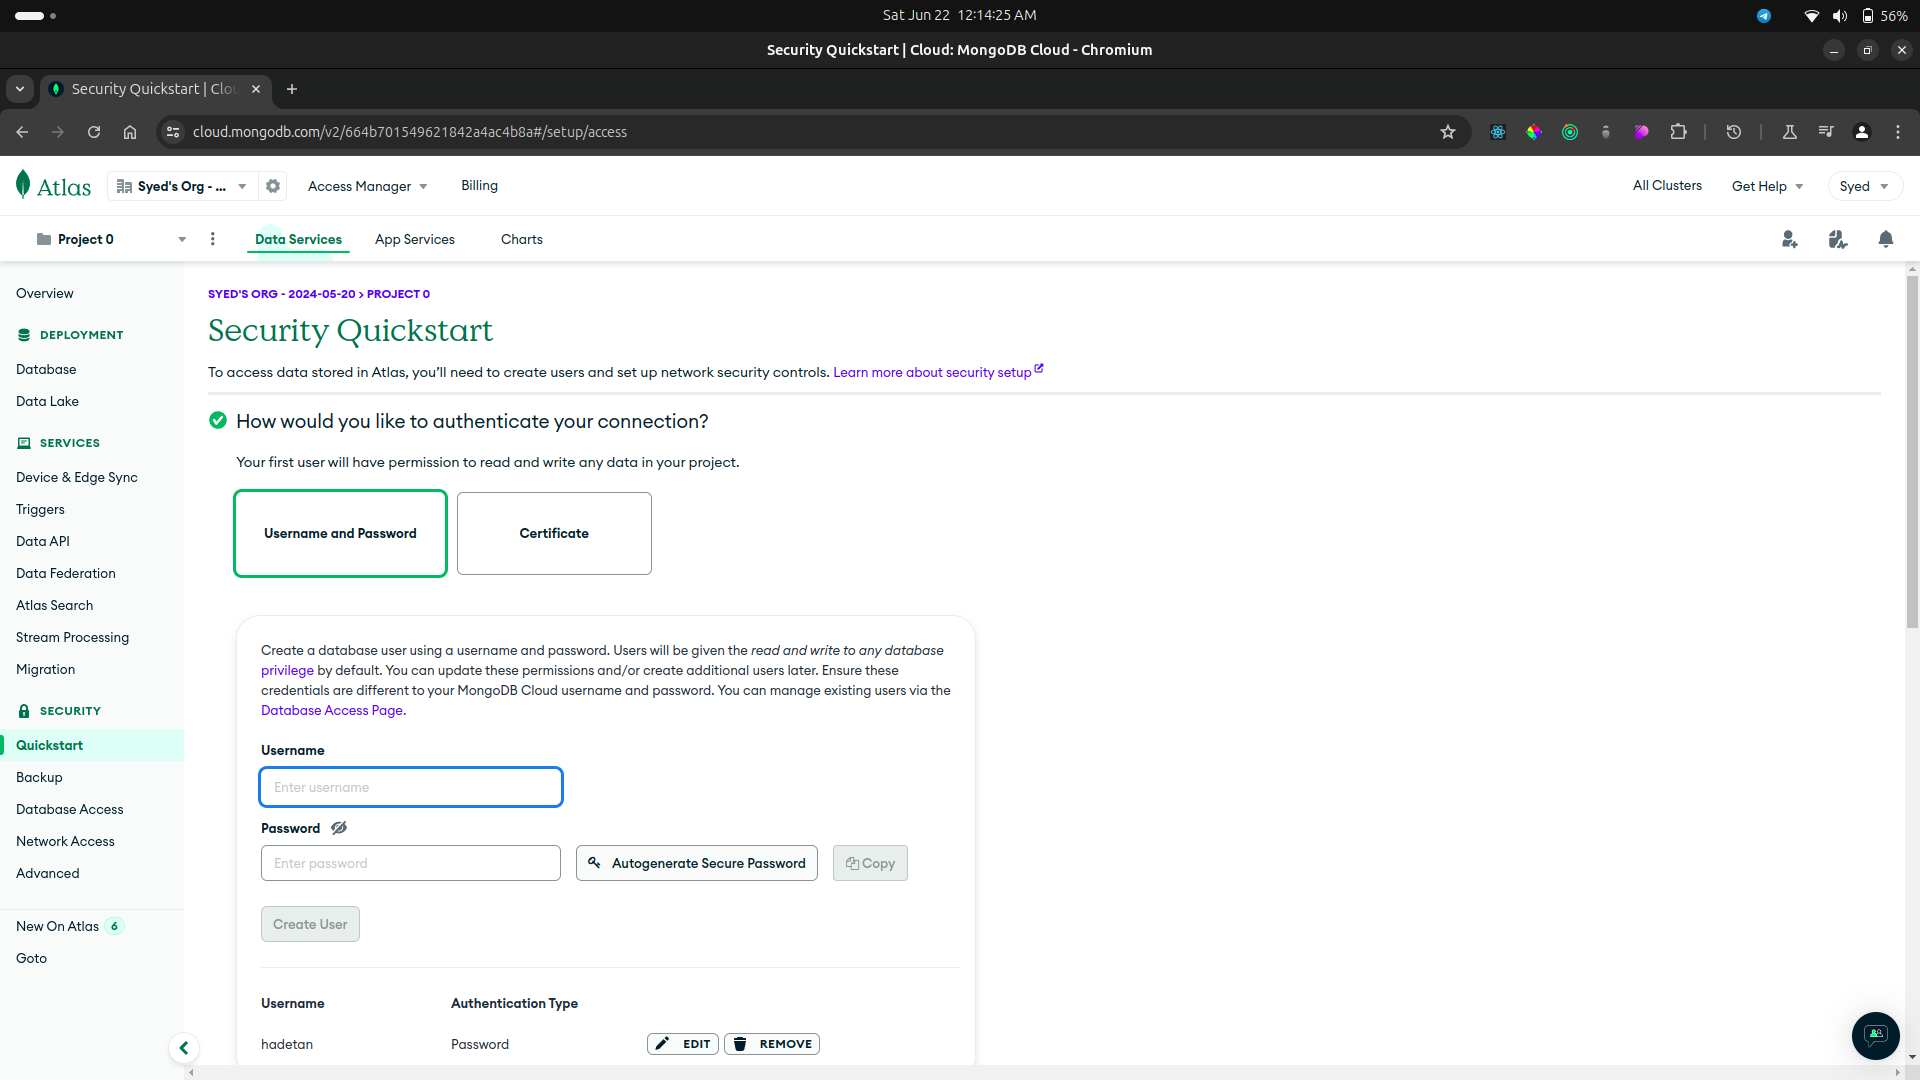
Locate to
Quickstartmenu from sidebar on left, here set a username and password for your server, remember the username and password because next step will require it for connection.
Mongoose
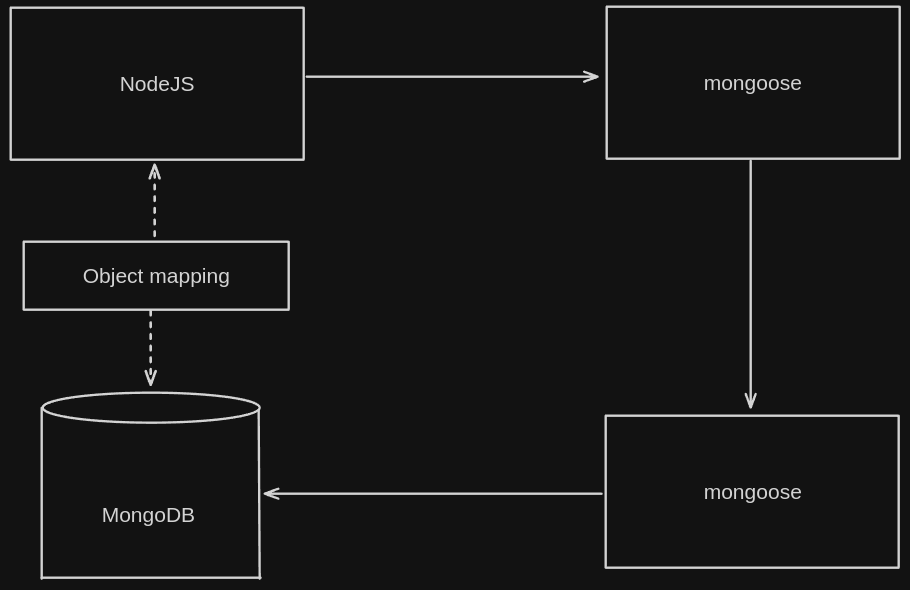
Mongoose is an object modeling tool for MongoDB and NodeJS. What this means in practical terms is that you can define your data model in just one place, in your code. It allows defining schema's for our data to fit into, while also abstracting the access to MongoDB. This way we can ensure all saved documents share a structure and contain required properties.
Important Terms
Fields
Fields or attribute are similar to columns in a SQL table.
Schema
While Mongo is schema-less, SQL defines a schema via the table definition. A Mongoose
schemais a document data structure (or shape of the document) that is enforced via the application layer.Models
Models are higher-order constructors that take a schema and create an instance of a document equivalent to records in a relational database.
Getting started with mongoose
npm i mongoose
Mini-project - User Authentication
Connecting NodeJS with MongoDB database using mongoose:
Open your project and create a file directly dbConnect.js (name can be anything you desire).
const mongoose = require('mongoose');
const dotenv = require('dotenv');
const { ServerApiVersion } = require('mongodb');

dotenv.config({
    path: './.env',
});

module.exports = () => {
    (async () => {
        try {
            // Connecting with database.
            await mongoose.connect(process.env.MONGO_URI, {
                serverApi: {
                    version: ServerApiVersion.v1,
                    strict: true,
                    deprecationErrors: true,
                },
            });
            console.log('Connected to DB');
        } catch (error) {
            console.error('ERROR:', error);
            throw error;
        }
    })();
};
This is a basic template for connecting your database to your project. On the example you can notice process.env.MONGO_URI, my URI is coming from my environment, and you should follow the same procedure since you do not want to publicly share your server's url.
Remember you had given a long string which you saved for connection, that is the string I have saved in my environment for connection. mongodb+srv://<username>:<password>@testing.ailb2vu.mongodb.net/?retryWrites=true&w=majority&appName=Testing fill your username in place of <username> and your password in place of <password> remove the <> while filling it up.
Now your database has been successfully connected inside your project.
Creating Models
Each collection must have a corresponding model associated with it. For example, if we are storing users in our database, we must create a user model so that mongoose knows what fields each user has.
Create a new folder called models. In this folder, make a file called
User.js. This model will contain all the fields needed to create a user.Creating a new model is easy with
mongoose.js:
const mongoose = require('mongoose');

// Creating new schema in our database
const userSchema = mongoose.Schema(
    {
        email: {
            type: String,
            required: true,
            trim: true,
            lowercase: true,
        },
        password: {
            type: String,
            required: true,
            trim: true,
            minlength: 6,
        },
    },
    { timestamps: true }
);

module.exports = mongoose.model('user', userSchema);
Creating controllers
Each functions will have its own controller, for user authentication we will create a folder named as
controllersand inside it we will create a fileauth.controllers.js(.controlleris not an extension or anything else, it is simply just a name, you can skip it if its creating confusion). Insideauth.controllers.jswe will do all of the validations. Let us create a user signup and login controller:
const User = require('../models/user');

// For our signup
const signupController = async (req, res) => {
    // Catching values coming from API testing application.
    const email = req.body.email;
    const password = req.body.password;

    // If there are no email or password been given then send a response with this message.
    if (!email || !password) {
        return res.status(500).json({
            message: 'email and password are required',
        });
    }

    // Checking if the email user has given is already stored in our database.
    const existingUser = await user.findOne({ email });

    // If we found the email already been registered then send a response with this message.
    if (existingUser) {
        return res.status(409).json({
            message: 'user already exists',
        })
    }

    // If user is new and has given email and password then creating it in database.
    const newUser = new User({
        email,
        password,
    });

    // Saving the data to database.
    await newUser.save();

    // If it was a success then send a response with this message and user's email.
    res.status(201).json({
        message: 'user created',
        email: newUser.email,
    });
};

const loginController = async (req, res) => {
    const email = req.body.email;
    const password = req.body.password;

    if (!email || !password) {
        return res.status(500).json({
            message: 'email and password are required',
        });
    }

    // Finding the user from our database with the findone() function while passing email and password given by user.
    const user = await User.findOne({ email, password });

    // If no user was found then response with this message.
    if (!user) {
        return res.status(404).json({
            message: 'user not found',
        });
    }

    // If everything went well then send a response with this message and user's email.
    res.status(200).json({
        message: 'user logged in',
        email: user.email,
    });
};

module.exports = {
    signupController,
    loginController,
};
Now that creation of models and controllers have been done let's create our routes for our authentication API:
// index.js
const dotenv = require('dotenv');
const express = require('express');
const v1 = require('./routes/v1/');
const dbConnect = require('./dbConnect');

dotenv.config({
    path: './.env',
});

const app = express();

app.use(express.json());

app.use('/v1', v1);

const PORT = process.env.PORT;

dbConnect();

app.listen(PORT, () => {
    console.log(`listening on port: ${PORT}`);
});
// routes/v1/index.js
const router = require('express').Router();
const authRouter = require('./auth');

router.use('/auth', authRouter);

module.exports = router;
// routes/v1/auth.js
const { signupController, loginController } = require('../../controllers/auth.controller');

const router = require('express').Router();

router.post('/login', loginController)
router.post('/signup', signupController)

module.exports = router;
And with that our basic signup and login API creation is done!
Querying the database
- find()
.find() is a method that you can call from an exported model, like User.
- findOne()
.findOne() is a method that you can use to get only one result related to the query.
There are many more methods that are useful while querying our database, little by little in mini projects we will be seeing them in action.
Comparison Operators always starts with$
$eqMatches values that are equal to a specified value.$gtMatches values that are greater than a specified value.$gteMatches values that are greater than or equal to a specified value.$inMatches any of the values specified in an array.$ltMatches values that are less than a specified value.$lteMatches all values that are less than or equal to a specified value.$neMatches all values that are not equal to a specified value.$ninMatches none of the values specified in an array.
Understanding how to configure the connection with MongoDB and how we can create our own schema and creating validations in our controllers is essential, since they play the core functionalities inside of our app.
Subscribe to my newsletter
Read articles from Syed Aquib Ali directly inside your inbox. Subscribe to the newsletter, and don't miss out.
Written by

Syed Aquib Ali
Syed Aquib Ali
I am a MERN stack developer who has learnt everything yet trying to polish his skills 🥂, I love backend more than frontend.