How to Deploy a React App on Docker with Jenkins and Docker Compose
 Wai Yan Soe
1. Introduction
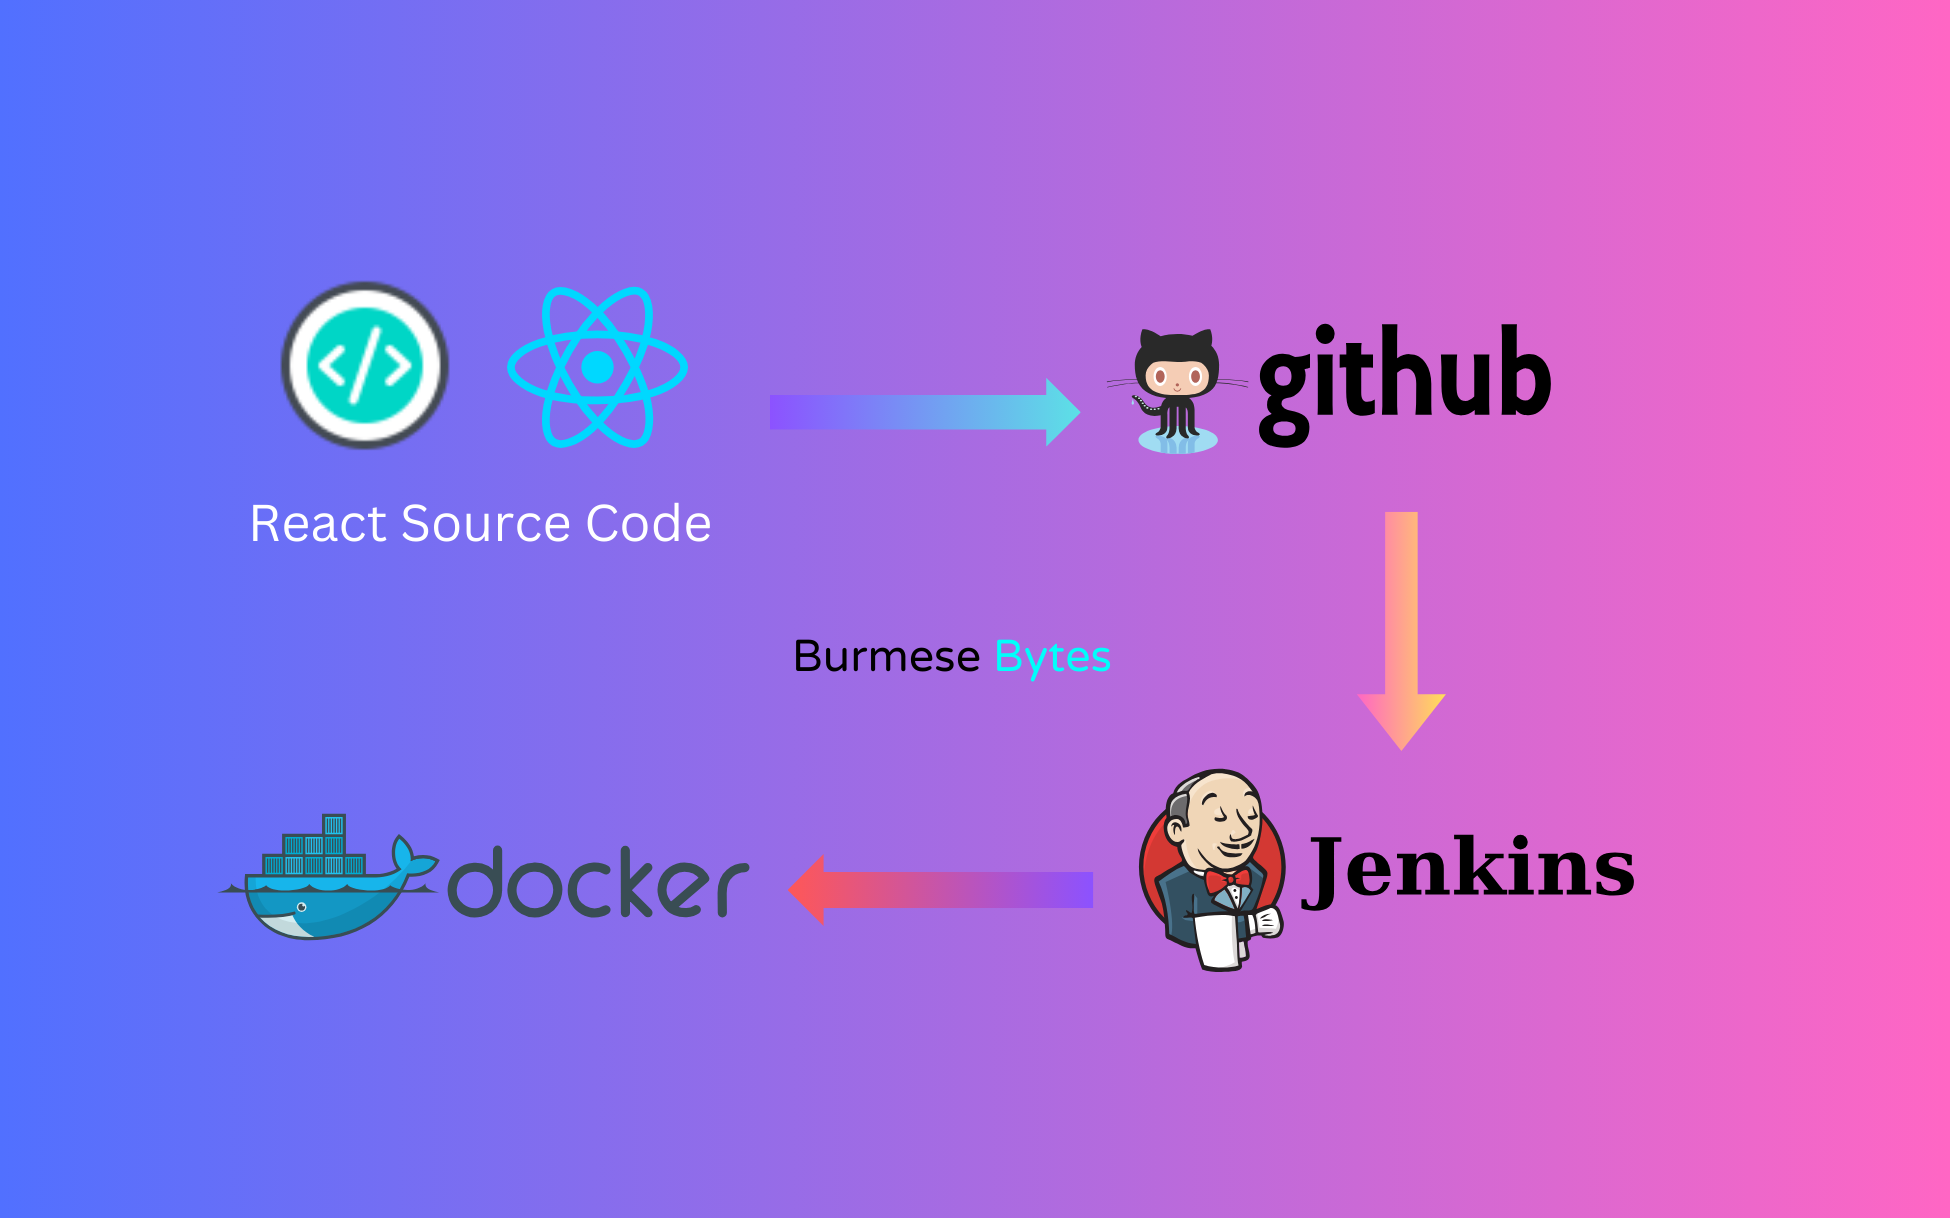
ဒီတစ်ခေါက်မှာတော့ React sample application တစ်ခုကို Jenkins pipeline နဲ့ Docker compose ကိုသုံးပြီး Deploy လုပ်ပြသွားမှာပါ။
2. Prerequisites
Jenkins installation
Jenkins installation လုပ်ထားဖို့လိုပါမယ်။ Jenkins နဲ့သိပ်မရင်းနီးသေးရင်တော့ Jenkins Jenkins master and agent installation and configuration ကိုအရင်စမ်းကြည့်ဖို့အကြံပြုပါရစေ။
Jenkins master and agent installation and configuration: Part 01
https://burmesebytes.hashnode.dev/install-and-configure-jenkins-master-and-jenkins-agent-via-ssh-part-01Jenkins master and agent installation and configuration: Part 02
https://burmesebytes.hashnode.dev/install-and-configure-jenkins-master-and-jenkins-agent-via-ssh-part-02Docker and Docker-Compose Installation:
Jenkins Agent မှာ Docker and Docker compose ကို install လုပ်ထားဖို့လိုပါမယ်။Create a react sample app (use npm)
ပြီးရင်တော့ react sample app တစ်ခု create လုပ်ရပါမယ်။
Create a GitHub repo for source code (SCM)
application ရပြီဆိုရင် source code တွေသိမ်းဖို့ GitHub repository တစ်ခု Create လုပ်ရပါမယ်။
3. Docker and Docker Compose installation
Jenkins master and agent ready ဖြစ်ပြီဆိုရင်တော့ Jenkins agent မှာ Docker Engine ကို စပြီး Install လုပ်ပါမယ်။
Docker apt source ကို add ပါမယ်။
# Add Docker's official GPG key:
sudo apt-get update
sudo apt-get install ca-certificates curl
sudo install -m 0755 -d /etc/apt/keyrings
sudo curl -fsSL https://download.docker.com/linux/ubuntu/gpg -o /etc/apt/keyrings/docker.asc
sudo chmod a+r /etc/apt/keyrings/docker.asc
echo \
  "deb [arch=$(dpkg --print-architecture) signed-by=/etc/apt/keyrings/docker.asc] https://download.docker.com/linux/ubuntu \
  $(. /etc/os-release && echo "$VERSION_CODENAME") stable" | \
  sudo tee /etc/apt/sources.list.d/docker.list > /dev/null
sudo apt-get update
apt source အတွက် လိုအပ်တာပြင်ပြီး add ပြီးသွားပြီဆိုရင်တော့ Docker ကို Install စလုပ်လို့ရပါပြီ။ အောက် က Command လေးအတိုင်း လိုအပ်တဲ့ Docker Components တွေ အကုန် Install လုပ်လိုက်ပါမယ်။
Install the Docker packages.
sudo apt-get install docker-ce docker-ce-cli containerd.io docker-buildx-plugin docker-compose-plugin
Add your user to docker group
agent run မယ့် user ကို Docker Group ထဲကို ထည့်ပါမယ်။ ပြီးရင်တော့ user ကို logout/ login ပြန်လုပ်လိုက်ပါ Group update လုပ်ထားတာကို အဆင်ပြေသွားအောင်လို့ပါ။
အကယ်၍ user ကို logout/login လုပ်တာတောင် Docker run ဖို့ permission မရတဲ့ error ပြနေခဲ့ရင် agent host ကို start ချပြီးပြန်စမ်းကြည့်ပါ။
ဒါကတော့ Docker Group ထဲကို agent user add တဲ့ Command ပါ။ ကျွန်တော်ကတော့ jenkins ဆိုတဲ့ user သုံးထားပါတယ်။
sudo usermod -aG docker <your-user-name>
Check the docker info
ပြီးရင်တော့ Docker install လုပ်တာ အောင်မြင်ရဲ့လား docker info command နဲ့ကြည့်ကြည့်နိုင်ပါတယ်။
docker info
Learn More about docker installation: https://docs.docker.com/engine/install/ubuntu/
4. Creating a react sample app (use npm)
Docker လည်း ရပြီဆိုတော့ react application ကို လက်ရှိသုံးနေတဲ့ laptop ထဲမှာပဲ Create လုပ်ပါမယ်။ Developer's laptop လို့ ယူစလိုက်ပါ။ အရင်ဆုံး react app တစ်ခု Create မလုပ်ခင် npm နဲ့ node js install လုပ်ထားဖို့ လိုပါမယ်။
Prerequisite for creating React app
- npm and node js >= version 14
ဒီမှာကတော့ကျွန်တော် က WSL သုံးထားတာမလို့ အောက်က step တွေအတိုင်း Node JS 14 ကို install လုပ်လိုက်ပါမယ်။ WSL - (Ubuntu 22.04.2 LTS — Jammy Jellyfish).
curl -o- https://raw.githubusercontent.com/nvm-sh/nvm/v0.38.0/install.sh | bash
export NVM_DIR="$HOME/.nvm"
[ -s "$NVM_DIR/nvm.sh" ] && \. "$NVM_DIR/nvm.sh"  # This loads nvm
[ -s "$NVM_DIR/bash_completion" ] && \. "$NVM_DIR/bash_completion"
command -v nvm
nvm install 14
nvm alias default 14
တခြား OS တွေကြောင့် အဆင်မပြေတာရှိရင် ဒီမှာ ကြည့်ပြီး install လုပ်နိုင်ပါတယ်။
Learn more about node js and npm installation
Install လုပ်ပြီးသွားရင်တော့ npm နဲ့ node js version တွေကို ဒီတိုင်းစစ်ကြည့်နိုင်ပါတယ်။
node -v
npm -v
npm version
installation step တွေပြီးသွားရင်တော့ react sample app လေးတစ်ခု စပြီး Create လုပ်ပါမယ်။
Check for more > https://create-react-app.dev/docs/getting-started
npm init react-app react-jenkins-docker
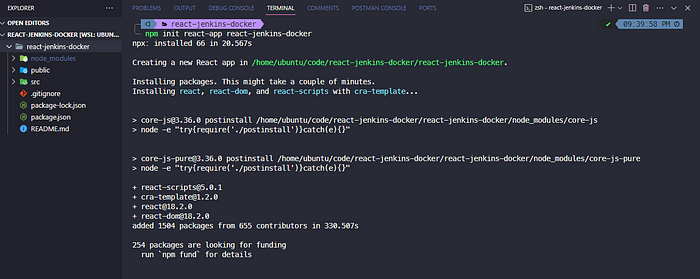
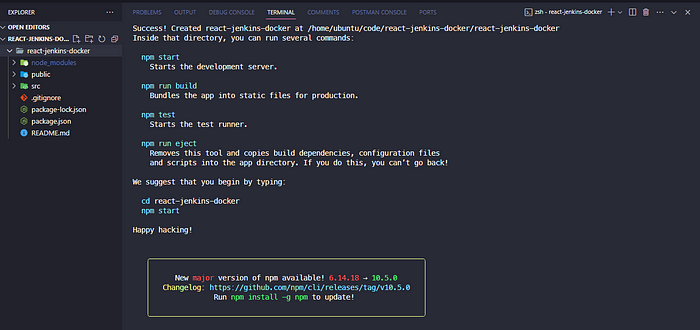
Create လုပ်ပြီးသွားရင်တော့ React Application folder ထဲကို ဝင်လိုက်ကြည့်လိုက်ပါ။Application Source Code တွေရောက်နေတာကိုတွေ့ရပါလိမ့်မယ်။
ပြီးရင်တော့ npm install နဲ့ application အတွက် လိုအပ်တဲ့ node packages တွေသွင်းပါမယ်။
ပြီးသွားရင်တော့ npm start ကြည်လိုက်ပါ။
cd react-jenkins-docker
npm install
npm start

npm start လိုက်ပြီဆိုတာနဲ့ Default port number 3000 မှာ react app လေးက run နေပါလိမ့်မယ် browser ကနေ localhost:3000 နဲ့ခေါ်ကြည့်နိုင်ပါတယ်။
For example: http://localhost:3000/

Learn more other react Example Projects:
https://legacy.reactjs.org/community/examples.html
5. Creating a GitHub repo for source code (SCM)
Application ရပြီဆိုရင်တော့ Application Source Code တွေသိမ်းဖို့ GitHub repository တစ်ခု Create လုပ်ပါမယ်။ GitHub အကောင့်ရှိထားဖို့လိုပါမယ်။
Prerequisites for creating a GitHub repo:
GitHub Account
Basic understanding of Git and GitHub
git နဲ့သိပ် familiar သိပ်မဖြစ်သေးဘူးဆိုရင်တော့ git နဲ့ပတ်သက်ပြီးဒီမှာသွားကြည့်နိုင်ပါတယ်။
https://www.w3schools.com/git/git_intro.asp?remote=github
Repo အသစ်တစ်ခု Create လုပ်ဖို့ New repository ကို နှိပ်လိုက်ပါ။
Create a git repo > Go to your github account

ပြီးရင် Repo Name ပေးလိုက်ပါ။ Private repo ပဲ ထားပါမယ်။
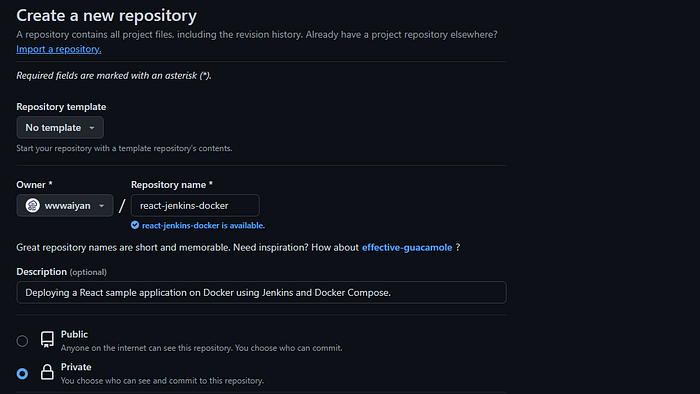
ပြီးရင်တော့ React app create လုပ်ခဲ့တဲ့ project directory ထဲပြန်သွားလိုက်ပါ။ ပြီးရင်တော့ အရင်ရှိပြီးသား .git ဆိုတဲ့ဖိုင်ကိုဖျက်လိုက်ပါမယ်။ repo အသစ်တစ်ခု အနေနဲ့ git init ကို run လိုက်ပါ။

rm -rf .git && git init
ပြီးရင်တော့ Laptop ထဲမှာ ရှိတဲ့ local repo နဲ့ GitHub ပေါ်မှာ ရှိတဲ့ remote repo တို့ကိုချိတ်ဆက်ပါမယ်။ ချိတ်ဆက်ဖို့အတွက် GitHub repo ကို laptop ကနေ access ရဖို့လိုပါမယ်။ Authorize ရှိဖို့လိုပါမယ် ကျွန်တော်ကတော့ဒီနေရာမှာ SSH ကိုပဲ သုံးပါမယ်။
ဒီမှာ ကြည့်လို့ရပါတယ်။
အရင်ဆုံး ssh-keygen နဲ့ Key pair တစ်ခု Create လုပ်ပါ။ ssh-keygen ဆိုပြီး generate လုပ်လို့ ရလာတဲ့ ~/.ssh/id_rsa.pub ဆိုတဲ့ public key ကို GitHub ဒီနေရာမှာ သွားထည့်လိုက်ရင်ရပါပြီ။
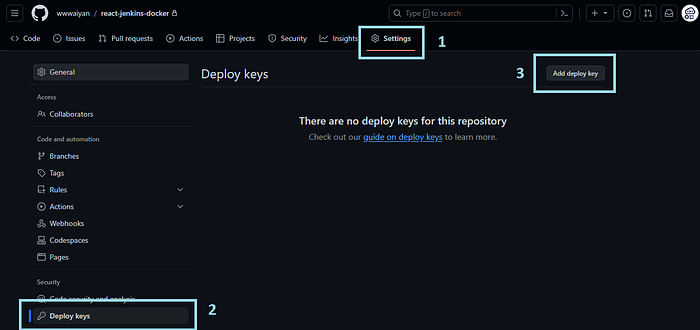
repo ဆီကို push လုပ်မှာ မလို့ အောက်က Allow write access ကို အမှတ်ခြစ်ပေးခဲ့ဖို့လိုပါမယ်။

စာအရမ်းရှည်သွားမှာစိုးလို့ ဒီအဆင့်ကိုအများကြီးမပြောတော့ပါဘူး။အဆင်မပြေတာရှိရင် Burmese Bytes ရဲ့ Communication channel တစ်ခုခုကနေ လာမေးလို့ရပါတယ်။ GitHub နဲ့ ချိတ်ပြီးသားသူတွေကတော့ https method ကို တန်းသုံးလည်းရပါတယ်။
အိုကေ remote SSH URL copy ယူလိုက်ပါမယ်။
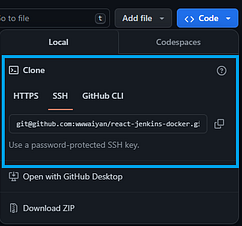
Local repo ထဲမှာ remote repo နဲ့ ချိတ်ဖို့ add လိုက်ပါမယ်။ Add ပြီးရင်တော့ git remote -v နဲ့ ပြန်ကြည့်လို့ရပါတယ်။
git remote add origin git@github.com:wwwaiyan/react-jenkins-docker.git
git remote -v

ပြီးရင်တော့ create လုပ်ခဲ့တဲ့ React application source code တွေကို remote repo ပေါ်ကို push လုပ်ဖို့ git staging ကိုပို့ပါမယ်ပြီးရင် commit လုပ်ပြီး တခါတည်း remote repo ဆီ တန်း push လိုက်ပါမယ်။
git add .
git commit -m "first commit"
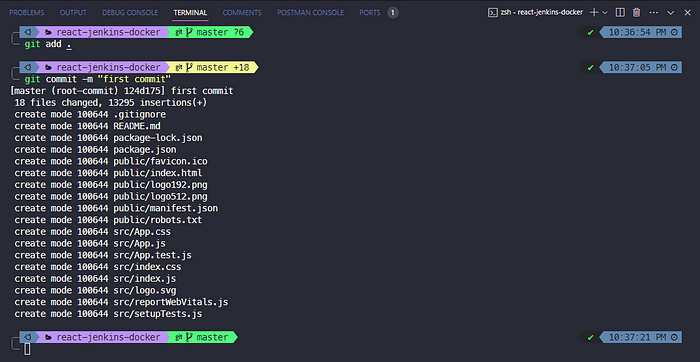
git push to GitHub remote repo
Note: Ensure you have write access to the GitHub repository.
git push origin master

Push လုပ်ပြီးသွားပြီဆိုရင်တော့ GitHub remote repo ထဲမှာ Source Code တွေကို သွားစစ်ကြည့်နိုင်ပါတယ်။
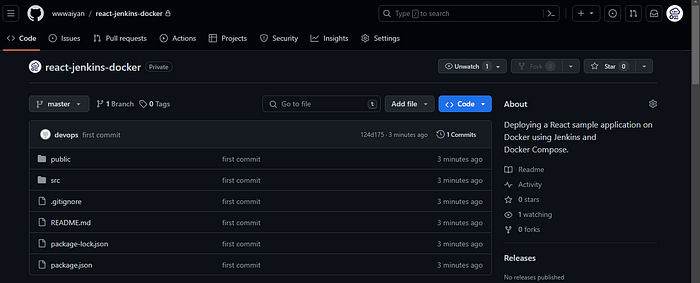
6. Creating a New Jenkins Pipeline
Application လည်းရပြီး Source Code တွေ GitHub remote repo ပေါ်လည်းရပြီဆိုရင် Jenkins pipeline ကိုစပြီး Create လုပ်ကြရအောင်။ Jenkins ကနေ GitHub repo ဆီက Code တွေကို လှမ်းယူမှာမလို့ repo ကိုတော့ Jenkins ကနေ Access ရဖို့ ထပ်လိုပါမယ်။
Prerequisites for creating a Jenkins pipeline:
- GitHub repo access (SCM) from Jenkins
6.1 Generate SSH key pair for GitHub repo access form Jenkins
ဒီမှာလည်း SSH method ကိုသုံးပါမယ်။ SSH Keypair တစ်ခု Generate လုပ်ပါမယ်။
ssh-keygen -C github-repo-ssh -f github-repo-ssh

6.2 Copy the public key to GitHub Repo
Generate လုပ်ပြီးရင်တော့ Public Key ကို GitHub Repo မှာ သွားထည့်ရပါမယ်။
GitHub repo Settings ထဲက Deploy Keys မှာထည့်လိုက်ပါ။
Go to GitHub Repo Settings > Deploy keys > add deploy key

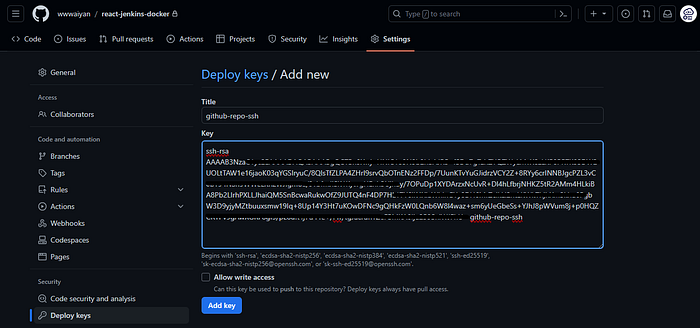
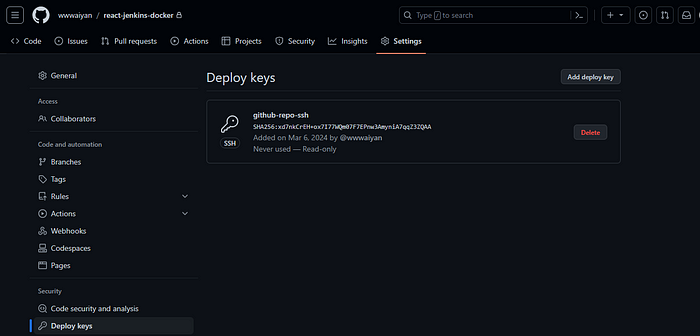
6.3 Copy Private Key to Jenkins Credential
Private Key ကိုတော့ Jenkins Credential အနေနဲ့ Create လုပ်ပါမယ်။ Security အောက်က Credentials ထဲကိုသွားလိုက်ပါ။
Go to Jenkins Console > Manage Jenkins > Go to Security tab > Credentials

Global ထဲမှာပဲ Create လုပ်ပါမယ်။ ပြီးရင်တော့ Add Credentials
Click on global Domain > Add Credential

SSH Private ကိုသုံးမှာဖြစ်လို့
Credentials kind ကို SSH Username with private key လို့ရွေးပေးလိုက်ပါ။
Credentials kind > Select SSH Username with private key
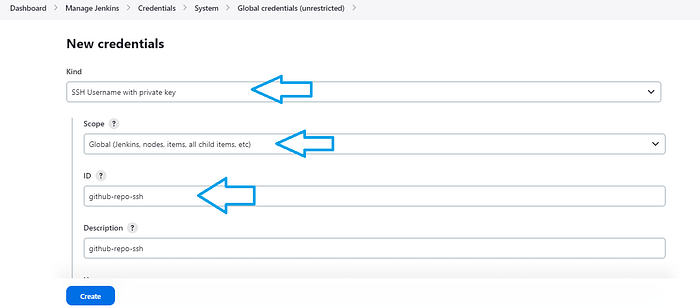
Credential ID ထည့်လိုက်ရင်ရပါပြီ username ကို ဒီမှာ blank ထားခဲ့လို့ရပါတယ်။
ပြီးရင်တော့ အခုဏ generate လုပ်ခဲ့တဲ့ SSH Private key ကို paste လုပ်ပြီးရင် Save လိုက်ပါ ။
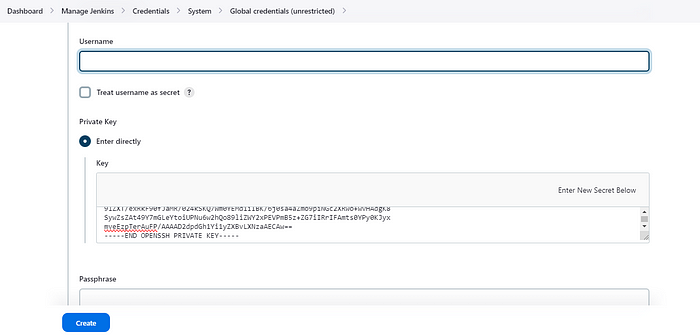
အခုဆိုရင် SSH Credential နှစ်ခုတွေပါလိမ့်မယ်ပထမ တစ်ခုကတော့ agent အတွက်လုပ်ထားတဲ့ တစ်ခုပါ။

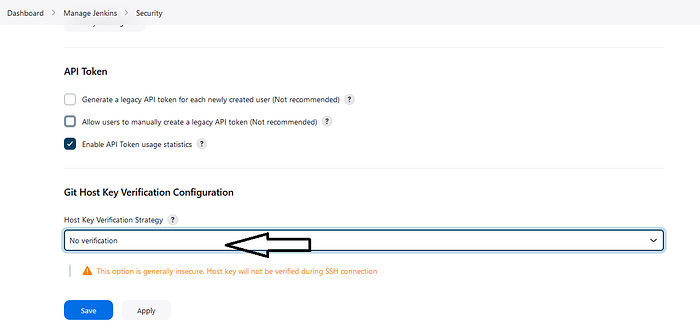
Pipeline Create မလုပ်ခင်မှာ GitHub repo ကို ssh နဲ့ access လုပ်မှာ မလို့ Git Host Key No Verification ကို No ထားလိုက်ပါမယ်။
notes: Git Host Key No Verification: not recommended for prod
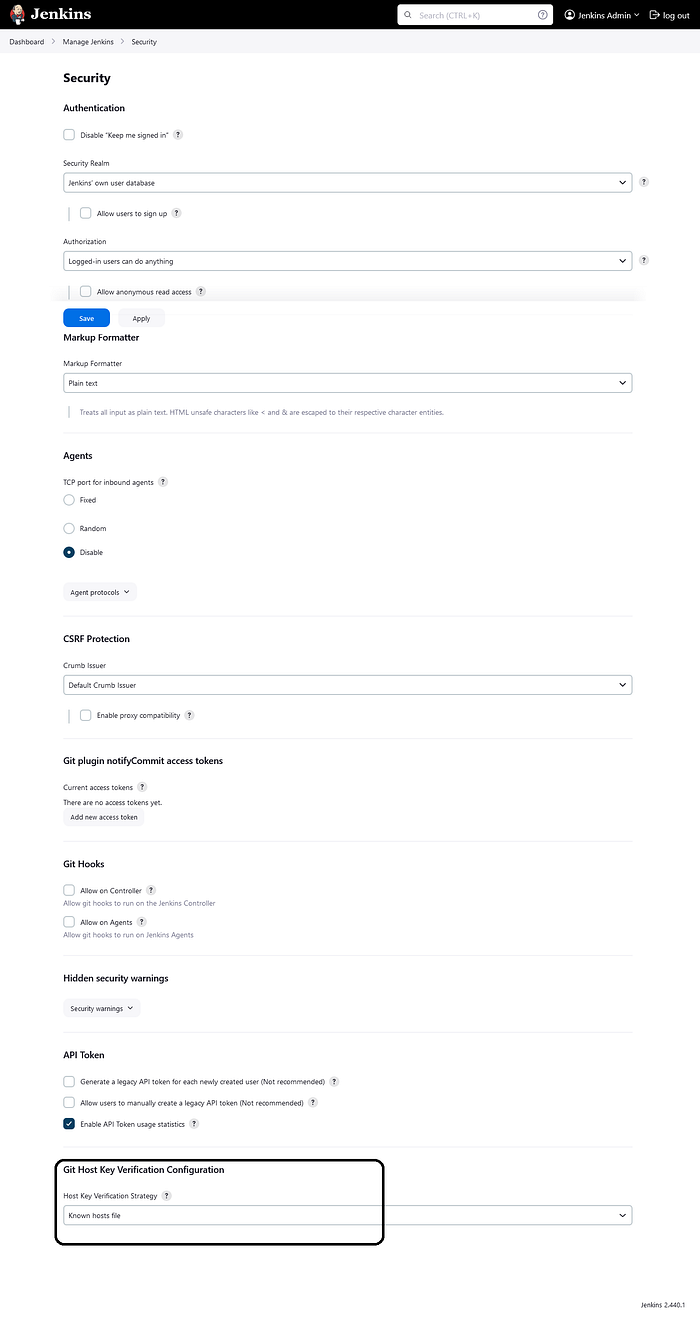
Manage Jenkins ထဲက Security အောက်က Security ထဲကို ဝင်လိုက်ပါ
Manage Jenkins > Go to Security Tab > Security

အောက်ဆုံးမှာ Git Host Key Verification Configurations ဆိုပြီး တွေ့ရပါလိမ့်မယ်။
No Verification လို့ထားလိုက်ပါ။
6.4 Creating Jenkins Pipeline
အခုဆိုရင်တော့ အားလုံး ready ဖြစ်ပြီမလို့ Jenkins pipeline ကို စပြီး Create လုပ်လို့ရပါပြီ
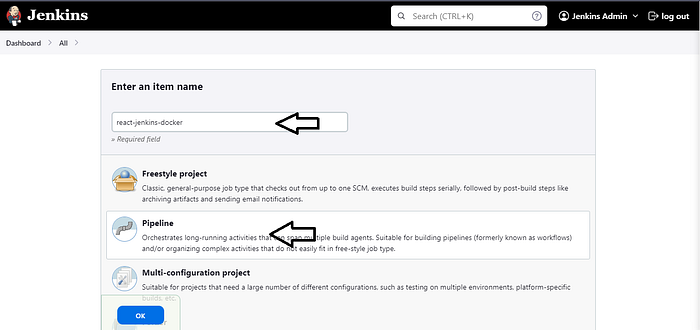
Jenkins Dashboard မှာပဲ New Item or Create a job ကို နှိပ်လိုက်ပါ။
New Item

Pipeline Job name တစ်ခုပေးလိုက်ပါ။ ပြီးရင် Pipeline ကို ရွေးပြီး ဆက်သွားလိုက်ပါ။
Sample Pipeline လေးနဲ့ပဲ Create လုပ်ပါမယ်။
Pipeline > Select on Pipeline > Click on OK
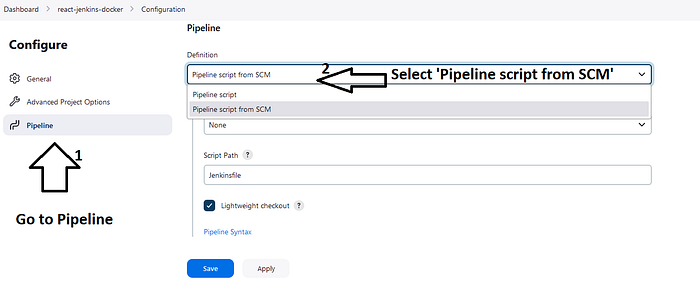
အထဲရောက်ပြီးဆိုရင် တခြား Configuration ကို ခဏ မေ့ထားပြီး ဘယ်ဘက်ခြမ်းက Pipeline ဆိုတဲ့နေရာကို တန်းသွားလိုက်ပါ။ ပြီးရင်တော့ Definition မှာ Pipeline script form SCM ကိုရွေးပါမယ်။
Go to Pipeline > Pipeline script form SCM
GitHub repo ကို Jenkins ကနေ access လုပ်တော့မှာ မလို့ GitHub repo SSH URL ကို Copy သွားယူလိုက်ပါ။
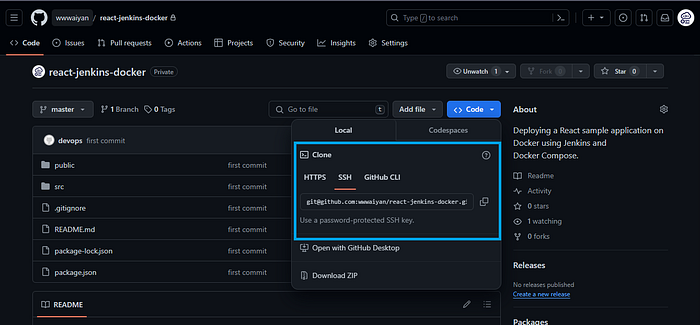
ပြီးရင်တော့
SCM ဆိုတဲ့နေရာမှာ Git ကိုရွေးပါ။
Repository URL နေရာမှာ copy ယူလာခဲ့တဲ့ GitHub repo SSH URL ကို ထည့်ပါ။
Credentials နေရာမှာကတော့ GitHub access အတွက် create လုပ်ခဲ့တဲ့ Credentials ကို select လုပ်ပေးလိုက်ရင်ရပါပြီ။

Git Branch ကိုတော့ master ပဲထားထား လိုက်ပါတယ်။
တခြား Config တွေ ပြင်ချင်တာရှိရင်ပြင်လိုက်ပါ ပြီးရင်တော့ Apply and Save
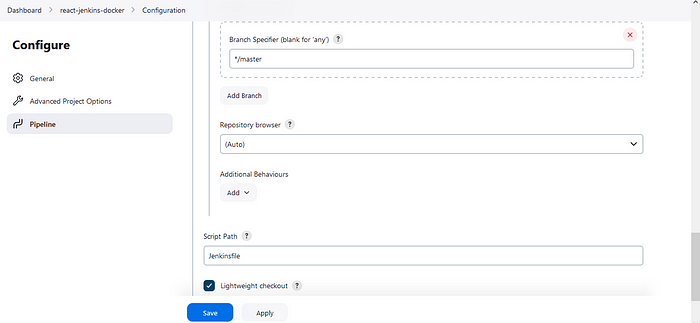
အခုဆိုရင်တော့ Pipeline စ run ဖို့အတွက် ready ပါပဲ။
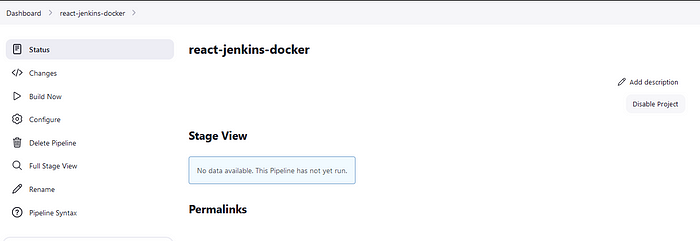
7. Creating Jenkinsfile and Docker compose
Pipeline စ run ဖို့အတွက် Jenkinsfile လိုပါမယ်။ Application ကို Docker Compose နဲ့ Run မှာမလို့ Dockerfile နဲ့ docker-compose.yml ဖိုင်တို့လည်းလိုအပ်ပါမယ်။
7.1 Creating Jenkinsfile
Jenkinsfile တစ်ခု အရင် create လုပ်ပါမယ်။
touch Jenkinsfile

Pipeline Syntax နဲ့လည်း Jenkins format တွေ generate ထုတ်နိင်ပါတယ်။
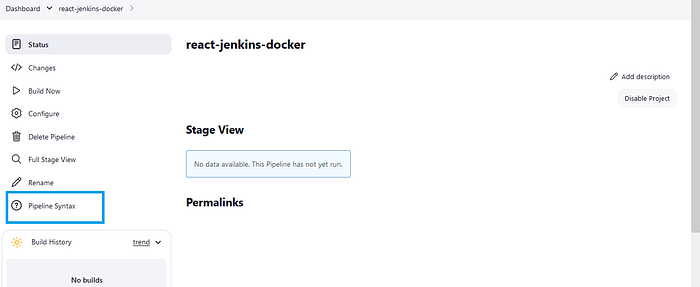
ဒီမှာ ဥပမာတစ်ခုအနေနဲ့ pipeline ကို ဘယ် agent မှာ run မလဲ ဆိုတာကို label အနေနဲ့ သတ်မှတ်ပြီး Jenkinsfile မှာထည့်ရေးဖို့အတွက် Syntax generate လုပ်ပြပါမယ်။
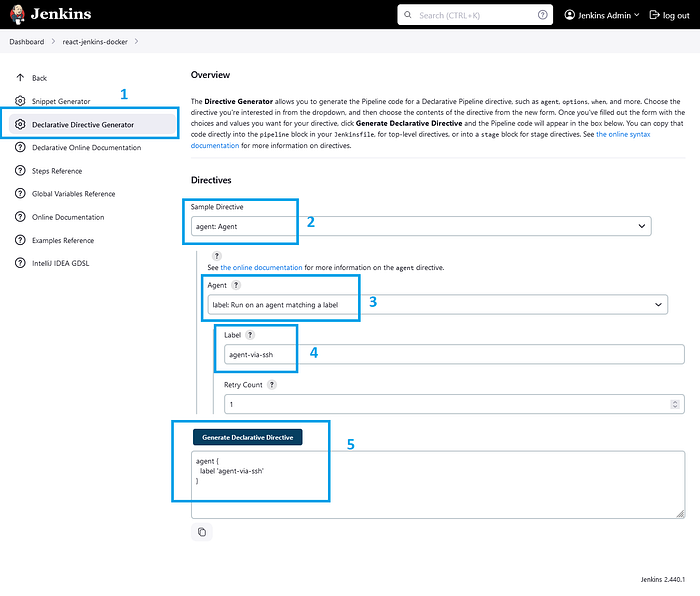
Jenkinsfile ထဲမှာ ဒီလိုမျိုး copy လုပ်ပြီးသုံးနိုင်ပါတယ်။
pipeline {
    agent {
        label 'agent-via-ssh'
    }
}

Learn more about Pipeline Syntax > https://www.jenkins.io/doc/book/pipeline/syntax/
အိုကေ အခုဆိုရင်တော့ကျွန်တော့်မှာ Jenkinsfile, Dockerfile နဲ့ docker-compose.yaml ဆိုပြီးသုံးဖိုင်ရှိပါမယ်။
ကျွန်တော် ကတော့ Pipeline ကို Jenkins agent ရဲ့ သီးသန့်နေရာမှာ သီးသန့် workspace တစ်ခုအနေနဲ့ run ချင်တာမလို့ Jenkins agent ထဲမှာ directory တစ်ခု သွားဆောက်လိုက်ပါမယ်။ဒါက optional ပါ မလုပ်လည်းရပါတယ်။
mkdir -p /home/jenkins/project/react-jenkins-docker/
ဒါကတော့ အရိုးရှင်းဆုံး Jenkins ဖိုင်ပါ workspace location ကို env အနေနဲ့ထည့်ထားပါတယ်။
Jenkinsfile
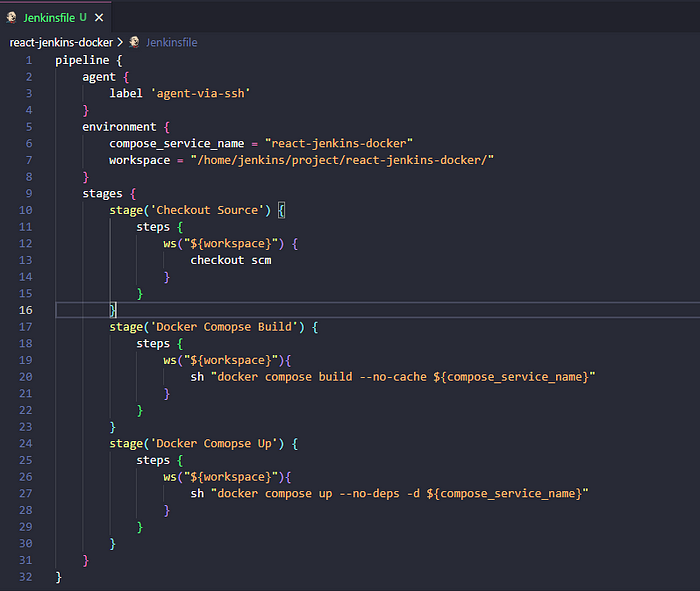
pipeline {
    agent {
        label 'agent-via-ssh'
    }
    environment {
        compose_service_name = "react-jenkins-docker"
        workspace = "/home/jenkins/project/react-jenkins-docker/"
    }
    stages {
        stage('Checkout Source') {
            steps {
                ws("${workspace}") {
                    checkout scm
                }
            }
        }
        stage('Docker Comopse Build') {
            steps {
                ws("${workspace}"){
                    sh "docker compose build --no-cache ${compose_service_name}"
                }
            }
        }
        stage('Docker Comopse Up') {
            steps {
                ws("${workspace}"){
                    sh "docker compose up --no-deps -d ${compose_service_name}"
                }
            }
        }
    }
}
ဒါကတော့ Application run ဖို့အတွက် Dockerfile နဲ့ docker-compose.yaml ဖိုင်ပါ။
Dockerfile and docker-compose.yaml
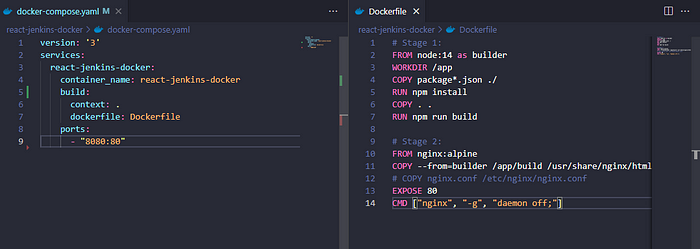
# Stage 1:
FROM node:14 as builder
WORKDIR /app
COPY package*.json ./
RUN npm install
COPY . .
RUN npm run build

# Stage 2:
FROM nginx:alpine
COPY --from=builder /app/build /usr/share/nginx/html
# COPY nginx.conf /etc/nginx/nginx.conf
EXPOSE 80
CMD ["nginx", "-g", "daemon off;"]
version: '3'
services:
  react-jenkins-docker:
    container_name: react-jenkins-docker
    build:
      context: .
      dockerfile: Dockerfile
    ports:
      - "8080:80"
Docker နဲ့ ပတ်သတ်တာများကိုလည်း နောက်ပိုင်းမှာဆက်ရေးသွားဖို့ရှိပါမယ်။
အခုဆိုရင်တော့ အသစ် create လုပ်လိုက်တဲ့ သုံးဖိုင်ကို GitHub remote repo ဆီကို push လုပ်ပါမယ်။
git commit -a -m "updated Jenkinsfile, Dockerfile and docker-compose.yaml"
git push origin master
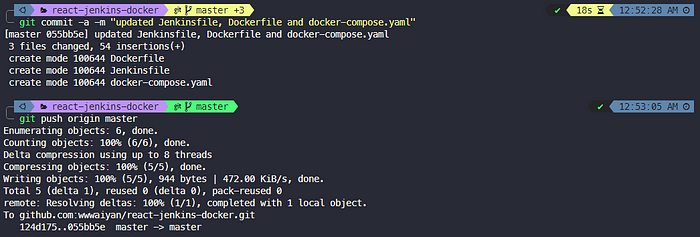
GitHub repo မှာ update တွေရောက်လာပါပြီ။
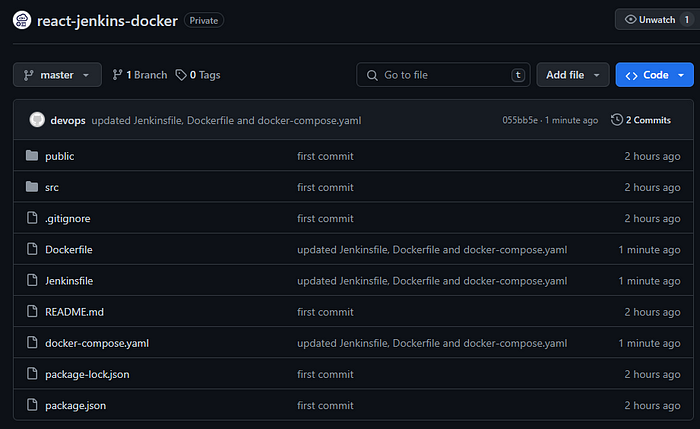
အိုကေ pipeline စဖို့ အတွက် Jenkins ကို ပြန်သွားပြီး create လုပ်ခဲ့တဲ့ Pipeline ထဲဝင်လိုက်ပါ။
ပြီးရင်တော့ဘယ်ဘက်ခြမ်းမှာရှိတဲ့ Build now ကို နှိပ်လိုက်ရင်ရပါပြီ။
Go to Pipeline > Build Now


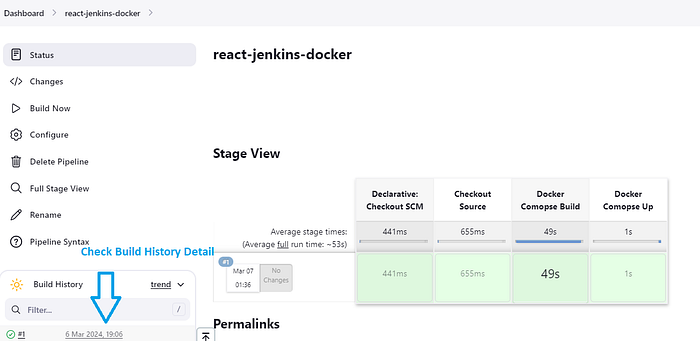
pipeline စ run သွားတာကို တွေရပါလိမ့်မယ်။ Console logs မှာလည်း ဘာတွေ run သွားလဲဆိုတာ အသေးစိပ် logs ကို ကြည့်နိုင်ပါတယ်။

ပြီးရင်တော့ Jenkins agent ထဲဝင်ပြီး react app လေးက Docker container အနေနဲ့ run နေလားဆိုတာ ကြည့်ကြည့်နိုင်ပါတယ်။
docker ps

ပြီးရင်တော့ browser ကတော့ Jenkins agent ရဲ့ ip နဲ့ port number 8080 ကို access လုပ်ကြည့်လိုက်ပါ။ တကယ် Real world မှာတော့ Deployment လုပ်မယ့် server က Jenkins agent မဟုတ်ပဲ သပ်သပ် စီဖြစ်နေမှာပါ။
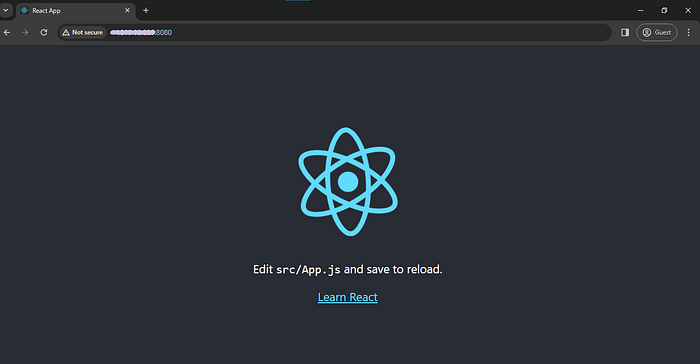
Troubleshooting:
Pipeline run တဲ့ အခါ Docker permission issue ဖြစ်နေခဲ့တယ်ဆိုရင် agent အတွက် create လုပ်ထားတဲ့ Jenkins credential ထဲမှာ သုံးခဲ့တဲ့ ssh user က Docker usergroup ထဲမှာရှိလား check ကြည့်ပါ။ အကယ်၍ ရှိနေခဲ့သည့်တိုင် permission issue ပဲဖြစ်နေရင်တော့ agent node ကို restart ချပြီးပြန်စမ်းကြည့်နိုင်ပါတယ် ec2 သုံးတဲ့သူတွေက public ip သုံးထားတယ်ဆိုရင် restart ချရင် ip ပြောင်းသွားနိုင်ပါတယ်။
Okayy အခု ဆိုရင်တော့ Jenkins နဲ့ Docker compose ကို သုံးပြီး react application ကို deploy လုပ်တာကို Lab အနေနဲ့ လုပ်ပြသွားတာပါ။အဆင်ပြေကြမယ်လို့မျှော်လင့်ပါတယ်။ step တွေအများကြီးမလို့ အဆင်မပြေတာရှိရင် Burmese Bytes ရဲ့ Communication channel တစ်ခုခု မှာ လာမေးနိုင်ပါတယ်။
Thank you for taking the time to read this article! Feel free to connect and share your thoughts or questions. I will also share more on the topic of Jenkins.
Subscribe to my newsletter
Read articles from Wai Yan Soe directly inside your inbox. Subscribe to the newsletter, and don't miss out.
Written by
