Kubernetes on Desktop - 3: Autoscaling Evolution in Kubernetes on Docker Desktop
 JERRY ISAAC
Introduction:
As Stated in my previous 2 blogs Kubernetes-1 & Kubernetes-2 This is my third installation of learning Kubernetes on desktop by the time you complete this 3rd Kubernetes exercise you will be able to understand the true aspects and beauty of Kubernetes Continue with me as i go on sharing my Realtime experience and solutions in Kubernetes with Helm charts later deploying an entire Environment in Kubernetes.
Horizontal Pod Autoscaler:
HPA is a kind of feature/service in Kubernetes that allows us to scale the number of pods according to the predefined quantity when the resource reaches a certain pre-defined value It is exactly like AWS AutoScaling when a server/Pod reaches a certain point the AutoScaler spins up new replicas of the same server/pods and handles the load among the pods/servers.
This method is extremely useful in handling unexpected amount of load in an environment and ensures the application is unaffected from an users point.
Step 1 :
For this we need certain files we need a deployment.yaml to deploy pods then a hpa.yaml file to set the config for autoscaling and a metrics-server.yaml, This file runs a pod that can take the cpu-metrics of the targeted pod and posts it to the hpa file for it to act on the metrics it receives
 FROM nginx:latest
 RUN apt update
 RUN apt install stress -y
This is the basic Dockerfile that we are going to build an image.
Now we need a deployment file to run pods and manage them
 apiVersion: apps/v1
 kind: Deployment
 metadata:
   name: hpa
 spec:
   replicas: 1
   selector:
     matchLabels:
       app: hpa
   template:
     metadata:
       labels:
         app: hpa
     spec:
       containers:
       - name: hpaimage
         image: hpaimage
         imagePullPolicy: Never
         resources:
           limits:
             cpu: "1"
             memory: "256Mi"
As you can see this is a simple yaml file that represents the configs that we want our pod to have, you can get these files from my GitHub repo here.
Lets Apply these file before that build an image with the docker file
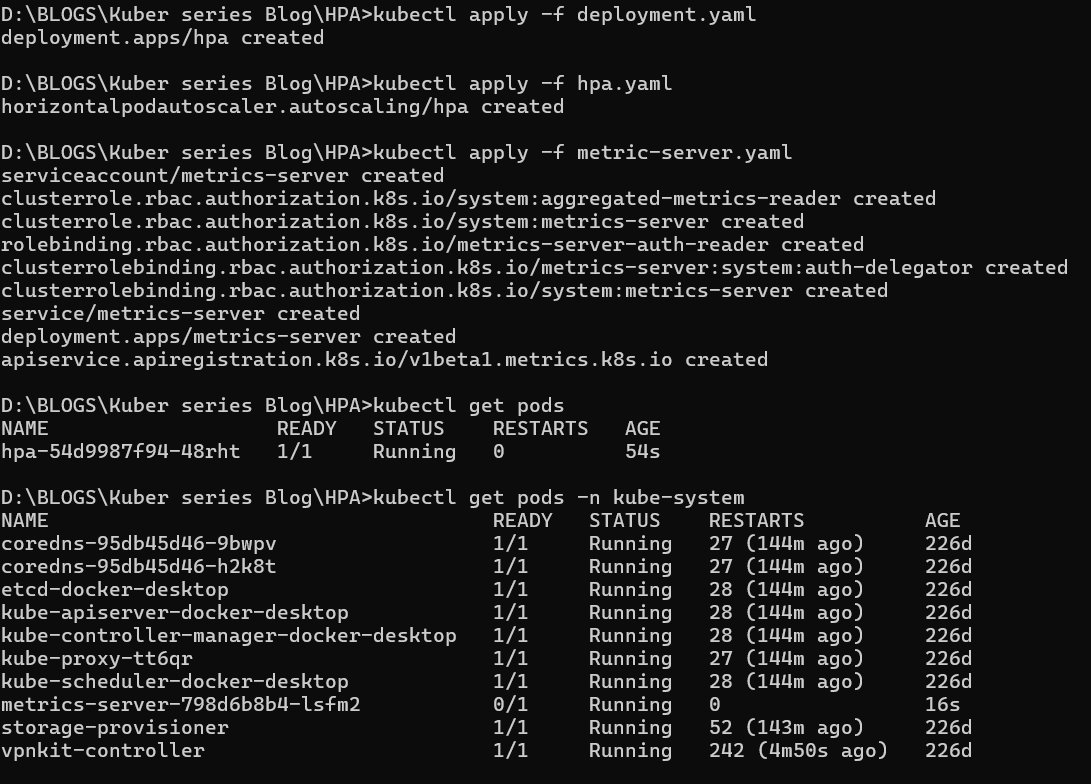
docker build -t hpaimage . kubectl apply -f deployment.yaml
Ensure the pods are running with
kubectl get pods
Step 2:
Now, we need metrics-server and an hpa.yaml file
For metric-server use the same file below as this is standard for kubernetes and it has been verifiedapiVersion: v1 kind: ServiceAccount metadata: labels: k8s-app: metrics-server name: metrics-server namespace: kube-system --- apiVersion: rbac.authorization.k8s.io/v1 kind: ClusterRole metadata: labels: k8s-app: metrics-server rbac.authorization.k8s.io/aggregate-to-admin: "true" rbac.authorization.k8s.io/aggregate-to-edit: "true" rbac.authorization.k8s.io/aggregate-to-view: "true" name: system:aggregated-metrics-reader rules: - apiGroups: - metrics.k8s.io resources: - pods - nodes verbs: - get - list - watch --- apiVersion: rbac.authorization.k8s.io/v1 kind: ClusterRole metadata: labels: k8s-app: metrics-server name: system:metrics-server rules: - apiGroups: - "" resources: - nodes/metrics verbs: - get - apiGroups: - "" resources: - pods - nodes verbs: - get - list - watch --- apiVersion: rbac.authorization.k8s.io/v1 kind: RoleBinding metadata: labels: k8s-app: metrics-server name: metrics-server-auth-reader namespace: kube-system roleRef: apiGroup: rbac.authorization.k8s.io kind: Role name: extension-apiserver-authentication-reader subjects: - kind: ServiceAccount name: metrics-server namespace: kube-system --- apiVersion: rbac.authorization.k8s.io/v1 kind: ClusterRoleBinding metadata: labels: k8s-app: metrics-server name: metrics-server:system:auth-delegator roleRef: apiGroup: rbac.authorization.k8s.io kind: ClusterRole name: system:auth-delegator subjects: - kind: ServiceAccount name: metrics-server namespace: kube-system --- apiVersion: rbac.authorization.k8s.io/v1 kind: ClusterRoleBinding metadata: labels: k8s-app: metrics-server name: system:metrics-server roleRef: apiGroup: rbac.authorization.k8s.io kind: ClusterRole name: system:metrics-server subjects: - kind: ServiceAccount name: metrics-server namespace: kube-system --- apiVersion: v1 kind: Service metadata: labels: k8s-app: metrics-server name: metrics-server namespace: kube-system spec: ports: - name: https port: 443 protocol: TCP targetPort: https selector: k8s-app: metrics-server --- apiVersion: apps/v1 kind: Deployment metadata: labels: k8s-app: metrics-server name: metrics-server namespace: kube-system spec: selector: matchLabels: k8s-app: metrics-server strategy: rollingUpdate: maxUnavailable: 0 template: metadata: labels: k8s-app: metrics-server spec: containers: - args: - --cert-dir=/tmp - --secure-port=4443 - --kubelet-preferred-address-types=InternalIP,ExternalIP,Hostname - --kubelet-use-node-status-port - --metric-resolution=15s - --kubelet-insecure-tls image: registry.k8s.io/metrics-server/metrics-server:v0.6.4 imagePullPolicy: IfNotPresent livenessProbe: failureThreshold: 3 httpGet: path: /livez port: https scheme: HTTPS periodSeconds: 10 name: metrics-server ports: - containerPort: 4443 name: https protocol: TCP readinessProbe: failureThreshold: 3 httpGet: path: /readyz port: https scheme: HTTPS initialDelaySeconds: 20 periodSeconds: 10 resources: requests: cpu: 100m memory: 200Mi securityContext: allowPrivilegeEscalation: false readOnlyRootFilesystem: true runAsNonRoot: true runAsUser: 1000 volumeMounts: - mountPath: /tmp name: tmp-dir nodeSelector: kubernetes.io/os: linux priorityClassName: system-cluster-critical serviceAccountName: metrics-server volumes: - emptyDir: {} name: tmp-dir --- apiVersion: apiregistration.k8s.io/v1 kind: APIService metadata: labels: k8s-app: metrics-server name: v1beta1.metrics.k8s.io spec: group: metrics.k8s.io groupPriorityMinimum: 100 insecureSkipTLSVerify: true service: name: metrics-server namespace: kube-system version: v1beta1 versionPriority: 100kubectl apply -f metric-server.yamlAs you can see in this file the namespace is in kube-system so ensire the pod is running
kubectl get pods -n kube-systemLets create a hpa.yaml file
 apiVersion: autoscaling/v2
 kind: HorizontalPodAutoscaler
 metadata:
   name: hpa
   namespace: default
 spec:
   maxReplicas: 4
   metrics:
   - resource:
       name: cpu
       target:
         averageUtilization: 10
         type: Utilization
     type: Resource
   - resource:
       name: memory
       target:
         averageUtilization: 80
         type: Utilization
     type: Resource
   minReplicas: 1
   scaleTargetRef:
     apiVersion: apps/v1
     kind: Deployment
     name: hpa
This is the hpa file as you can see from the kind as
kind: HorizontalPodAutoscaler
Here I have set the Target as deployment and to match the name hpa i have set the CPU utilization to 10% here for testing purpose but you can set it to 80% usually and I have set it to target Memory utilisation as well
you can get these files from my GitHub repo here.Lets apply this file
kubectl apply -f hpa.yaml
So now we have all the files ready and deployed Lets test it out
if you have all these then you set to test it , let us exec into our pod and apply stress to the CPU through the stress service we installed with the image
kubectl exec -it <pod_name> bash
Then execute the command
stress --cpu 80
This will induce 80 units of stress on the CPU
in about 2 mins you should see about a max of 4 pods running

As you can see there is about 4 pods running cause of the induced stress.
Then that's it we have successfully AutoScaled in Kubernetes
This is a short project that I did in an production environment if you are looking to start learning kubernetes these kind of services are a feather to your cap
you can get these files from my GitHub repo here.
There are more features in Kubernetes like configmaps, services, secrets and ways it can be brought in in a deployment I will be doing more blogs on them so keep following me.
Happy Kubing !!
Subscribe to my newsletter
Read articles from JERRY ISAAC directly inside your inbox. Subscribe to the newsletter, and don't miss out.
Written by

JERRY ISAAC
JERRY ISAAC
I am a DevOps Engineer with 3+ years of experience I love to share my Tech knowledge on DevOps and I love writings that's how I started Blogging