WebGPU Basics: How to Create a Triangle
 Gift Mugweni
Hello 👋, it's been a minute. How's life and all that good stuff? Anyway to get myself back into the groove I thought I'd start where I left off, Graphics Programming specifically using WebGPU.
In this series, I'll give semi-tutorials on working with WebGPU and the shading language WGSL which I'll explain as and when is necessary so hopefully you can also dive into this crazy world of making art with code and maths.
To keep things simple, this article will teach you how to make the equivalent of a "Hello World" in shader land which is a triangle because drawing text to screen turns out to be really hard. See this video if you think I'm lying. With this example, you'll fully get to experience the basic flow of working with WebGPU and I'll also point to some resources I came across that you can read up on that helped me start this journey.
Before we begin, let's answer a few obvious questions.
Question: What is WebGPU?
Answer: It's a graphics API
Question: What does that mean?
Answer: It is software that helps you utilize the Graphics Card(GPU) that comes with every modern computer/smartphone to either draw stuff on the screen or do more general computations on the graphics card e.g. matrix math.
Question: Why would I ever need to use a GPU can't my CPU do all that already?
Answer: Yes it can but because of how a CPU is designed, as you get more sophisticated with your graphics or you need to do a lot of simple stuff in parallel, it will struggle a lot and not be efficient. That's where we use GPUs that have been purpose-built for such tasks.
With that preamble in place, let us talk about browser support. As I mentioned in my previous article, WebGPU is still relatively new so, browser support hasn't fully rolled out yet at the time of writing, you can only use the API on the latest Chrome, Edge, Opera, Chrome for Android, Samsung Internet and Opera Mobile browsers. Safari support is present in the Technical Preview only so far. So yeah, as you can see, it hasn't rolled out fully yet but the rollout is being actively worked on and you can check on this site, where support will be as time goes on. I don't think this browser support state is much of an issue but, it is something to be aware of.
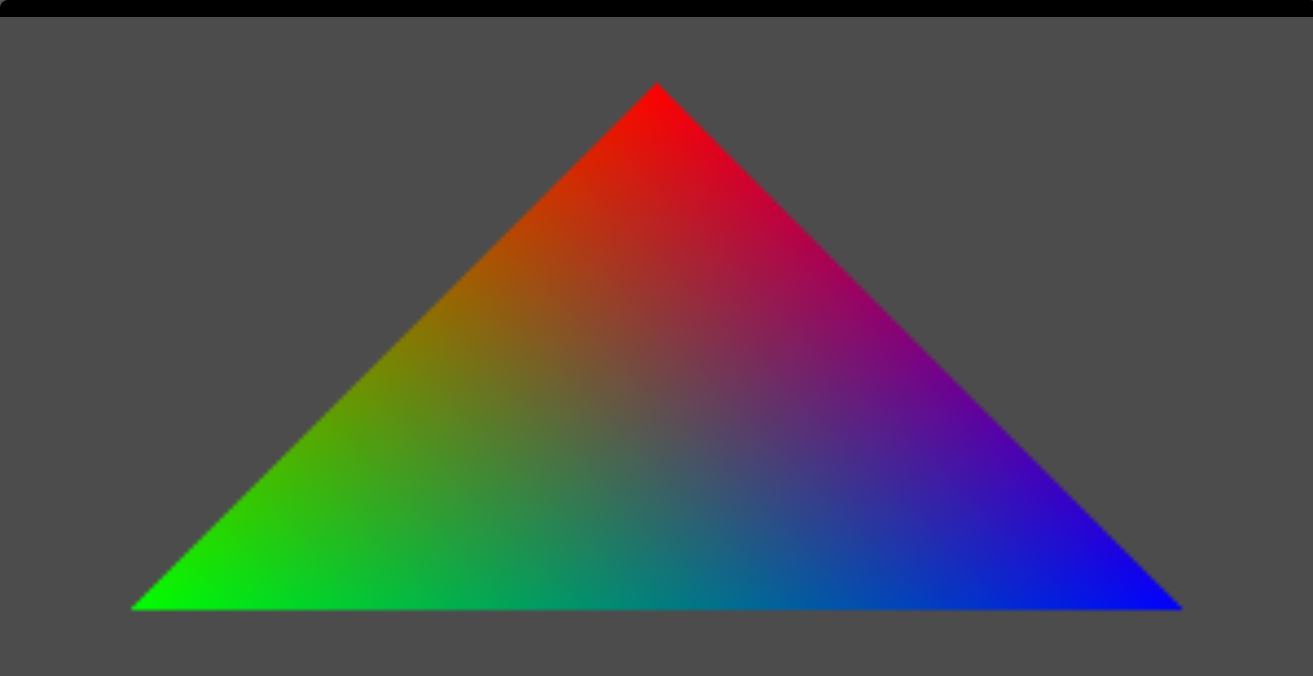
Now that's done, let's see what we will be drawing today.

Looks beautiful right? This triangle and all the following code come from this wonderful site called WebGPU Fundamentals that goes in-depth into WebGPU and is a great resource to learn about Web GPU but, it does look a bit intimidating when you first visit it so I thought I'd make this series to give an easier entry point to jump off from.
Although I did say it's an easier entry point, I still need to make some assumptions for brevity. The first assumption is that you are familiar with modern JavaScript and are comfortable with basic HTML and CSS though we won't use the latter two all that much. If you are not familiar with any of these, here are some great playlists made by the YouTuber The Net Ninja that will get you up to speed. He also makes other great videos in general so feel free to check him out.
Assuming you have explored those resources or already have the basics covered, let's set up our basic HTML page.
<!DOCTYPE html>
<html lang="en">
    <head>
        <meta charset="UTF-8">
        <meta name="viewport" content="width=device-width, initial-scale=1.0">
        <title>WebGPU</title>
        <style>
            html, body {
                height: 100%;
                margin: 0;
            }

            .container {
                display: flex;
                min-width: 100%;
                min-height: 100%;
                align-items: center;
                justify-content: center;
                background-color: black;
            }

            .display {
                min-width: 100%;
                min-height: 100%;
            }
        </style>
        <script src="main.js" defer></script>
    </head>
    <body>
        <div class="container">
            <canvas id="webgpu-output" class="display"></canvas>
        </div>
    </body>
</html>
So there's nothing fancy with this code snippet here. Just make a basic page and resize the canvas element to which we will be drawing to to fill the entire page. Aside from that, we also include a "main.js" file which will contain all of our code from here on out.
Before I begin though, look at this meme and internalize it for the rest of this article.

The GPU exists in a different world from the CPU. In GPU land, many things are different and some things that might be simple in the CPU are a nightmare in the GPU and vice versa. Because of this, drawing a triangle ends up being a bit involved.
Having set your expectations, let us draw our lovely triangle.
First, we need to get permission to use the GPU. For that, we enter the below code.
 function fail(msg) {
    alert(msg);
}

async function main() {
    // get GPU device
    const adapter = await navigator.gpu?.requestAdapter();
    const device = await adapter?.requestDevice();
    if (!device) {
        fail('need a browser that supports WebGPU');
        return;
    }
Now, I could go in-depth into the fine details going on here but this is a beginners' course so all we need to know is that if the device variable is not undefined, congratulations 👏👏👏 we now have our GPU device and can continue forward. For a more in-depth explanation, check out the Fundamentals Article on the WebGPU Fundamentals website.
Moving on, we need to prepare the canvas so that it understands the eventual commands we will send to it.
    // Get a WebGPU context from the canvas and configure it
    const canvas = document.getElementById('webgpu-output');
    const context = canvas.getContext('webgpu');
    const presentationFormat = navigator.gpu.getPreferredCanvasFormat();
    context.configure({
        device,
        format: presentationFormat,
    });
The main role of this section of code is to ensure that the canvas understands the draw commands it will eventually get from our drawing code.
Moving on, let's set up our shader code.
    const module = device.createShaderModule({
        label: 'our hardcoded triangle shaders',
        code: `
            // data structure to store output of vertex function
            struct VertexOut {
                @builtin(position) pos: vec4f,
                @location(0) color: vec4f
            };

            // process the points of the triangle
            @vertex
            fn vs(
                @builtin(vertex_index) vertexIndex : u32
            ) -> VertexOut {
                let pos = array(
                    vec2f(   0,  0.8),  // top center
                    vec2f(-0.8, -0.8),  // bottom left
                    vec2f( 0.8, -0.8)   // bottom right
                );

                let color = array(
                    vec4f(1.0, .0, .0, .0),
                    vec4f( .0, 1., .0, .0),
                    vec4f( .0, .0, 1., .0)
                );

                var out: VertexOut;
                out.pos = vec4f(pos[vertexIndex], 0.0, 1.0);
                out.color = color[vertexIndex];

                return out;
            }

            // set the colors of the area within the triangle
            @fragment
            fn fs(in: VertexOut) -> @location(0) vec4f {
                return in.color;
            }
        `,
    });
This right here is the meat of the topic. I understand that this code can be overwhelming so, let's make broad strokes for now. To understand this code, we need a basic understanding of how GPUs draw stuff on the screen.
The first important point is when drawing, GPUs only understand points, lines and triangles. Thats it. Everything that appears on the screen is decomposed into these fundamental elements. Hence, we need to think of things from this perspective to get our lovely visual showing.
The next important point is the order in which the GPUs carry out the drawing. First, it establishes all the points(vertices) of the shape we want to draw. Then it groups all three points into triangles. Afterwards, it colours in all the grouped triangles.
With this framework in mind, we can see a function called vs and another called fs . The vs function is where we process all our points and do any transformations if we want to whilst the fs function is responsible for the colouring of the respective triangles. For our starting point, I think this is good enough and if you want to know more, check out the Fundamentals Article on the WebGPU Fundamentals website.
Now that we've had our meat, it's time to face the bone and that's us doing all the necessary plumbing to actually draw the triangle. Right now, we're still writing stuff in CPU land and we need to send this information to GPU land. and for that, we use the below code to do that transfer.
    const pipeline = device.createRenderPipeline({
        label: 'our hardcoded red triangle pipeline',
        layout: 'auto',
        vertex: {
        module,
        },
        fragment: {
        module,
        targets: [{ format: presentationFormat }],
        },
    });

    const renderPassDescriptor = {
        label: 'our basic canvas renderPass',
        colorAttachments: [
        {
            // view: <- to be filled out when we render
            clearValue: [0.3, 0.3, 0.3, 1],
            loadOp: 'clear',
            storeOp: 'store',
        },
        ],
    };

    function render() {
        // Get the current texture from the canvas context and
        // set it as the texture to render to.
        renderPassDescriptor.colorAttachments[0].view =
            context.getCurrentTexture().createView();

        // make a command encoder to start encoding commands
        const encoder = device.createCommandEncoder({ label: 'our encoder' });

        // make a render pass encoder to encode render specific commands
        const pass = encoder.beginRenderPass(renderPassDescriptor);
        pass.setPipeline(pipeline);
        pass.draw(3);  // call our vertex shader 3 times.
        pass.end();

        const commandBuffer = encoder.finish();
        device.queue.submit([commandBuffer]);
    }

    render();
Again, quite a chunky bit of code here but at its core, we're just setting things up so that we can transfer our shader code to the GPU. You'd be correct to feel that this feels like too much work for such a basic triangle but bear in mind that our current use case isn't what WebGPU was made for. It's designed for drawing multiple objects moving in potentially complex patterns. At that point, it helps to think of drawing stuff in batches and the above code structure helps support that method of thinking.
And with that, we're done. You, my friend, if you've followed along now have your first-ever triangle on screen and you are destined for greatness. So what's next after this?
If you're hooked, try out the Google Codelab project where you get to recreate the classic Conway's Game of Life and learn more about WebGPU.
I've placed all the code discussed here in a GitHub repo here. I'd recommend you write it yourself instead. You always learn more that way instead.
In my next article, I'll talk about making much nicer visuals and hopefully get deeper into exploring shaders now that we've gotten the foundation in place.
Subscribe to my newsletter
Read articles from Gift Mugweni directly inside your inbox. Subscribe to the newsletter, and don't miss out.
Written by

Gift Mugweni
Gift Mugweni
Just your chilled programmer sharing random facts I've learnt along my journey.