Simplifying State Management in React with the Context API
 Raghvendra Misra
In this article, we'll explore what the Context API is, how to implement it, and why it's needed.
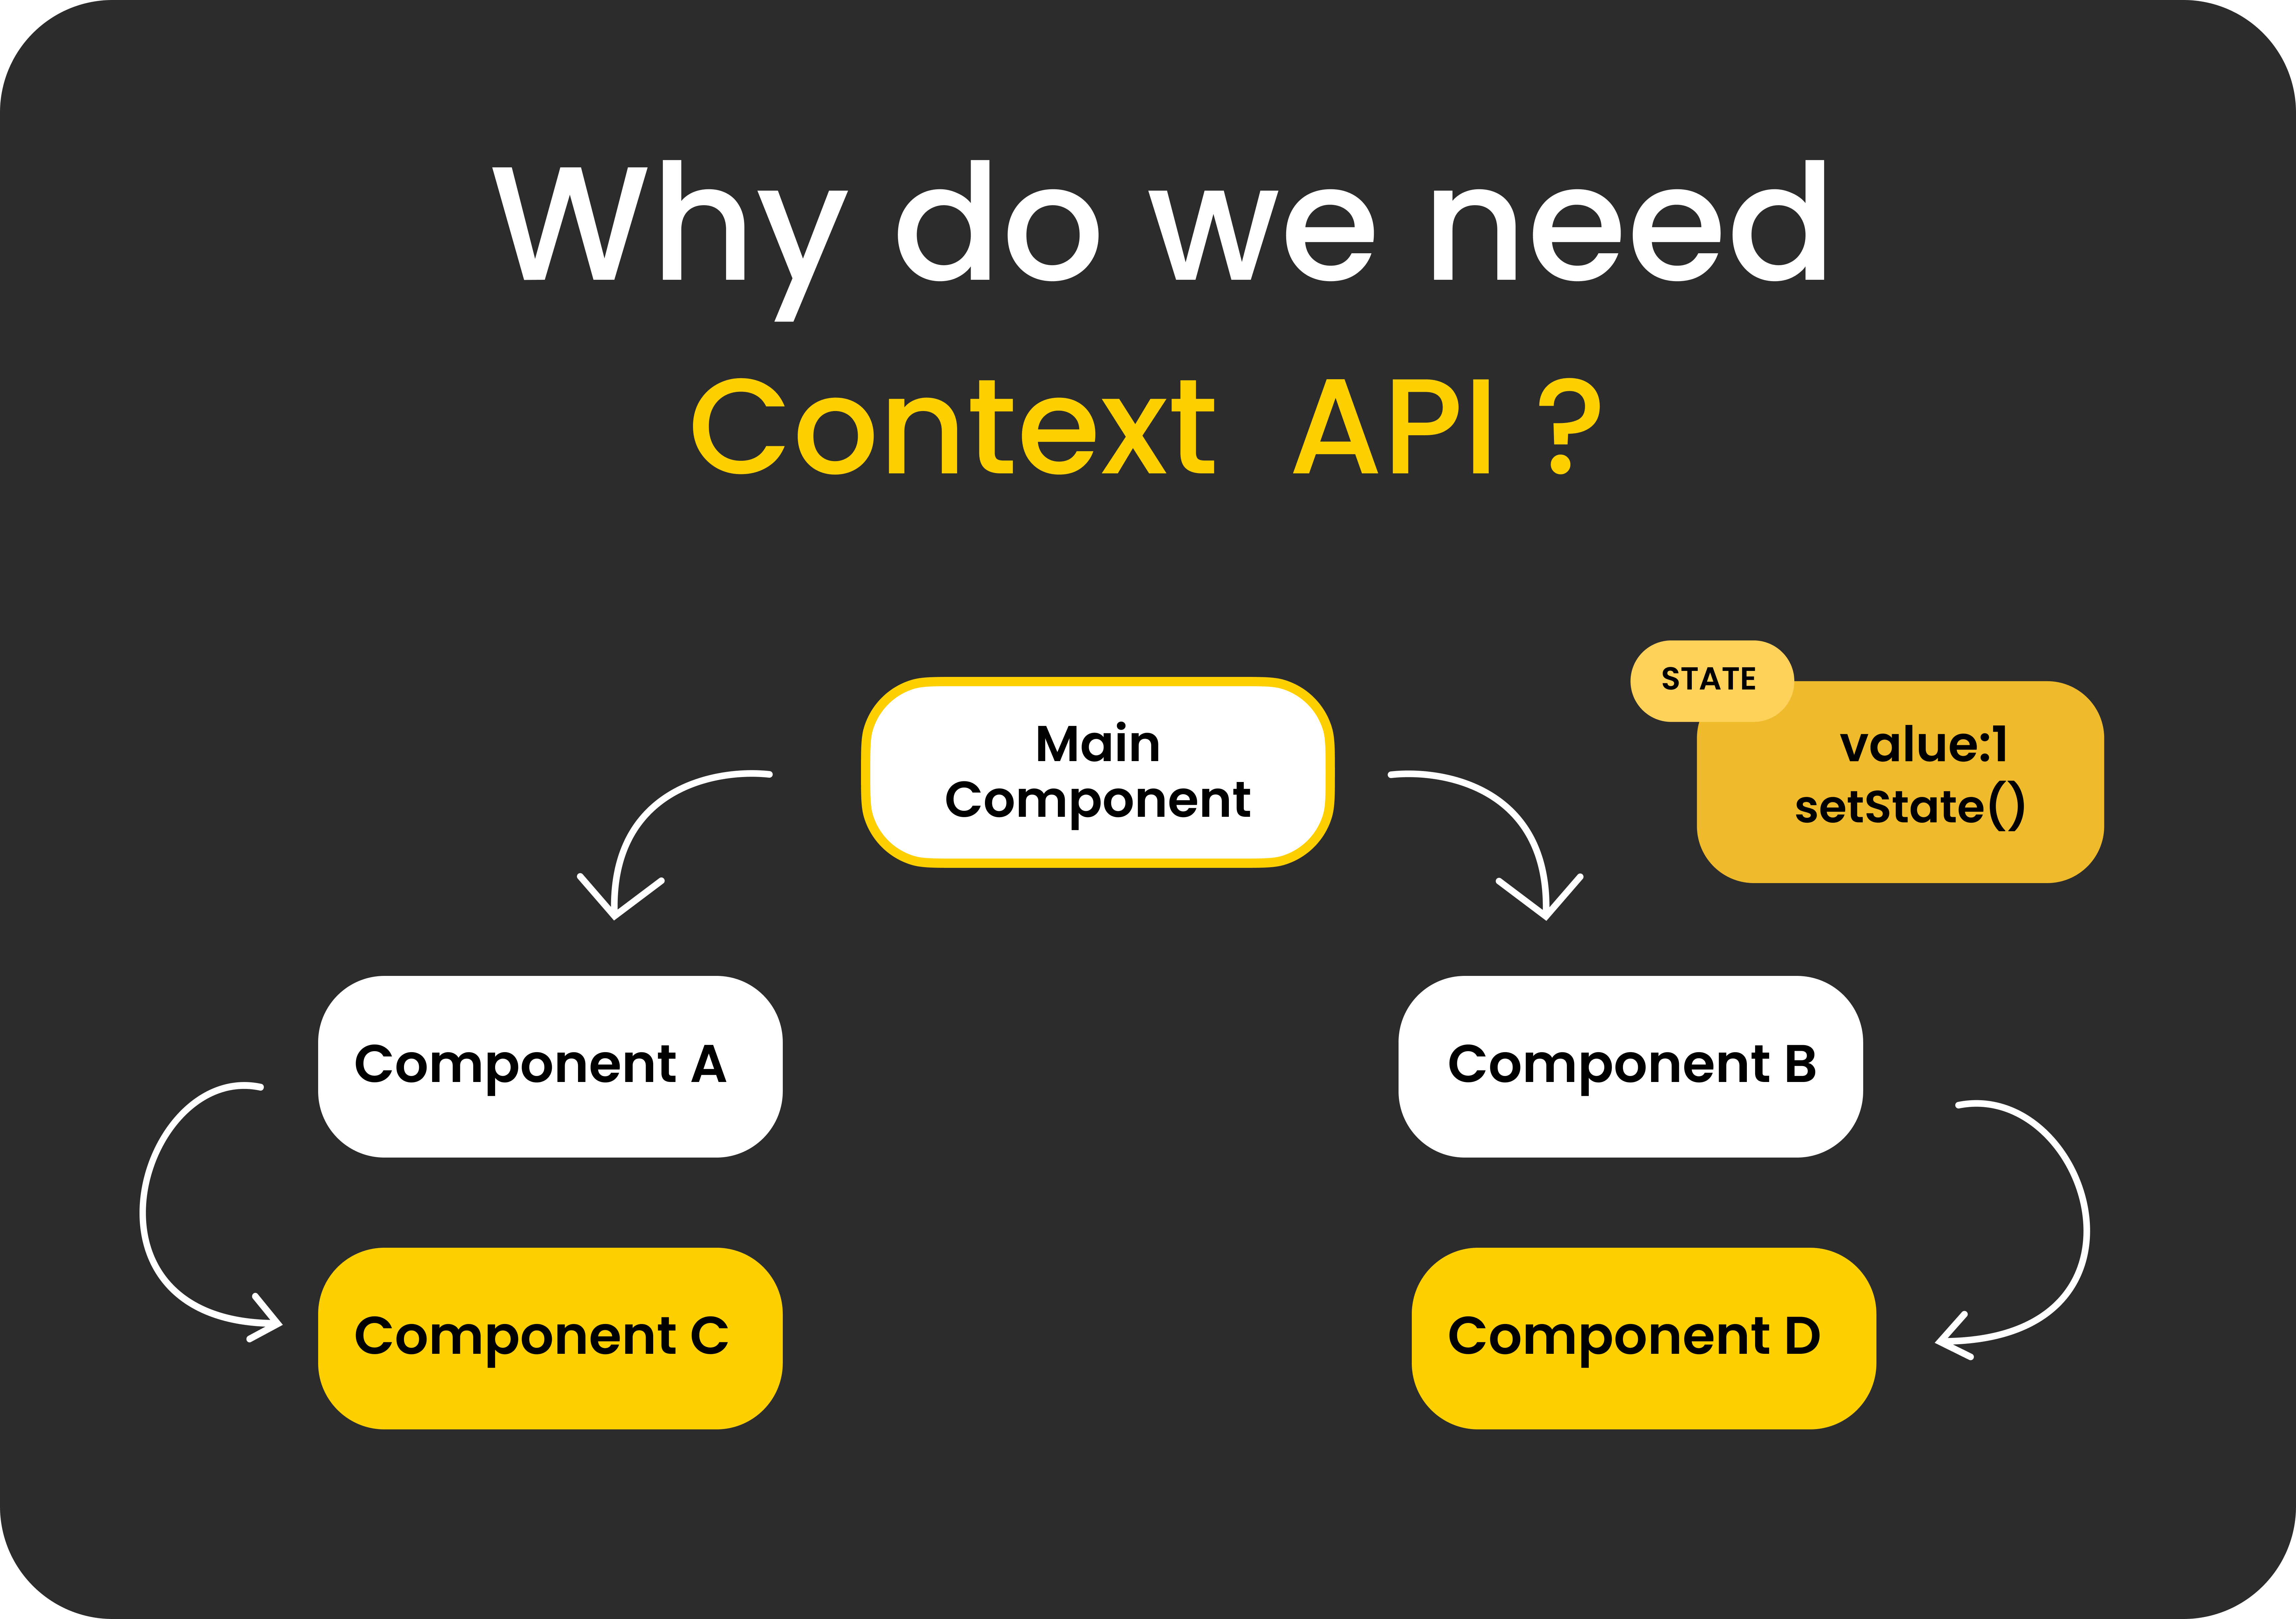
Let's start by creating a scenario. Imagine our application has four components. The A and B components each have nested components, C and D, respectively. Now, suppose we want to pass a prop to the C and D components. To do this, we would need to pass the prop through the A and B components so that it can reach the C and D components. Additionally, if we want to pass some value as a prop from the C to the D component, we need to update that prop value from the C component, then pass it back through the app component to the A, and finally to the C component.
This process is cumbersome and inefficient. It consumes memory unnecessarily because we are passing props through intermediate components that don't need them. This phenomenon, known as "prop drilling," not only wastes memory but also makes our code more error-prone and difficult to read.
Why Context Api ?

To address the issues mentioned above and simplify the process of passing props, we use the Context API. While we can still create a fully functional React app without the Context API, it would lack memory optimization and code readability.
How to implement it ?

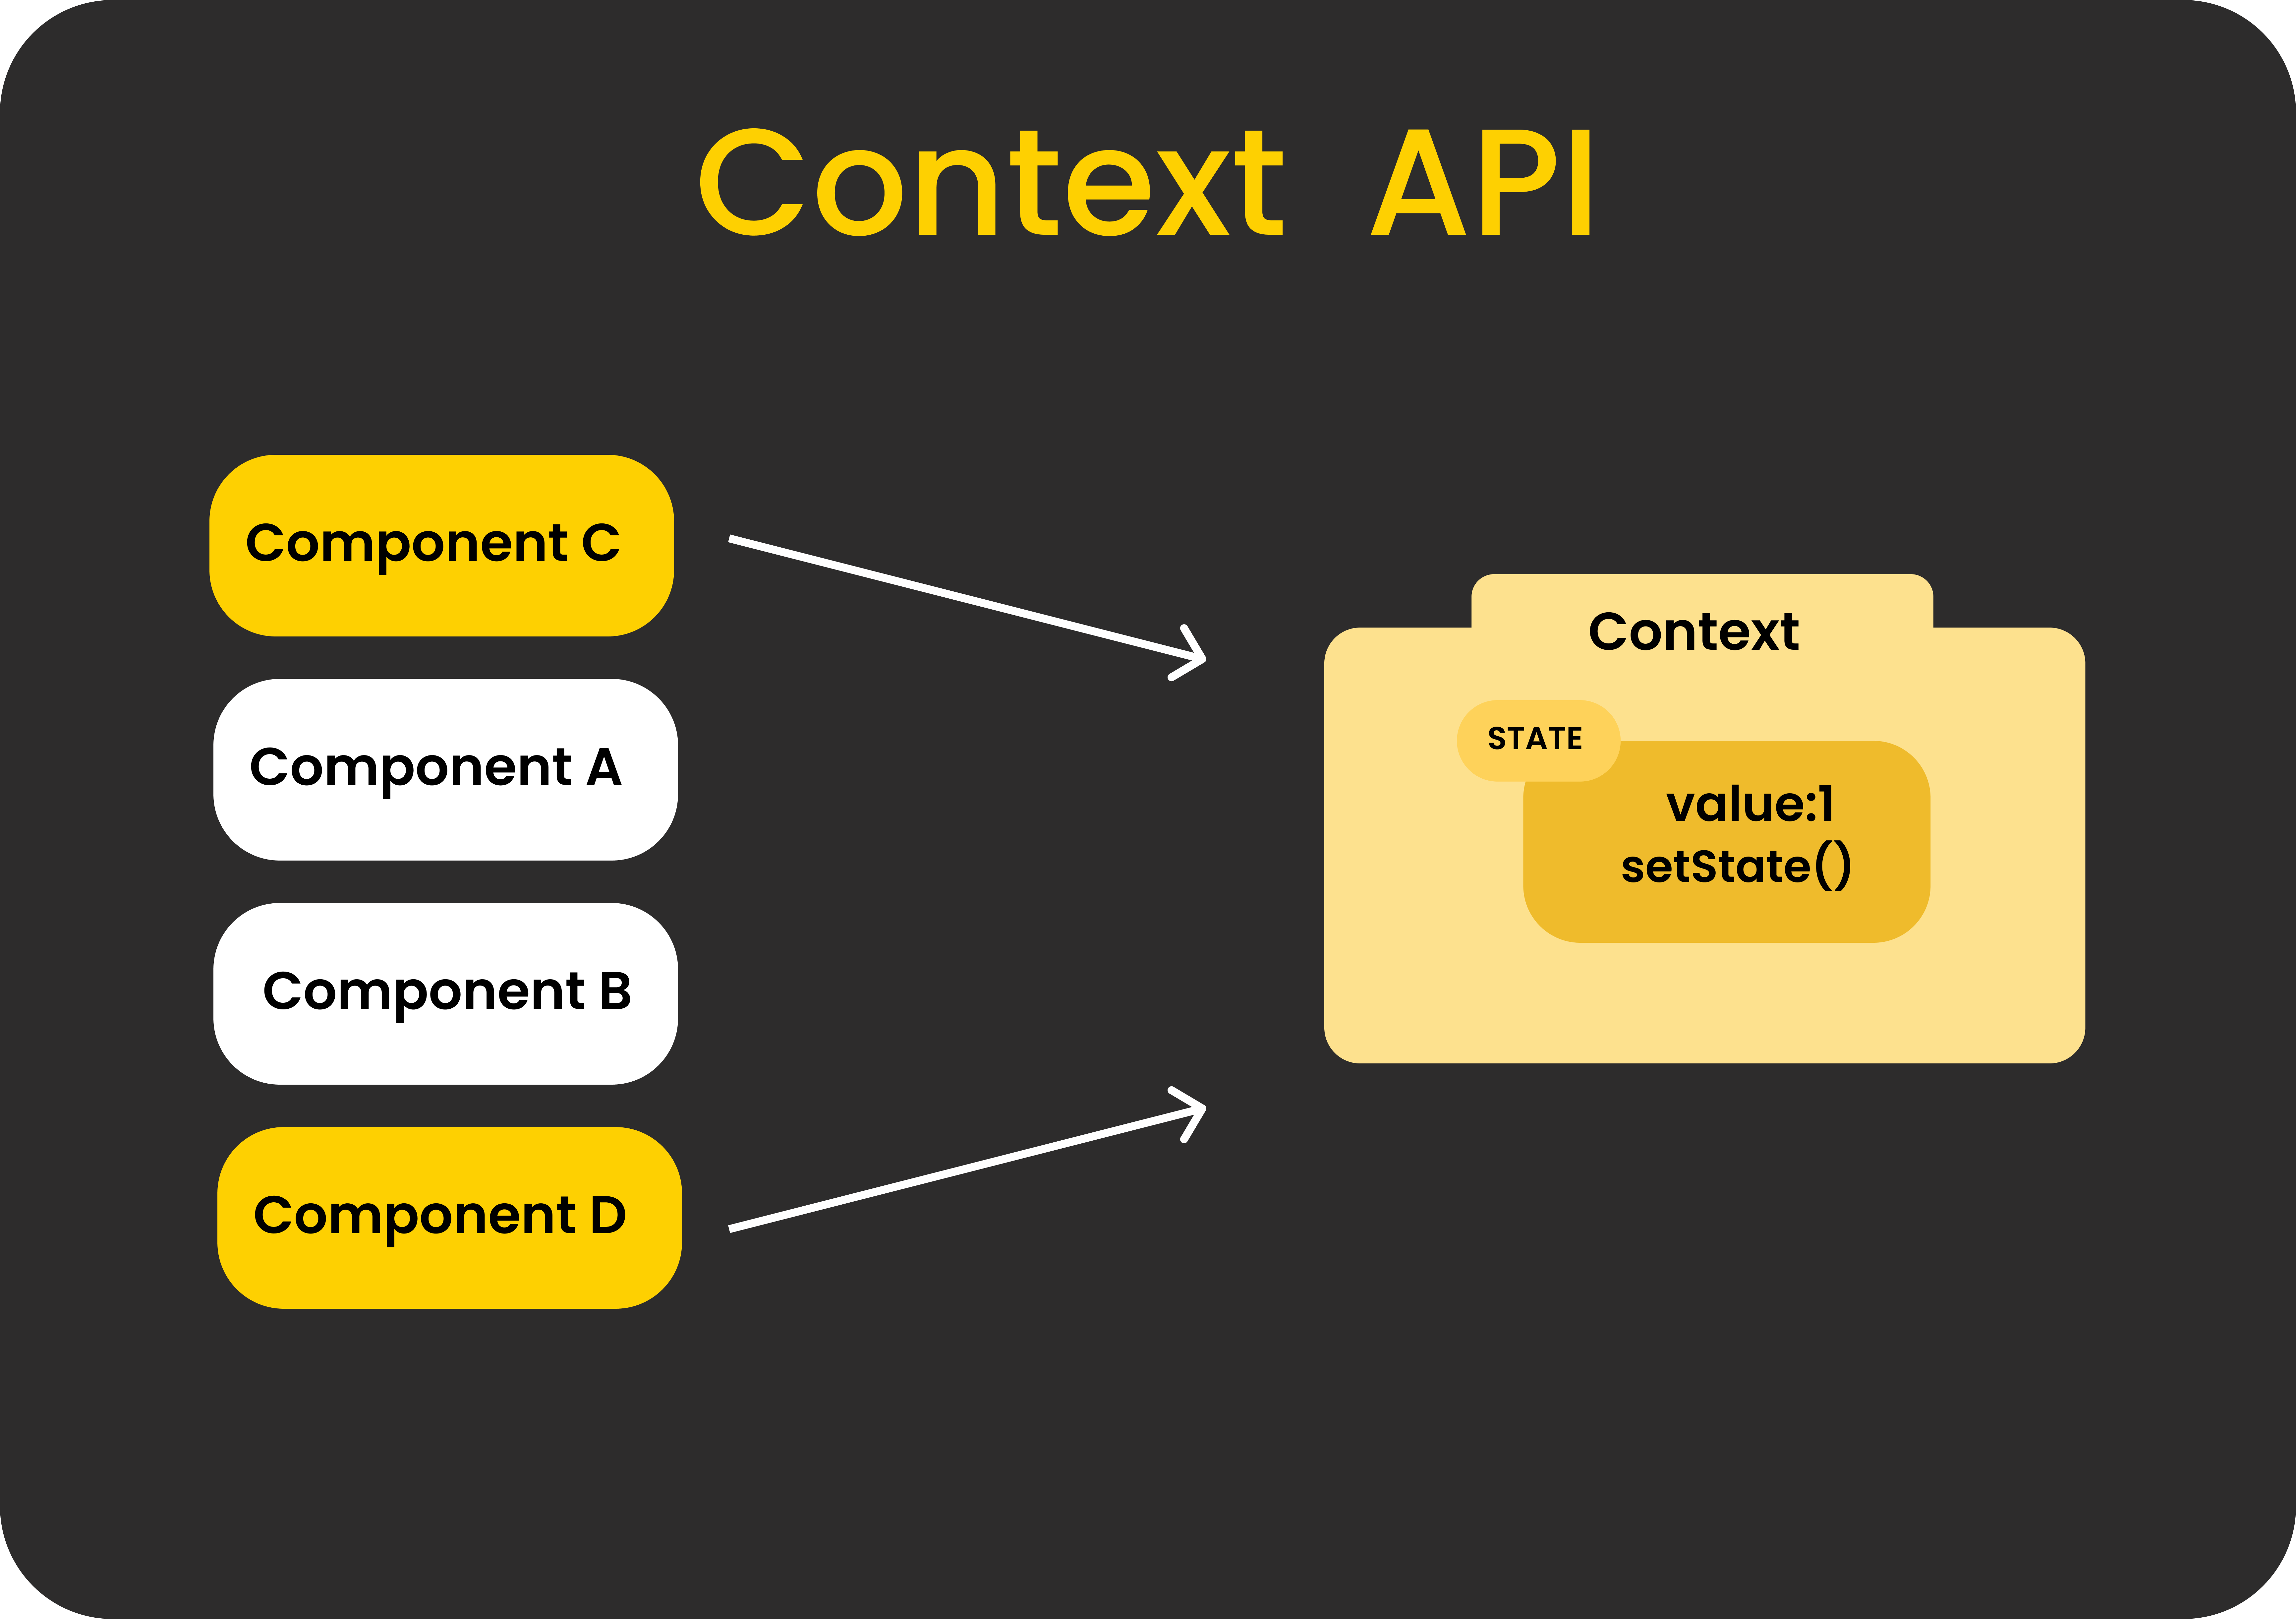
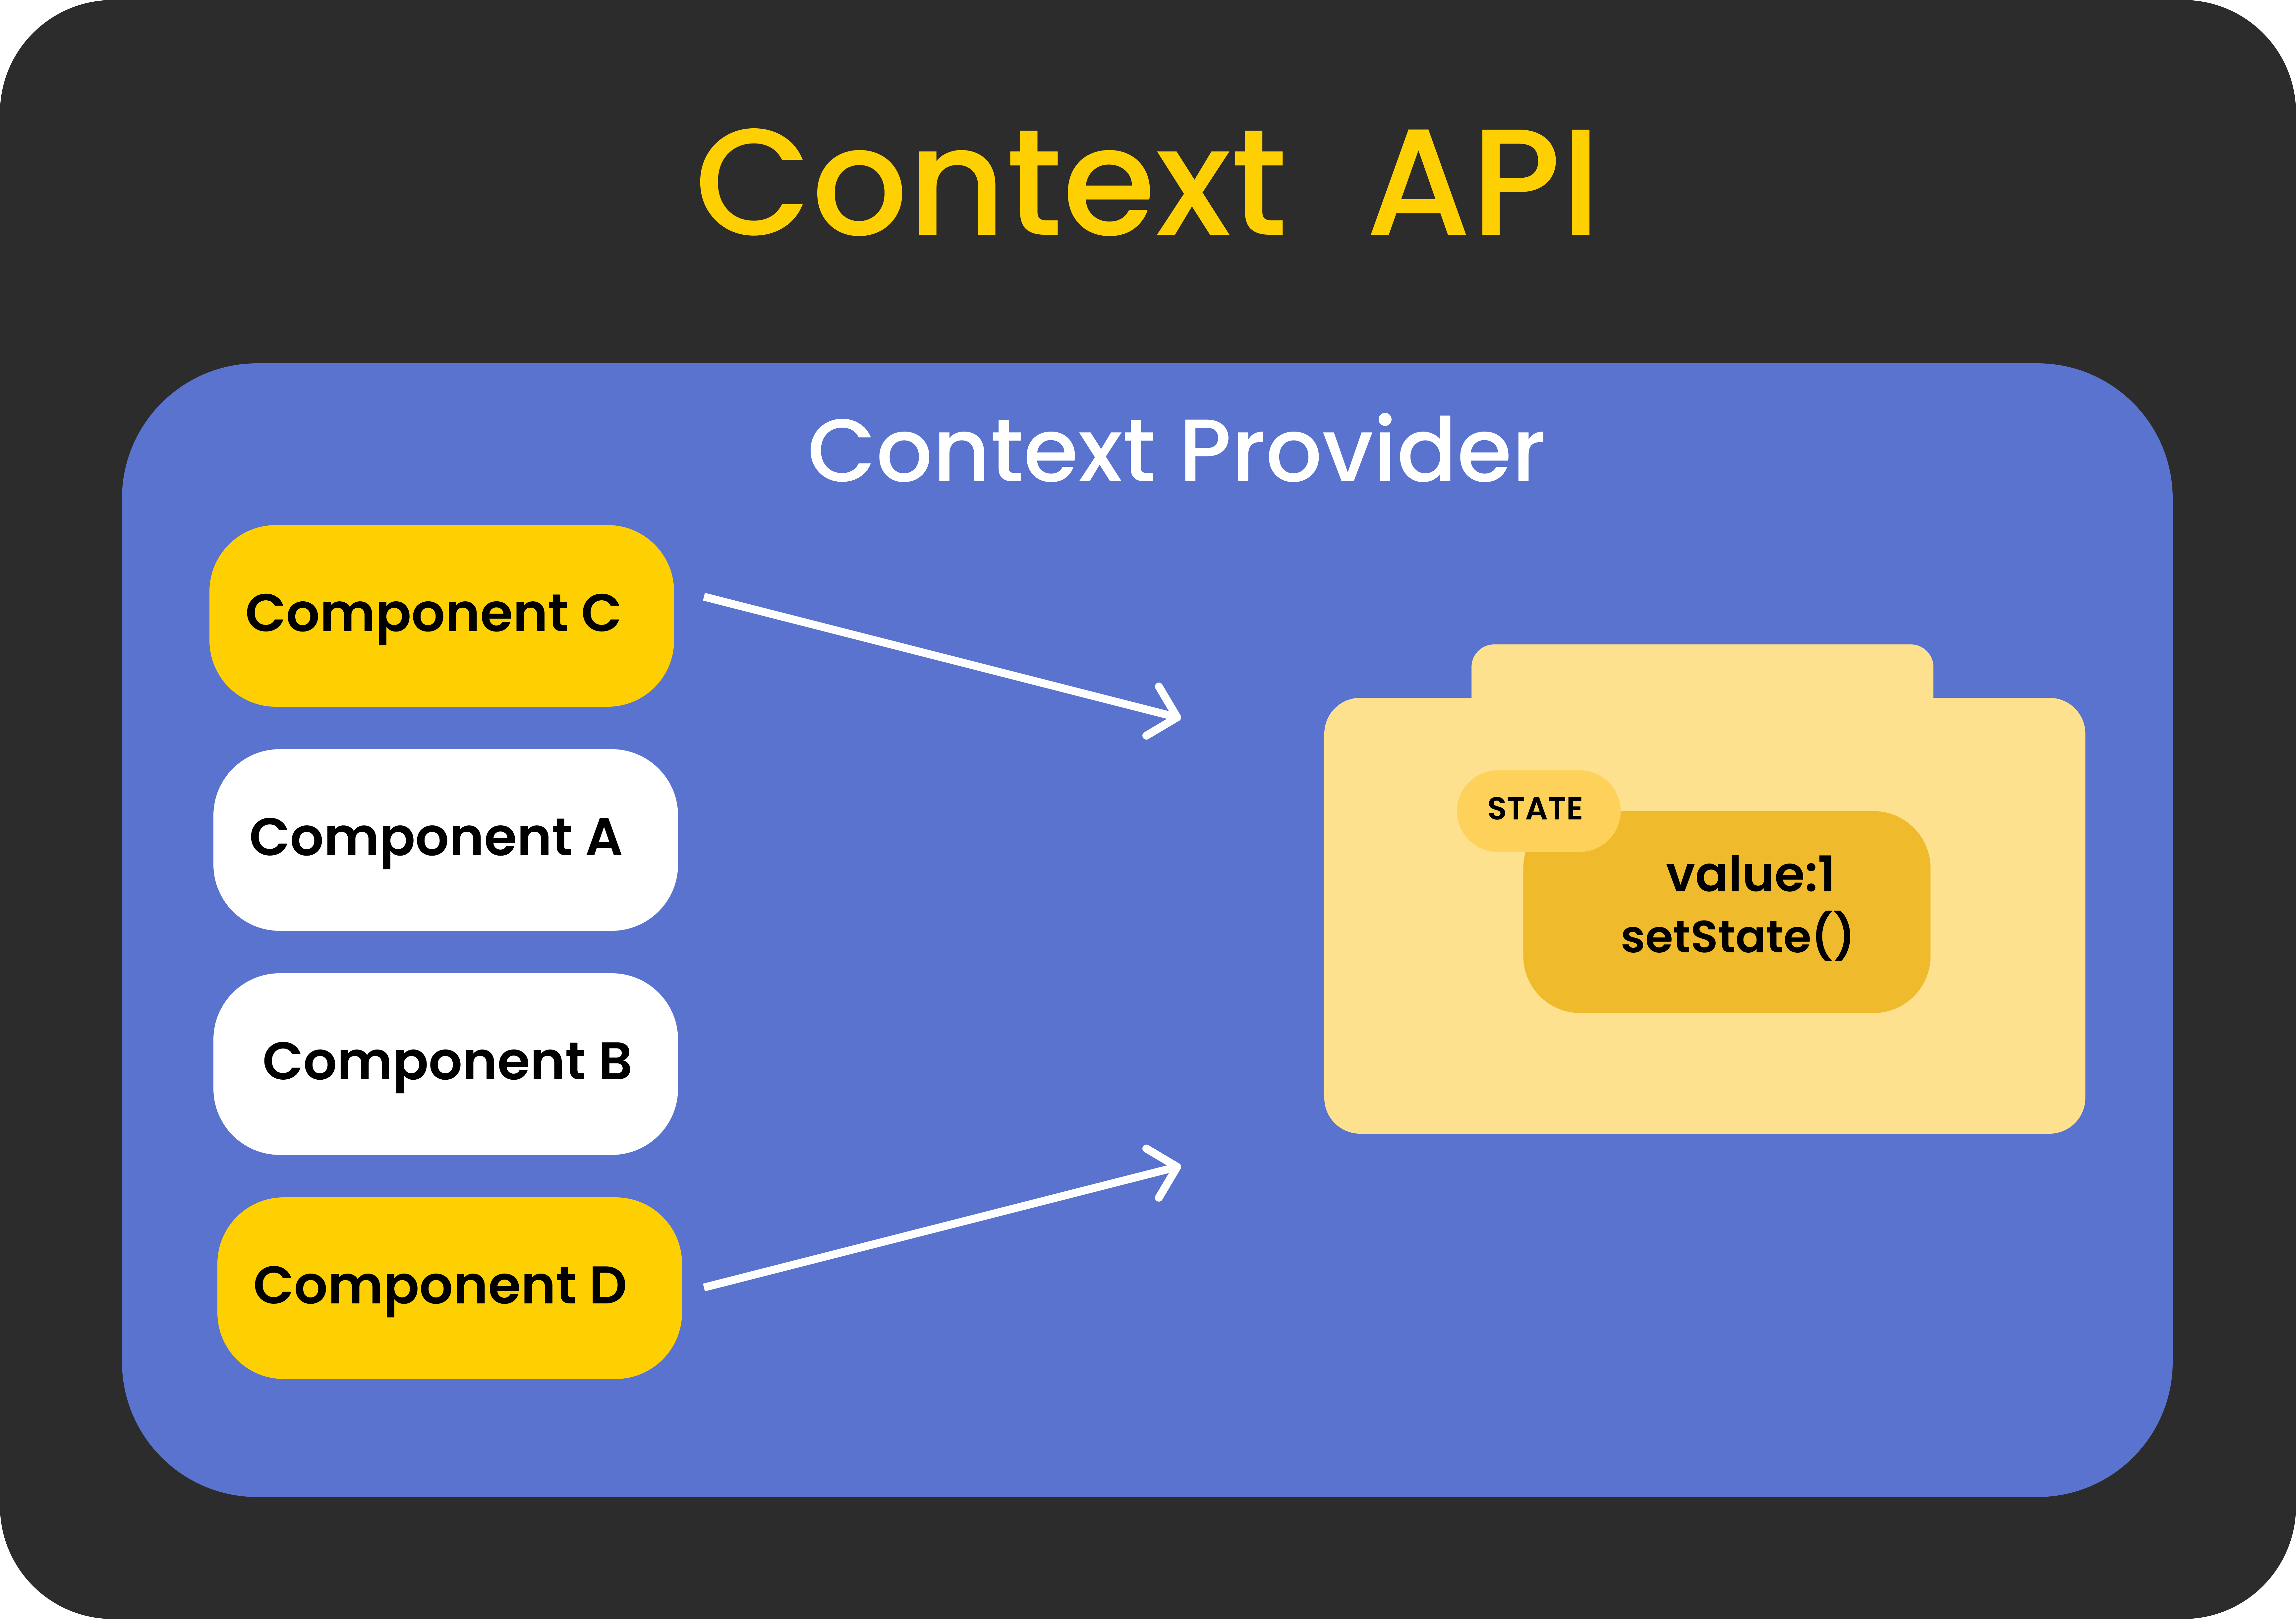
Now, let's see how we implement this. The approach with the Context API is to create a separate space in the code where all the states that we used to pass as props are stored. All the components can then access these states directly, without needing to pass them through multiple levels of components. Any changes to these states should be reflected across all components using them.
Before diving into the complete picture, we'll break it down into smaller pieces and then combine them to form the full picture. This step-by-step approach will help us understand the concept better as it can get complicated.
What does the Context object contain?

In React, to create this special space to store our states, we use a function called createContext. This function creates a context. The object returned by createContext has two properties: Provider and Consumer. Let's examine each of them separately.
import React from 'react';
 import MyContext from './MyContext.js';
const MyProvider = ({ children }) => {
 return (
    <MyContext.Provider>
      {children}
    </MyContext.Provider>
   );
 };

export default MyProvider;
Provider:
The Provider component of the context object has two main properties: the children prop and the value prop.
The
childrenprop is an array that includes the components that should have access to the context. More specifically, these components will have access to the value object, which stores all the states and functions.The
valueprop is an object that holds the state or state functions we would have passed from component to component while prop drilling. Instead of passing these props manually through multiple components, we keep them in a single unit, the value object.
Now that we are gradually understanding the implementation of the Context API, let's look at the Consumer component and how it functions. After that, we will combine both the Provider and Consumer to form a complete vision of the Context API. Finally, we will explore the different syntaxes to implement it.
const ChildComponent = () => {
 return (
<MyContext.Consumer>
   {value => (Count: {value.count}
   Increment Decrement)}
 </MyContext.Consumer> ); };
Consumer:
The Consumer component is another component provided by the context object. It functions differently from the Provider. Instead of expecting an array of components via a children prop, it expects a function. This function serves as a callback that receives the value object of the context as its argument. Within this callback function, we can access the value object of the context and use its values as props. It's important to note that this process occurs at the lowest level of the component hierarchy.
This might seem similar to prop drilling in theoretical explanation, but it's fundamentally different. We are not passing props manually from component to component; instead, components directly access the context they need.
Let's look at an example code snippet:
This syntax might be unfamiliar, especially for beginners. Essentially, wrapping components or JSX with the Consumer is akin to passing components or JSX as a value to the children prop of any component.
Now that we understand the Provider and Consumer, let's connect the dots.
Syntax 1
To implement the Context API using the first syntax, which is somewhat deprecated due to its bulkiness and readability issues, follow these steps:
Context Creation :
First, create a context as described earlier. After creating the context, define a functional component. In this component, create a state variable for demonstration purposes. Next, use the context's Provider component and pass the value prop. As discussed earlier, populate the value prop with the state variables and functions that components should access.
Provider Usage :
Furthermore, take the children prop in the parameter of the component function. Pass this children prop to the Provider's children prop. Remember, as discussed earlier, when we talk about passing children as props in JSX syntax, within the functional component, we can destructure the children property from the props object to directly access the component passed. Take this component and pass it as the children of the Provider. Essentially, both passing as props and wrapping inside a component are ways to handle children.
import React from 'react';
 import MyContext from './MyContext.js';

const MyProvider = ({ children }) => {
 return (
       <MyContext.Provider>
        {children}
        </MyContext.Provider> );
      };

export default MyProvider;
Finally, return the Provider from the functional component and export it. Now, our provider is ready. Let's proceed to the consumer implementation.
Consumer Usage :
Now, let's discuss the consumer aspect. To consume the value object from a component:
- Import Context: First, import the context into the component where you want to access it.
 import React, { useContext } from 'react';
 import MyContext from './MyContext';
// Replace with the actual path to your context
Use Consumer : Utilize the Consumer component provided by the context. This involves using a callback function as children to access the value object.
 const ChildComponent = () => {
  return (
 <MyContext.Consumer>
    {value => (Count: {value.count}
    Increment Decrement)}
  </MyContext.Consumer> ); };
Summary:
By creating a Provider, we grant components access to the context by wrapping them. The Consumer allows components to consume this access. Any component can access the context's
valueobject, and changes to this object's properties or anycontext stateor variable will propagate to all components accessing the context.
Syntax 2
(with a minor change but major impact)
React introduced the useContext hook to simplify the consumption of Context API. This hook takes the context as an argument and returns the value object. Let's see how it drastically simplifies the process:
Using useContext Hook:
Instead of using the Consumer component with a render prop, you can now use the useContext hook directly in functional components. This allows you to access the value object containing states and state functions without passing them as props from a callback function.
import React, { useContext } from 'react';
import MyContext from './MyContext';

const ChildComponent = () => {
const value = useContext(MyContext);

return (

Count: {value.count}

Increment Decrement

); };
Plus points of using useContext in second Syntax:
Simpler and Cleaner Syntax:
useContextprovides a more straightforward and readable way to consume context compared to the Consumer component, which often requires a nested function structure.
Less Boilerplate Code:
useContextreduces the amount of boilerplate code we need to write, making our components less verbose and easier to maintain.
Easier to Use with Hooks:
- When using functional components with hooks,
useContextfits naturally into the functional programming style. It allows for easier integration with other hooks likeuseState,useEffect, etc.
Less Nested Code:
- Using the Consumer component can lead to deeply nested code, especially if you have multiple contexts or other render props in the same component.
useContexthelps in reducing this nesting.
Overall pros of using the Context API
- Automatic Rerendering:
React tracks the components that use the useContext hook. Whenever the state variables within the context change, React automatically triggers a rerender of these components. This ensures that all components using the context stay in sync with the latest state.
- Eliminating Prop Drilling:
By leveraging useContext, React eliminates the need for prop drilling to pass state and state functions down through multiple levels of components. This simplifies state management and improves code readability.
This concludes our overview of the Context API and now by the end of this article we know why , how, what of Context Api in React!
Subscribe to my newsletter
Read articles from Raghvendra Misra directly inside your inbox. Subscribe to the newsletter, and don't miss out.
Written by

Raghvendra Misra
Raghvendra Misra
A tech enthusiast, aspiring full-stack developer, and avid music lover. From my beginnings as a UI/UX designer, I've delved deeper into the world of development, driven by a passion for crafting seamless digital experiences. When I'm not immersed in code, you'll often find me exploring new melodies on my guitar or discovering fresh beats to fuel my creativity. Join me as I navigate the intersection of technology and art, constantly seeking new ways to innovate and inspire.