Simple Steps to Dockerize an Application and Deploy on AWS EC2
 Jasai Hansda
In today’s software development, containerization is key for deploying and managing applications. Docker provides a lightweight, consistent environment, ensuring seamless operation across systems. This guide will show you how to Dockerize an application, from setup to deployment in AWS EC2.
Introduction to Docker
Before going into Docker, Let's understand How companies used to deploy applications in a server. They have different methods for deploying applications:
Bare Metal Servers involve installing the operating system directly on a physical server, making recovery slow in case of application crashes, and it could take around 30 minutes.
With Virtual Machines like AWS EC2, a hypervisor manages virtual machines, reducing downtime but still taking around 5 minutes to restart.
Docker, a containerization technology, uses images to create lightweight and isolated containers, allowing for instant recovery within seconds if the application crashes.
What is Docker?
Docker is a tool designed to create, deploy, and run applications using containers. Containers encapsulate everything your application needs to run, including the code, dependencies, libraries, and configurations.
What is Docker Image?
Docker Image is a template for creating Docker containers. It contains all dependencies and libraries needed to run an application. We can create a Docker image by using Dockerfile or by using the docker commit command. It is like a Package that contains all the dependencies and libraries required to run the application.
What is a Docker Container?
A Docker Container is a running instance of a Docker image. When we create a Docker container from a Docker image, it includes everything needed to run the application, such as the code, runtime, system tools, libraries, and settings.
Key Docker Features:
Consistent Runtime Environment: You can develop your application locally and be confident it will behave the same way when deployed to staging or production. This consistency eliminates the "it works on my machine" problem caused by different underlying infrastructures.
Lightweight and Fast Containers: Unlike traditional virtual machines that need a full operating system, Docker containers share the host system's kernel and only include essential components. This reduces overhead, speeds up startup times, and uses system resources more efficiently.
Integration with CI/CD Pipelines: It helps automate building, testing, and deploying applications, leading to quicker releases and more reliable software. Docker Hub offers a vast repository of pre-built images, speeding up development and deployment.
Dockerizing and Testing a simple To-do List API in AWS EC2
Any application can be hosted on EC2. We are Dockerizing a sample API and hosting it on AWS EC2.
Step 1: Create the API
We'll create a simple API that adds, deletes, and shows tasks in a to-do list using Node.js and Express.
Check Here For Detailed Project Setup
Step 2: Create a Dockerfile
The Dockerfile contains the instructions for building the Docker image for any kind of application. In this case, it is a Node.js application.
Let's create a file named Dockerfile in the project directory with the following content:
# Step 1: Use an official Node runtime as a parent image
FROM node:14

# Step 2: Set the working directory in the container
WORKDIR /app

# Step 3: Copy package.json and package-lock.json to the working directory
COPY package*.json ./

# Step 4: Install the application dependencies
RUN npm install

# Step 5: Copy the rest of the application code to the working directory
COPY . .

# Step 6: Expose port 3000 to the outside world
EXPOSE 3000

# Step 7: Define the command to run the application
CMD ["node", "index.js"]
Code Breakdown:
Step 1:FROM node:14 This line tells Docker to use the official Node.js 14 image as the base image for our new image. This means that our image will inherit all the dependencies and configurations from the Node.js 14 image.
Step 2:WORKDIR /app This line sets the working directory in the container to /app. This means that any subsequent commands will be executed in this directory.
Step 3:COPY package*.json./ This line copies the package.json and package-lock.json files from the current directory (i.e., the directory where the Dockerfile is located) to the working directory (/app) in the container. The * is a wildcard that matches both package.json and package-lock.json.
Step 4:RUN npm install This line runs the npm install command in the container, which installs the dependencies specified in package.json. This command is executed in the /app directory, which is where the package.json file was copied in the previous step.
Step 5:COPY.. This line copies the rest of the application code from the current directory to the working directory (/app) in the container. The . refers to the current directory, and the second . refers to the destination directory (/app).
Step 6:EXPOSE 3000 This line exposes port 3000 from the container to the outside world. This means that when the container is running, it will listen on port 3000 and allow incoming requests.
Step 7:CMD ["node", "index.js"] This line defines the default command to run when the container is started. In this case, it runs the node command with the argument index.js, which means that the index.js file will be executed as the entry point of the application.
In summary, this Dockerfile creates a Node.js 14 image, sets up the working directory, installs dependencies, copies the application code, exposes port 3000, and defines the command to run the application.
Step 3: Launch an EC2 Instance and Connect
We will set up an AWS EC2 instance where the Docker container will be running.
Step 4: Install Docker
Follow these instructions to install Docker on your operating system.
To install Docker on Amazon Linux 2 or Amazon Linux 2023
Update the installed packages and package cache on your instance.
sudo yum update -yInstall the most recent Docker Community Edition package.
For Amazon Linux 2, run the following:
sudo amazon-linux-extras install dockerFor Amazon Linux 2023, run the following:
sudo yum install -y docker
Start the Docker service.
sudo service docker startAdd the
ec2-userto thedockergroup so that you can run Docker commands without using sudo.sudo usermod -a -G docker ec2-userPick up the new
dockergroup permissions by logging out and logging back in again. To do this, close your current SSH terminal window and reconnect to your instance in a new one. Your new SSH session should have the appropriatedockergroup permissions.Verify that the
ec2-usercan run Docker commands without using sudo.docker psYou should see the following output, confirming that Docker is installed and running:
CONTAINER ID IMAGE COMMAND CREATED
Step 5: Set Up Your Project on EC2
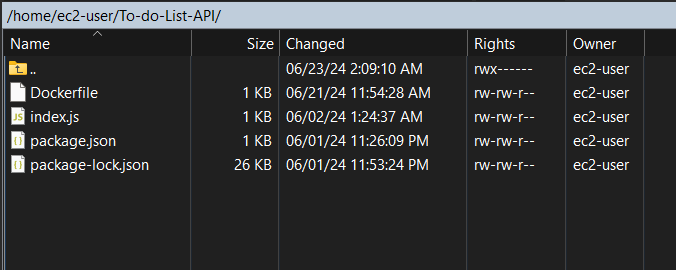
Clone your project repository or upload your project files to the EC2 instance.
You can use
gitto clone your repository:git clone https://github.com/your-username/your-repo.gitYou can use WinSCP to upload your project files:
Step 6: Build and Run Your Docker Container
BULID the Docker image:
docker build -t <image-name> <Dockerfile location>
docker build -t todo-list-api /home/ec2-user/To-do-List-API/If
Dockerfileis in current directory then this will also workdocker build -t todo-list-api .
RUN the Docker container:
The
to-do-apiimage created will be running on port 3000docker run -d -p 3000:3000 todo-list-api
VERIFY the Docker container running:
docker ps

Step 7: Verify and Add Security Group Rules:
Before Testing Ensure that your EC2 instance's security group has an inbound rule allowing traffic on port 3000.
VERIFY:
Go to the AWS Management Console.
Navigate to the EC2 Dashboard.
Select your running instance.
Under the Security tab, click on the security group associated with your instance.
Check the Inbound rules and ensure there is a rule that allows traffic on port 3000 from your IP address or from all IP addresses (0.0.0.0/0) for testing purposes.

Add Inbound Rule:
If the rule does not exist, click on Edit inbound rules.
Add a new rule:
Type: Custom TCP
Protocol: TCP
Port range: 3000
Source: Anywhere (0.0.0.0/0) for testing, or restrict to your IP for security.
Click Save rules.

Step 8: Testing the API hosted on EC2 instance
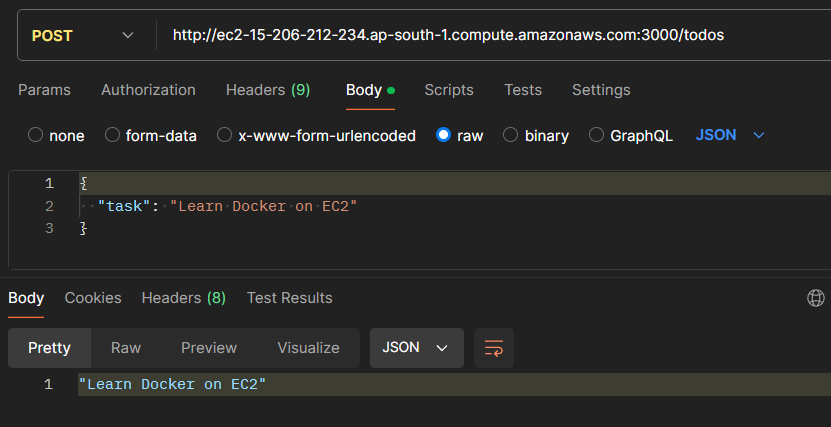
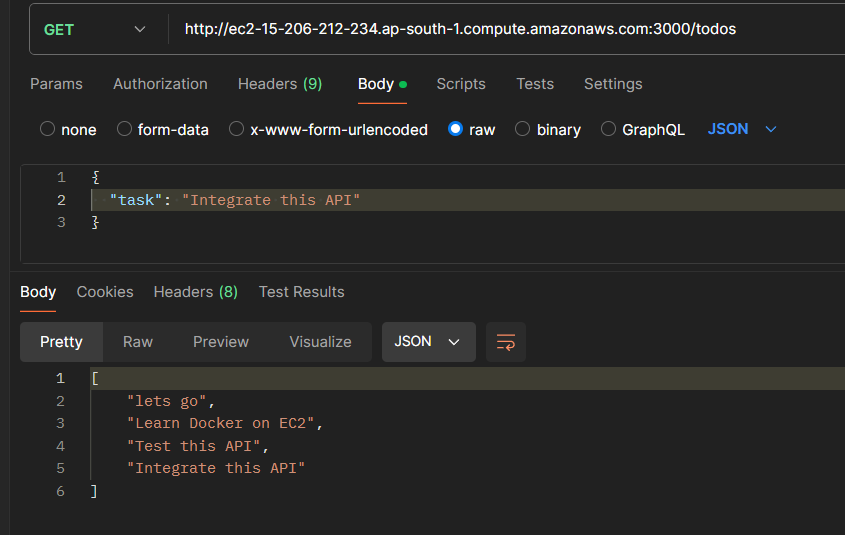
We will be testing this API in Postman using this endpoint which is hosted on port 3000 : http://your-ec2-public-dns:3000/todos
Basically we will be testing three endpoints,- GET /todos, POST /todos and DELETE /todos/:index
POST /todos - Let's add some tasks
GET /todos - Let's see what tasks we have to do
DELETE /todos/:index - Ok, Task done
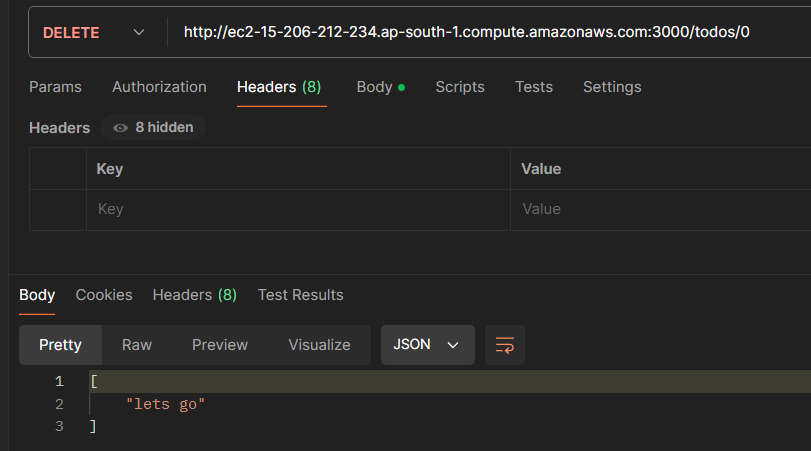
TEST PASSED!!!
Subscribe to my newsletter
Read articles from Jasai Hansda directly inside your inbox. Subscribe to the newsletter, and don't miss out.
Written by

Jasai Hansda
Jasai Hansda
Software Engineer (2 years) | In-transition to DevOps. Passionate about building and deploying software efficiently. Eager to leverage my development background in the DevOps and cloud computing world. Open to new opportunities!