Step by Step guide to create basic MVVM Application in Android
 Khush Panchal
In this blog we will create a basic mvvm application where user will fetch some data from the api and show it to the UI as a list.
For the sake of this article, we will use OMDb (The Open Movie Database) API to fetch the title and thumbnail image of the movie.
Purpose of this blog is to get started with creating MVVM project following proper architecture which can be used as a base to create any project.
This blog will help in machine coding round in android interviews.
Out of Scope for this blog:
Pagination
Testing
Compose
Offline Caching
Multiple Screen / Search section
Check out the NewsApp that covers all the above out of scope points.
1. Understanding the API
For this article we will be using free open source movie api which can be found at: https://www.omdbapi.com?s=army&apikey=[yourkey] (To Get Free API Key go to https://www.omdbapi.com/ and then API Key tab) ( I have used the search “army” keyword for the sake of this article so we can get some list of data)
Json looks like this:
{
  "Search": [
    {
      "Title": "Hellboy II: The Golden Army",
      "Year": "2008",
      "imdbID": "tt0411477",
      "Type": "movie",
      "Poster": "https://m.media-amazon.com/images/M/MV5BMjA5NzgyMjc2Nl5BMl5BanBnXkFtZTcwOTU3MDI3MQ@@._V1_SX300.jpg"
    },
    {
      "Title": "Army of Darkness",
      "Year": "1992",
      "imdbID": "tt0106308",
      "Type": "movie",
      "Poster": "https://m.media-amazon.com/images/M/MV5BODcyYzM4YTAtNGM5MS00NjU4LTk2Y2ItZjI5NjkzZTk0MmQ1XkEyXkFqcGdeQXVyNjU0OTQ0OTY@._V1_SX300.jpg"
    },
    ..
    ..
   ],
  "totalResults": "703",
  "Response": "True"
}
- For this project we show the list showing image and title of the movie.
2. Add dependencies
- Create the new android project in Android Studio and add the following dependency in app level
build.gradle.ktsorbuild.gradlefile.
//build.gradle.kts

dependencies {

    //Dagger for dependency injection
    implementation("com.google.dagger:hilt-android:2.51")
    kapt("com.google.dagger:hilt-compiler:2.51")

    //Glide for image loading
    implementation("com.github.bumptech.glide:glide:4.16.0")

    //Retrofit for networking
    implementation("com.squareup.retrofit2:retrofit:2.9.0")
    implementation("com.squareup.retrofit2:converter-gson:2.9.0")

    //ViewModel scope
    implementation("androidx.lifecycle:lifecycle-viewmodel-ktx:2.8.2")
}
- Additionally for Hilt add the following plugins in app level
build.gradle.ktsorbuild.gradlefile.
//build.gradle.kts

plugins {
    id("com.android.application")
    id("org.jetbrains.kotlin.android")
    id("kotlin-kapt") //<-- this one
    id("com.google.dagger.hilt.android") // <-- this one
}
- Also add following at root level
build.gradle.ktsorbuild.gradlefile.
//build.gradle.kts

plugins {
    id("com.android.application") version "8.1.4" apply false
    id("org.jetbrains.kotlin.android") version "1.9.0" apply false
    id("com.google.dagger.hilt.android") version "2.51" apply false //<-- this one
}
- Since we will be using view binding for our xml layouts, add the following in app level
build.gradle.ktsorbuild.gradlefile.
//build.gradle.kts

android {
..
..
  buildFeatures {
      viewBinding = true
  }
}
- Sync the gradle and run your project.
3. Create Application class and Add necessary permissions in Manifest file
- Create Application class and add
@HiltAndroidAppannotation.
//MainApplication.kt

@HiltAndroidApp
class MainApplication: Application()
- Add the name in manifest file.
<!--AndroidManifest.xml-->

<application
  android:name=".MainApplication">
</application>
- Add Internet permission in manifest file.
<!--AndroidManifest.xml-->

<uses-permission android:name="android.permission.INTERNET"/>
4. Create Folder structure
Create the following folder structure, with empty folders (“common”, “data/model”, “data/network”, “data/repository”, “di/module”, “ui”, “ui/viewmodel”).
Check the below final project structure added for reference only, we will create each file step by step.
|── MainApplication.kt
├── common
│   ├── Const.kt
│   └── UIState.kt
├── data
│   ├── model
│   │   ├── MainData.kt
│   ├── network
│   │   ├── ApiInterface.kt
│   └── repository
│       └── MainRepository.kt
├── di
│   ├── module
│   │   └── ApplicationModule.kt
├── ui
    ├── MainActivity.kt
    ├── MainAdapter.kt
    └── viewmodel
        ├── MainViewModel.kt
5. Create Model class (Data Layer)
- Create class
MainData.ktinside “data/model” folder and add the following data class based on the JSON, we are using only title and image.
//MainData.kt

data class ApiResponse(
    @SerializedName("Search")
    val dataList: List<MainData>?
)

data class MainData(
    @SerializedName("Title")
    val title: String,

    @SerializedName("Poster")
    val poster: String
)
6. Create Networking interface (Data Layer)
- First create object class
Const.ktinside “common” folder and add Base url and Api Key.
//Const.kt

object Const {
    const val BASE_URL = "https://www.omdbapi.com/"
    const val API_KEY = "your api key"
}
- Then create
ApiInterface.ktclass inside “data/network” folder with following function.
//ApiInterface.kt

interface ApiInterface {
    @GET(".")
    suspend fun getMoviesData(
        @Query("s") s: String = "army",
        @Query("apikey") apikey: String = Const.API_KEY
    ): ApiResponse
}
- We are not using OkHttp interceptor for adding api key for of this article but it is recommended to add api key via interceptors.
7. Create ApplicationModule (DI Layer)
- Create
ApplicationModule.ktclass inside “di/module” folder for providing Retrofit instance.
//ApplicationModule.kt

@Module
@InstallIn(SingletonComponent::class)
class ApplicationModule {

    @Singleton
    @Provides
    fun provideNetworkService(): ApiInterface {
        return Retrofit
            .Builder()
            .baseUrl(Const.BASE_URL)
            .addConverterFactory(GsonConverterFactory.create())
            .build()
            .create(ApiInterface::class.java)
    }
}
8. Create Repository class (Data Layer)
- Create
MainRepository.ktclass inside “data/repository” folder that will return flow of list which will be collected by view model.
//MainRepository.kt

@Singleton
class MainRepository @Inject constructor(
    private val apiInterface: ApiInterface
) {

    fun getMainData(): Flow<List<MainData>> {
        return flow {
            emit(
                apiInterface.getMoviesData().dataList ?: emptyList()
            )
        }
    }
}
9. Create ViewModel and UIState (UI Layer)
- First create
UIState.ktinside “common” folder which is a sealed interface representing the state of UI that will emit and collect between ViewModel and UI component.
//UIState.kt

sealed interface UIState<out T> {
    data class Success<T>(val data: T) : UIState<T>
    data class Failure<T>(val throwable: Throwable, val data: T? = null) : UIState<T>
    data object Loading : UIState<Nothing>
}
Then create
MainViewModel.ktinside “ui/viewmodel” folder which extendsViewModel()and injectMainRepository.We use StateFlow to emit data from ViewModel and then collect by UI.
We use IO dispatcher for network call (For this article we are not injecting dispatcher from outside, but it is recommended to provide from outside).
//MainViewModel.kt

@HiltViewModel
class MainViewModel @Inject constructor(
    private val mainRepository: MainRepository
) : ViewModel() {

    private val _mainItem = MutableStateFlow<UIState<List<MainData>>>(UIState.Loading)
    val mainItem: StateFlow<UIState<List<MainData>>> = _mainItem

    init {
        fetchItems()
    }

    private fun fetchItems() {
        viewModelScope.launch {
            _mainItem.emit(UIState.Loading)
            mainRepository
                .getMainData()
                .flowOn(Dispatchers.IO)
                .catch {
                    _mainItem.emit(UIState.Failure(it))
                }
                .collect {
                    _mainItem.emit(UIState.Success(it))
                }
        }
    }

}
10. Create Layouts (UI Layer)
- Edit
activity_main.xmlwith RecyclerView for showing the list, progress bar and error message.
<!--activity_main.xml-->

<?xml version="1.0" encoding="utf-8"?>
<androidx.constraintlayout.widget.ConstraintLayout xmlns:android="http://schemas.android.com/apk/res/android"
    xmlns:app="http://schemas.android.com/apk/res-auto"
    xmlns:tools="http://schemas.android.com/tools"
    android:layout_width="match_parent"
    android:layout_height="match_parent"
    tools:context=".ui.MainActivity">

    <androidx.recyclerview.widget.RecyclerView
        android:id="@+id/rv"
        android:layout_width="match_parent"
        android:layout_height="match_parent"
        android:visibility="gone"
        app:layout_constraintStart_toStartOf="parent"
        app:layout_constraintTop_toTopOf="parent" />

    <ProgressBar
        android:id="@+id/progress"
        android:layout_width="wrap_content"
        android:layout_height="wrap_content"
        android:visibility="gone"
        app:layout_constraintBottom_toBottomOf="parent"
        app:layout_constraintEnd_toEndOf="parent"
        app:layout_constraintStart_toStartOf="parent"
        app:layout_constraintTop_toTopOf="parent" />

    <TextView
        android:id="@+id/error"
        android:layout_width="wrap_content"
        android:layout_height="wrap_content"
        android:visibility="gone"
        app:layout_constraintBottom_toBottomOf="parent"
        app:layout_constraintEnd_toEndOf="parent"
        app:layout_constraintStart_toStartOf="parent"
        app:layout_constraintTop_toTopOf="parent"
        tools:text="Something went wrong" />

</androidx.constraintlayout.widget.ConstraintLayout>
- Create
item_main.xmllayout and put inside “res” folder for single item visible on UI that will be used by Recycler View Adapter.
<!--item_main.xml-->

<?xml version="1.0" encoding="utf-8"?>
<androidx.constraintlayout.widget.ConstraintLayout xmlns:android="http://schemas.android.com/apk/res/android"
    xmlns:app="http://schemas.android.com/apk/res-auto"
    xmlns:tools="http://schemas.android.com/tools"
    android:layout_width="match_parent"
    android:layout_height="110dp">

    <ImageView
        android:id="@+id/iv_item"
        android:layout_width="100dp"
        android:layout_height="100dp"
        android:layout_margin="5dp"
        app:layout_constraintStart_toStartOf="parent"
        app:layout_constraintTop_toTopOf="parent"
        tools:background="@color/design_default_color_secondary" />

    <TextView
        android:id="@+id/tv_item"
        android:layout_width="wrap_content"
        android:layout_height="wrap_content"
        android:layout_margin="5dp"
        app:layout_constraintBottom_toBottomOf="parent"
        app:layout_constraintStart_toEndOf="@+id/iv_item"
        app:layout_constraintTop_toTopOf="parent"
        tools:text="Hey there" />

</androidx.constraintlayout.widget.ConstraintLayout>
11. Create Adapter class (UI Layer)
Create
MainAdapter.ktinside “ui” folder that extends RecyclerView Adapter.We use DiffUtil for calculating data diff and bind data.
We use Glide for loading image into image view.
//MainAdapter.kt

class MainAdapter : RecyclerView.Adapter<MainAdapter.MainViewHolder>() {

    private val items = ArrayList<MainData>()

    fun setItems(items: List<MainData>) {
        val diffResult = DiffUtil.calculateDiff(MainDiffCallBack(this.items, items))
        this.items.clear()
        this.items.addAll(items)
        diffResult.dispatchUpdatesTo(this)
    }

    override fun onCreateViewHolder(parent: ViewGroup, viewType: Int): MainViewHolder {
        return MainViewHolder(
            ItemMainBinding.inflate(LayoutInflater.from(parent.context), parent, false)
        )
    }

    override fun getItemCount(): Int {
        return items.size
    }

    override fun onBindViewHolder(holder: MainViewHolder, position: Int) {
        holder.bind(items[position])
    }

    inner class MainViewHolder(private val binding: ItemMainBinding) : ViewHolder(binding.root) {

        fun bind(mainData: MainData) {
            binding.tvItem.text = mainData.title
            Glide.with(itemView.context)
                .load(mainData.poster)
                .placeholder(com.google.android.material.R.color.design_default_color_secondary)
                .into(binding.ivItem)
        }

    }
}

class MainDiffCallBack(private val oldList: List<MainData>, private val newList: List<MainData>) :
    DiffUtil.Callback() {
    override fun getOldListSize(): Int {
        return oldList.size
    }

    override fun getNewListSize(): Int {
        return newList.size
    }

    override fun areItemsTheSame(oldItemPosition: Int, newItemPosition: Int): Boolean {
        return (oldList[oldItemPosition].title == newList[newItemPosition].title)

    }

    override fun areContentsTheSame(oldItemPosition: Int, newItemPosition: Int): Boolean {
        return oldList[oldItemPosition] == newList[newItemPosition]
    }
}
12. Observe UIState inside MainActivity (UI Layer)
Drag
MainActivity.ktfile inside “ui” folder.We collect Flow from viewmodel and update UI.
//MainActivity.kt

@AndroidEntryPoint
class MainActivity : AppCompatActivity() {

    private lateinit var binding: ActivityMainBinding

    private lateinit var adapter: MainAdapter

    private val mainViewModel: MainViewModel by lazy {
        ViewModelProvider(this)[MainViewModel::class.java]
    }

    override fun onCreate(savedInstanceState: Bundle?) {
        super.onCreate(savedInstanceState)
        binding = ActivityMainBinding.inflate(layoutInflater)
        setContentView(binding.root)
        adapter = MainAdapter()
        collector()
        setupUI()
    }

    private fun setupUI() {
        binding.rv.adapter = adapter
        binding.rv.layoutManager =
            LinearLayoutManager(this, LinearLayoutManager.VERTICAL, false)
        binding.rv.addItemDecoration(
            DividerItemDecoration(
                this,
                DividerItemDecoration.VERTICAL
            )
        )
    }

    private fun collector() {
        lifecycleScope.launch {
            repeatOnLifecycle(Lifecycle.State.STARTED) {
                mainViewModel.mainItem.collect {
                    when (it) {
                        is UIState.Success -> {
                            binding.progress.visibility = View.GONE
                            binding.error.visibility = View.GONE
                            binding.rv.visibility = View.VISIBLE
                            adapter.setItems(it.data)
                        }

                        is UIState.Failure -> {
                            binding.progress.visibility = View.GONE
                            binding.error.visibility = View.VISIBLE
                            binding.rv.visibility = View.GONE
                            binding.error.text = it.throwable.toString()
                        }

                        is UIState.Loading -> {
                            binding.progress.visibility = View.VISIBLE
                            binding.error.visibility = View.GONE
                            binding.rv.visibility = View.GONE
                        }
                    }
                }
            }
        }
    }

}
Run your application after each step to check everything is working fine.
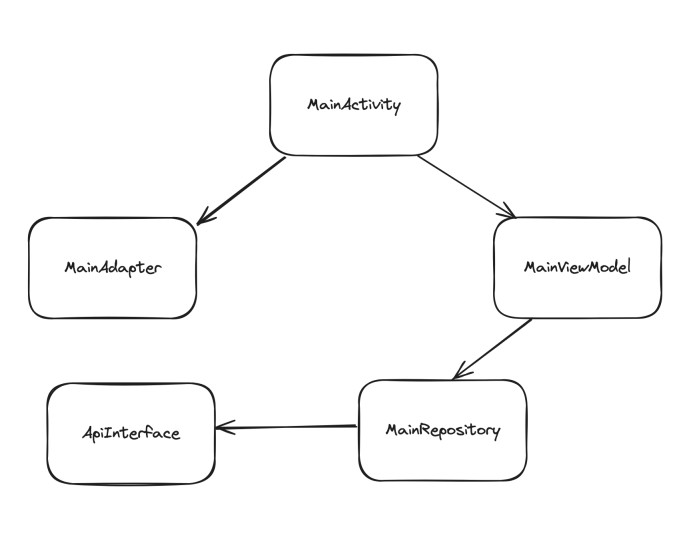
High level flow
- Check the below high level flow of how data coming from API and is shown to UI.

- Using the above step by step approach help making a base for any MVVM application making it scalable.
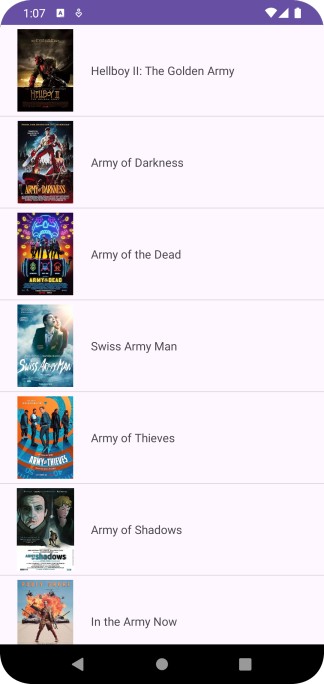
Final Result

Source Code: GitHub
Contact Me:
Happy Coding ✌️
Subscribe to my newsletter
Read articles from Khush Panchal directly inside your inbox. Subscribe to the newsletter, and don't miss out.
Written by

Khush Panchal
Khush Panchal
Currently working as an Android Engineer at ALLEN Digital, making the learning journey smoother and more engaging for millions of students. Previously, I worked at Amazon MX Player, a popular video streaming platform with over 1 billion downloads, where I contributed to features across SVOD, Ad Tech, and Smart TV domains. I have hands-on experience across the entire Android development lifecycle — from planning and design to deployment — using modern tools and technologies like Kotlin, Jetpack Compose, KMP, CMP, ExoPlayer, Flow, and Coroutines. I graduated from IIT Kharagpur and was awarded the Institute Silver Medal for the best academic performance in my department, along with the Prof. Sudhir Ranjan Sengupta Memorial Prize for academic excellence. Beyond work, I’m an active open-source contributor with over 700 stars across various repositories, including EventKT (a highly customizable Android tracking library) and Ketch (an Android file downloader library with over 500 stars). I also write technical blogs that simplify complex topics for developers. I’m passionate about learning new technologies, solving challenging problems, and collaborating with diverse teams. Always open to exciting projects and opportunities to contribute.