SonarQube Scanner and SonarQube Server Configuration in Jenkins
 Kadaie Kyiphyu
Hi Welcome back to Burmese Bytes
SonarQube Server ၊ Scanner နဲ့ Quality Gate တို့ရဲ့ work flow ကိုမသိသေးရင်တော့ ဒီမှာအရင်ဆုံးသွားကြည့်နိုင်ပါတယ်။
ဒီအပိုင်းမှာတော့ Application Source Code တွေကို Sonar Scanner နဲ့ Scan ဖတ် ပြီး SonarQube Server ဆီကို report အနေနဲ့ ပို့တဲ့ Step တွေကို Jenkins pipeline နဲ့ integrate လုပ်ပြသွားမှာပါ။
အောက်က step တွေကို မစတင်ခင် အရင် ဆုံး perquisite အနေနဲ့ SonarQube Server install ထားရပါမယ်။
မလုပ်ရသေးရင် ဒီမှာ ကြည့်လုပ်နိုင်ပါတယ်။
Jenkins pipeline job တစ်ခု ရှိရပါမယ်။ Jenkins နဲ့ သိပ်မရင်းနီးသေးရင် CI/CD Tools ဆိုတဲ့ Series အောက်မှာ Jenkins နဲ့ ပတ်သက်ပြီး Burmese Bytes ရဲ့ Member အကိုတစ်ယောက်ရေးထားတာရှိပါတယ်။Jenkins နဲ့ သိပ်မရင်းနီးသေးရင် အရင်စမ်းကြည့်သင့်ပါတယ်။
ဒါဆိုရင်တော့ စလို့ရလောက်ပြီထင်ပါတယ် …
မှတ်ရလွယ်အောင် လုပ်ရမယ့် Step လေးတွေကို အရင်ဆုံး Checklist လေးတွေ ချရေးကြည့်ရအောင်။
Check List
Install and configure the SonarQube Scanner Plugin in the Jenkins Management Console.
Install and configure the SonarQube Scanner tools in the Jenkins Management Console.
Configure the SonarQube server connection in the Jenkins Management Console.
- Generate a SonarQube server authentication token and create a Jenkins credential with the token.
Create a project in the SonarQube Server Management Console.
1. Install and configure the SonarQube Scanner Plugin in the Jenkins Management Console.
အရင်ဆုံး SonarQube Scanner Plugin ကို Jenkins ရဲ့ Plugins ထဲကနေရှာပြီး install လုပ်ရပါမယ်။
Jenkins Management Console ကနေ Manage Jenkins > Plugins > Available plugins ကိုသွားလိုက်ပါ ပြီးရင်တော့ Search box မှာ SonarQube Scanner ဆိုပြီးပုံမှာပြထားတဲ့အတိုင်း install လိုက်ရင်ရပါပြီ။
Plugin: https://plugins.jenkins.io/sonar/


SonarQube Scanner Plugin ကို install လုပ်ပြီးတာနဲ့ Jenkins Management Console ကနေ Manage Jenkins > Tools ထဲကို သွားပြီး အောက်ဘက်ကို Scroll ဆွဲကြည့်တဲ့အခါမှာ SonarQube Scanner နဲ့ပတ်သက်တဲ့ Tools Configuration လုပ်လို့ရတဲ့နေရာတစ်ခု ကို တွေ့ရပါလိမ့်မယ်မယ်။

နောက်တစ်ခုကတော့ Manage Jenkins > Systems ထဲကို သွားပြီး အောက်ဘက်ကို scroll ဆွဲကြည့်တဲ့အခါမှာ SonarQube Servers နဲ့ပတ်သက်တဲ့ Configuration လုပ်လို့ရတဲ့နေရာတစ်ခု တွေ့ရပါလိမ့်မယ်။

2. Install and configure the SonarQube Scanner tools in the Jenkins Management Console.
အရင်ဆုံး SonarQube Scanner ရဲ့ Tools configurations ကို အရင် စလုပ်ပါမယ်။ အဲ့ဒီမှာ သတိထားရမှာက ကိုယ်က dotnet(Microsoft .NET) application အတွက်ဆိုရင်တော့ SonarScanner for MSBuild ကို install လုပ်ပေးရမှာ ဖြစ်ပြီး တခြား Application ဆိုရင်တော့ သာမာန် SonarQube Scanner ကိုပဲ install လုပ်ရမှာပါ။
SonarQube Scanner ကိုပဲ သုံးမယ်ဆိုရင်တော့ Jenkins console ကနေ Manage Jenkins > Tools ထဲကို ပြန်သွားပြီးရင် ပုံမှာပြထားတဲ့အတိုင်း Scanner installations ဆိုပြီးရှာလို့တွေ့နိုင်ပါတယ်။Add SonarQube Scanner ကို နှိပ်ပြီး ဒီတိုင်းလေးရွေးပေးလိုက်ရင်ရပါပြီ။ ဒီ tools လေးကနေ ညီမတို့ရဲ့ Source Code တွေကို Scanner ဖတ်ပေးမှာပါ။ Name ကိုတော့ ဒီမှာ Sonar လို့ပဲ ပေးထားလိုက်ပါတယ်။
Manage Jenkins > Tools > SonarQube Scanner installations


3. Configure the SonarQube server connection in the Jenkins Management Console.
နောက်တစ်ခုကတော့ Scanner ကဖတ်လို့ရတဲ့ scanning reports တွေကို SonarQube Server ဆီကို ပို့နိုင်ဖို့ Connection အတွက် SonarQube Server Configurations ကို Jenkins System ထဲမှာ လုပ်ရပါမယ်။ SonarQube server connection အတွက် configuration မလုပ်ခင်မှာ လိုအပ်တာတွေကိုအရင်ဆုံးလုပ်ရပါမယ်။ အဲ့တာတွေကတော့
SonarQube Scanner ဆီကနေ SonarQube Server ဆီကို scanning reports တွေပို့တဲ့အခါ authenticate လုပ်ဖို့အတွက် access token တစ်ခုလိုပါတယ်။ Access token ကို SonarQube Server မှာ Generate လုပ်ရပါမယ်။ပြီးရင်တော့ ရလာတဲ့ access token ကို Jenkins မှာ Credential တစ်ခုအနေနဲ့ Create လုပ်ရပါမယ်။ ဒီ step လေးတွေစလုပ်ကြရအောင် …
3.1 Generate authentication access token in SonarQube Server
SonarQube Server Console ကိုသွားပါမယ်။ ပြီရင် ညာဘက် အပေါ်ဒေါင့်လေးမှာရှိတဲ့ Account ပုံစံ icon လေးကိုနှိပ်ပြီး My Account ထဲကိုသွားပါ။ (ဒီမှာတော့ admin account ကိုပဲသုံးပြထားပါတယ်)(ဒီတိုင်းလည်းသွားနိုင်ပါတယ် http://sonar-qube-url/account)
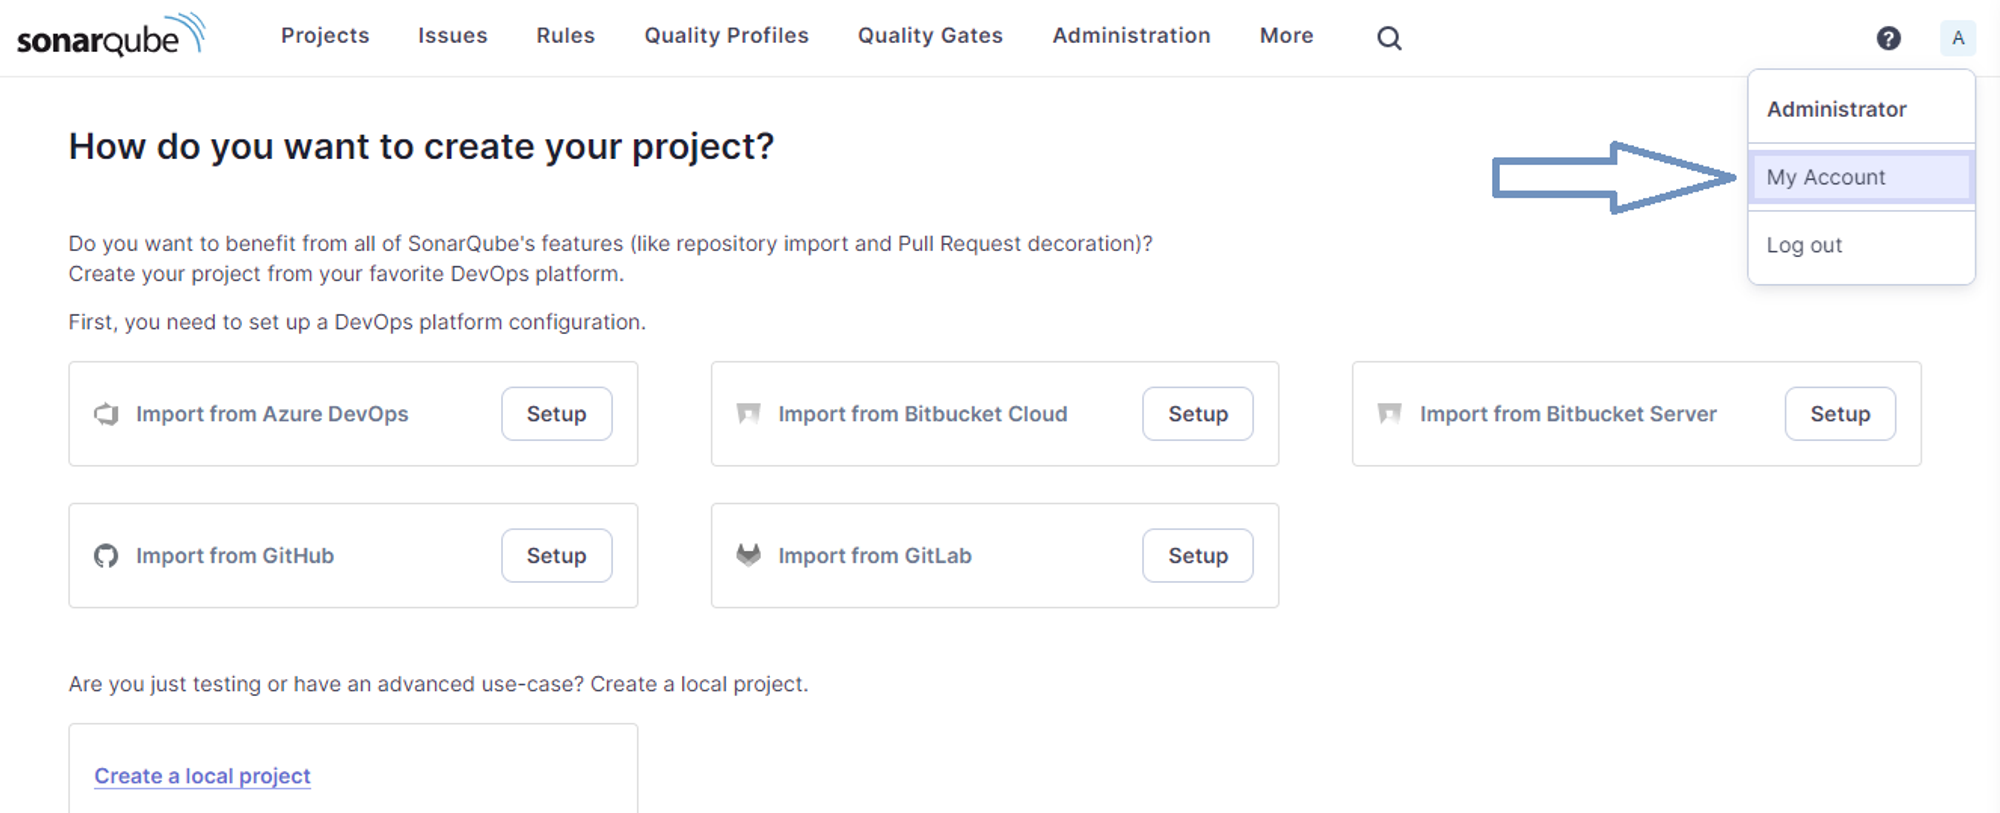
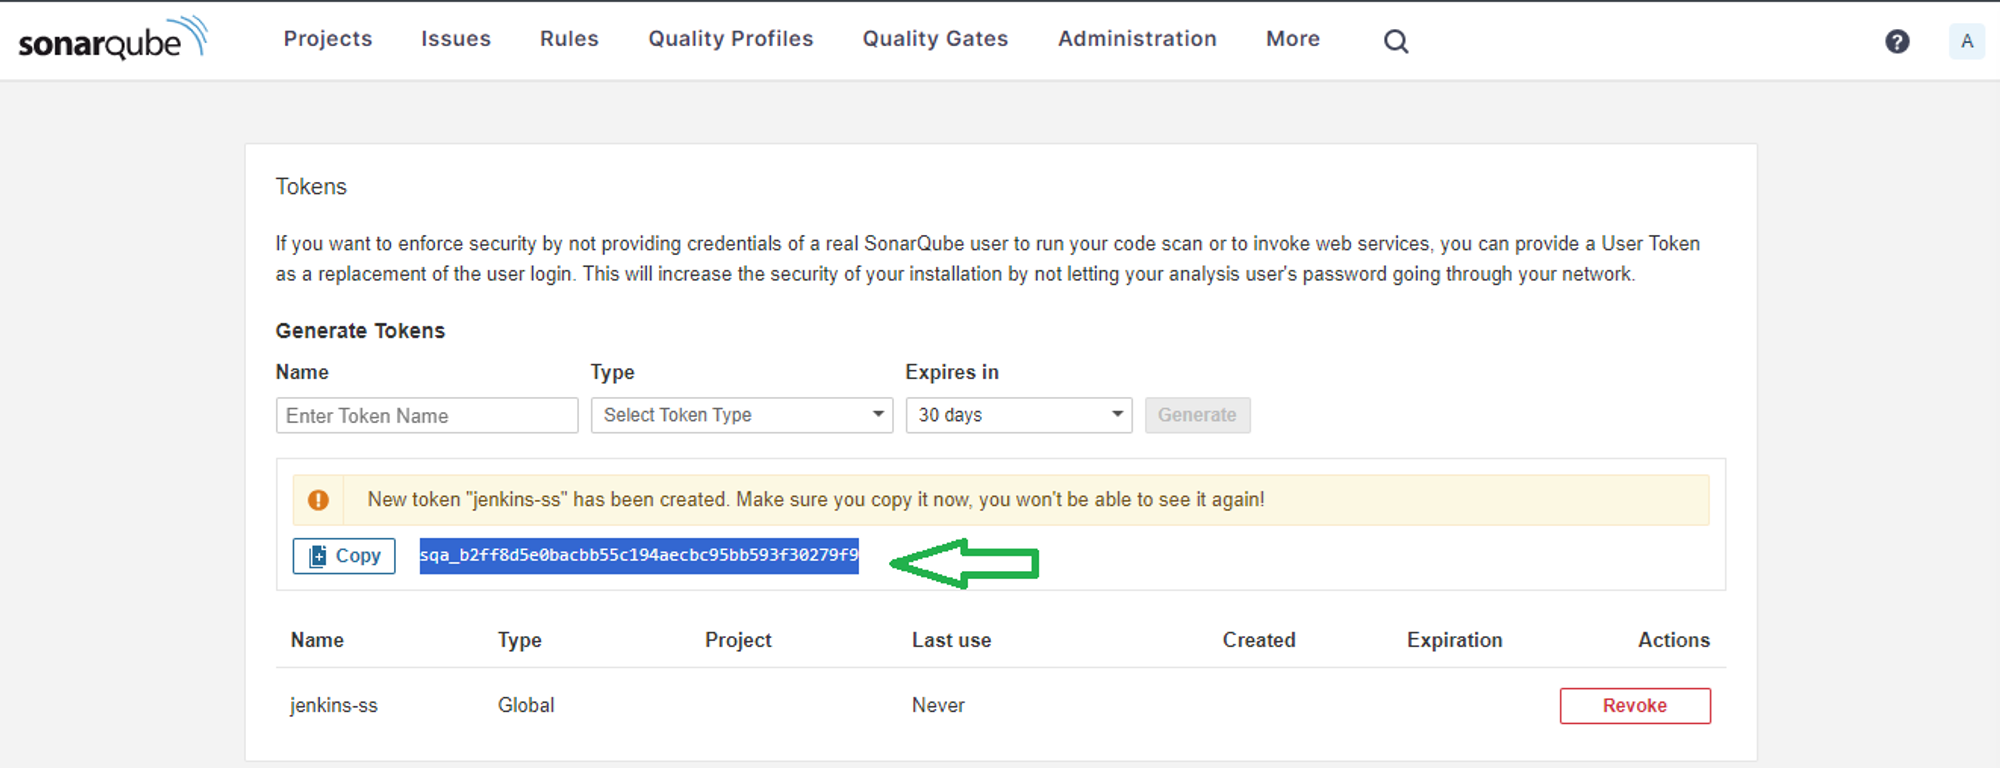
ပြီးရင်တော့ Security Tab ကိုသွားပါ။ အောက်မှာပြထားတဲ့အတိုင်း Token name, Type Token Expire Date တို့ကို သတ်မှတ်ပြီး Generate လုပ်လို့ရပါပြီ။ type ကို Global Analysis Token လို့ပဲ ရွေးထားပါတယ်။

Generate လုပ်လိုက်ပြီဆိုတာနဲ့ ဒီလို token လေးကို အောက်ကပုံအတိုင်းတွေရမှာပါ။ Copy ကူးခဲ့ပါ ပျောက်သွားမှာစိုးရင် notepad မှာ ဖြစ်ဖြစ် ခဏ paste လုပ်ထားပါ။ ပြီးရင်တော့ အဲ့ဒီ token ကို Jenkins မှာ credential အနေနဲ့ create စလုပ်ပါမယ်။
ဒီတစ်ခါမှာတော့ အခုက ရလာတဲ့ token ကို Jenkins Credential အနေနဲ့ create လုပ်ဖို့အတွက် Jenkins Management Console ကိုပြန်သွားပါမယ်။ ပြီးရင် Manage Jenkins > Credentials ထဲကိုသွားပါမယ် Security အောက်မှာရှိပါတယ်။ ပြီးရင်တော့ Global ကိုနှိပ်ပြီးဝင်သွားလိုက်ပါ။

Add Credentials ကို နှိပ်ပြီး Credential အသစ်တစ်ခု စပြီး Create လုပ်လို့ရပါပြီ။

ဒီနေရာမှာ Secret text ကိုရွေးပါမယ်။

ပြီးရင်တော့ Secret နေရာမှာ အခုဏ Copy လုပ်ခဲ့ တဲ့ Token ကိုထည့်ပါမယ်။ ID နေရာမှာတော့ ပြန်ယူသုံးမယ့် နာမည်တစ်ခုပေးလိုက်ပြီး Create လိုက်ရင်ရပါပြီ။

အခုဆိုရင်တော့ အပေါ်မှာပြောခဲ့တဲ့ Jenkins System ထဲမှာ SonarQube Server အတွက် Configuration စလုပ်ဖို့လိုအပ်တဲ့ Access Token နဲ့ Credential တွေရပါပြီ။
SonarQube Server အတွက် Configuration စလုပ်ဖို့ Jenkins Console ကိုပြန်သွားလိုက်ပါ။ ပြီးရင်တော့
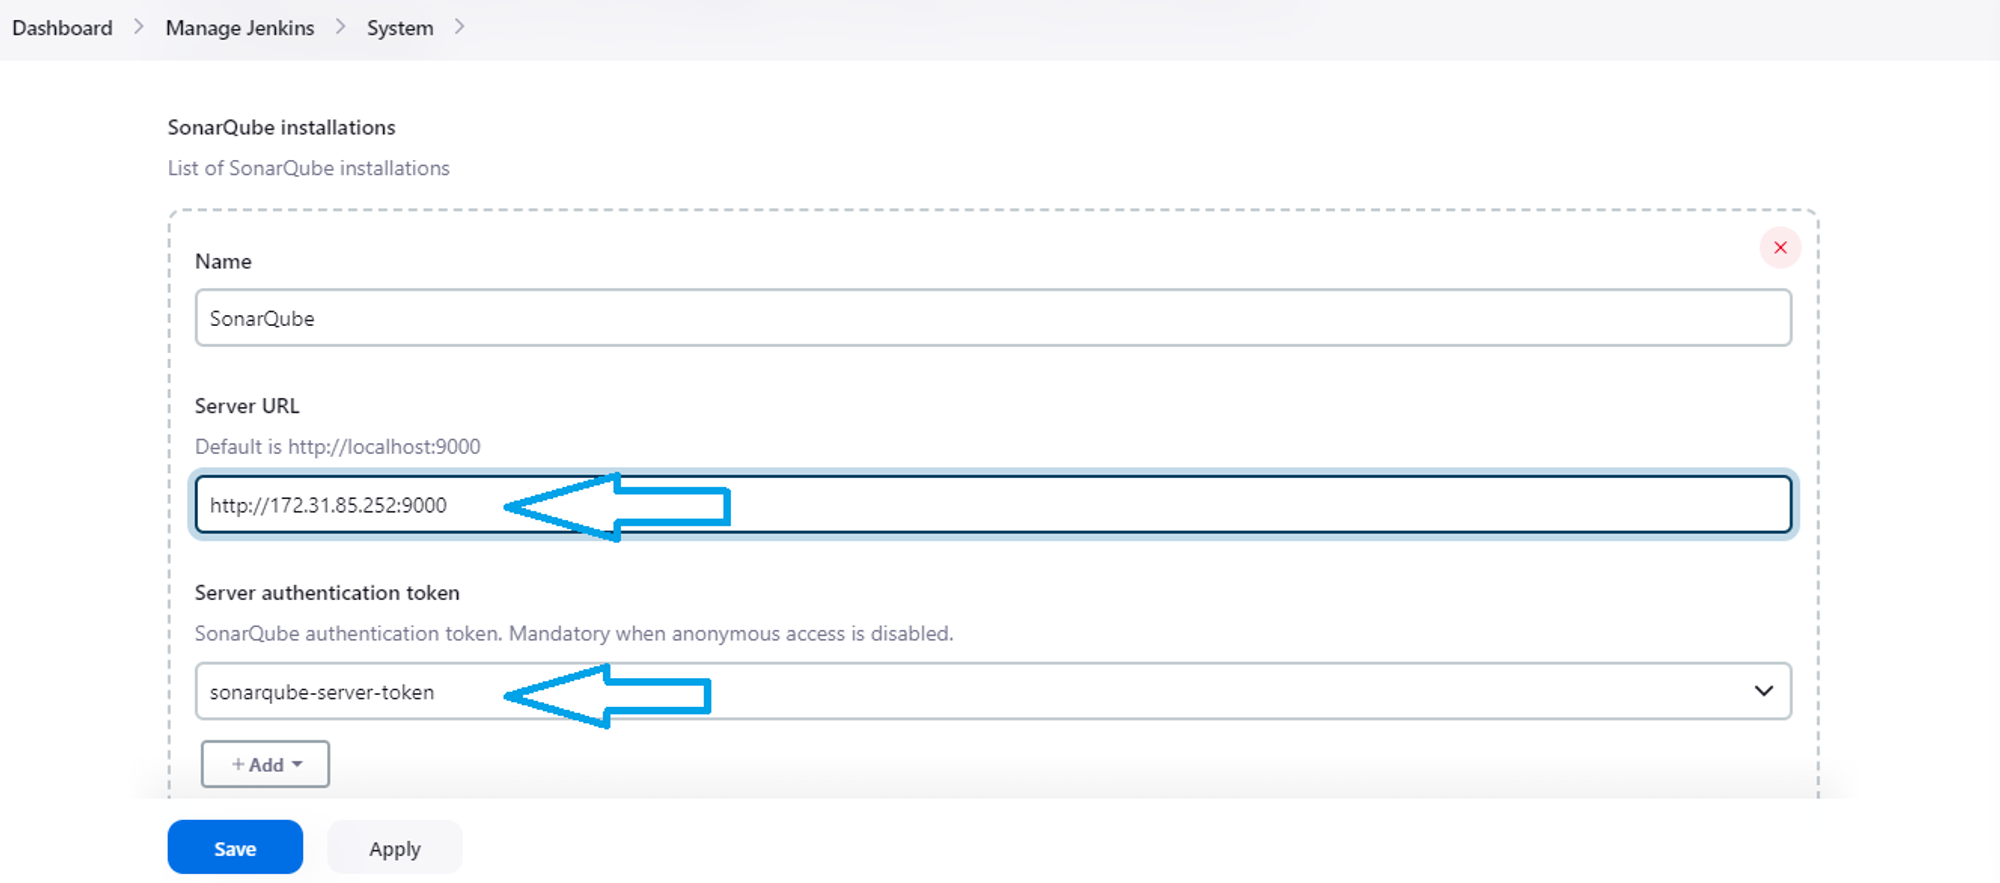
Manage Jenkins > Systems ထဲကိုသွားပြီး SonarQube Installations ရဲ့ အောက်မှာ Add SonarQube ကိုနှိပ်ပါ။

Server URL ကတော့ SonarQube Server URL Address ကို ထည့်ရမှာပါ။ ဒီမှာတော့ SonarQube Server ရဲ့ Private IP ကိုပဲ အသုံးပြုပေးလိုက်ပါတယ်။
Server authentication token နေရာမှာကတော့ Jenkins မှာ Access Token နဲ့ create လုပ်ခဲ့တဲ့ Credential ကို အသုံးပြုရမှာပါ။ ပြီးရင်တော့ ရပါပြီ။ Apply > Save ကိုနှိပ်ပြီးထွက်လိုက်ပါ။
အခုဆိုရင်တော့ SonarQube Server နဲ့ Sonar Scanner တို့ရဲ့ Installation and configurations ပြီးသွားပါပြီ။ Source code တွေကို Scan ဖတ်လို့ရပြီလား Server ဆီကို report တွေ ပို့လို့ရပြီလား လို့ စပြီး စမ်းကြရအောင်ပါ။စာအရမ်းရှည်သွားမှာစိုးလို့ Quality Gate ကိုတော့ နောက်ထပ် post တစ်ခုအနေနဲ့ ဆက်ရေးထားပါတယ်။
4. Create a project in the SonarQube Server Management Console.
SonarQube Server နဲ့ Sonar Scanner ကို စမ်းဖို့အတွက် SonarQube Server ဆီကိုအရင်သွားပါမယ်။ပြီးရင် Project အသစ်တစ်ခု စပြီး Create လုပ်ပါမယ်။
Create a local project ကိုရွေးပြီးပဲ Create လုပ်ပါမယ်။
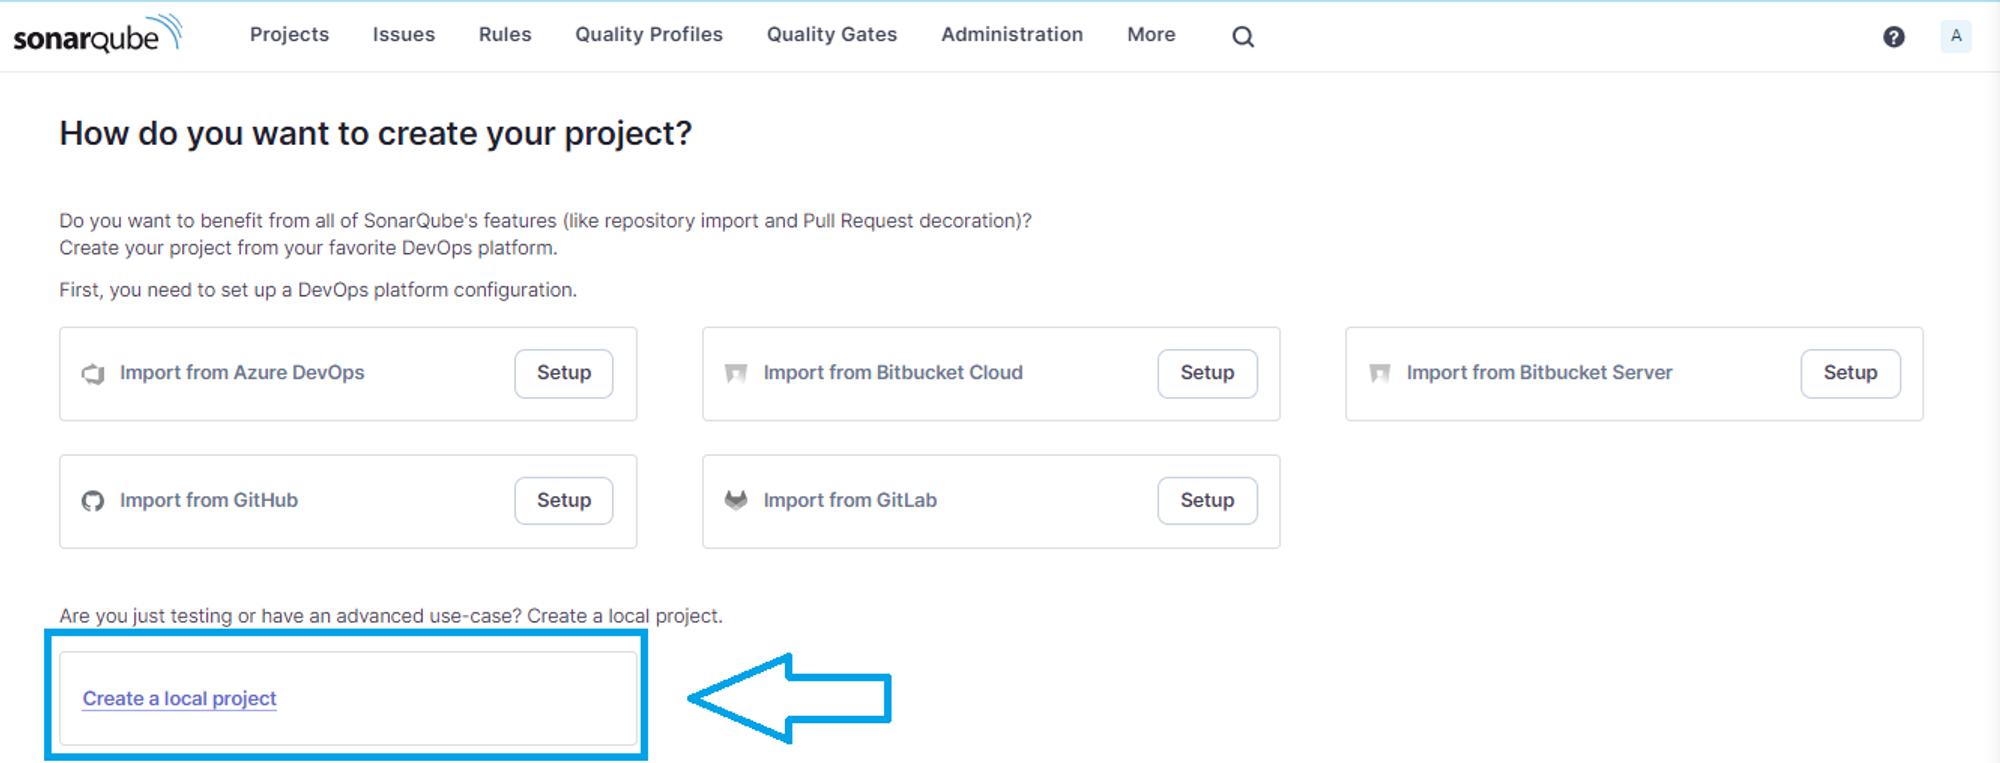
Project Name, Project Key နဲ့ default git branch name တို့ကို ထည့်ပါမယ် ပြီးရင် Next ဆက်သွားလိုက်ပါ။

Global setting ပဲသုံးပါမယ်။

ပြီးရင်တော့ Jenkins pipeline ထဲမှာ သုံးမှာမလို့ With Jenkins ကိုရွေးလိုက်ပါ။

အခု Jenkins pipeline မှာသုံးထားတဲ့ Code တွေက GitHub မှာ ရှိတာမလို့ GitHub ကိုပဲရွေးပါမယ်။
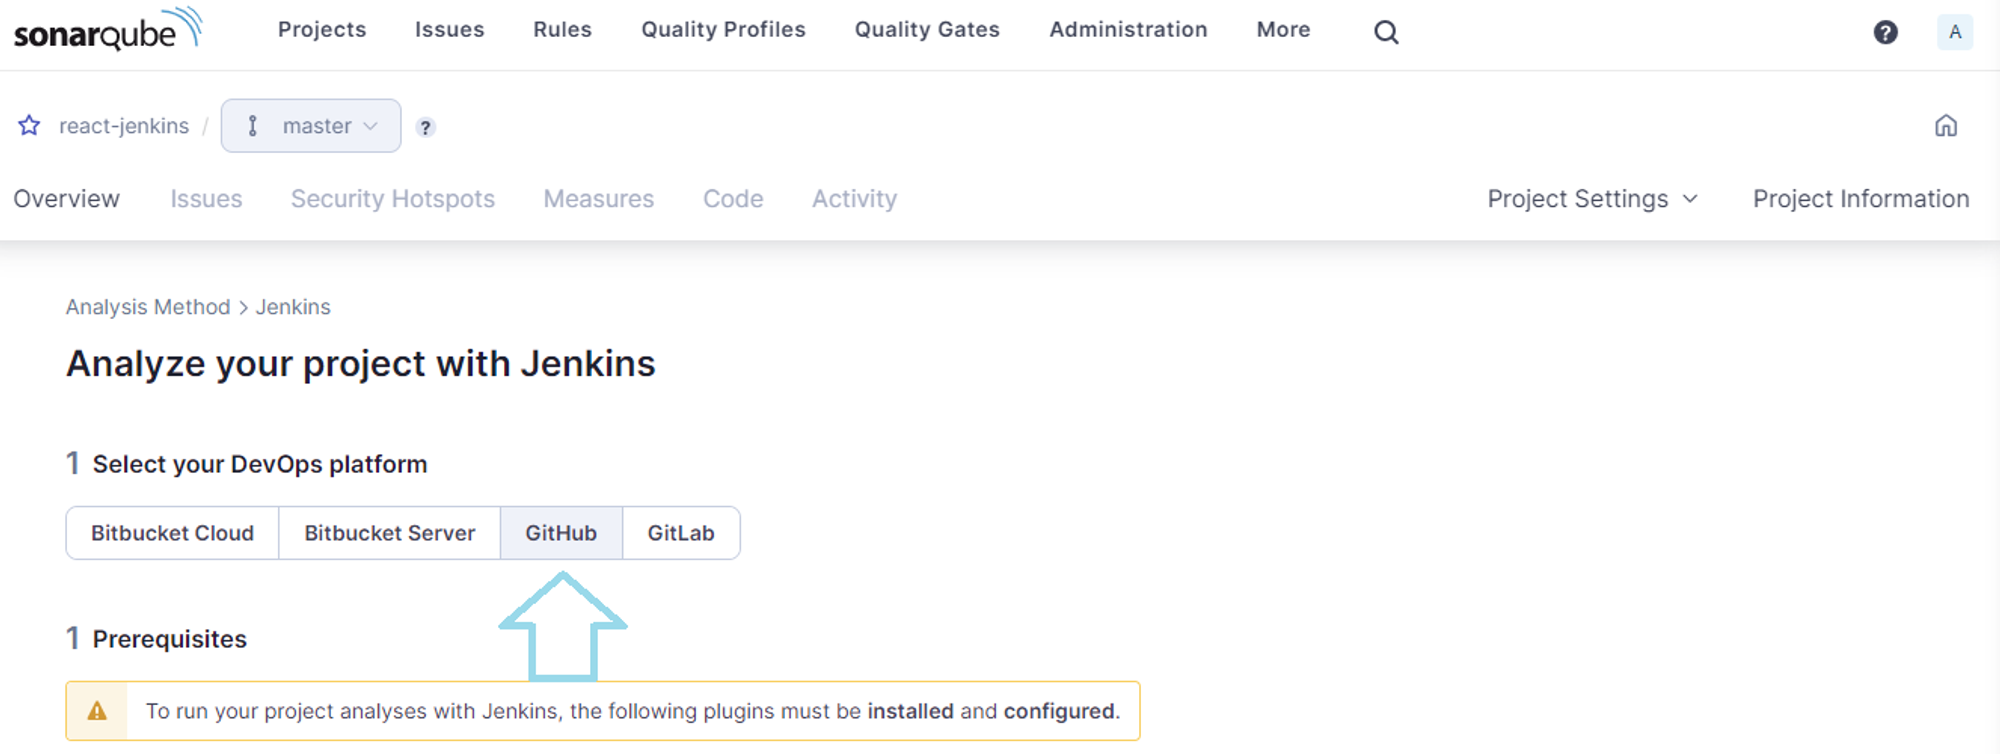
GitHub ကို ရွေးလိုက်တာနဲ့ အောက်ဘက်မှာ step 4 ခု ကျလာပါလိမ့်မယ်။
SonarQube Scanner plugin for Jenkins
Create a Pipeline Job in Jenkins
Create a GitHub Webhook
Create a Jenkinsfile
နံပါတ် ၁ အဆင့် ကတော့ အပေါ်မှာ install လုပ်ပြီးသားပါ။ နံပါတ် ၂,၃ ကတော့ဒီမှာ ဒီ Article မှာ ထည့်မပြတော့ပါဘူး စာအရမ်းရှည်သွားမှာစိုးလို့ပါ။ Jenkins pipeline create လုပ်တာနဲ့ GitHub webhook configuration လုပ်တာတွေကို ဒီ post တွေမှာ သွားကြည့်နိုင်ပါတယ်။
အဲ့ဒီတော့ နံပါတ် ၄ အဆင့်ကိုတန်းသွားပြီး Jenkinsfile ကို update လုပ်ပါမယ်။ နံပါတ် ၄ အဆင့်မှာ သူရေးထားတဲ့အတိုင်းလိုက်လုပ်ကြည့်ပါမယ်။ အရင်ဆုံး စမ်းမယ့် application ကို ညီမက react သုံးထားတာ ဖြစ်လို့ other ကို ပဲ ရွေးပါမယ် ပြီးရင်တော့ အောက်က အဆင့်မှာပြောထားတဲ့အတိုင်း application source code ရှိတဲ့ project folder ထဲမှာ sonar-project.properties ဆိုတဲ့ဖိုင်ထဲမှာ project key ကိုထည့်ပါမယ်။

echo "sonar.projectKey=react-jenkins" > sonar-project.properties
ပြီးရင်တော့ အောက်ဆုံးအဆင့်မှာ ပြထားတဲ့အတိုင်း Jenkins ဖိုင်ထဲမှာ update လုပ်ရပါမယ်။ အဲ့ထဲကအတိုင်း တန်း copy ထည့်လိုက်ရင်တော့ error တက်မှာပါ။ tools locations မသိတာတို့ Jenkinsfile syntax မှားတာတို့ဖြစ်တတ်ပါတယ်။ နည်းနည်းပြင်ပြီး update လုပ်လိုက်ပါမယ်။
Jenkins ဖိုင်မှာတော့ ဘာမှထူးထူးခြားခြားထည့်မထားပါဘူး။ ဒါကတော့ update မလုပ်ခင် Jenkinsfile ပါ

ဒါကတော့ Sonar Scanner အတွက် stage အသစ်တစ်ခု update လုပ်ပြီးသားဖိုင်ပါ
pipeline {
    agent any
    stages {
        stage('Checkout Source') {
            steps {
                checkout scm
            }
        }
        stage('SonarQube Analysis') {
            steps {
                script{
                    def scannerHome = tool name: 'Sonar', type: 'hudson.plugins.sonar.SonarRunnerInstallation';
                    withSonarQubeEnv() {
                        sh "${scannerHome}/bin/sonar-scanner"
                    }
                }
            }
        }
        stage('Build') {
            steps {
                echo 'Building....'
                echo  'Build completed.'
            }
        }
        stage('Deploy') {
            steps {
                echo 'Deploying....'
                echo  'Deploy completed.'
            }
        }
    }
}

ပုံထဲမှာ select လုပ်ထားတဲ့ line number 12 မှာပါတဲ့ tool name တို့ type တို့က ဘယ်က ရလဲဆိုတာတစ်ချက်ပြပါမယ်။ Create လုပ်ထားတဲ့ Jenkins pipeline job ထဲကိုသွားလိုက်ပါ ပြီးရင် ဘယ်ဘက် အောက်ဆုံးနားလေးမှာ Pipeline syntax ဆိုတာ ရှိပါတယ်။ အဲ့ဒီထဲကိုဝင်လိုက်ပါ။
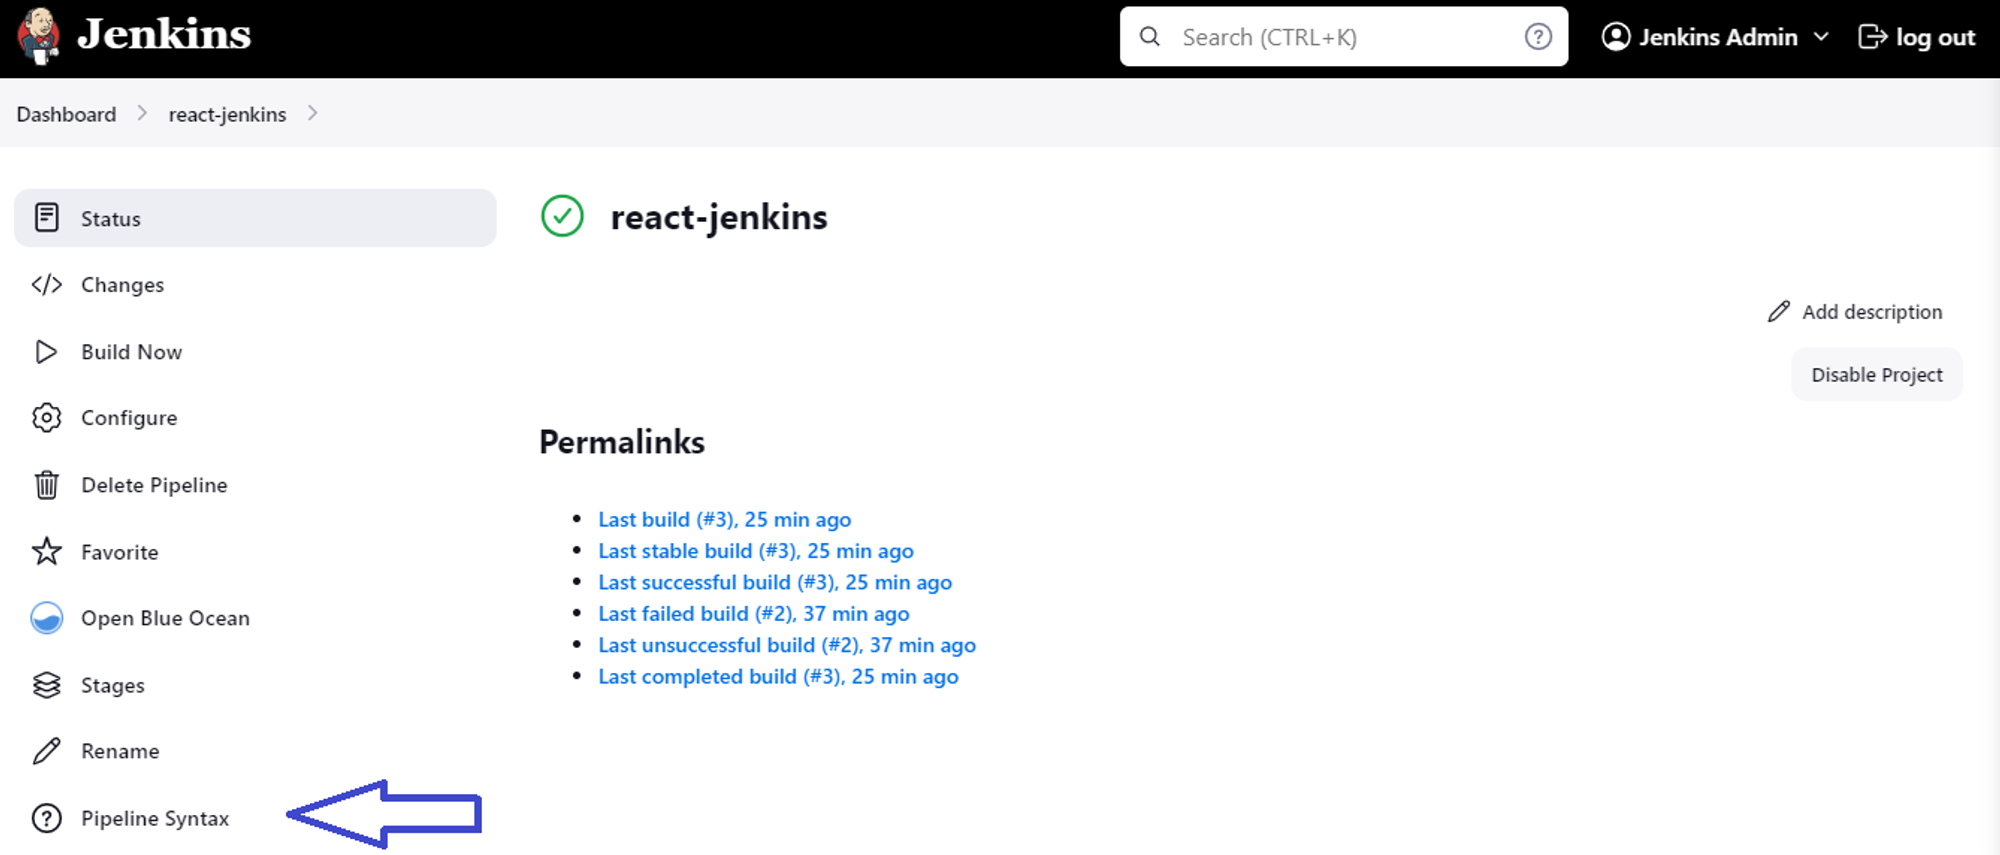
ပြီးရင်တော့ အောက်ကပုံ ပုံမှာ ပြထားတဲ့အတိုင်း Snippet Generator ထဲမှာ Tool ကို ရွေးပါ ပြီးရင် ဘာ tools လဲဆိုတာ type မှာ ရွေးပါ။ အပေါ်မှာ Jenkins ရဲ့ Manage Jenkins > Tools ထဲမှာ install လုပ်ခဲ့တဲ့ Sonar Scanner ရဲ့ Name လေး ပေါ်လာပါလိမ့်မယ်။ ပြီးရင် Generate လုပ်လိုက်ပါ အောက်မှာ ကျလာတာလေး Copy ကူးပြီးသုံးလိုက်ရင်ရပါပြီ။

အဲ့ဒီတော့ အပေါ်မှာပြထားတဲ့ Jenkinsfile အတိုင်း update လုပ်ပြီးပြီဆိုတော့ GitHub repo ဆီကို အသစ် push လုပ်လိုက်ပါမယ်။ ပြီးရင်တော့ pipeline ကိုစောင့်ကြည့်ကြတာပေါ့။
git commit -a -m "SonarQube update" && git push origin master
အခုဆိုရင်တော့ SonarQube Scanner က Scan ဖတ်ပြီးတော့ SonarQube Server ဆီကို report တွေပို့နိုင်သွားပါပြီ။ Pipeline Overview မှာ ကြည့်ကြည့်နိုင်ပါတယ်။

Blue Ocean မှာလည်း ကြည့်လို့ရပါတယ်။

Blue Ocean ကိုမသိသေးရင်တော့ဒီမှာဖတ်ကြည့်နိုင်ပါတယ်။
ဒါကတော့ SonarQube Server ဆီကို ရောက်ရှိလာတဲ့ Report တွေကို Server ကနေ report အနေနဲ့ထုတ်ပြနေတာပါ ဒီမှာသုံးထားတဲ့ Code တွေက clean ဖြစ်နေတာမလို့ ဘာမှ မပြပဲ 0 တွေဖြစ်နေတာပါ။

အခု bugs ပါတဲ့ Code တစ်ခု ရှာထည့်ပြီ pipeline ကိုပြန် run ကြည့်လိုက်ပါမယ်။ ဒီ Python Django application လေးကို scan လုပ်ကြည့်တဲ့အခါမှာ များစွာသော bugs တွေ security vulnerabilities တွေကို ရမှာပါ။
ဒီ repo ကို application project folder ထဲမှာပဲ clone ပြီး scan ဖတ်ပြီးစမ်းကြည့်နိုင်ပါတယ်။ https://github.com/kayyum1905/ananymous_voting_platform.git
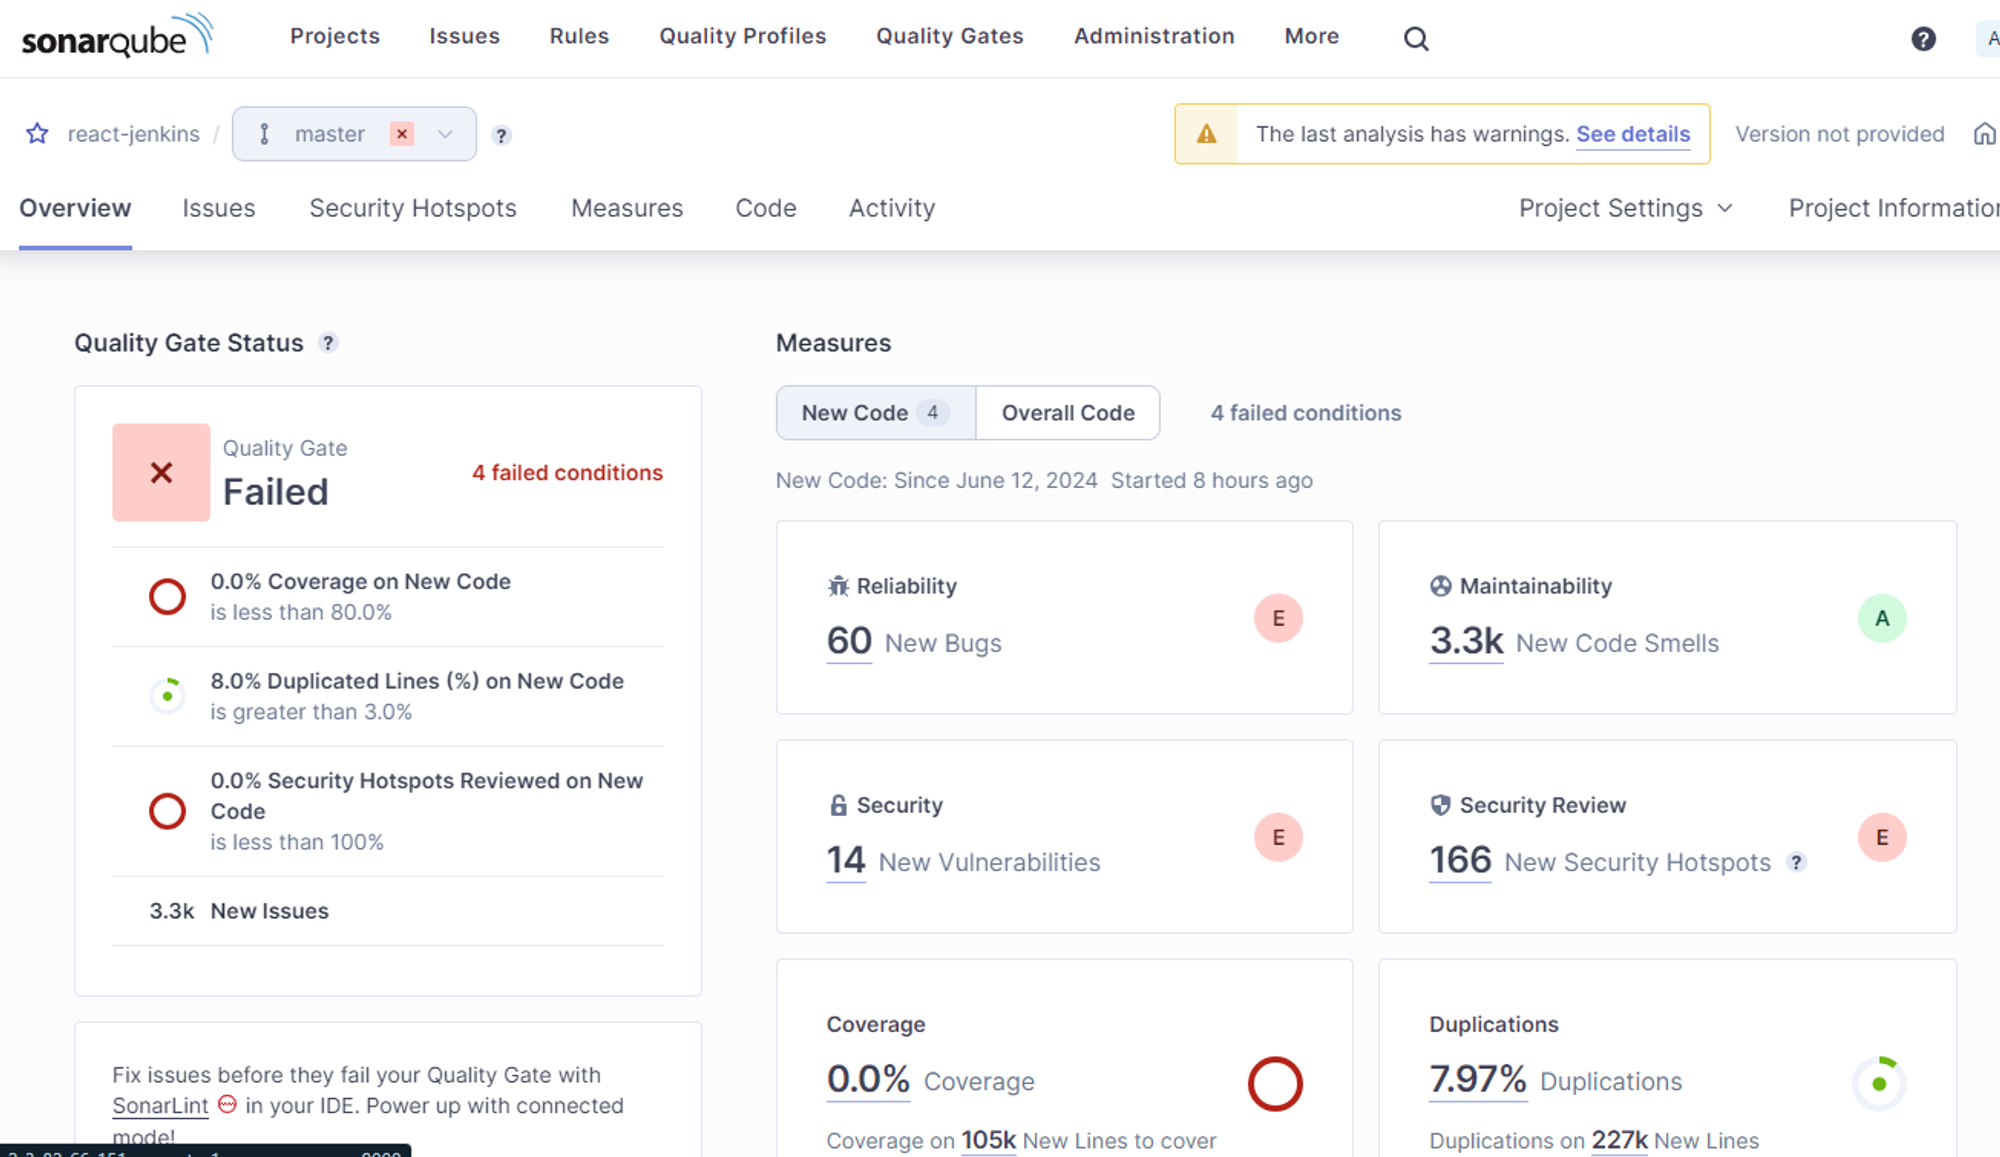
အဓိက ဒီနေရာမှာပြောချင်တာကတော့ Applications Source Code တွေကို Jenkins pipeline ထဲကနေ တဆင့် SonarQube Scanner နဲ့ Scan ဖတ်ပြီး SonarQube Server ဆီကို ရောက်လာပြီး Dashboard အနေနဲ့ မြင်ရတဲ့ အခြေအနေ ကိုပြောချင်တာပါ။ Server ဆီမှာ report မြင်ရပြီဆိုတာနဲ့ တခြား Tab တွေ ဆီသွားတာဖြစ်ဖြစ် Bugs တွေ တခြား Issues တွေကို နှိပ်ကြည့်ပြီး ကြည့်ကြည့်နိုင်ပါတယ်။
ဒီအခြေအနေ မှာ pipeline ကို ထိန်းထားတာ ဘာမှ မပါသေးပါဘူး Sonar Scanner နဲ့ Scan ဖတ်မယ် SonarQube Server ဆီ report ပို့မယ် ဒီလောက်ပါပဲ။ Pipeline ကတော့ SonarQube Server မှာ Failed လို့ ပြခဲ့သည့်တိုင်အောင် နောက် step တွေဆီကို Continuous ဆက်သွားနေဦးမှာပါ။
ဒါကို ထိန်းဖို့ ဆိုရင် Jenkins ထဲ မှာ Quality Gate ကို ထည့်ရပါမယ်။ Quality Gate အကြောင်းကိုတော့ နောက် post တစ်ခု မှာ ရေးထားပါတယ်။
SonarQube Scanner နဲ့ SonarQube Server အတွက်ကတော့ ဒီလောက်ဆို အဆင်ပြေကြမယ်လို့ မျှော်လင့်ပါတယ်။ အားလုံးကိုကျေးဇူးတင်ပါတယ်။
Quality Gate အကြောင်းကိုတော့ ဒီမှာ ဆက်ဖတ်ကြည့်နိုင်ပါတယ်။
Subscribe to my newsletter
Read articles from Kadaie Kyiphyu directly inside your inbox. Subscribe to the newsletter, and don't miss out.
Written by
