Automate Deployment of Node.js App on AWS EC2 via GitHub Actions CI/CD Pipeline
 Mohammad Minhazul Alam
Table of contents
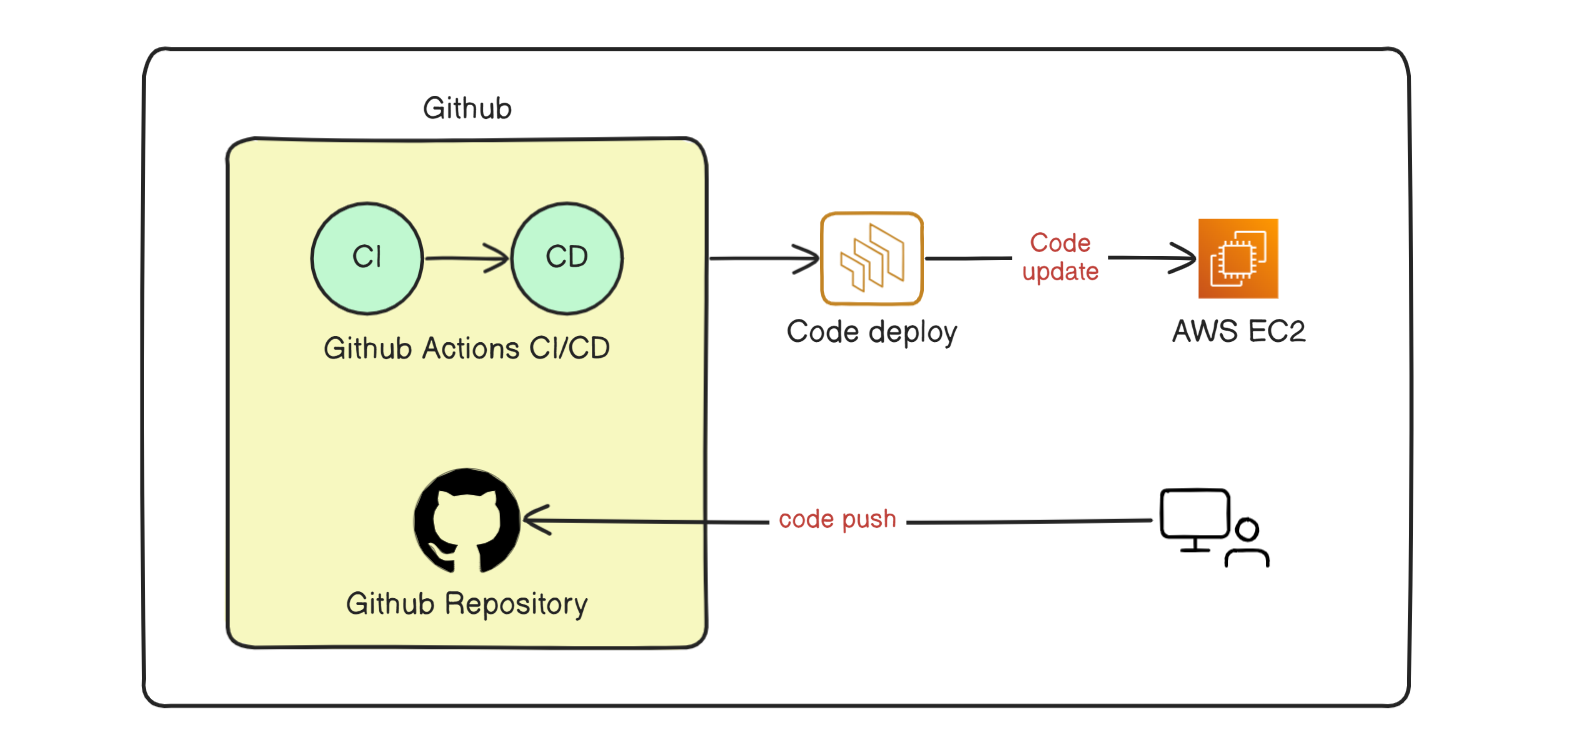
In this guide, we'll walk you through the process of setting up automatic deployment for a Node.js REST API on an AWS EC2 instance using a CI/CD pipeline with GitHub Actions. You'll learn how to configure your EC2 instance, set up your GitHub repository, and create workflows that ensure your app is deployed seamlessly whenever you push changes to your main branch. Let's get started!
Prerequisites
AWS Account: Ensure you have an AWS account and proper permissions to create and manage EC2 instances.
GitHub Account: Ensure you have a GitHub account and a repository for your Node.js project.
Node.js and NPM: Ensure you have Node.js and NPM installed on your local machine.
1. Setup Local Node.js Project
1.1 Initialize Node.js Project
Init your NodeJS app and install its dependencies using the following command:
  npm init -y
  npm install express dotenv
Create a
.envfile in your project with the port number specified:PORT = 5000Create
index.jsfile and set a basic express web server:require('dotenv').config(); const express = require('express'); const app = express(); const port = process.env.PORT; app.get('/', (req, res) => { res.status(200).send(`Hello, from Node App on PORT: ${port}!`); }); app.listen(port, () => { console.log(`App running on http://localhost:${port}`); });This Node.js script creates a simple Express server that listens on a port specified in a
.envfile. When accessed at the root URL (/), it responds with a message showing the port number. The server starts and logs a message indicating it's running and the port it's using.
1.2 Upload it in a GitHub Repository
Create GitHub Repository: Create a new repository for your Node.js project on GitHub. In our case, we named it
NodeJS-App-in-EC2.Push Code to GitHub: Initialize Git, add remote origin and push your code to the GitHub repository.
2. Setup AWS EC2 Instance
Login to your AWS account and continue with the following process:
2.1 Launch EC2 Instance
Choose "Ubuntu" as the operating system.
Ensure it's a free-tier eligible instance type.
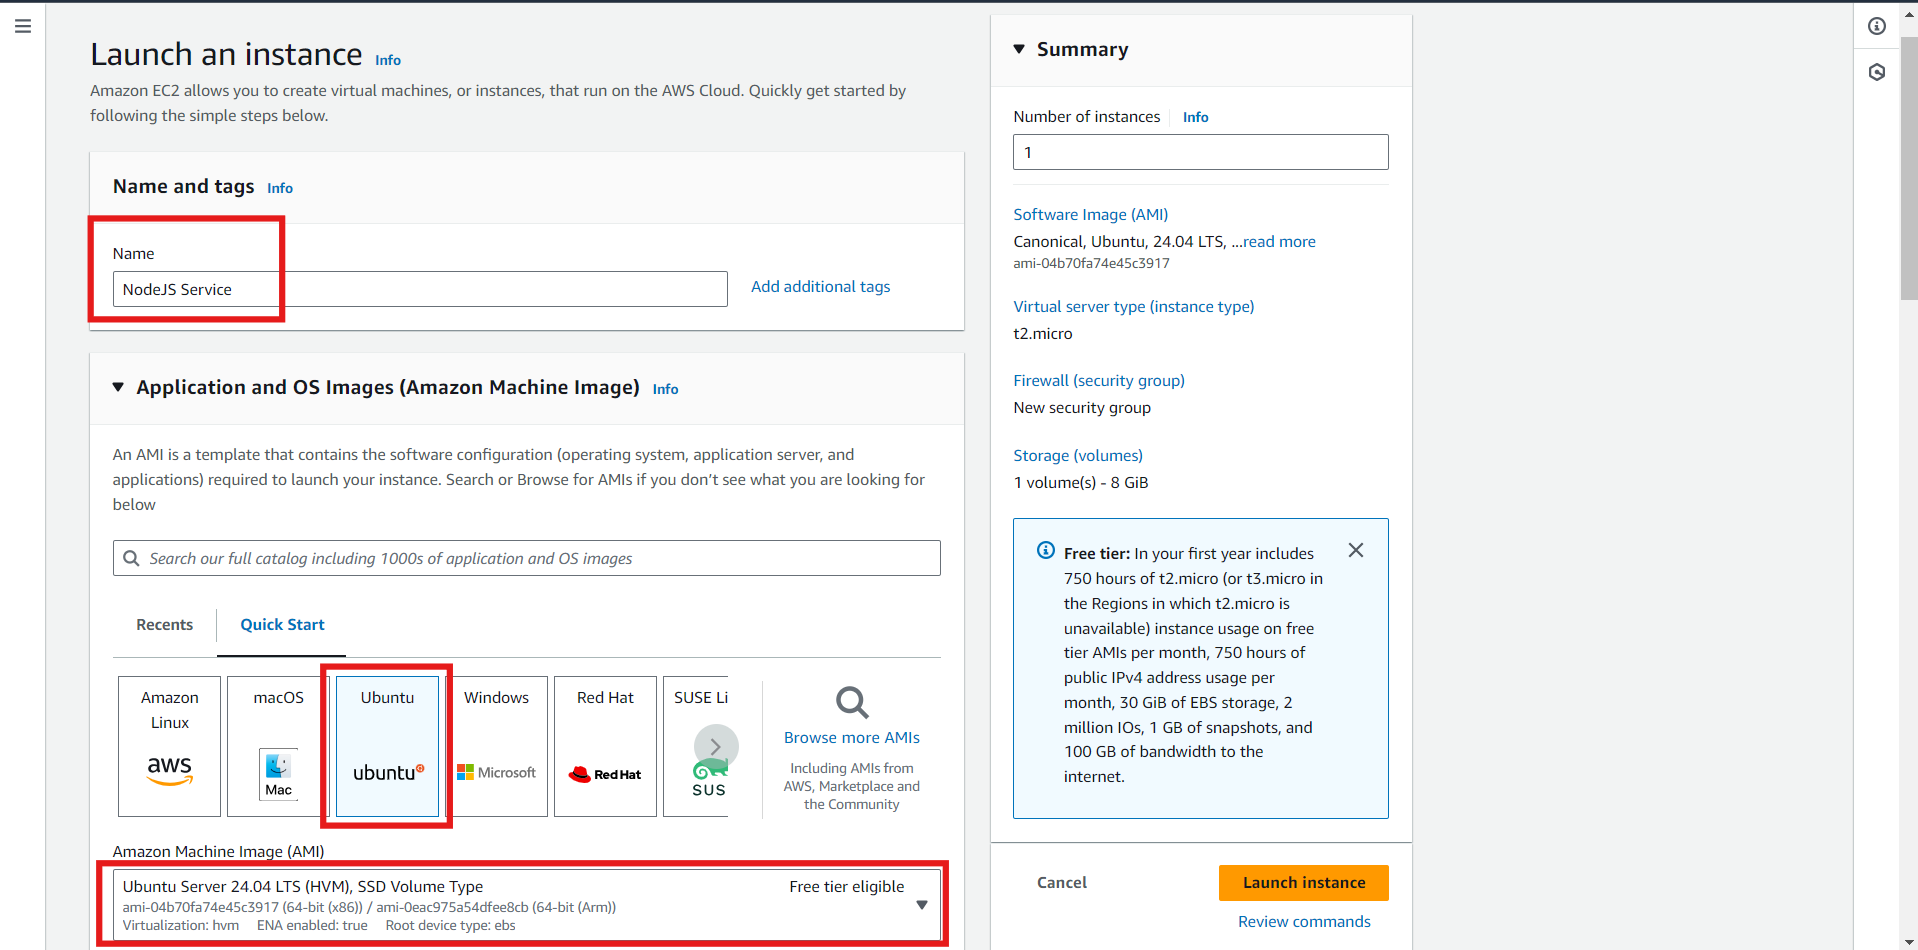
Create a new key pair or use an existing one.

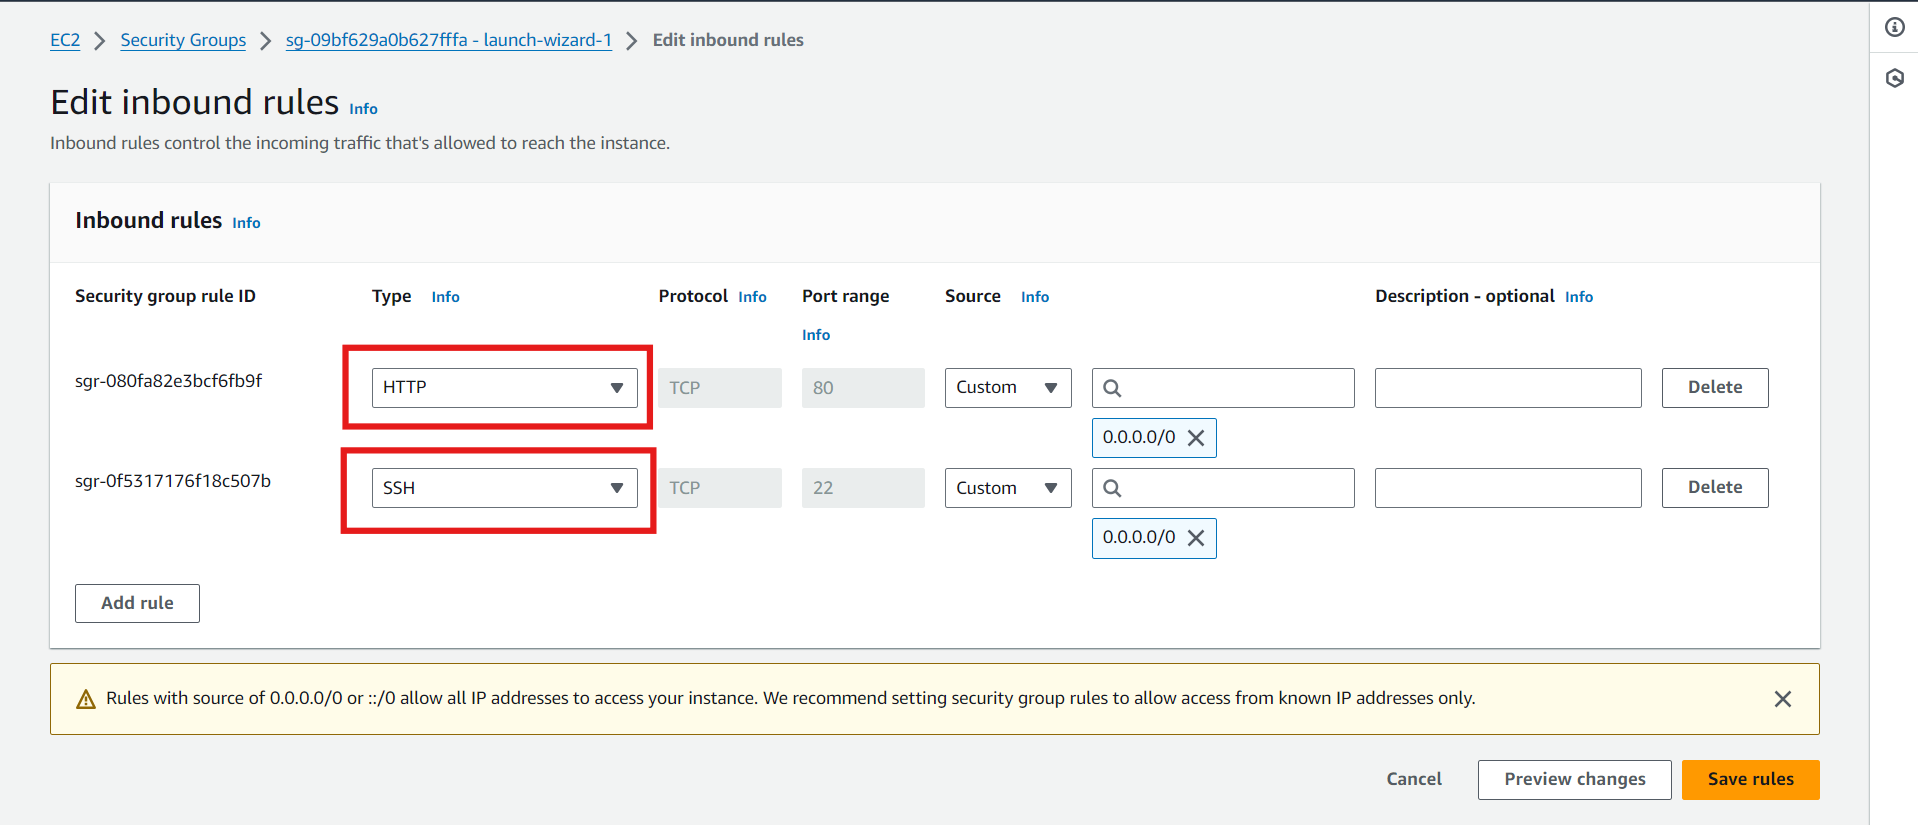
2.2 Configure Security Group
Go to security group > select the one for our instance > Edit inbound rules.
Allow SSH (port 22) from your IP.
Allow HTTP (port 80) from anywhere.
3. Connect to EC2 Instance
3.1 SSH into EC2 Instance
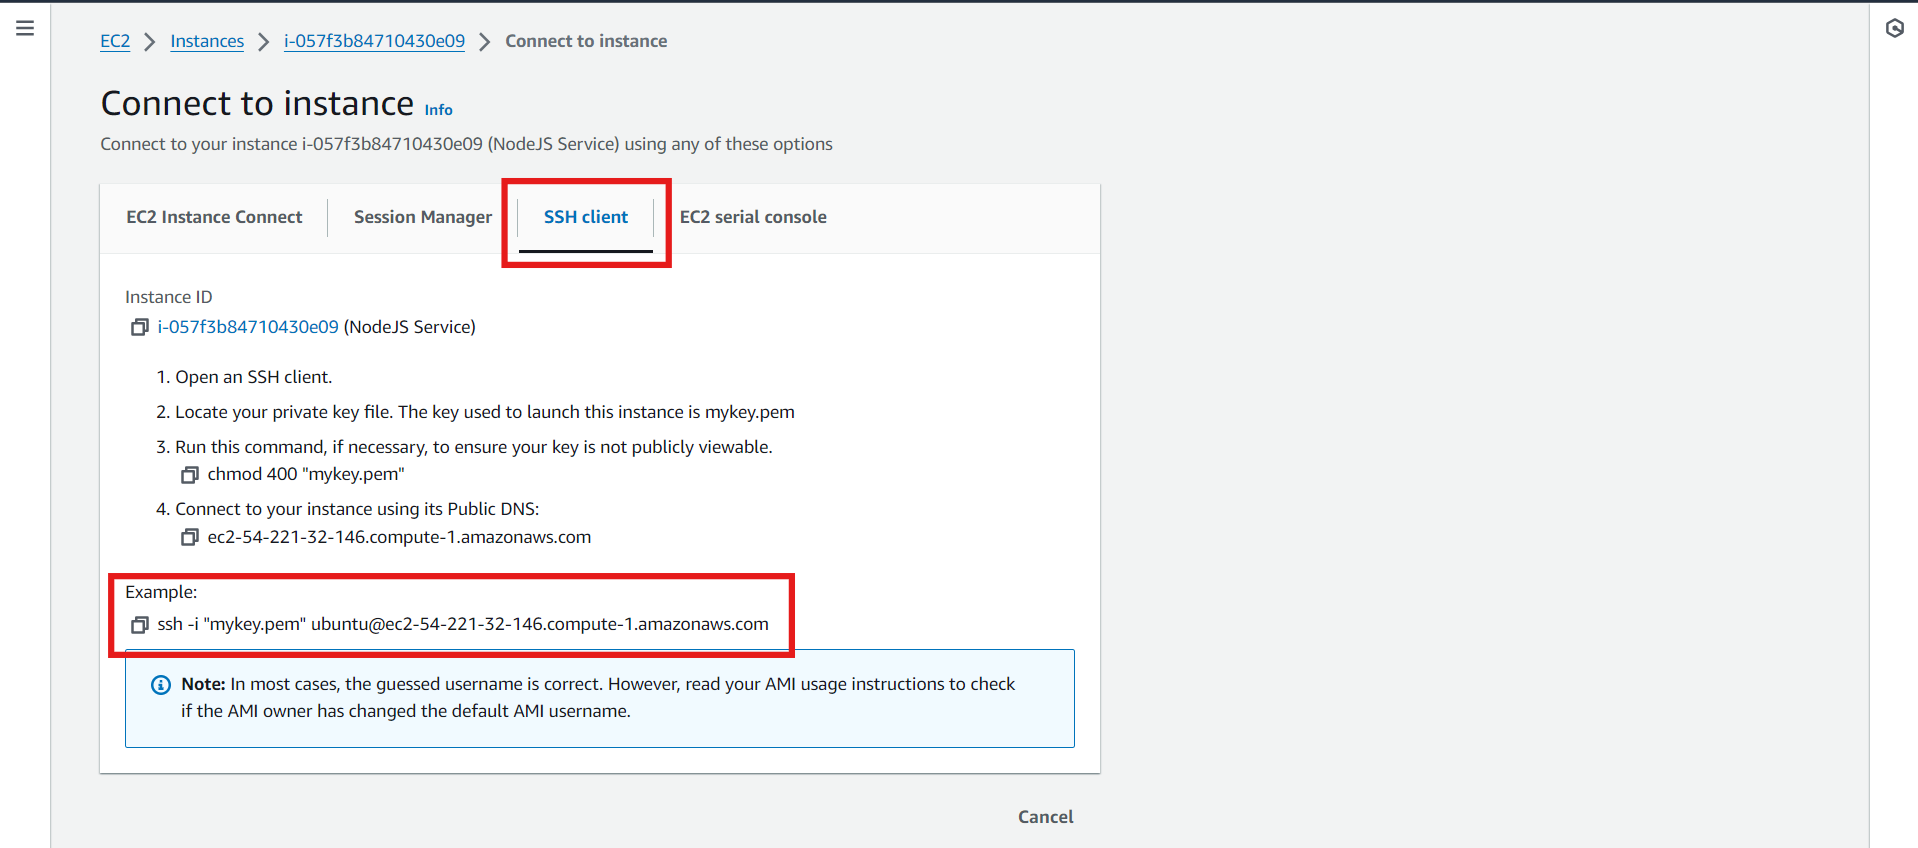
Go to your instance and click on
connect.Open the terminal and navigate to the directory with your PEM file.
Use the SSH command provided by AWS to connect. We used Windows Powershell to SSH into the EC2 Instance.
4. Setup GitHub Actions Runner on EC2
Go to your repository’s settings on GitHub.
Under “Actions”, click “Runners” and add a new self-hosted runner for Linux.
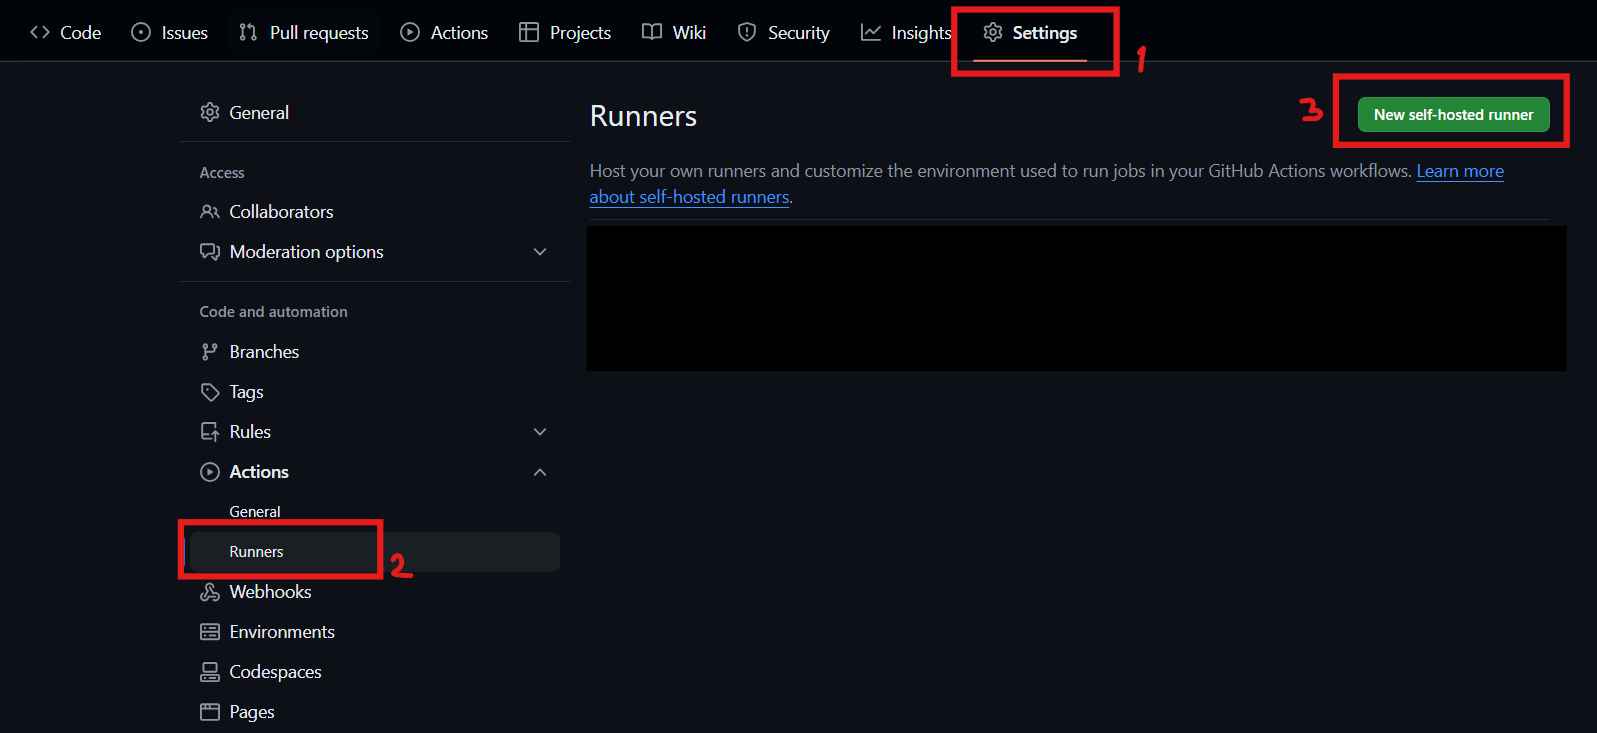
Follow the commands provided to set up the runner on your EC2 instance.
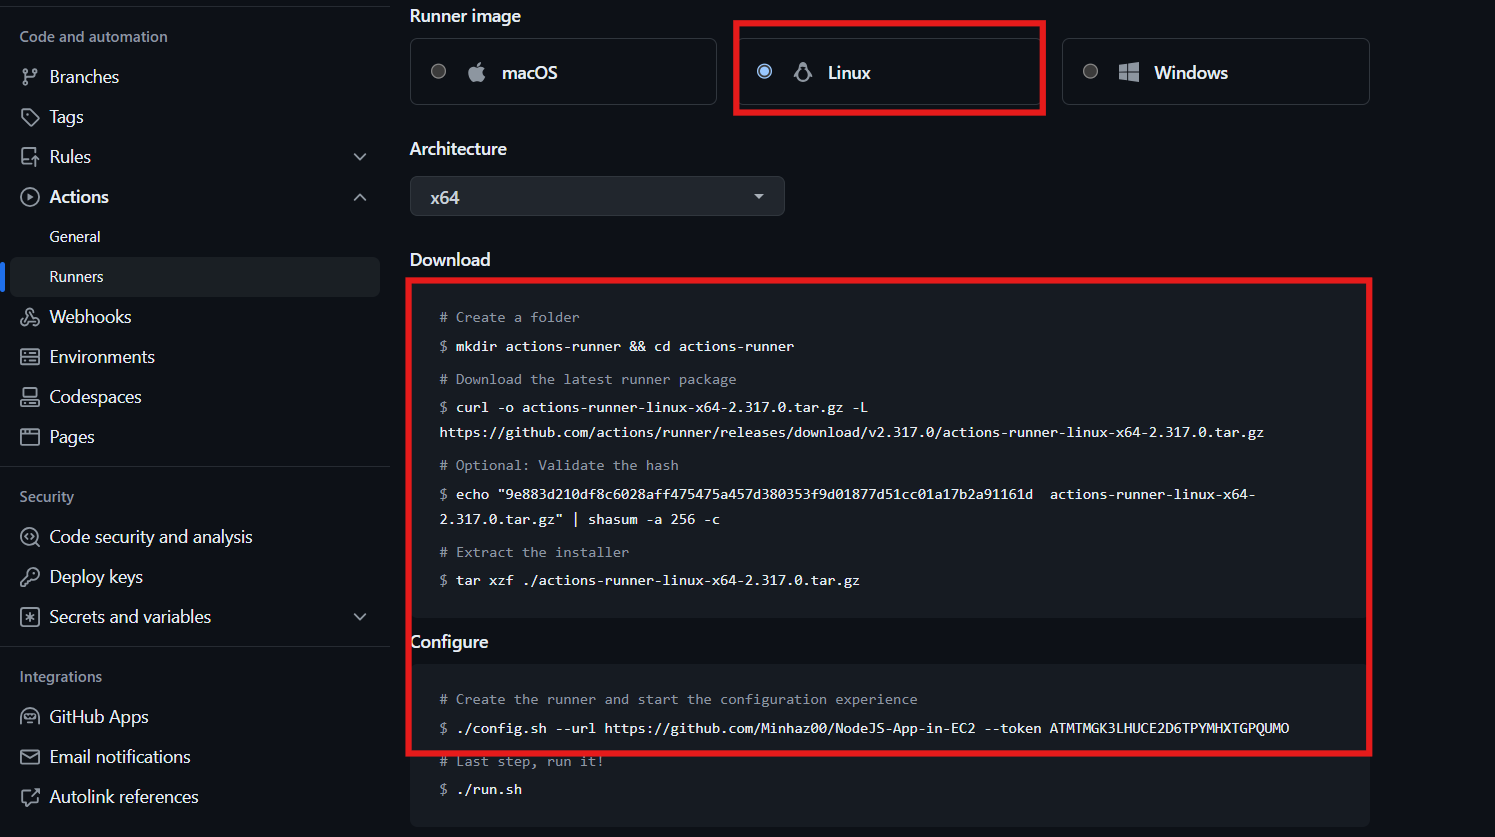
You will get something like this after the final command (marked portion):

After that, keep hitting
Enterto continue with the default settings. Now if you go to the GitHub repository > settings > runners, you will get something like this: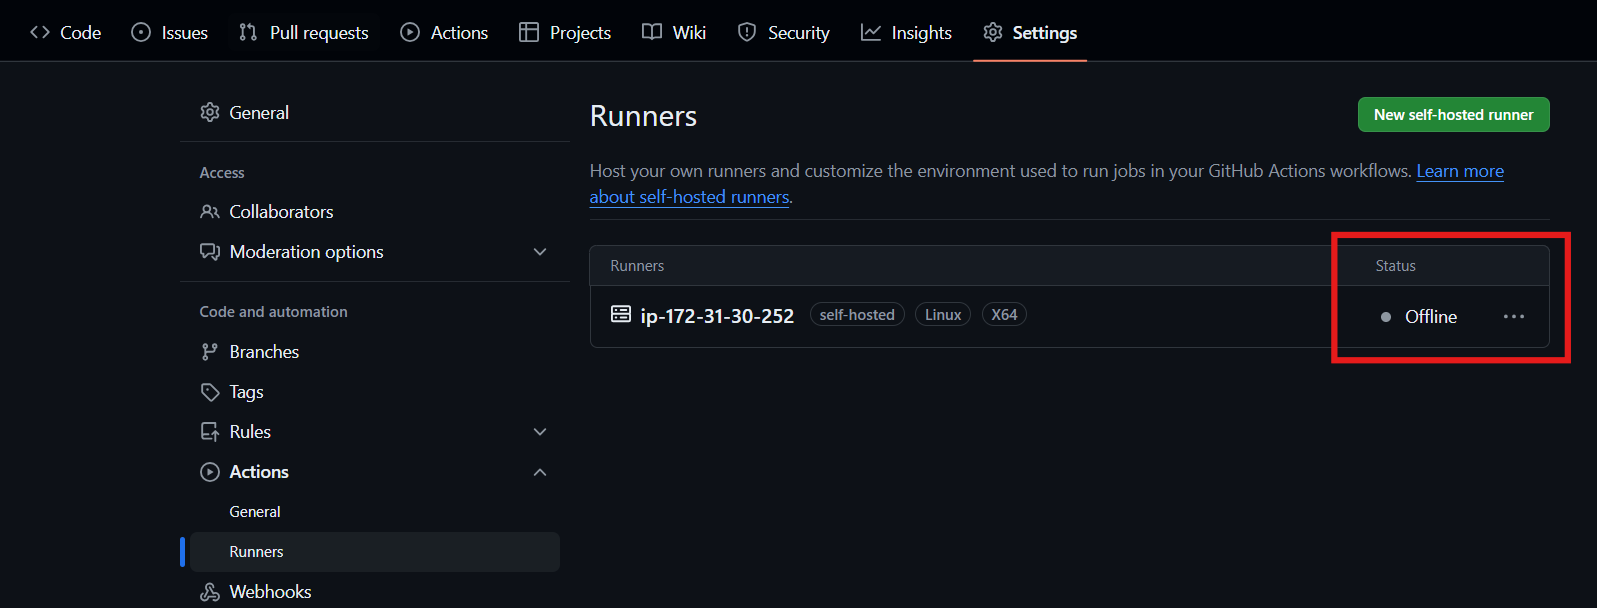
It is in offline state. Go to the SSH PowerShell and use the following command:
 sudo ./svc.sh install
 sudo ./svc.sh start
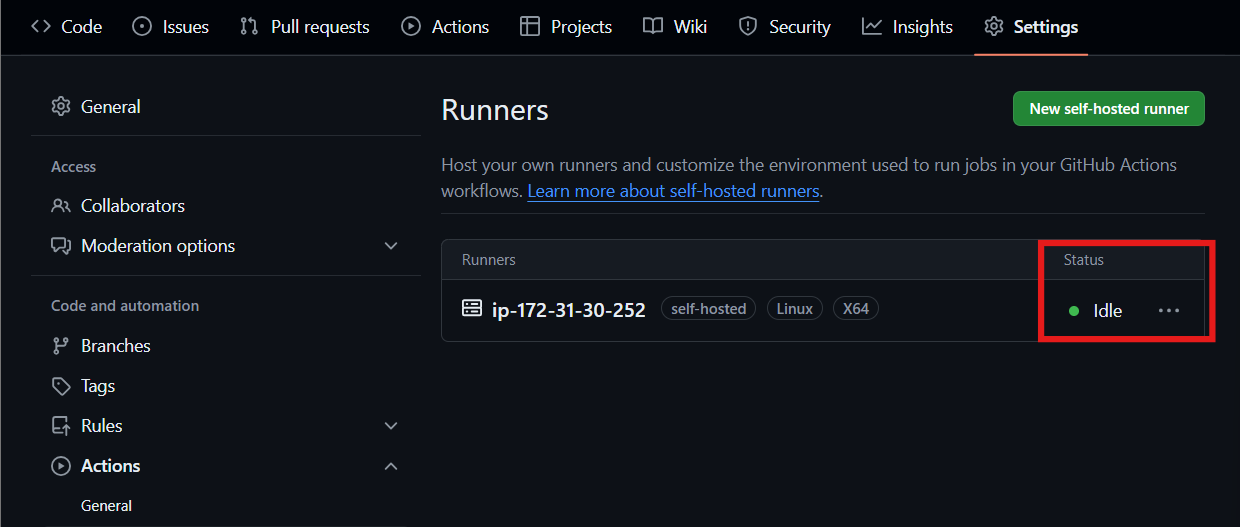
Now the runner in the GitHub repository is no more in Offline state:
5. Create GitHub Secrets
Go to your repository’s settings.
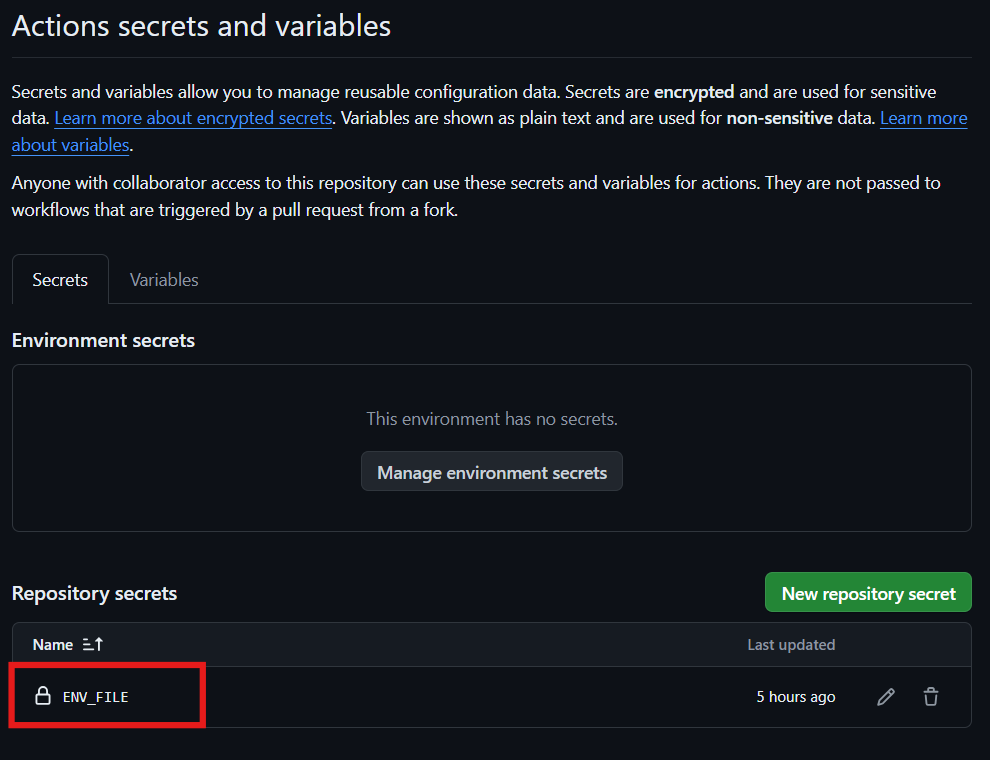
Under “Secrets and variables” > “Actions”, create a
New repository secretwith your.envvariables. In our case, we named itENV_FILE. File Content:PORT = 5000Save the secret.
6. Setup CI/CD Pipeline with GitHub Actions
6.1 Create GitHub Actions Workflow
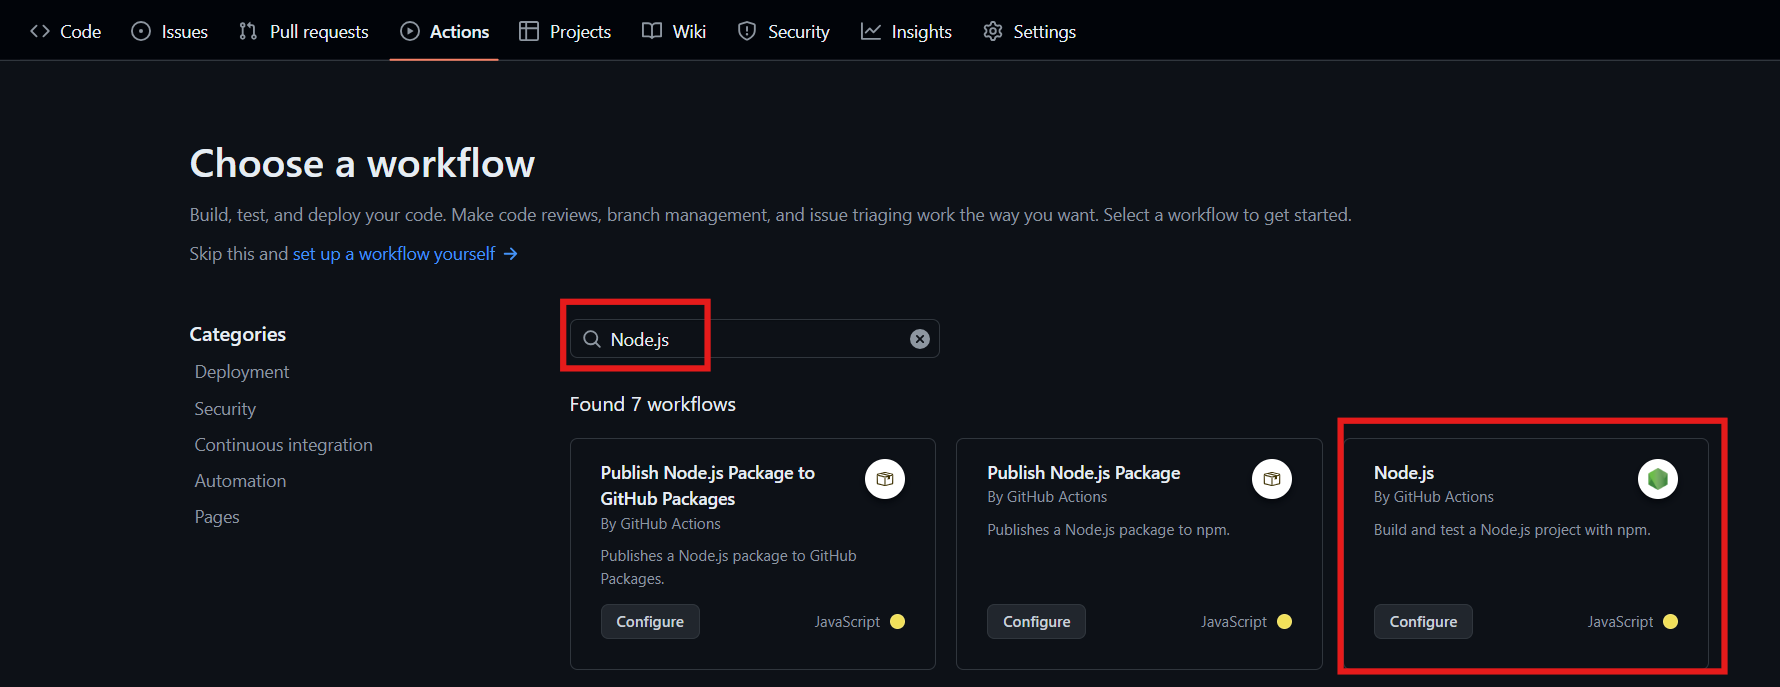
In your repository, go to the “Actions” tab.
Choose the Node.js workflow template.
Configure/Change it as follows:
  name: Node.js CI/CD

  on:
  push:
      branches: [ "main" ]

  jobs:
  build:
      runs-on: self-hosted
      strategy:
      matrix:
          node-version: [18.x]

      steps:
      - uses: actions/checkout@v4
      - name: Use Node.js ${{ matrix.node-version }}
      uses: actions/setup-node@v3
      with:
          node-version: ${{ matrix.node-version }}
          cache: 'npm'

      - run: npm ci
      - run: |
          touch .env
          echo "${{ secrets.ENV_FILE }}" > .env
This GitHub Actions configuration sets up a CI/CD pipeline for a Node.js application. The workflow triggers a push to the
mainbranch. It runs on aself-hostedrunner and uses the Node.js version18.x. The steps include checking out the code, setting up Node.js, and installing dependencies usingnpm ci, and creating a.envfile from a secret stored in GitHub (ENV_FILEthat we've created).
6.2 Deploy and Verify
Push Changes to GitHub: Commit and push changes to your GitHub repository.
Check GitHub Actions: Ensure the workflow runs successfully and deploys the updated code to your EC2 instance.

If you go to the SSH terminal, you can see
_workdirectory. Now go to_workfolder. In this folder, you will see your Nodejs app directory from Git Hub. Therefore code is updated to your EC2 instance.
7. Install Node.js and Nginx on EC2
Now go to _work folder. In this folder, you will see your Nodejs app directory from Git Hub. Navigate to that directory. Use ls to see your app files.
Update Packages:
sudo apt-get updateInstall Node.js and NPM:
 sudo apt-get install -y nodejs
 sudo apt install -y npm
Check Node and NPM versions:
 node -v
 npm -v
Install Nginx:
sudo apt-get install -y nginxIf you visit
http://<ec2-instance-public-ip>you will see:
Install pm2:
sudo npm i -g pm2The command installs PM2 globally on your system with superuser (root) privileges. PM2 is a popular process manager for Node.js applications, which helps manage and run applications.
Verify pm2 installation:
pm2
8. Configure Nginx
Edit Nginx Config:
 cd /etc/nginx/sites-available
 sudo nano default
Add Reverse Proxy Configuration: Set the
serverblock as follows.server { listen 80; server_name _; location / { proxy_pass http://localhost:5000; proxy_http_version 1.1; proxy_set_header Upgrade $http_upgrade; proxy_set_header Connection 'upgrade'; proxy_set_header Host $host; proxy_cache_bypass $http_upgrade; # Additional headers for proper proxying proxy_set_header X-Real-IP $remote_addr; proxy_set_header X-Forwarded-For $proxy_add_x_forwarded_for; proxy_set_header X-Forwarded-Proto $scheme; } }Restart Nginx:
sudo systemctl restart nginxIf you visit
http://<ec2-instance-public-ip>you will see:
It gives an error because our NodeJS app in ec2 is not running.
Start the NodeJS App:
Let's navigate to the NodeJS app directory and run the server using the following command:
pm2 start index.jsExpected output:
 ubuntu@ip-172-31-30-252:~/actions-runner/_work/Github-Actions-NodeJS-App/Github-Actions-NodeJS-App$ pm2 start index.js

 [PM2] Spawning PM2 daemon with pm2_home=/home/ubuntu/.pm2
 [PM2] PM2 Successfully daemonized
 [PM2] Starting /home/ubuntu/actions-runner/_work/Github-Actions-NodeJS-App/Github-Actions-NodeJS-App/index.js in fork_mode (1 instance)
 [PM2] Done.
 ┌────┬──────────┬─────────────┬─────────┬─────────┬──────────┬────────┬──────┬───────────┬──────────┬──────────┬──────────┬──────────┐
 │ id │ name     │ namespace   │ version │ mode    │ pid      │ uptime │ ↺    │ status    │ cpu      │ mem      │ user     │ watching │
 ├────┼──────────┼─────────────┼─────────┼─────────┼──────────┼────────┼──────┼───────────┼──────────┼──────────┼──────────┼──────────┤
 │ 0  │ index    │ default     │ 1.0.0   │ fork    │ 8843     │ 0s     │ 0    │ online    │ 0%       │ 39.0mb   │ ubuntu   │ disabled │
 └────┴──────────┴─────────────┴─────────┴─────────┴──────────┴────────┴──────┴───────────┴──────────┴──────────┴──────────┴──────────┘
Note that the process name is
indexwhich can be different in your case.Now, if you visit
http://<ec2-instance-public-ip>you will see:
Our App has been successfully deployed to AWS and Nginx is serving our NodeJS app properly.
9. Verify CI/CD
9.1 Update the Workflow manifest
Go to your GitHub repository. From the workflows directory open the node.js.yml and start editing. Add - run: pm2 restart index at the end so that our NodeJS app restarts automatically whenever there is a new deployment. Here index is the process name we saw earlier which can be different in your case. Final node.js.yml will be:
name: Node.js CI/CD

on:
  push:
    branches: [ "main" ]

jobs:
  build:
    runs-on: self-hosted
    strategy:
      matrix:
        node-version: [18.x]

    steps:
    - uses: actions/checkout@v4
    - name: Use Node.js ${{ matrix.node-version }}
      uses: actions/setup-node@v3
      with:
        node-version: ${{ matrix.node-version }}
        cache: 'npm'

    - run: npm ci
    - run: |
        touch .env
        echo "${{ secrets.ENV_FILE }}" > .env
    - run: pm2 restart index
9.2 Deploy and Verify
Push Changes to GitHub: Commit and push changes to your GitHub repository.
Check GitHub Actions: Ensure the workflow runs successfully and deploys the updated code to your EC2 instance.
9.3 Update the local NodeJS app
Update the index.js of your app locally:
require('dotenv').config();
const express = require('express');
const app = express();
const port = process.env.PORT;


app.get('/', (req, res) => {
  res.status(200).send(`Hello, from Node App on PORT: ${port}!`);
});

app.get('/users', (req, res) => {
    res.status(200).send(`Congratulations! You have reached the users endpoint!`);
});

app.listen(port, () => {
  console.log(`App running on http://localhost:${port}`);
});
Here we have added new /users endpoint. Let's push the code in github to see the updated app in our aws ec2 instance. We need to pull first. Use the following command:
git pull
git add .
git commit -m "Added /users endpoint"
git push
Now if we go to the github action tab we will see new workflow triggered by our new commit with same name as our commit message.

Now, if you visit http://<ec2-instance-public-ip>/users you will see:

So the new endpoint has been automatically added to our AWS deployment.
Additional Tips
Environment Variables: Use GitHub secrets to securely manage environment variables.
Security: Ensure your EC2 instance is secure and only accessible from necessary IPs.
Monitoring: Use tools like PM2 for process management and monitoring.
Conclusion
This guide covers the setup of a CI/CD pipeline to automatically deploy a Node.js application on an AWS EC2 instance using GitHub Actions. By following these steps, you can automate your deployment process, ensuring consistent and reliable updates to your application.
Subscribe to my newsletter
Read articles from Mohammad Minhazul Alam directly inside your inbox. Subscribe to the newsletter, and don't miss out.
Written by

