Docker Day 4: Here's How You Can Reduce the Size of Your Docker Image by 99.7%
 Rachana
What is Docker Multi-Stage-Build?
Imagine you’re a chef making a delicious pizza. You want to prepare the dough, sauce, and toppings separately and combine them at the end. Similarly, Docker multi-stage builds allow you to create different stages in a Dockerfile, each focusing on a specific part of your application, and then combine them into a final image. This approach helps you create smaller, more efficient images.
With multi-stage builds, you can separate the build environment from the runtime environment, enabling you to compile and package your application in one stage and then copy the resulting artifacts into a lightweight runtime image in another stage.
Stage 1 (
buildstage) installs dependencies, copies source code, and builds the application.Stage 2 uses a lightweight scratch image for the runtime environment. It copies the built artifacts from the
buildstage and installs only production dependencies.Finally, it specifies the command to run the application.
https://github.com/RachanaVenkat/docker-multi-stage-build - fork this repository to perform this demo.
Understanding the Dockerfile
In this demo, we are going to build the Docker Image of a simple calculator application developed in Go(calculator.go), which is present at the same location as that of the Dockerfile.

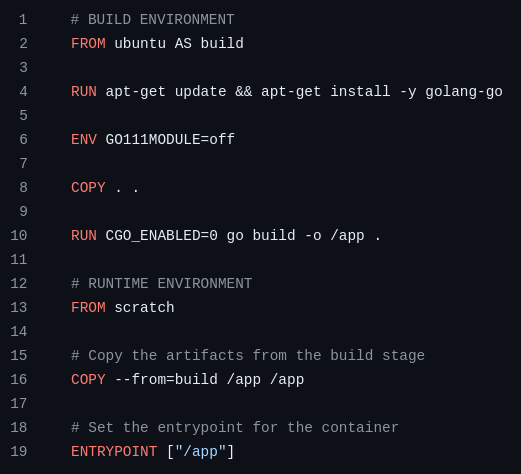
As it is seen here, the Dockerfile is divided into two stages - one for the build environment and other for the runtime environment
Stage 1
FROM ubuntu AS build: This starts the build stage using the
ubuntuimage as the base. TheAS buildpart names this stage "build," which we will use later.RUN apt-get update && apt-get install -y golang-go: This updates the package list and installs the Go programming language (
golang-go).ENV GO111MODULE=off: This sets the environment variable
GO111MODULEtooff, which is a setting related to Go modules. This setting is used here to disable module support if you’re building without modules.COPY . .: This copies all the files from your local directory (where the Dockerfile is located) into the Docker image’s working directory.
Optional - RUN CGO_ENABLED=0 go build -o /app .: This command compiles the Go application. The
CGO_ENABLED=0part disables CGO (C bindings) to create a statically linked binary. The-o /appflag specifies that the output binary should be namedappand placed in the root directory (/). The.at the end specifies the current directory as the source code location.
Stage 2
FROM scratch: This starts the runtime stage using
scratchas the base image.scratchis an empty image and represents the starting point for building images. It contains nothing by default, which provides better security. Since Golang doesn't need a runtime to run, a scratch image is the most efficient.COPY --from=build /app /app: This copies the compiled binary (
/app) from thebuildstage into the root directory of the new image. The--from=buildpart specifies that the source of the copy operation is thebuildstage.ENTRYPOINT ["/app"]: This sets the entrypoint for the container to
/app, which means when the container starts, it will execute the/appbinary.
Summary
Build Stage (Kitchen):
We set up a full kitchen with all the tools and ingredients.
Prepare the dough and toppings (compile the application).
Output a ready-to-bake pizza (compiled binary).
Runtime Stage (Pizza Box):
Use a clean, minimal box to keep the pizza (a small, empty base image).
Place the prepared pizza into the box (copy the compiled binary).
Set instructions for serving the pizza (define the entrypoint).
This multi-stage build ensures our final product (the Docker image) is lightweight, containing only the necessary elements (the compiled binary), just like a pizza delivered in a minimal, clean box without all the kitchen mess.
Practical Demonstration
https://github.com/RachanaVenkat/docker-multi-stage-build - this repository consists of 2 folders- one consists on the Dockerfile without multi-stage build and one with multi-stage build.
We will be building Docker Images from both the Dockerfiles and compare its sizes
Create an ubuntu EC2 instance, with docker and Golang installed.
sudo apt updatesudo apt install docker.iosudo apt install golang-goClone my repository -
git clonehttps://github.com/RachanaVenkat/docker-multi-stage-build.gitNavigate to the folder
dockerfile-without-multistageand build the imagedocker build -t simplecaclci .Check the size of the docker image created
docker images
870MB for a simple calculator is hefty isn't it?
Now, navigate to the folder
dockerfile-with-multistageand build the imagedocker build -t multicalci .
There you see the difference guys. It is almost a 99.7% reduction in the size of the docker image, proving its efficiency.
This way, Docker multi-stage builds are a powerful technique for creating efficient and lightweight Docker images. By separating the build and runtime environments, you can significantly reduce the size of your final image, as demonstrated in our practical example with the Go-based calculator application.
This approach not only optimizes resource usage but also enhances security by minimizing the attack surface. Distroless images further enhance the security. Embracing multi-stage builds in your Docker workflow can lead to more streamlined and maintainable deployments, making it an essential practice for modern containerized application development.
You must be feeling Great already!
Subscribe to my newsletter
Read articles from Rachana directly inside your inbox. Subscribe to the newsletter, and don't miss out.
Written by

Rachana
Rachana
Hi to the fellow tech enthusiasts out there! 👋 I am an aspiring Cloud and DevOps Engineer ☁️ With strong foundation in containerization technologies like Docker and Kubernetes🐳 Capable of building resilient, secure and cost optimized infrastructure on AWS cloud - AWS SAA certified.☁️🔒 Currently learning to build CI/CD pipelines using Jenkins, github-actions, AWS CodePipeline, and many more.🛠️🔄 Exploring other tools like Ansible for configuration management and Terraform for Infrastructure as Code(IaC).🧩📜 Let's connect, learn and grow together! 🌟🤝