Getting Started with JavaScript Using QuickBlox Examples
 Sayantani Deb
JavaScript is a versatile and powerful language that forms the backbone of interactive web development. In this blog, we'll cover the fundamentals of JavaScript, providing a strong foundation to start coding with confidence. By the end, we'll explore some practical examples using QuickBlox. Let's dive in!
Refer to our quickblox documentation to see more examples - https://docs.quickblox.com/docs/js-quick-start
Table of Contents
Introduction to JavaScript
1.1 Setting up your Code Editor
1.2 Running JavaScript in the Browser
1.3 Installing Node.js and npmHistory and Evolution of JavaScript
Understanding ECMAScript Versions
3.1 Key ECMAScript VersionsVariables and Data Types
JavaScript in Web Development
5.1 Operators and Expressions
5.2 Conditionals (if, else, switch)
5.3 Basics of Document Object Model (DOM)
5.4 Loops (for, while, do-while)JavaScript Functions
6.1 Function Features and Usage
6.2 Understanding Functions: Declarations, Expressions, Arrow Functions
6.3 Function Parameters and Return Values
6.4 Promises: Asynchronous HandlingScope and Closures
Higher-Order Functions
Variable Declarations
9.1 Using var, let, and const
9.2 Block Scope vs. Function ScopeBrowser Scripting and Events
10.1 Client-Side Scripting
10.2 Event Handling and User Interaction
10.3 Manipulating the DOM
10.4 Form Validation
10.5 QuickBlox Initialization and Session Creation
Introduction to JavaScript
JavaScript is a programming language used to create dynamic content on websites.
Prerequisites:
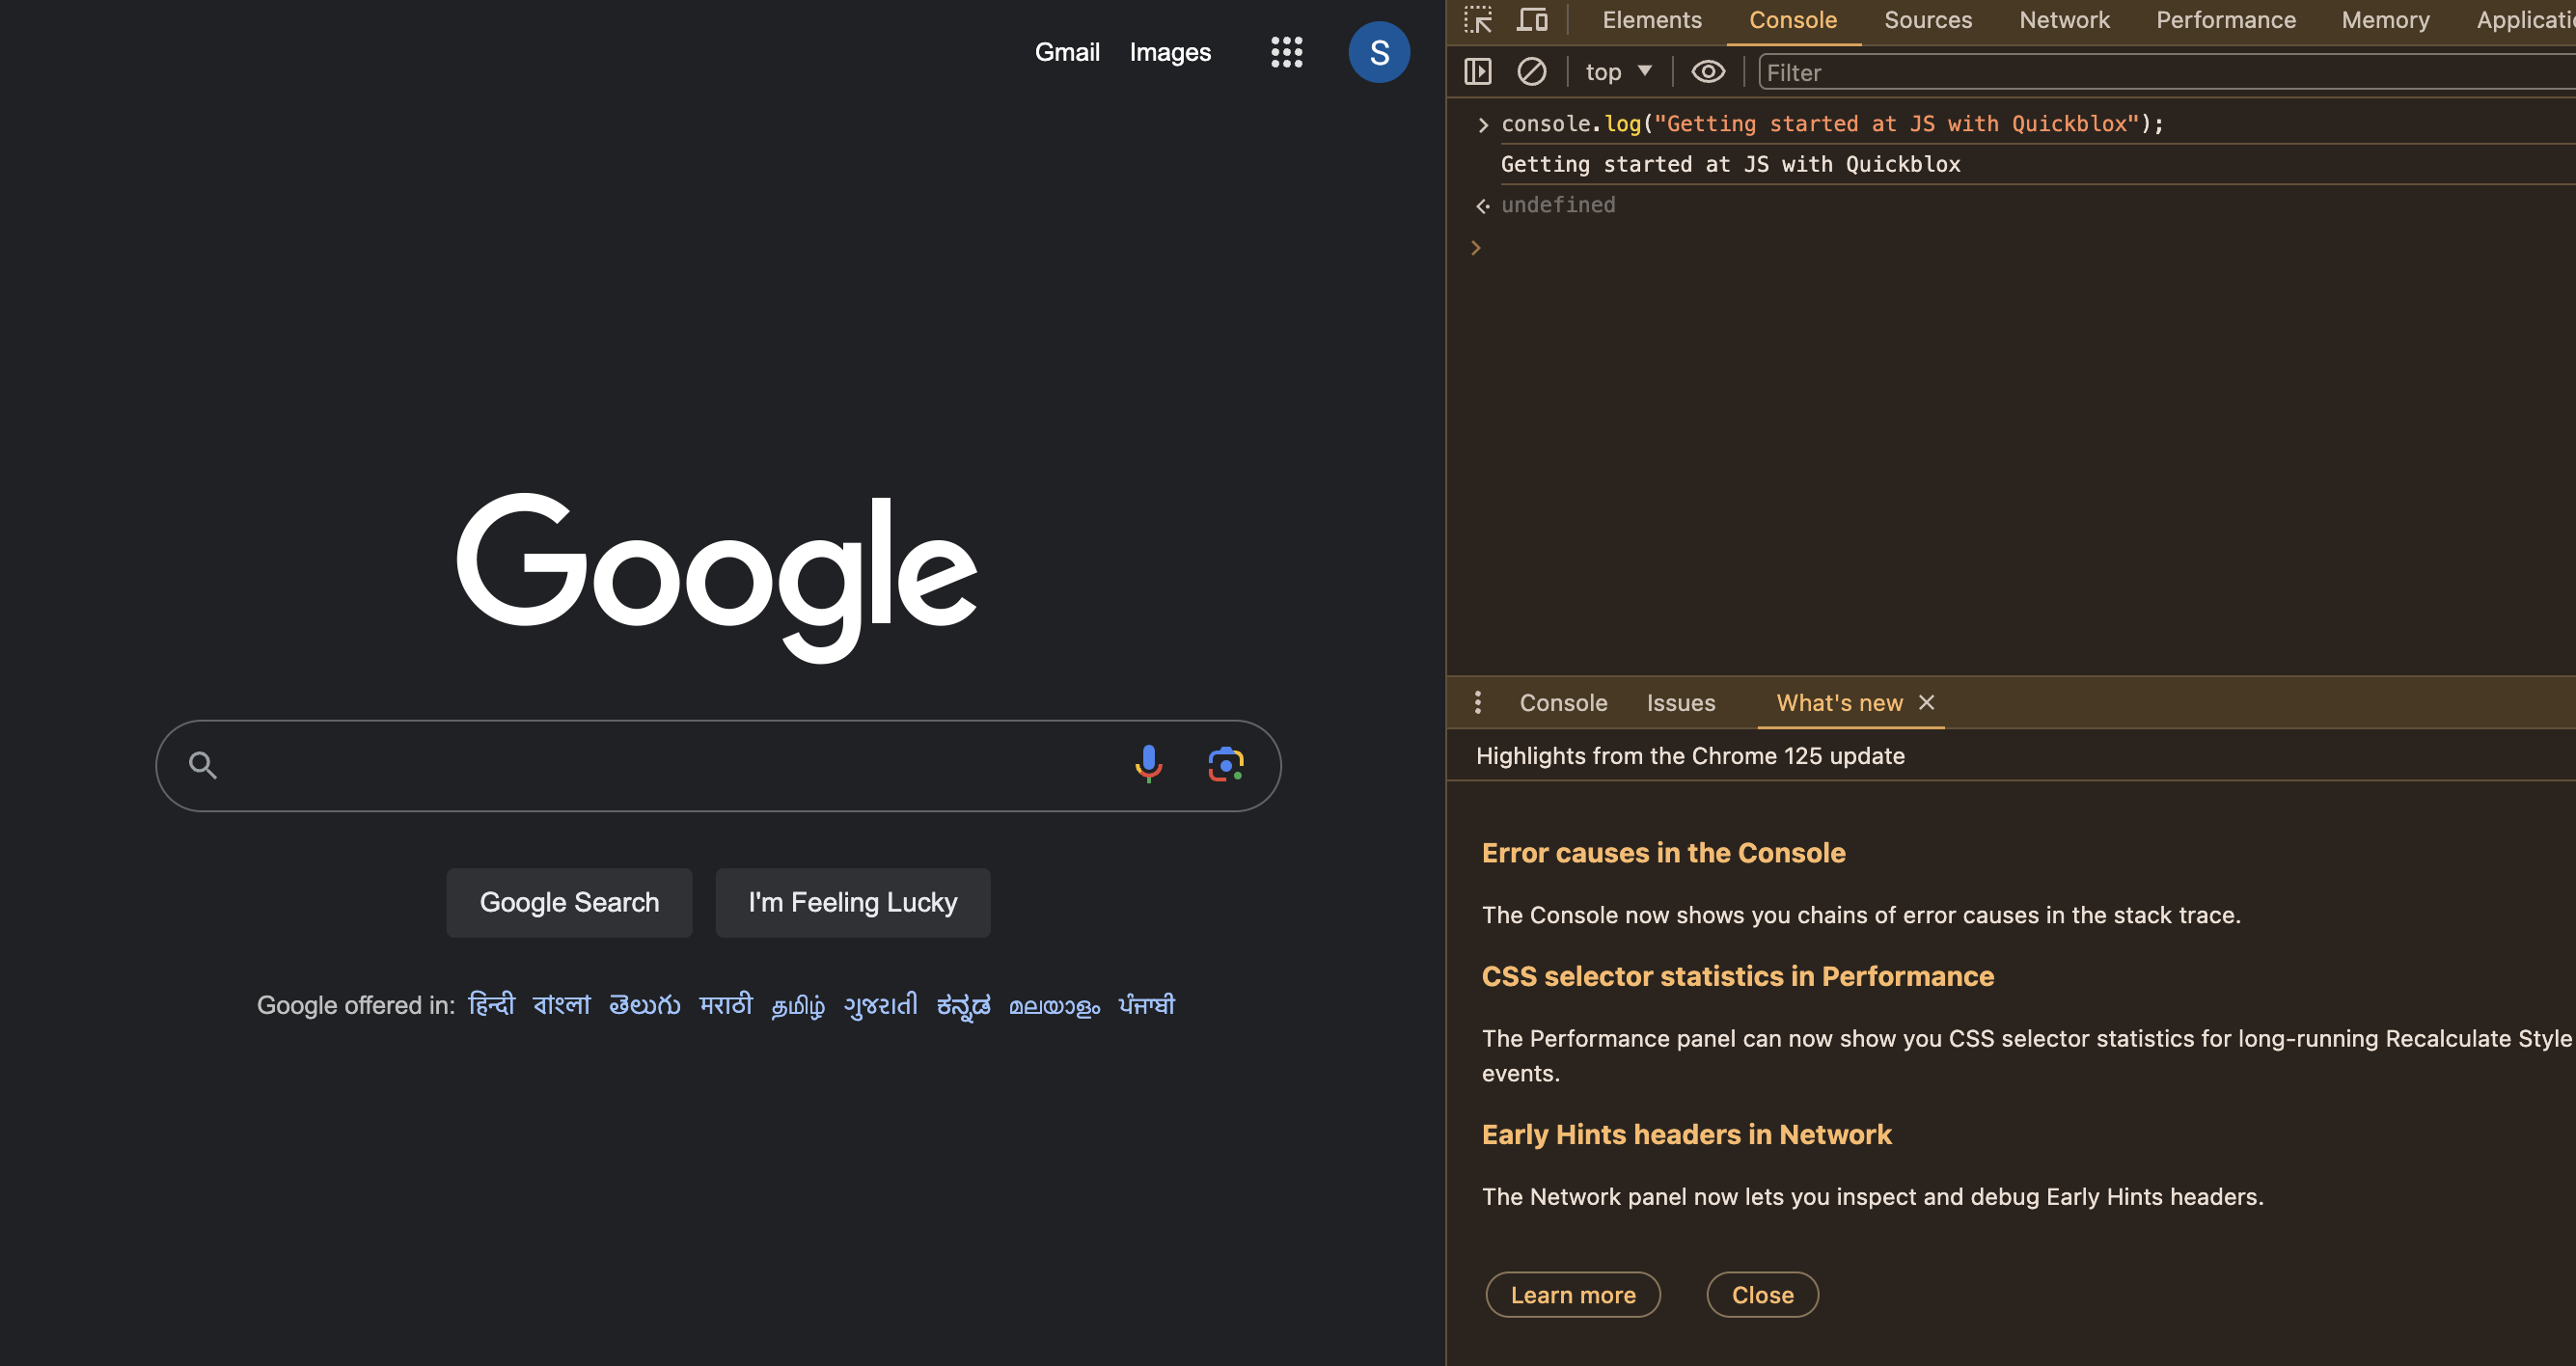
Fun Fact: You don't need any special software to start coding in JavaScript! 🎉 You can run JavaScript directly in your web browser's console
To try JavaScript in Google Chrome:
Open Chrome and navigate to any webpage.Press Ctrl + Shift + J (Windows/Linux) or Cmd + Option + J (Mac) to open the Developer Tools.Click on the "Console" tab.Type :console.log("Getting started at JS with Quickblox");And it will appear in the console of the browser.
- Install Node.js and npm
Node.js is a JavaScript runtime that allows you to run JavaScript on the server side. npm (Node Package Manager) is included with Node.js and allows you to manage project dependencies.
Download and install Node.js from the official website. npm is installed automatically with Node.js.
To verify the installation of Node.js and npm (Node Package Manager), follow these steps:
Open your Command Line Interface (CLI):
On Windows, you can use Command Prompt or PowerShell.
On macOS, open Terminal.
On Linux, open Terminal.
Check the Node.js version:
Type the following command in your CLI and press Enter:
node -vThis command will display the installed version of Node.js.
Check the npm version:
Type the following command in your CLI and press Enter:
npm -vThis command will display the installed version of npm.
If Node.js and npm are correctly installed, you should see the version numbers displayed in the terminal. If there are any issues or errors, you may need to recheck your installation process.
- Set Up a Code Editor
Choose a code editor to write your JavaScript code. Popular options include:
Visual Studio Code (VS Code): It is widely used, highly customizable, and has a rich ecosystem of extensions. [Recommended]
Sublime Text
Atom
WebStorm
History and Evolution of JavaScript
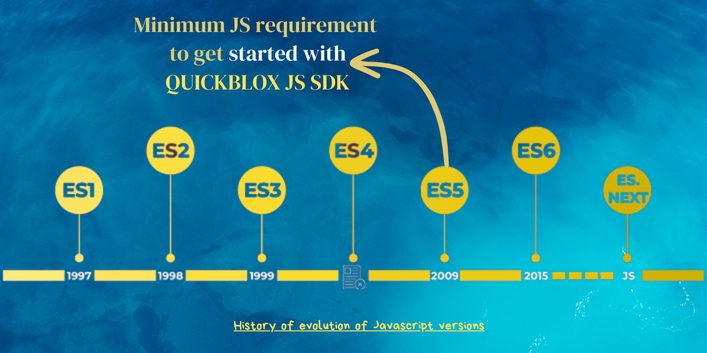
JavaScript was created by Brendan Eich in 1995 and has since evolved significantly, with ECMAScript (ES) standards driving its development.
The minimum requirement to get started with QuickBlox Javascript SDK is ES5.

Understanding ECMAScript Versions
ECMAScript is the standard upon which JavaScript is based. New versions (ES6, ES7, etc.) introduce new features and improvements.
Key Versions:
ES5 (2009): Strict mode, array methods (forEach, map).
ES6 (2015): let, const, arrow functions, classes, modules.
ES7 (2016): Exponentiation operator, Array.prototype.includes.
ES8 (2017): Async functions, Object.entries, Object.values.
ES9 (2018): Rest/spread properties, async iteration.
ES10 (2019): Array.prototype.flat, Object.fromEntries.
ES11 (2020): BigInt, dynamic import().
Variables and Data Types
Variables are used to store data values. JavaScript supports various data types including strings, numbers, booleans, objects, and more.
let name = "Alice";
let age = 25;
JavaScript in Web Development
Operators and Expressions
Operators are used to perform operations on variables and values. Expressions are combinations of values, variables, and operators, which compute to a value.
let sum = 10 + 20; // 30
Conditionals (if, else, switch)
Conditionals are used to perform different actions based on different conditions.
if (age < 18) {
    console.log("Minor");
} else {
    console.log("Adult");
}
Basics of Document Object Model (DOM)
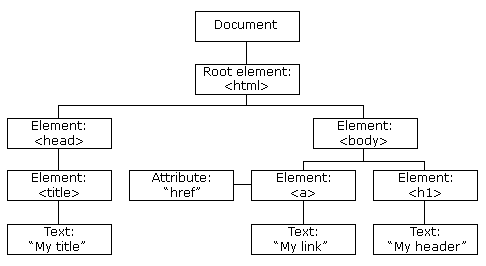
The DOM is a programming interface for web documents. It represents the page so that programs can change the document structure, style, and content.

Loops (for, while, do-while)
Loops are used to repeat a block of code as long as a specified condition is true.
for (let i = 0; i < 5; i++) {
    console.log(i);
}
JavaScript Functions: Features and Usage
Understanding Functions: Declarations, Expressions, Arrow Functions
Functions are blocks of code designed to perform specific tasks, executed when called.
Function Declaration:
  function greet(name) {
      return `Hello, ${name}!`;
  }
Function Expression:
  const greet = function(name) {
      return `Hello, ${name}!`;
  };
Arrow Function:
const greet = (name) => `Hello, ${name}!`;
Function Parameters and Return Values
Functions can take parameters and return values:
function add(a, b) {
    return a + b;
}
Promises: Asynchronous Handling
A Promise encapsulates the eventual result of an asynchronous operation, whether it's available now, in the future, or not at all.
Creating a Promise:
const loginUser = (username, password) => {
    return new Promise((resolve, reject) => {
        const userCredentials = { login: username, password: password };
        QB.createSession(userCredentials, (err, res) => {
            if (err) {
                reject("Error creating session: " + err.message);
            } else {
                resolve(res.token);
            }
        });
    });
};
In this example:
loginUser function accepts username and password parameters.
It returns a new Promise that wraps an asynchronous operation.
Inside the Promise, QB.createSession is called with userCredentials.
If createSession succeeds, it calls resolve with the token obtained.
If an error occurs, reject is called with an error message.
This structure ensures clear, manageable handling of asynchronous operations, facilitating better control flow in your applications.
Scope and Closures
Scope defines the accessibility of variables, while closures enable functions to retain access to their lexical environments.
Example with QuickBlox:
const QB = require('quickblox');
const QBAppCredentials = {
    appId: "yourAppId",
    authKey: "yourAuthKey",
    authSecret: "yourAuthSecret"
};

function initializeQuickBlox() {
    QB.init(QBAppCredentials.appId, QBAppCredentials.authKey, QBAppCredentials.authSecret);

    function loginUser(userCredentials) {
        let sessionToken;

        QB.createSession(userCredentials, function(err, res) {
            if (!err) {
                sessionToken = res.token;
                console.log("Session created:", sessionToken);
            }
        });

        return {
            getSessionToken: () => sessionToken
        };
    }

    return { loginUser };
}

const quickbloxInstance = initializeQuickBlox();
const userSession = quickbloxInstance.loginUser({ login: "userLogin", password: "userPassword" });

setTimeout(() => {
    console.log("Session token:", userSession.getSessionToken());
}, 3000);
In this example:
initializeQuickBlox sets up QuickBlox using provided credentials.
loginUser function initiates a session using QB.createSession and stores the sessionToken locally.
The getSessionToken closure allows external access to sessionToken.
setTimeout demonstrates closure behavior by accessing sessionToken after a delay.
Understanding scope and closures is crucial for managing variable visibility and leveraging function contexts effectively in JavaScript applications.
Higher-Order Functions
Higher-order functions take other functions as arguments or return them as results.
const numbers = [1, 2, 3];
const doubled = numbers.map(num => num * 2);
Variable Declarations: var, let, and const
Function Scope with var:
var x = 1;Block Scope with let and const:
  let y = 2;
  const z = 3;
Browser Scripting and Events
Client-Side Scripting enables the creation of dynamic, interactive web pages.
Event Handling
React to user actions:
document.getElementById("myButton").addEventListener("click", () => {
    alert("Button clicked!");
});
Manipulating the DOM
Update HTML content dynamically:
document.getElementById("myDiv").innerHTML = "Hello, DOM!";
Form Validation
Validate form input before submission:
document.getElementById("myForm").addEventListener("submit", function(event) {
    event.preventDefault();
    const username = document.getElementById("username").value;
    const password = document.getElementById("password").value;
    if (username && password) {
        loginUser(username, password);
    } else {
        document.getElementById("formFeedback").innerText = "Please enter a username and password.";
    }
});
QuickBlox Initialization and Session Creation
Initialize QuickBlox and handle session creation:
const QBAppCredentials = {
    appId: "yourAppId",
    authKey: "yourAuthKey",
    authSecret: "yourAuthSecret"
};

QB.init(QBAppCredentials.appId, QBAppCredentials.authKey, QBAppCredentials.authSecret);

function loginUser(username, password) {
    const userCredentials = { login: username, password: password };
    QB.createSession(userCredentials, (err, res) => {
        if (!err) {
            const sessionToken = res.token;
            document.getElementById("dynamicContent").innerHTML = `Session Token: ${sessionToken}`;
            localStorage.setItem("qbSessionToken", sessionToken);
        }
    });
}

document.getElementById("myForm").addEventListener("submit", function(event) {
    event.preventDefault();
    const username = document.getElementById("username").value;
    const password = document.getElementById("password").value;
    if (username && password) {
        loginUser(username, password);
    } else {
        document.getElementById("formFeedback").innerText = "Please enter a username and password.";
    }
});
These examples illustrate essential concepts in browser scripting, from event handling and DOM manipulation to form validation and integration with external services like QuickBlox for session management. Understanding these fundamentals empowers developers to create robust and user-friendly web applications.
We've explored JavaScript fundamentals and practical examples using QuickBlox. Dive deeper by trying QuickBlox in your projects and joining our QuickBlox Discord community for further learning and support.
Happy coding! 🚀
Subscribe to my newsletter
Read articles from Sayantani Deb directly inside your inbox. Subscribe to the newsletter, and don't miss out.
Written by

Sayantani Deb
Sayantani Deb
A Javascript Porgrammer who loves to build cool projects in the weekends!