Day06-Ubuntu in GCP: How to Set Up Apache and Tomcat Web Servers
 Karan Singh Rajawat
Set Up Apache and Tomcat Web Servers in GCP
Introduction
This guide provides step-by-step instructions on how to set up Apache and Tomcat web servers on an Ubuntu instance hosted on Google Cloud Platform (GCP). Apache is a widely used web server, and Tomcat is an application server that runs Java servlets and JSP pages. Integrating these servers allows you to handle both static and dynamic content efficiently.
- Note: The Apache server is an HTTP web server, while the Apache Tomcat server is mainly a Java application server
Prerequisites
A Google Cloud Platform (GCP) account.
Basic understanding of Linux command-line interface.
SSH access to your GCP instance.
Setting Up Your GCP Environment
Creating a VM Instance
Log in to your GCP account.
Navigate to the Compute Engine section.
Click on "Create Instance".
Configure your instance:
Name: Give your instance a meaningful name.
Region and Zone: Choose a region and zone close to your user base.
Machine type: Select an appropriate machine type (e.g., e2-medium).
Boot disk: Choose Ubuntu as the operating system (e.g., Ubuntu 20.04 LTS).
Firewall: Allow HTTP and HTTPS traffic.
Click on "Create".
If you need detailed document, please follow my blog post to create VM in GCP:
Google Compute Engine(GCE) - Creating and Managing Virtual Machines
Once your instance is created, note the external IP address, as you will need it to access your server.
Installing Apache Web Server
To grant root rights, type the following command in your VM
sudo suUpdate the package list
apt update
Install Apache Webserver
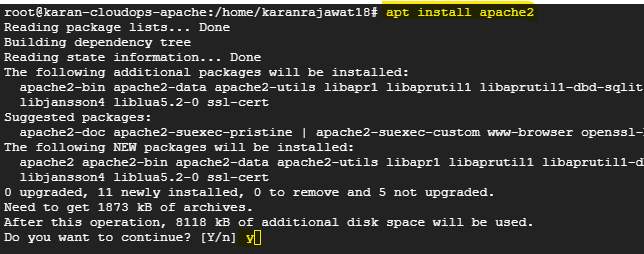
apt install apache2
Type "y" to install all package and libraries

Go to index.html file to type anything to display on webpage
Type the following command to edit the index.html
echo "Hello I am Karan Singh Rajawat! from $(hostname) $(hostname -i)" > /var/www/html/index.htmlStart the Apache2 service on your VM
systemctl start apache2Now, copy the public IP of your VM from the GCP Console and paste to the web browser.

Installing Tomcat Web Server
Update the package list:
apt-get update
Install Java (if not already installed):
apt-get install default-jdk -y
Download Apache Tomcat:
wgethttps://downloads.apache.org/tomcat/tomcat-9/v9.0.89/bin/apache-tomcat-9.0.89.tar.gz
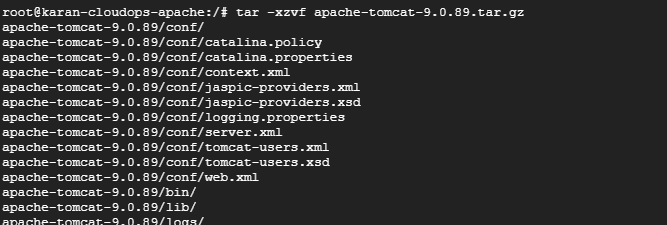
Extract the Tomcat tar.gz file:
tar -xzvf apache-tomcat-9.0.89.tar.gz
Move Tomcat to the /opt directory:
mv apache-tomcat-9.0.89 /opt/tomcatSet permissions for the Tomcat scripts:
chmod +x /opt/tomcat/bin/*.sh
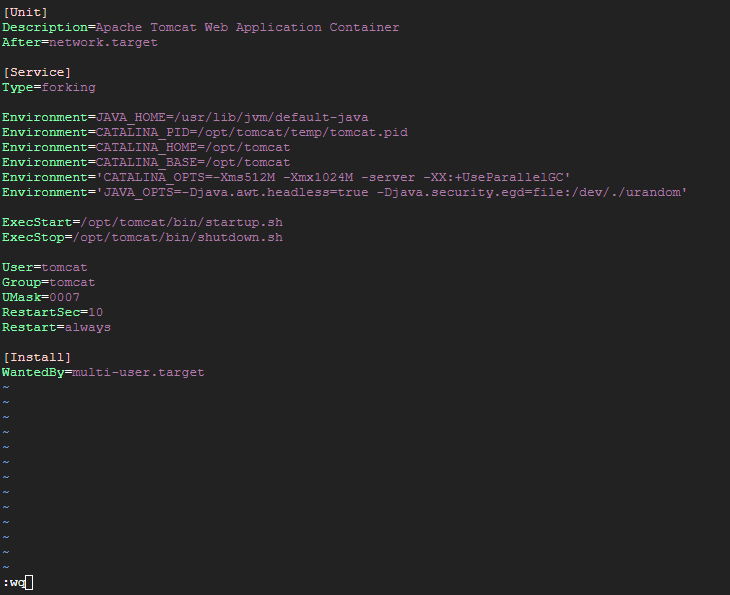
Configure Tomcat as a Systemd Service:
vim /etc/systemd/system/tomcat.serviceor
nano /etc/systemd/system/tomcat.serviceAdd the following content to the file:
[Unit] Description=Apache Tomcat Web Application Container After=network.target[Service] Type=forkingEnvironment=JAVA_HOME=/usr/lib/jvm/default-java Environment=CATALINA_PID=/opt/tomcat/temp/tomcat.pidEnvironment=CATALINA_HOME=/opt/tomcat Environment=CATALINA_BASE=/opt/tomcat Environment='CATALINA_OPTS=-Xms512M -Xmx1024M -server -XX:+UseParallelGC' Environment='JAVA_OPTS=-Djava.awt.headless=true -Djava.security.egd=[file:/dev/./urandom](file:/dev/./urandom)'ExecStart=/opt/tomcat/bin/startup.shExecStop=/opt/tomcat/bin/shutdown.shUser=tomcat Group=tomcat UMask=0007 RestartSec=10 Restart=always[Install] WantedBy=multi-user.target
Create a tomcat group and user:
groupadd tomcatuseradd -s /bin/false -g tomcat -d /opt/tomcat tomcatChange ownership of the Tomcat directory:
chown -R tomcat:tomcat /opt/tomcat
Reload the systemd daemon to recognize the new Tomcat service:
systemctl daemon-reloadEnable and start the Tomcat service:
systemctl enable tomcatsystemctl start tomcat
Verify Tomcat Installation
Check the status of the Tomcat service:
systemctl status tomcat
Access Tomcat:
Open a web browser and navigate to
http://[YOUR_VM_EXTERNAL_IP]:8080to see the Tomcat welcome page.
By following these steps, you will have Tomcat installed and running on a GCP VM instance.
If you are facing issues launching Tomcat at http://[YOUR_VM_EXTERNAL_IP]:8080 and encountering a "page can't be displayed" error or the page is just spinning. Follow my blog post.
Subscribe to my newsletter
Read articles from Karan Singh Rajawat directly inside your inbox. Subscribe to the newsletter, and don't miss out.
Written by

Karan Singh Rajawat
Karan Singh Rajawat
I am a Senior Software Engineer at Cross Country Healthcare. I have 8+ year experience in Infrastructure and CloudOps and three AWS certifications: Cloud Practitioner, Solutions Architect - Associate, and SysOps Administrator - Associate. I started my career as a Service Desk Engineer, where I built a strong foundation in IT support and customer service. I then transitioned to on-premise infrastructure, where I gained valuable experience in diverse technologies and platforms. Inspired by the rapid growth of cloud computing, I specialized in AWS CloudOps.