How to Deploy Your Application on AWS EKS and Make it Internet Accessible: Step-by-Step
 Rachana
Table of contents
- Why EKS?
- Why Not Self-Managed Kubernetes on AWS Instances?
- Understanding the Demo
- Pre Requisites
- Lets get started with the Demo
- Create an EKS cluster using eksctl on the command line
- Update the kube-config
- Create a new fargate profile
- 4. Understanding the Kubernetes Manifest
- 5. Deploying the Application Using the Manifest
- 6. Configure IAM OIDC
- 7. Configure IAM role for the cluster to interact with ALB
- 8. Create an Ingress Controller(ALB Controller)
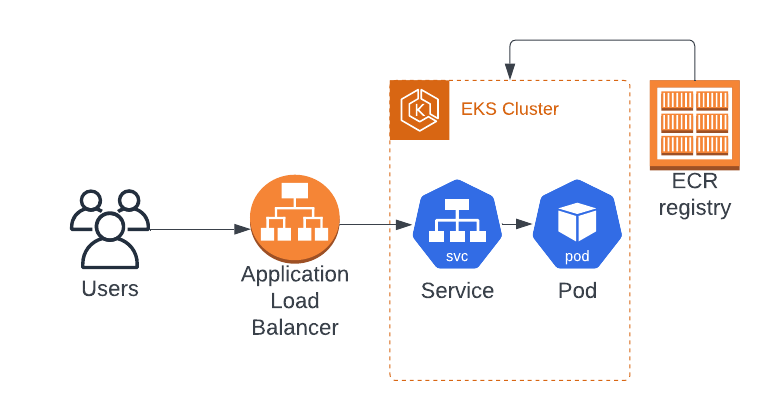
In this blog, I will explain how to deploy the 2048 game on AWS Elastic Kubernetes Service (EKS). This will be a step-by-step tutorial with explanations to make it beginner-friendly.
Why EKS?
EKS is a managed Kubernetes services on AWS and is preferred over manually configuring Kubernetes on AWS instances for the following reasons:
Managed Control Plane: EKS takes care of managing the Kubernetes control plane components, such as the API server, controller manager, and etcd.
Automated Updates: EKS automatically updates the Kubernetes version, eliminating the need for manual intervention and ensuring that the cluster stays up-to-date with the latest features and security patches.
Scalability: EKS can automatically scale the Kubernetes control plane based on demand, ensuring the cluster remains responsive as the workload increases.
AWS Integration: EKS seamlessly integrates with various AWS services, such as AWS IAM for authentication and authorization, Amazon VPC for networking, and AWS Load Balancers for service exposure.
Security and Compliance: EKS is designed to meet various security standards and compliance requirements, providing a secure and compliant environment for running containerized workloads.
Why Not Self-Managed Kubernetes on AWS Instances?
It is possible to create normal EC2 instances on AWS and manually install and configure Kubernetes on it. While this offers full control over the cluster's configuration and infrastructure, enabling customization and optimization, it can get very complicated and error-prone.
It also requires a lot of manual maintenance, making it complex and less efficient. It requires additional efforts to main security and compliance of the cluster. And it obviously lacks automation.
Due to all these reasons, EKS is considered a better option to deal with Kubernetes on AWS.
Understanding the Demo
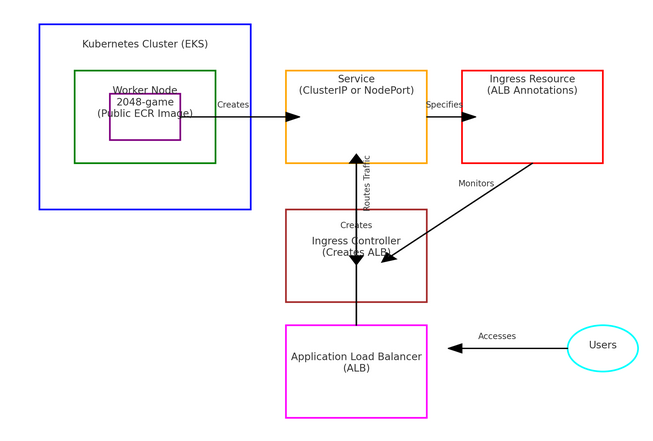
The goal of this demo is to create a Kubernetes Cluster on EKS, deploy the 2048-game on its worker node and make the application accessible to the users outside of AWS. We will be using a public ECR image to build the app.
We will then create a service on top of the deployment for service-discovery mechanism. The service can be of 3 types:
ClusterIP mode - It will be accessible only from within the cluster.
NodePort mode - It will be accessible by people who have access to the private subnet of the cluster.
Load Balancer mode - It will be accessible from anyone outside AWS. They just need to be able to access the Load Balancer and it will route the traffic to the application in the private subnet.
Here, the Load Balancer mode serves our purpose, but it is more simple and efficient to use the AWS' ALB instead of others. We can create an AWS ALB using Ingress.
So, we will create an Ingress resource on top of the service(can be either ClusterIP or NodePort). The Ingress resource will specify the annotations specific to AWS ALB and configure how the traffic should be routed. But it doesn't create the Load Balancer itself. For this, we should create an Ingress Controller on the Cluster.
The Ingress controller will look for the Ingress resource and create an AWS ALB on the cluster. Now, the people outside AWS can access the ALB and according to the rules in the Ingress resource definition, the traffic will be securely routed to the application deployed on the EKS Cluster.
Pre Requisites
Install
kubectlwhich is a command line tool used to interact with Kubernetes API.https://docs.aws.amazon.com/eks/latest/userguide/install-kubectl.html
Verify installation -
kubectl version --clientInstall
eksctlwhich is another command line tool to create and manage EKS resources by communicating with its API. It is very important because, creating an EKS cluster using the AWS console can be tedious and time-consuming as it includes many steps to configure. Using command line in such scenarios are efficient.https://docs.aws.amazon.com/emr/latest/EMR-on-EKS-DevelopmentGuide/setting-up-eksctl.html
Verify installation -
eksctl versionInstall AWS CLI, which is a command line tool to create and manage resources on AWS through its API
https://docs.aws.amazon.com/cli/latest/userguide/getting-started-install.html
Verify installation -
aws --versionAfter installing AWS CLI, configure your account on the command line using your AWS account credentials - AWS Access key, Secret Access key
aws configure
Lets get started with the Demo
Create an EKS cluster using
eksctlon the command line
eksctl create cluster --name demo-cluster --region ap-south-1 --fargate
You can modify the
--name, name of the cluster and--regionas per your preferences.You can create two types of worker nodes on the EKS cluster - EC2 instance type or Fargate. In the former, just normal EC2 instances will be created, which requires manual interference. But, Fargate is completely serverless i.e., the resources to run the task will automatically created and manged without any manual interference.
So we will be using Fargate type of instances in this demo.
The creation of this cluster can take 15-20 mins.

Verify if it is created by checking the AWS console

It can be noticed that the cluster automatically used the latest version of Kubernetes, even if we didn't specify it.
Another advantage of EKS is that we can view the resources on the console and not just the CLI. If we used self-managed Kubernetes, then we will have to configure dashboards separately to get this feature.
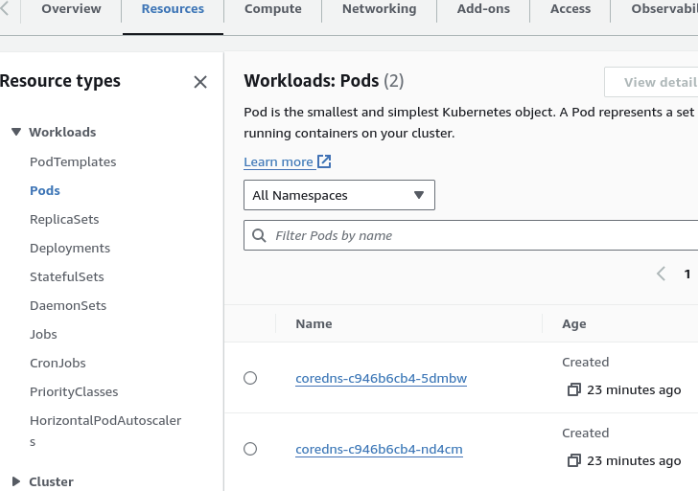
It can also be noticed that two fargate instances are created in the cluster.
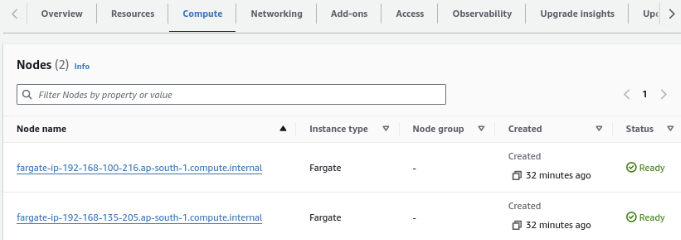
The default fargate profile will allow deploying in
defaultandkube-systemnamespace only.
In this demo, we will be creating a new fargate profile and deploy our application in the new namespace.
Update the kube-config
A kubeconfig is a configuration file used by
kubectl, the Kubernetes command-line tool, to communicate with a Kubernetes cluster. It contains information about clusters, users, namespaces, and authentication mechanisms.This enables you to use tools like
kubectlto interact with and manage the Kubernetes cluster hosted on Amazon EKS directly from your local machine.aws eks update-kubeconfig --name demo-cluster --region ap-south-1Make sure to match the name of the cluster and the region.
Create a new fargate profile
We will be deploying this application in a new namespace which we are going to create now by creating a new fargate profile.
  eksctl create fargateprofile \
      --cluster demo-cluster \
      --region ap-south-1 \
      --name alb-sample-app \
      --namespace game-2048
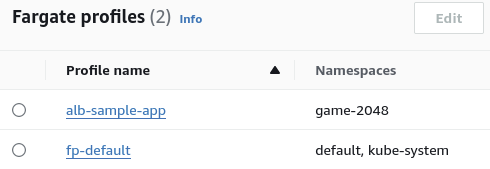
As we can see, a new fargate profile
alb-sample-appis created in a new namespacegame-2048
4. Understanding the Kubernetes Manifest
Creating a namespace-

Previously, we just created a fargate profile which will allow deployment in the
game-2048namespace, but we haven't created the namespace itself.So, this YAML script creates a namespace
game-2048
Creating a Deployment-
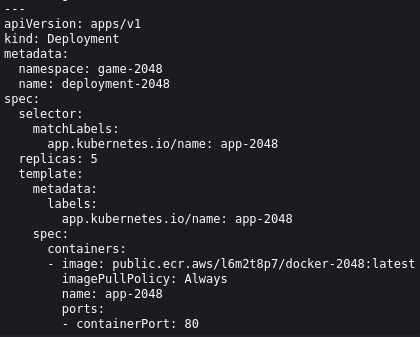
This YAML file pulls an image of the game from a public ECR registry and deploys in the
game-2048namespace.It creates a Deployment resource named
deployment-2048specifies how the game application should be deployed and managed.It ensures that there are 5 replicas (pods) of the game running at all times.
The container listens on port 80 for incoming traffic.
Creating a Service-
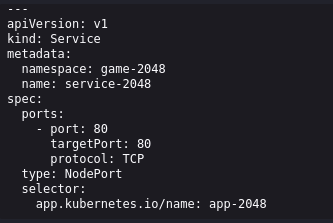
The Service resource named
service-2048exposes the game application to other pods within thegame-2048namespace.It defines a NodePort type service, meaning it exposes the game application on a specific port on each node in the Kubernetes cluster.
Creating an Ingress Resource-
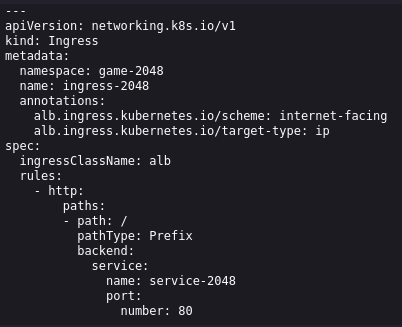
The Ingress resource named
ingress-2048enables external access to the game application from the internet.It uses annotations specific to AWS ALB (Application Load Balancer) to configure how traffic should be routed.
The Ingress is configured to route HTTP traffic coming to the root URL ("/") to the
service-2048within thegame-2048namespace.
Overall, this manifest sets up a scalable deployment of the "2048" game application within the Kubernetes cluster, accessible both internally and externally through a NodePort service and an ALB Ingress respectively.
5. Deploying the Application Using the Manifest
The above Manifest File is present in the URL - https://raw.githubusercontent.com/kubernetes-sigs/aws-load-balancer-controller/v2.5.4/docs/examples/2048/2048_full.yaml
kubectl apply -f https://raw.githubusercontent.com/kubernetes-sigs/aws-load-balancer-controller/v2.5.4/docs/examples/2048/2048_full.yamlWhen you execute this command, Kubernetes will fetch the configuration file from the specified URL, parse its contents, and then create or update the Kubernetes resources defined in the file within your cluster.
This enables you to deploy the 2048-game application and its supporting infrastructure to your Kubernetes cluster in one step.

Check if the pods are created -
kubectl get pods -n game-2048
The
-n game-2048gets the pods in thegame-2048namespace.Check if the service is created -
kubectl get svc -n game-2048
This service is of the type NodePort just like mentioned in the YAML file. We will be exposing this service using the ALB controller.
Check the Ingress Resource -
kubectl get ingress -n game-2048
The ingress resource has no address yet because there is no ingress-controller. Except that, the port is mentioned and host i.e., accessible from anyone anywhere.
6. Configure IAM OIDC
Configure IAM OIDC provider for provisioning of identity for the ALB-controller(which is a pod, any controller is a pod)
eksctl utils associate-iam-oidc-provider --cluster demo-cluster --approveWhen you execute this command, eksctl will automatically associate the IAM OIDC provider with the specified EKS cluster.
This association is necessary for certain AWS services (such as IAM roles for service accounts) to authenticate with the EKS cluster using OIDC.
7. Configure IAM role for the cluster to interact with ALB
Download IAM policy(provided by ALB-controller) to interact with ALB
curl -O https://raw.githubusercontent.com/kubernetes-sigs/aws-load-balancer-controller/v2.5.4/docs/install/iam_policy.jsonCreate an IAM policy using downloaded file
      aws iam create-policy \
      --policy-name AWSLoadBalancerControllerIAMPolicy \
      --policy-document file://iam_policy.json
When you execute this command, it will create an IAM policy with the specified name and attach the policy document defined in the JSON file to it.
file://iam_policy.json: This flag specifies the JSON file containing the IAM policy document. Thefile://prefix indicates that the policy document is stored locally.Create a Service account and an IAM role by attaching the IAM policy
       eksctl create iamserviceaccount \
    --cluster=demo-cluster \
    --namespace=kube-system \
    --name=aws-load-balancer-controller \
    --role-name AmazonEKSLoadBalancerControllerRole \
    --attach-policy-arn=arn:aws:iam::<your-aws-account-id>:policy/AWSLoadBalancerControllerIAMPolicy \
    --approve
When you execute this command, eksctl will create an IAM role with the specified name and attach the specified IAM policy to it. Then, it will create a Kubernetes service account with the specified name and associate it with the IAM role.
8. Create an Ingress Controller(ALB Controller)
helm repo add eks https://aws.github.io/eks-chartsWhen you execute this command, Helm will download and index the charts available in the specified repository. After adding the repository, you can use the
helm searchcommand to search for available charts in the repository, andhelm installto install charts from the repository onto your Kubernetes cluster.helm repo update ekshelm install aws-load-balancer-controller eks/aws-load-balancer-controller -n kube-system \ --set clusterName=demo-cluster \ --set serviceAccount.create=false \ --set serviceAccount.name=aws-load-balancer-controller \ --set region=ap-south-1 \ --set vpcId=vpc-0b154a80b7424ef11Get VPC ID from the 'Networking' tab of the EKS cluster
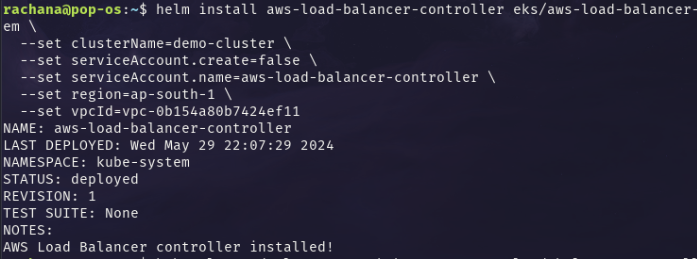
Verify if the ALB controller is deployed- it is deployed as pods only

It is deployed in the
kube-systemnamespace, which is the default namespace, but it has the ability to look for the ingress resources in other namespaces.Now that we have deployed an ALB controller, it should look for the existing ALB resources and launch an Application Load Balancer in the public subnet of the VPC.
Check the ingress resource -
kubectl get ingress -n game-2048
Now, the
ADDRESSfield of the resource is populated. This means that the ALB controller has created an ALB.Check it in the AWS Console
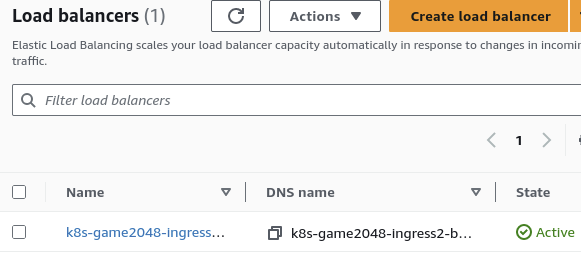
Yayy!! The ALB is deployed using which the application is accessible from the internet.
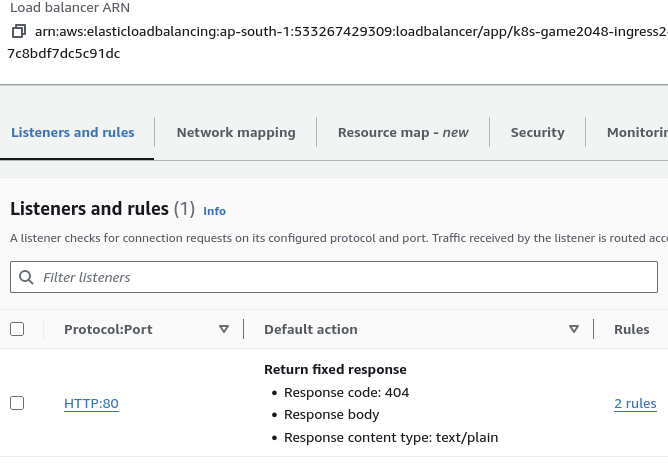
Copy the DNS of the ALB and paste it in your browser

YAYYY!! We deployed the game using EKS.
It was accessible from the browser as we had configured while creating the ingress resource to allow HTTP traffic
Clean-up
It is important to delete all the resources to avoid charges
Delete the EKS Cluster
eksctl delete cluster --name demo-cluster --region ap-south-1Also manually delete the VPC, which was created by EKS
Finally delete the ALB too.
We are done now!
Thank you All!
Subscribe to my newsletter
Read articles from Rachana directly inside your inbox. Subscribe to the newsletter, and don't miss out.
Written by

Rachana
Rachana
Hi to the fellow tech enthusiasts out there! 👋 I am an aspiring Cloud and DevOps Engineer ☁️ With strong foundation in containerization technologies like Docker and Kubernetes🐳 Capable of building resilient, secure and cost optimized infrastructure on AWS cloud - AWS SAA certified.☁️🔒 Currently learning to build CI/CD pipelines using Jenkins, github-actions, AWS CodePipeline, and many more.🛠️🔄 Exploring other tools like Ansible for configuration management and Terraform for Infrastructure as Code(IaC).🧩📜 Let's connect, learn and grow together! 🌟🤝