How to Build an Image Classification App Using TensorFlow Lite and Flutter
 Yashraj Tarte
Table of contents
- Let’s take a quick peek at what we’re going to create today:
- Get the Dataset
- This article will be divided into two modules:
- Module 1: Neural Networks Training
- Option 1: Using Teachable Machine
- Option 2: Using TensorFlow and Keras
- Module 2: Importing and Using TensorFlow Lite File in Our Flutter App
- Now you may experience the strength of AI 😉.
Machine learning and Artificial Intelligence elevate mobile app development to unprecedented heights. With machine learning, apps can detect speech, recognise images, and interpret body language. AI provides fresh and captivating methods to engage and connect with people globally. But, how exactly do we weave machine learning into our mobile applications?
Developing mobile applications with integrated machine learning has long been a daunting task. However, with development platforms and tools like Firebase’s ML and TensorFlow Lite, it has become as easy as pie. These tools offer pre-trained machine learning models and resources for training and importing traditional models. But how do we build a captivating experience atop these machine learning models? Enter Flutter.
The Flutter SDK is a versatile UI toolkit developed by Google and its open community, aimed at enhancing applications across Android, iOS, web, and desktop platforms. At its heart, Flutter combines a powerful graphics engine with the Dart programming language. With Flutter, we can seamlessly craft mobile applications featuring machine learning capabilities like image classification and object detection on Android and iOS platforms.
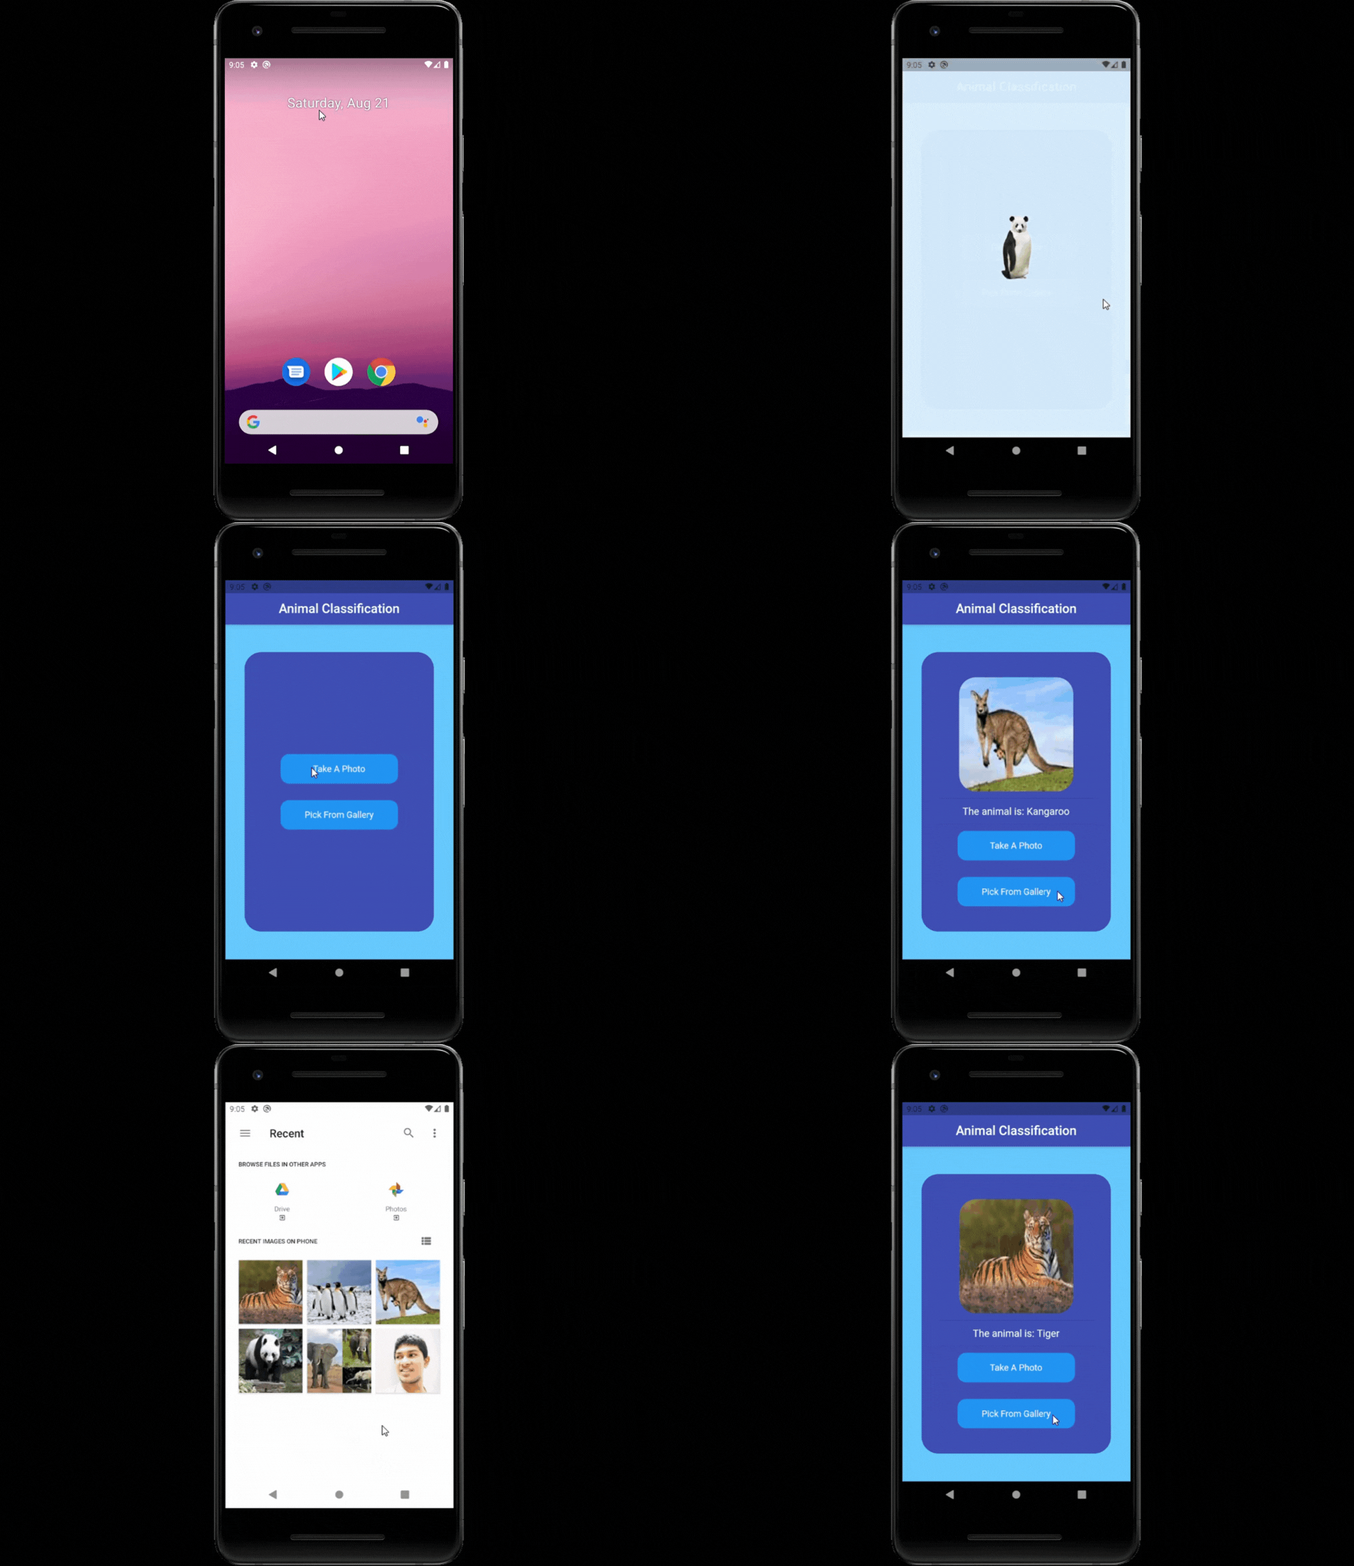
In this article, we will harness the combined power of Flutter and on-device machine learning to develop a Flutter application capable of detecting animals.
Let’s take a quick peek at what we’re going to create today:
Get the Dataset
I’ve downloaded the dataset from here. Simply download the dataset, and pick your favorite classes (in this case, animals). You can download the dataset from here. Feel free to use any other dataset if you prefer.
This article will be divided into two modules:
Training a CNN (Convolutional Neural Network) for image classification.
Integrating the trained .tflite model into a Flutter application for on-device inference.

The entire, project awaits you for cloning on my GitHub repository, Go have a look at it.
Module 1: Neural Networks Training
Here's the deal with training our model:
Option 1: Teachable Machine (for those who prefer skipping the TensorFlow and Keras hustle).
Option 2: TensorFlow and Keras (because who doesn't love diving into Deep Learning?)
Option 1: Using Teachable Machine
What is a Teachable Machine? Well, it's a nifty web-based tool designed to swiftly and effortlessly create machine learning models, making the process accessible to everyone. You can use it to recognize images, sounds, or poses.
Now, let's dive into how we can craft our machine learning model using Teachable Machine.
Firstly, head over to Teachable Machine and launch an Image Project. To kickstart the training process, we'll define five classes based on my dataset: "Elephant," "Kangaroo," "Panda," "Penguin," and "Tiger." Then, upload your training images to begin building your model.
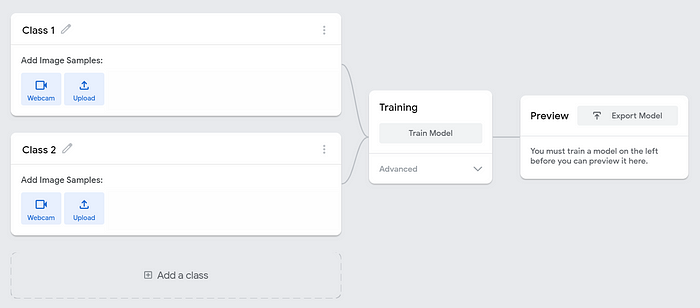
Replace Class 1 with Elephant and click on Upload to start uploading the training images for the cats.
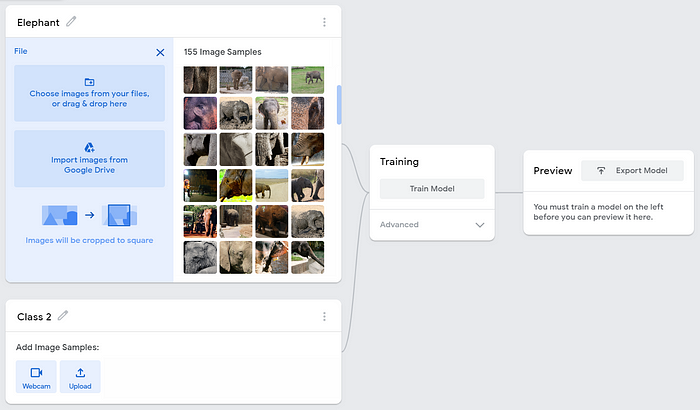
Now repeat the process for the other classes. Change Class 2 to Kangaroo and upload the training images for kangaroos. Change Class 3 to Panda and upload the training images for pandas. Follow the same steps for the remaining animals.
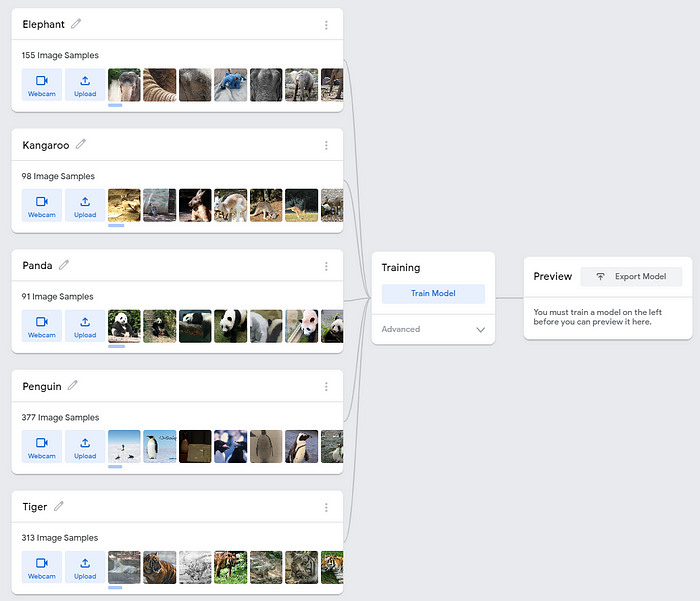
It's going to take some time, especially if you've uploaded a hefty amount of training images. So, sit back, relax, and savo your coffee while the magic happens!

Once your model is trained, click on "Export Model" and proceed to download the TensorFlow Lite Floating Point Model.
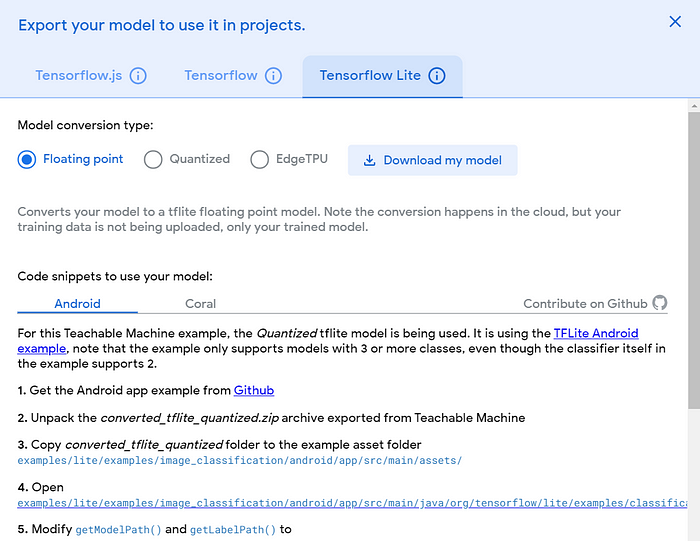
Make Sure your model do recognize our cute penguin, Otherwise!!!!

You can find my model.tflite & labels.txt files directly fromhere.
Option 2: Using TensorFlow and Keras
What is TensorFlow? Well, it's an open-source artificial intelligence library that uses data flow graphs to build models. It empowers developers to create large-scale neural networks with numerous layers. TensorFlow is primarily used for:
Classification: Sorting data into categories.
Perception: Recognizing patterns, like identifying objects in images.
Understanding: Interpreting complex data, like translating languages.
Discovering: Finding hidden patterns or insights in data.
Prediction: Forecasting future trends based on current data.
Creation: Generating new content, like music or text.
Let's get our hands dirty and dive into some code:

Let’s start by opening Jupyter Notebook (or Google Colab):
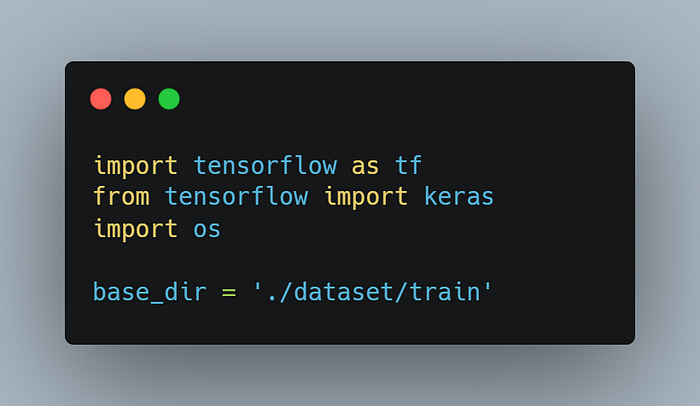
The
osmodule will provide us functions for fetching contents of and writing to a directory.Set the
base_dirvariable to the location of the dataset containing the training images.
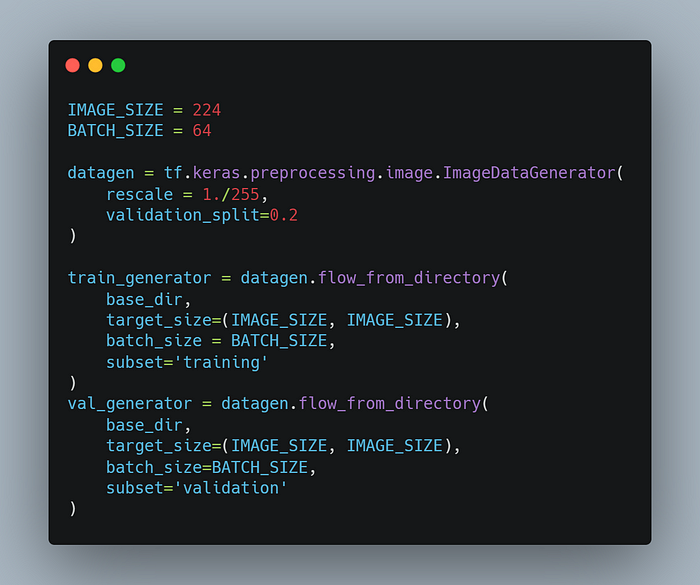
First things first, let's set
IMAGE_SIZEto 224 because, obviously, that's the size we're going to resize our dataset images to.Next up,
BATCH_SIZEis set to 64—because apparently, our neural network likes to chew on 64 images at a time.The
rescale=1./255bit is our way of saying, "Hey, let's shrink those file sizes and speed up training because no one has time for slow models."Our dataset is split into a Test set and a Training set. The training set gets to do the heavy lifting (training our model), while the test (validation) set sits back and judges how well our model performs. By setting
validation_split=0.2, we're telling Keras, "Use 80% of the data for training and save 20% for validation, because we like our models tested and accurate."Finally, we have our two trusty generators (
train_generatorandval_generator) that will grab the directory path and churn out batches of augmented data. Just to keep us in the loop, they'll output something like: "Found 2872 images belonging to 36 classes" for training and "Found 709 images belonging to 36 classes" for validation.
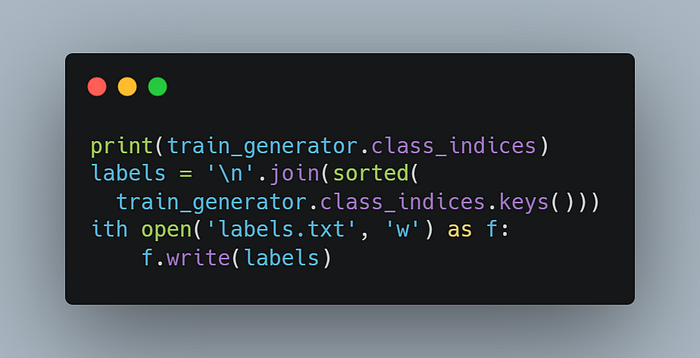
Print all keys and classes (labels) of the dataset to re-check if everything is working fine.
Flutter requires two files:
model.tfliteandlabels.txt.The ‘w’ in the code creates a new file called
labels.txtcontaining the labels (names of animals), and if it already exists, it will overwrite it.
Now we will use MobileNetV2, which is a convolutional neural network architecture that seeks to perform well on mobile devices. It is based on an inverted residual structure where the residual connections are between the bottleneck layers.
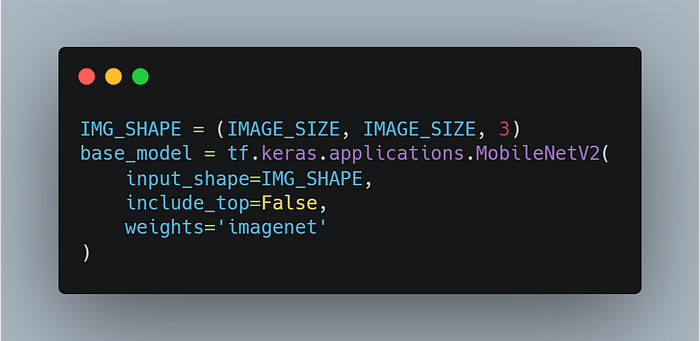
- In our approach, we're opting not to load the fully connected output layers of the MobileNetV2 model, which enables us to add and train a new output layer. Therefore, we set the
include_topargument to False.
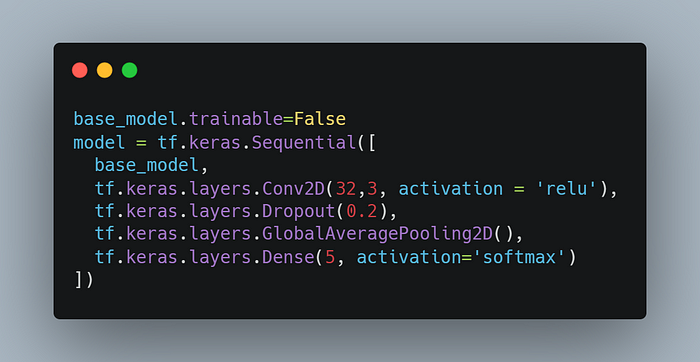
Make sure to set
base_model.trainabletoFalseto keep those weights in check before we compile the model.Moving on, let's toss in our hidden layers:
Conv2D Layer: Convo2D is this fancy layer that uses a window to peek at your input data and magically spits out some output numbers. It's all about deciphering those intricate patterns hidden in your images.
▹ReLU Activation: Ah, 'relu'—short for rectified linear unit—does this neat trick where it either gives you back what it sees (if it's positive), or just plays dead and gives you a big fat zero. Simple and effective!
Dropout Layer: This one's the party pooper of Neural Networks. The dropout layer crashes the party by randomly shutting down some of the input neurons during training. Why? To stop the network from getting too cozy with its data and becoming a snob that only recognizes what's already in its training set.
GlobalAveragePooling2D Layer: Imagine a layer that goes, "Hey, let's average out all the excitement from the previous layer." ▹GlobalAveragePooling2D does exactly that—it takes the average of each feature map, effectively downsizing the data for the final stretch.
Dense Layer: Dense layer is like the town square of neurons—it connects everyone from the previous layer to each neuron in its gang. And that '5' there? It's the number of animal types our network is going to gossip about.
▹Softmax Activation: Softmax takes a bunch of real numbers and turns them into probabilities. It's like turning up the volume on how confident our network is about each animal type it identifies.
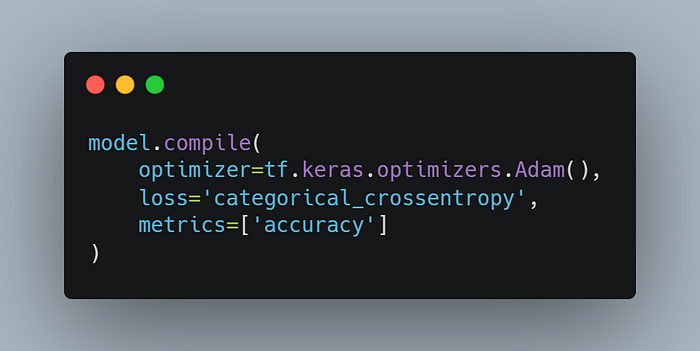
Before training the model, we need to compile it using
model.compile, which defines the loss function, optimizer, and metrics for prediction. This step is crucial because a compiled model is necessary for training, as it utilizes the specified loss function and optimizer.We'll be using Adam as our optimizer, a popular choice designed specifically for training deep neural networks. Adam serves as a replacement for stochastic gradient descent in many cases, offering efficient optimization for complex models.
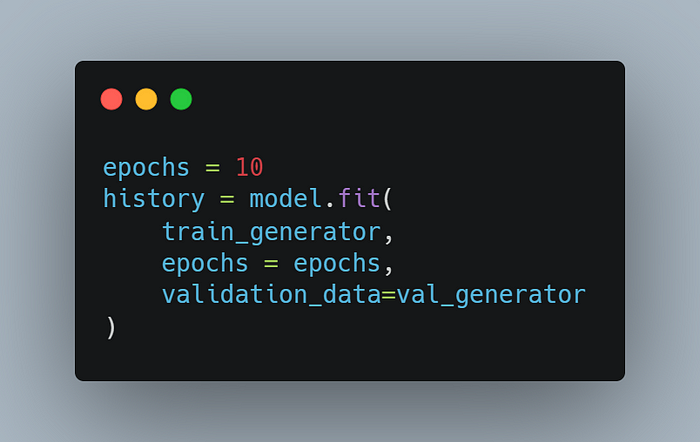
Epochs refer to the number of times the neural network goes through the entire training dataset during training. Each epoch involves using all the training data once for both forward and backward passes. An epoch consists of one or more batches, where each batch is a subset of the dataset used for training.
Increasing the number of epochs can improve the accuracy of the neural network by allowing it to learn more from the data. However, setting the number too high can lead to overfitting, where the model becomes overly specialized to the training data and performs poorly on new, unseen data.
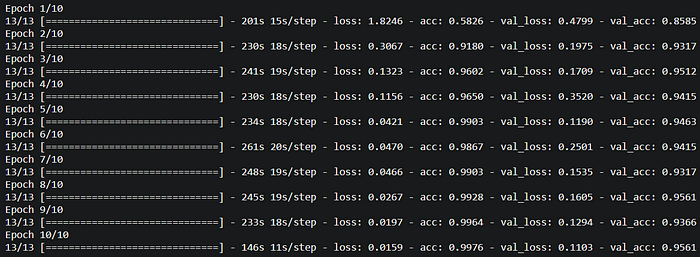
Training might take a while, especially if you've uploaded a ton of training images. So, sit tight and let the model do its thing. Patience is key while the magic happens!

Now we have to convert our Neural Network Model to a .tflite file which we can use in our Flutter App.
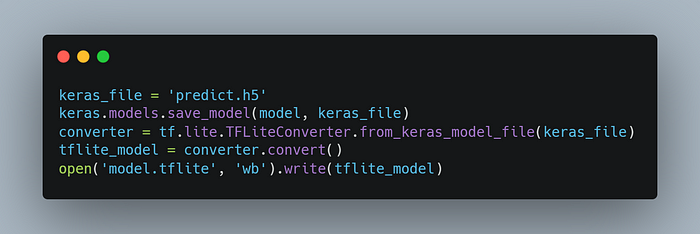
Keras
SavedModelusestf.saved_model.saveto save the model along with all trackable objects attached to it.To convert a
SavedModelto a TensorFlow Lite model, we usetf.lite.TFLiteConverter.from_saved_model.
If you are using Google Colab, first upload the dataset.zip file to Google Drive. Mount the drive, extract the files using Colab, and then use the dataset. Finally, you can download the model.tflite and labels.txt files using the following code:
from google.colab import files
files.download(‘model.tflite’)
files.download(‘labels.txt’)
Warning: In case your model fails to recognize our cute panda...!

You can find my
model.tfliteandlabels.txtfiles directly from [here].
Module 2: Importing and Using TensorFlow Lite File in Our Flutter App
Open terminal, then navigate to your project directory and run the command flutter run project_name.
If you are using Visual Studio Code, follow these steps:
Open the command palette from the 'View' menu in the top bar (or by pressing
Ctrl+Shift+P).Choose the option to create a new Flutter app.
Enter the project name and hit
Enter.
Let's dive in and start writing some code once again:

Next, head over to the
pubspec.yamlfile, add the following dependencies, and save. You may need to run theflutter pub getcommand, which ensures that Flutter saves the specific package versions found in thepubspec.lockfile:
dependencies:
  flutter:
    sdk: flutter
  tflite: ^1.1.2
  image_picker: ^0.8.3+2
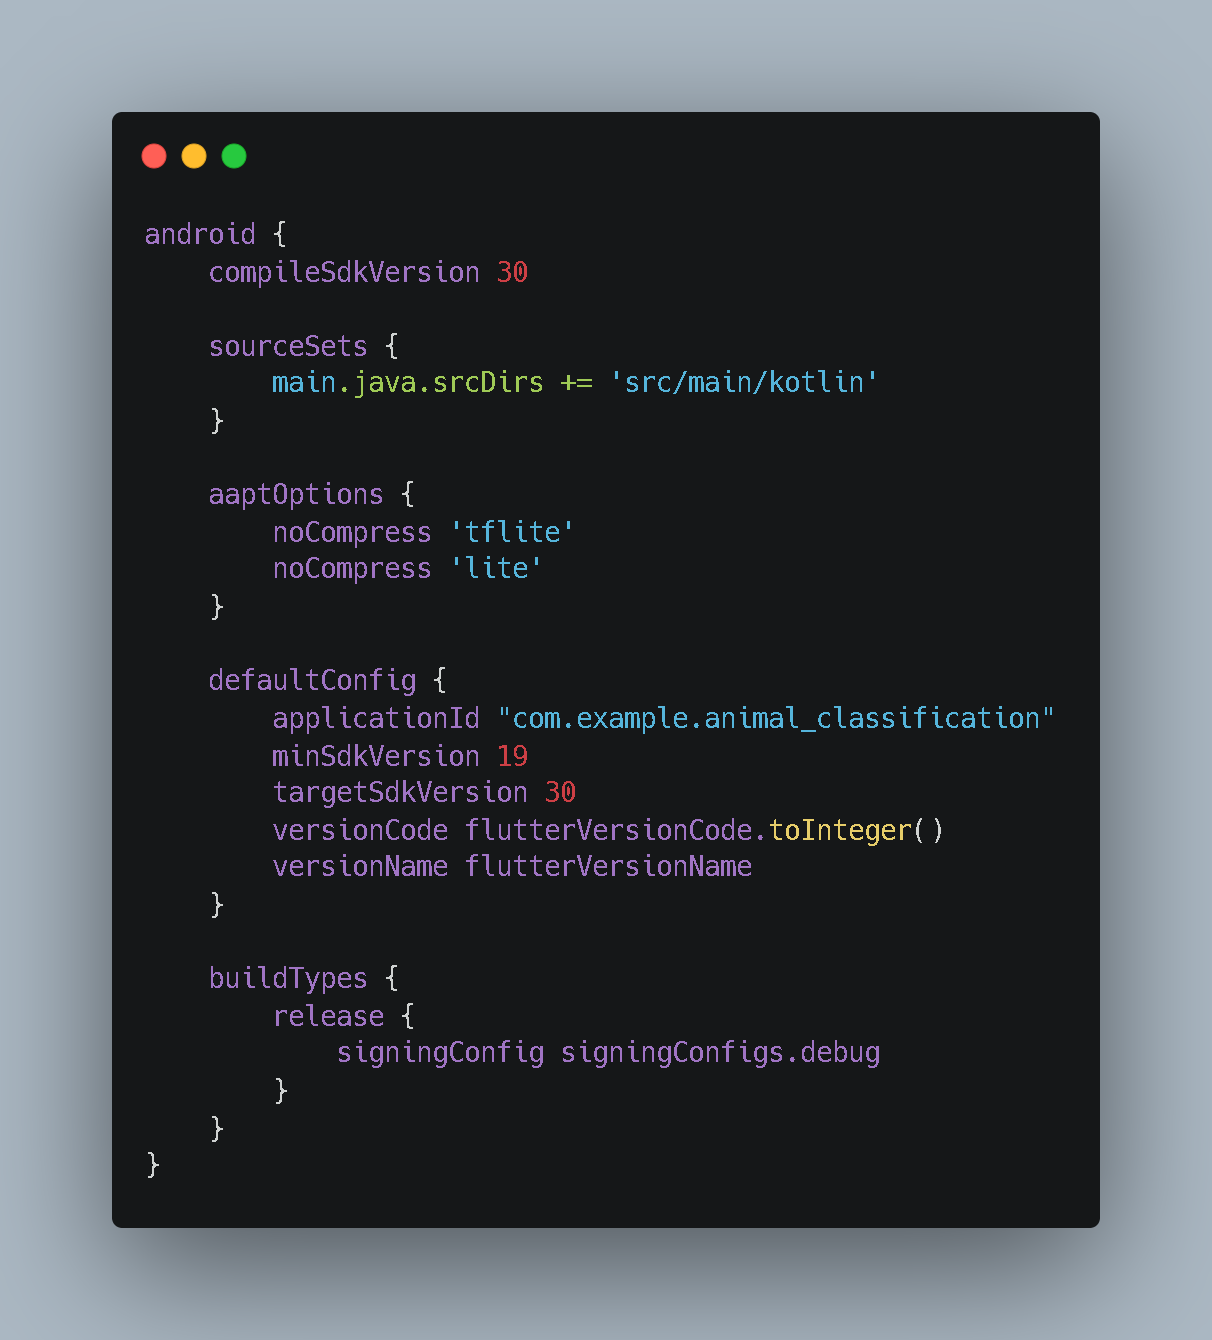
For TensorFlow Lite to work, you'll need to configure your Android project settings. Open the
android/app/build.gradlefile, setminSdkVersionto 19, and add the following settings within theandroidblock:
aaptOptions {
        noCompress 'tflite'
        noCompress 'lite'
    }
android block in android/app/build.gradle path
To enable
image_pickerto work on iOS, you need to add the necessary keys to yourInfo.plistfile located at/ios/Runner/Info.plist.
<key>NSCameraUsageDescription</key>
<string>Need Camera Access</string>
<key>NSMicrophoneUsageDescription</key>
<string>Need Microphone Access</string>
<key>NSPhotoLibraryUsageDescription</key>
<string>Need Gallery Accesss</string>
Create a folder named “assets” and place the model.tflite & labels.txt files within it.Then add their existency in pubspec.yaml file like following.
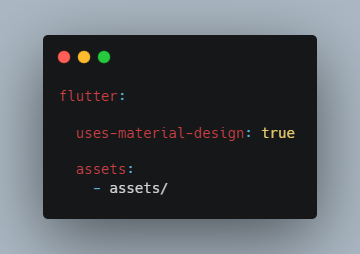
Then save the file (may be you have to run ‘
flutter pub get’ command, by this command flutter saves the concrete package version found in thepubspec.locklockfile) like previous.
Let's proceed to develop the user interface and functionality for our Flutter app.
In the 'main.dart' file, set up
MaterialAppwith the home parameter pointing toHome().
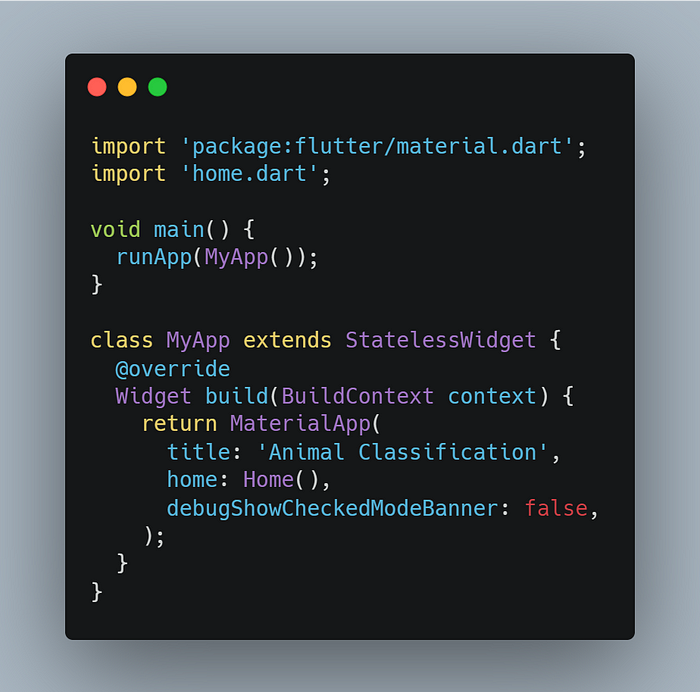
Next, create a new file named 'home.dart' and define a Stateful widget class called
Home(). This class will serve as our homepage. Let's kick off the functional Flutter app by importing the required packages and setting up our initial functions.
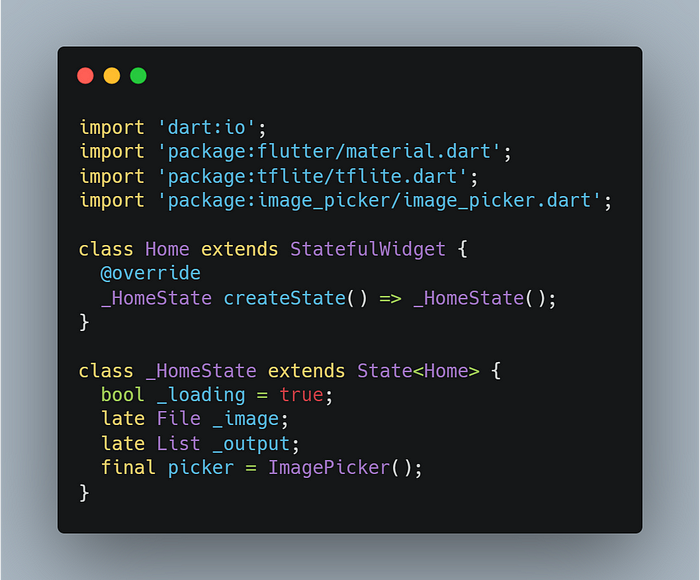
Code: lib/home.dart at initial phase
_loading: This handy flag lets us know if someone's actually bothered to pick an image yet or if we're just twiddling our thumbs._image: It's the lucky winner from our gallery or camera—a snapshot of whatever strikes our fancy at the moment._output: Think of this as the oracle's proclamation—the TensorFlow Model's educated guess about what's in that chosen image.picker: This nifty tool gives us the power to pluck images from our gallery or snap new ones with our camera.
Next, we'll create six distinct methods for the class:
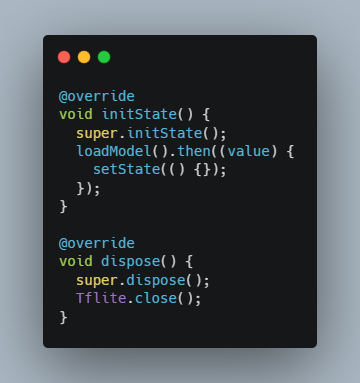
The first two methods:
initState(): This method gets the ball rolling when the Home widget springs to life—right after we decide to grace the app with our presence and land on Home(). Before diving into building the widget itself, initState() takes charge. Here, we kick off the process by loading our model using loadModel(), a method we'll define shortly. It sets the stage for everything that follows, ensuring we're ready to roll with all systems go.dispose()→ This method disposes and clears our memory.
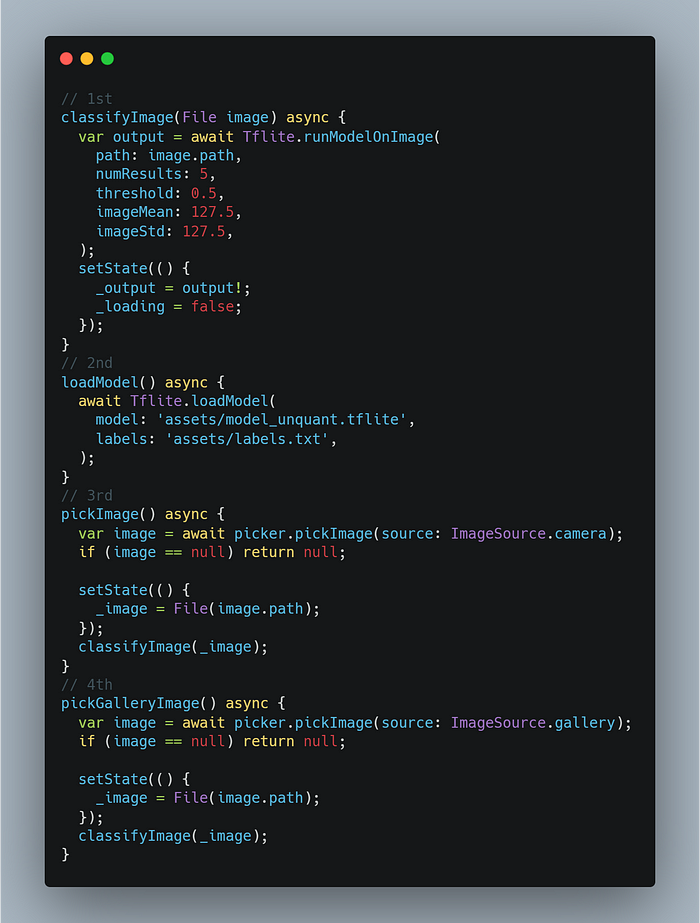
The last 4 methods:classifyImage(): This method executes the classification model on the selected image.
numResultsspecifies the number of classes (in this case, types of animals) we expect. It updates the UI usingsetStateto reflect any changes.loadModel(): This function loads our model, making it ready for use. It's called within
initState()to ensure the model is ready when the widget initializes.pickImage(): This function retrieves an image directly from the device's camera.
pickGalleryImage(): This function retrieves an image from the user's gallery or photo library.
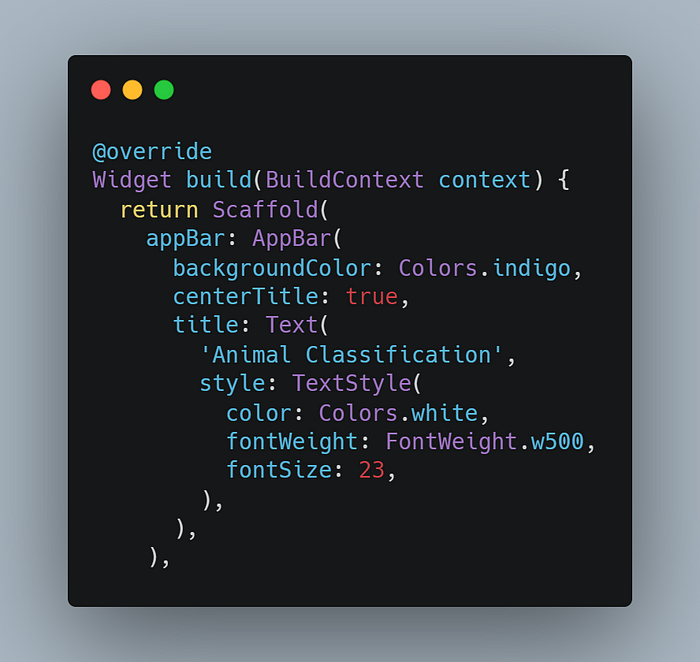
Let us build the AppBar:
Now it's time for the main section of our webpage. Let's create a container to hold the picture that the user has picked.
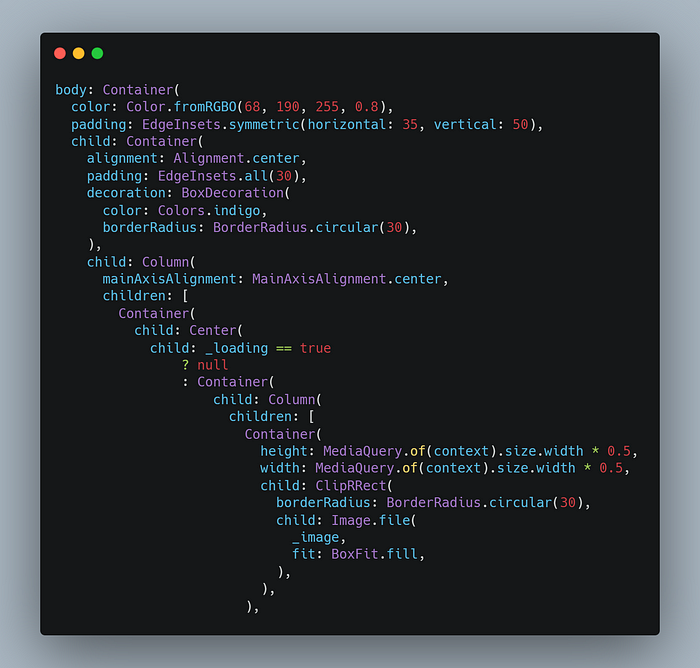
We used ClipRRect to create lovely circular borders for the image.
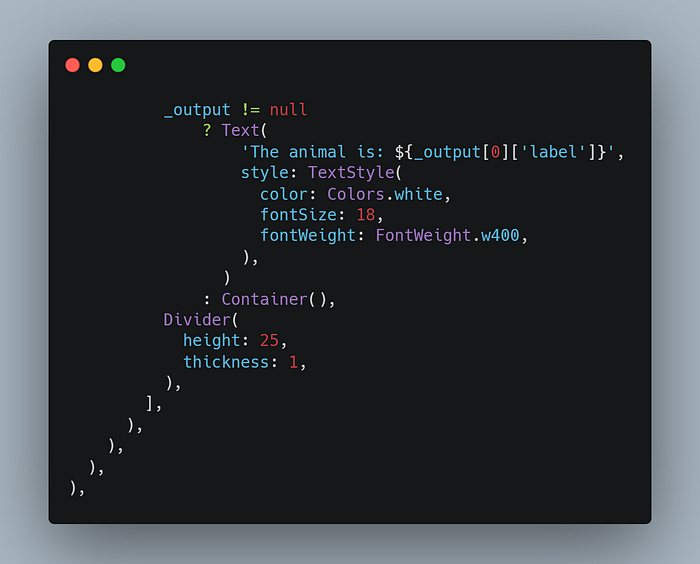
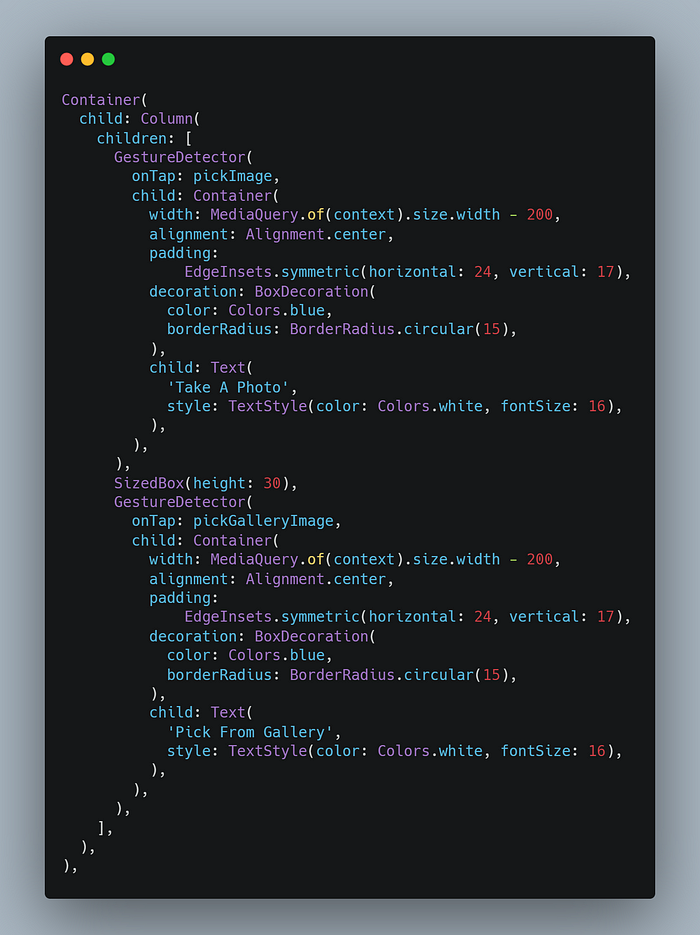
Next, we'll create two GestureDetectors that, when tapped, will refer to the pickImage and pickGalleryImage functions.
NOTE:
pickImage(without parentheses) within onTap is a function reference, which means it is run once the user clicks on a certain widget, also known as a callback.pickImage()is a function call that is run instantly.
Done!
To run your Flutter project, you have two options:
Using Terminal:
Open your terminal or command prompt.
Navigate to your Flutter project directory.
Run the command:
arduinoCopy codeflutter run
Using Visual Studio Code:
Open Visual Studio Code.
From the top bar, click on "Run Without Debugging" or use the shortcut
Ctrl+F5.
I hope your program doesn't crash throughout the build process and no errors occur.

Open the app, snap photographs or choose images from the gallery, and forecast 🤩.

Now you may experience the strength of AI 😉.
Once you get the hang of it, you'll realize how simple it is to utilize TensorFlow Lite with Flutter to create proof-of-concept machine learning mobile apps. It's fantastic to create such a strong programme with such a minimal amount of code. To further your expertise, go to the Kaggle website and download multiple datasets to create different categorization models and apply them in your own app.
Syntax Station Newsletter
Subscribe To Newsletter
Thanks for reading! I hope you found it helpful. Any thoughts, questions, or suggestions are really important to me.
Subscribe to my newsletter
Read articles from Yashraj Tarte directly inside your inbox. Subscribe to the newsletter, and don't miss out.
Written by

Yashraj Tarte
Yashraj Tarte
I am a student with a deep passion for learning and a voracious appetite for knowledge, I constantly seek to broaden my horizons as an innovative thinker.