Your best chance to learn GitHub Actions : Let's implement CI/CD
 Navraj Singh
Table of contents
- What will you get from this blog ?
- What is GitHub Actions
- Some things to keep in mind
- Initial Setup For Every Project
- Workflows ? Events ? Jobs ? Runners ? Steps ? Actions ? Shell script ? WTH are these..
- Images to visually see how all these look in code and graphics
- Running Our First GITHUB-ACTIONS Workflow
- Follow me, other wise i will be sad
- About My Ongoing CI/CD Blog Series
What will you get from this blog ?
What is github-actions.
Some things to keep in mind about github-actions.
How to introduce and setup github-actions in your projects.
Understand all the terminologies like what is meant by :
Workflows
Events
Runners
Jobs
Steps
Actions
Shell commands/Scripts
Image illustrations showing exactly what everything looks like.
Create your first ever workflow in github-actions and run it.
What is GitHub Actions
It is a CI/CD tool offered by github company. It can perform both CI and CD.
It only works for github repositories only, so if your project is on other platform it won't work.
It automatically comes available with every github repository for free (not completely free, but on a student level it's free, they give 2000 minutes a month for free on their free plan). I would say just use it, its basically free don't think too much.
Go to this link to understand their pricing: https://github.com/pricing
YAML language is used in Github-Actions. YAML
.ymlfiles are used. To kickstart github-actions.. just make a path named “.github/workflows“ in the root of your github repository and create YAML files in it.
Some things to keep in mind
Github-Actions is not a application or software, it is website based thing.
We dont need to install, delete, etc. anything to get github-actions.
Github-Actions in most primal textual form is just some YAML files which can either be created in github website itself or on our lovely VS code itself. No fancy thing is happening.
All you have to do to setup github-actions is.. defined in section below.
Initial Setup For Every Project
So when you want to use CI/CD using github-actions in your current github repository these are the common and repetitive things that you would kind of always do :
Step Zero: Have a repository on github, CI/CD thing is performed on a repository on github, so make one.
Step First: Go to your github repository, then create a
.githubfolder in the root of the repository and under it make another folder namedworkflows.
Remember, to activategithub-actionsin any repository you might have on your github account you must do this step.See the image below, it has
.github/workflowspath defined. Meaning github-actions can be used in this repository now:Step Second: Create empty
.yml(YAML) files in./github/workflowsfolder, these.ymlfiles are calledworkflows. We will discuss all this "workflow" and other stuff in detail below, right now just keep reading.See the image below, here a
First-Workflow.ymlfile (also called a workflow) is created :In the YAML files we code/define the
eventson which certainjobswill run. Dont worry these terms "jobs" and "events" are explained below.. Wait !Like on a
pull request( which is a event), we can test the code (by running a job).On
pushing code(which is a event) to main branch of repository, a build of the project can be executed (by running a job).
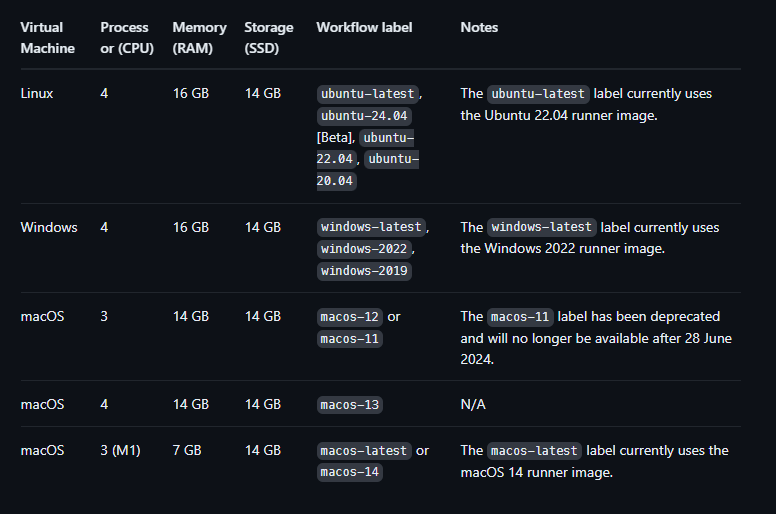
Jobsruns under their own virtual machine (ubuntu-linux, Mac, Windows). It is our choice about which OS machine we want to choose to run a our workflow's jobs. So if a github-actions.ymlfile has 3 different jobs in it, then 3 different virtual machine will be used.Github automatically creates these machine with certain RAM, CPU, SSD etc. and runs the jobs there. 90~97% of time people use a linux machine. Below image shows what are the specification of each machine :
We don't need to
payfor any of this if we are just learning and testing github-actions. So don't worry just freely use github-actions. Your empty bank account is safe 🤣. Mine is empty too though 😔.Now your initial setup is complete, you know how to activate Github-Actions in your repository. You create a repo and create
.github/workflowspath then in this path you create workflows (.yml files). These files run a certain event triggers. Good now keep reading !!
Workflows ? Events ? Jobs ? Runners ? Steps ? Actions ? Shell script ? WTH are these..
In this section you will get the complete picture about all the terminology i used and knowledge for writing your first github-actions workflow.
Workflow
Workflow is the
.ymlfile you created in the repository's.github/workflowsfolder.Each of these .yml file is called a
workflow.There can be multiple workflows in the
.github/workflowsfolder.A single workflow can have multiple
eventsand multiplejobs.
Events
Events are a component of workflow.
Events in the workflow are defined by
on:key. Thison:key takes names of the events that will trigger a workflow.Events are something which tell
github-actionsthat hey run this particular.ymlfile (workflow) right now automatically.When you execute
git push(push event) on your VS code terminal well that is aeventa push-event. When you create a newissueon github website or create a newpull-requeston github website.. yeah what are these?? YESSS these are EVENTS !!! There are many many other events also, Other Events.So i can trigger these events like
git push,opening/closing a issue,opening/editing/etc. a pull-requestand if the workflow is configured to run on one of these events, the workflow will run automatically without us having to do anything.
Jobs
Jobs are also a component of a workflow file.
Jobs are defined in a workflow with the
jobs:key. Under this key we define our jobs with their respectivename,runner,steps,actions,shell commands.Each of the job needs a
runnerto run itself. Runners are discussed below.Jobs contains set of steps and actions and shell scripts and shell commands.
Jobs themselves dont do anything. Their reason to exist in the workflow file is that a job provide a runner machine (linux, mac, windows) and on this runner machine all the
steps,actions,shell scriptswill run and execute.One job is completely isolated from other job. They cant communicate unless we want to.
Each job needs it own different runner (their own linux, mac, windows).
One workflow file can have multiple jobs.
Runners
Runners are also a component of workflow file.
Runner is defined under a
jobwithruns-on:key. This key accept the name of thevirtual machineon which the job will run.Runners are virtual machines in which a specific job is executed.
They are defined under the job.
Each runner works only for a specific single job.
Runners can be linux machines or mac or windows machines.
If a workflow file has 5 jobs then 5 runners will be needed.
Like we can have a job called
testwhich test's the code it will has it own separate runner. There can be a another job calledbuildwhich builds the tested code and this job will have it own separate runner.
Steps
Steps are a component of a workflow file.
Steps are defined under a job with
steps:key. This key takes theactionsorshell commandsas input.Steps are defined under a job.
Steps are where actual work and execution of something happens. So execution of commands and scripts to complete the a specific job is done under steps.
Like as i said job named
testwill have it own separate set of steps and job namedbuildwill have its own separate set of steps and so on for other jobs.Steps have further sub components in it:
actionsandshell scripts/commandsSteps are executed on the runner (virtual machine) which is defined under the job.
Actions
Component of workflow file.
Actions are defined under a step with
uses:key. We provide the name of the action we want to use to this key. Actions/uses:can also take arguments which can be given underwith:key.Actions are defined under a step.
Actions are pre-made code files (procedures) written and developed by the github engineers and community itself.
A action does a certain task like
Caching the dependencies (node_modules, etc.) of your project.
Downloading the code from your repository and many more.
Instead of us writing our code and logic to achieve some goal and task in the workflow, which would take days or hours and might not be 100% optimized, we can use these pre-made actions from the github marketplace to help reduce our work.
There wont be a day you wont use actions, they are heavily used.
Actions are 100% free off cost to use.
Shell Scripts/Commands
A component of workflow.
Shell scripts or commands are defined under the
stepusing arun:key. This key takes ashell commandas its input value.Nothing special these are just linux commands or some linux shell scripts that we want to execute.
The commands or scripts are also defined under the
step.
Images to visually see how all these look in code and graphics

- So first you create this folder
./github/workflowsand in it you create all your .yml files called workflows.
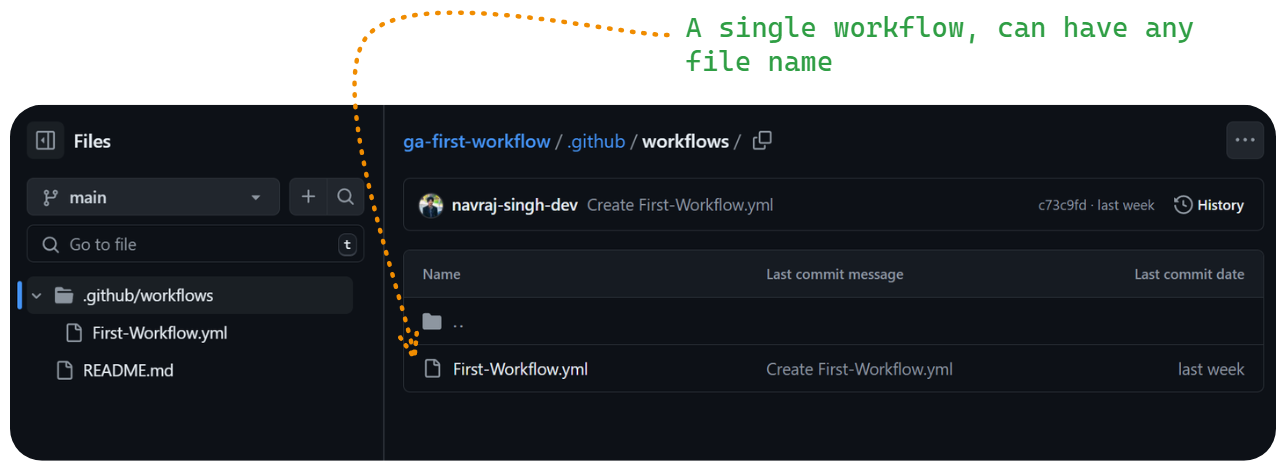
- This is how you would make your workflows files.
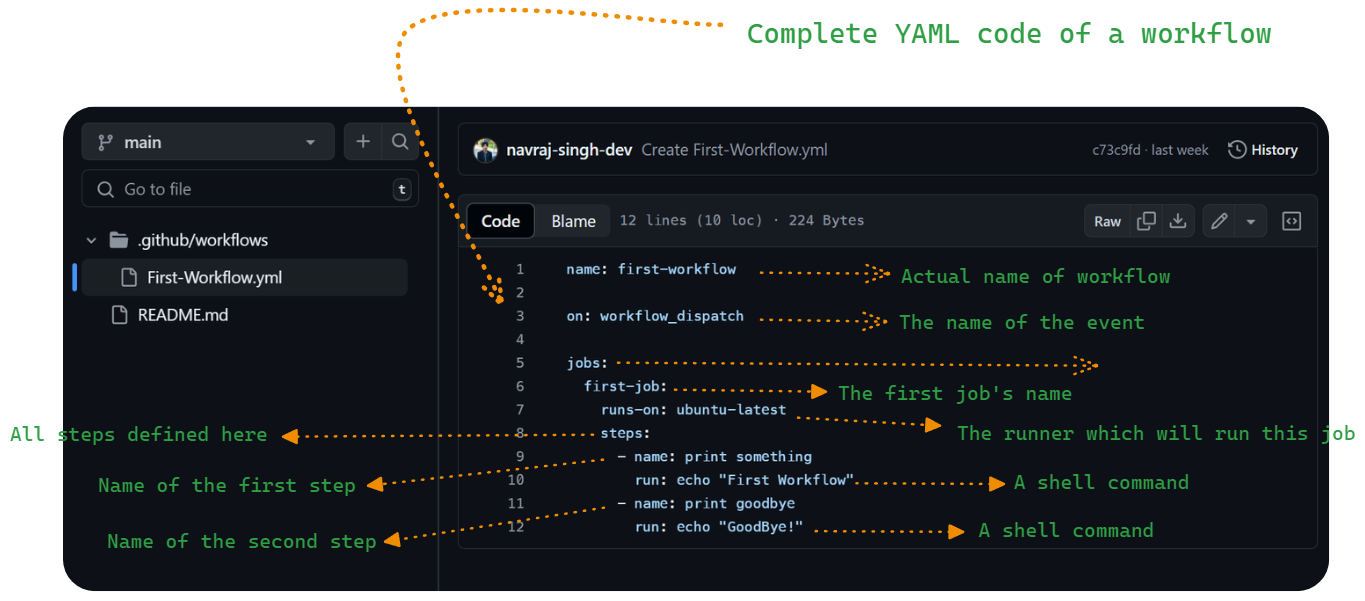
This is the workflow we will code in this blog.
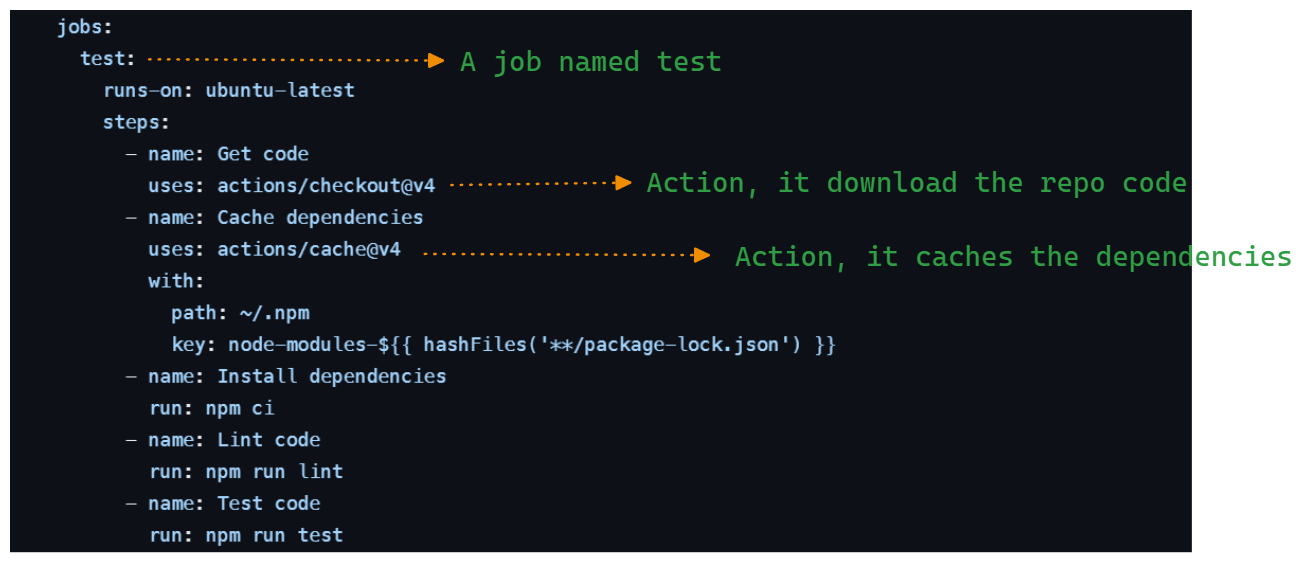
Look the code and see what a
event,job,runner,steps,actions,shell commands/scriptslooks like in YAML format. Remember and map this to your brain because we do write all these similar things all the time for every workflow file.Now you can clearly see we have
eventswhich trigger all thejobsandjobsetups arunnerandrunnerexecutes all thestepsand real things which are being executed are theseshell commands or scripts.This image do not have a example of action, but see the below image to see what a action looks like:
Running Our First GITHUB-ACTIONS Workflow
Make a new repository on github, named whatever you like. Look at the image to see how i did:
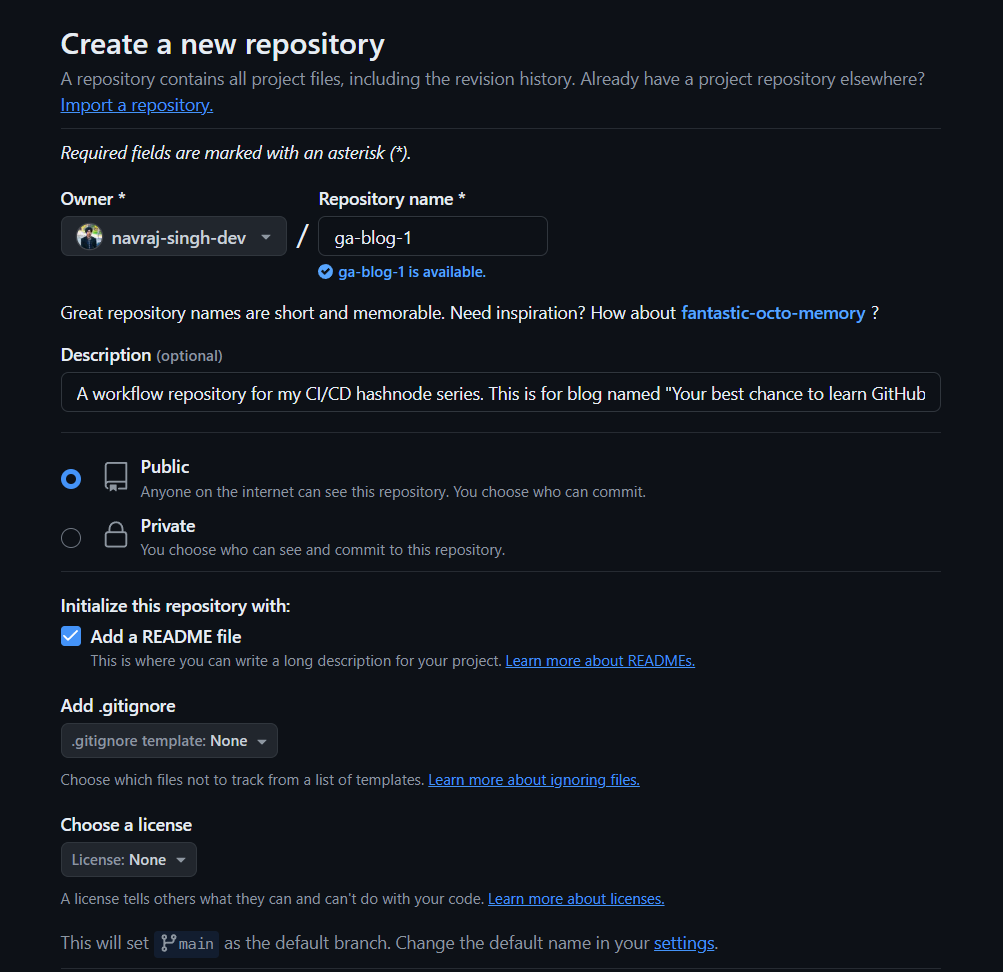
After making new repo, Now click that
Actionsbutton on the top of your repository name.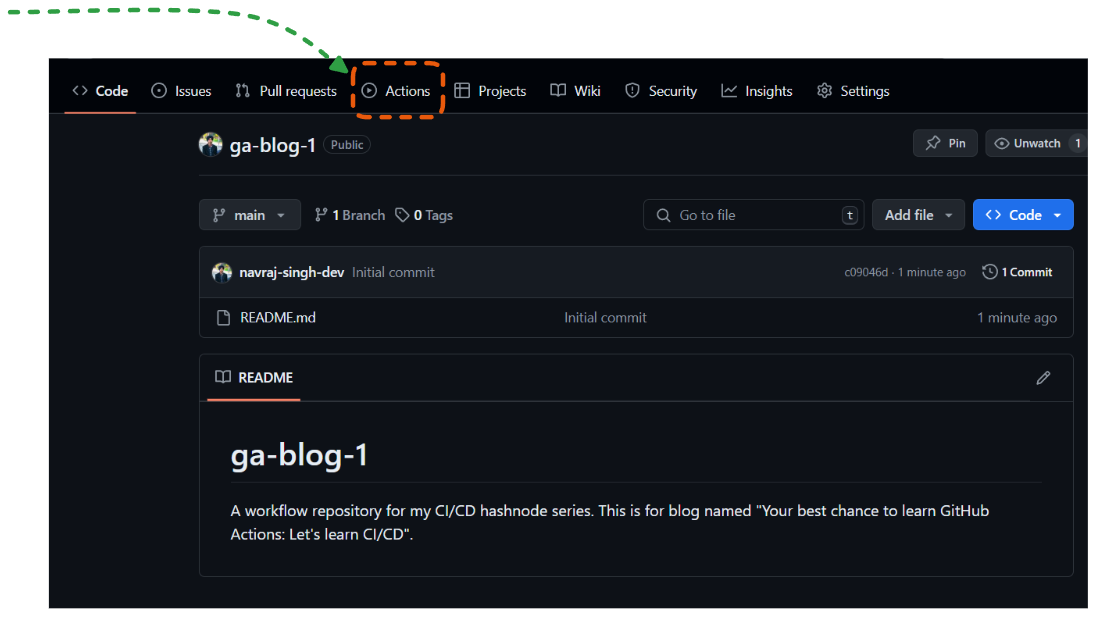
This is where the magic happens.
Now a new window will open, there click on the configure button. This button automatically creates your
.github/workflowspath in the repository and also it opens a space where we can write the code to the workflow straight up in the github website without leaving it. See the image to know where to click :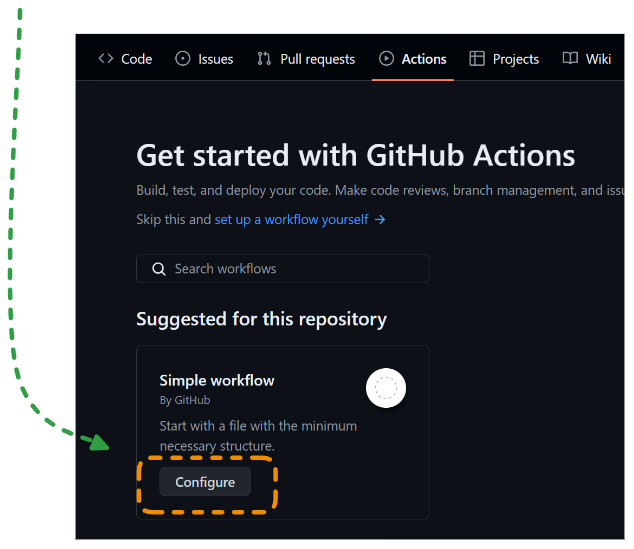
Now a new window like this will open :
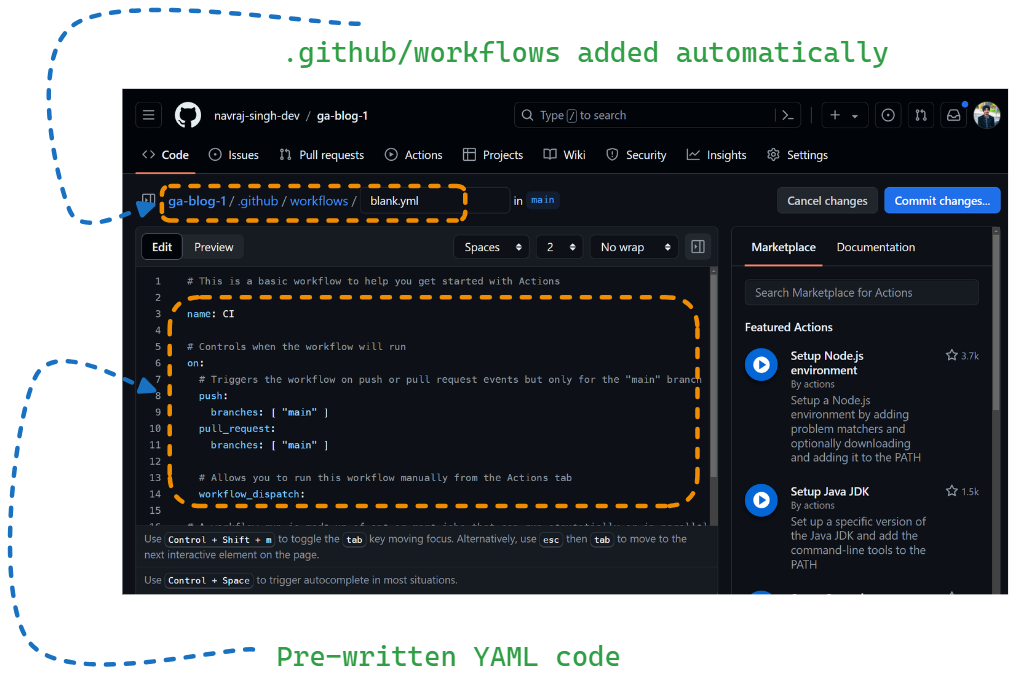
See how github automatically added
.githubandworkflowsfolder !! Also we can give filename to our first workflow, by default it isblank.ymlbut you can give it any file name you like.
Please delete the initial Pre-written YAML code you can see. Make the code editor space completely blank and delete everything.Now it is time to understand and write some YAML code to complete our first workflow and run it. I have already explained the keys like:
name:,on:,jobs:,runs-on:,steps:,run:,uses:andwith:. So keep these keys in mind. In all workflows you will ever write these keys are must to know. Because these keys are basic building block of any workflow file.So here is the code that completes our first workflow
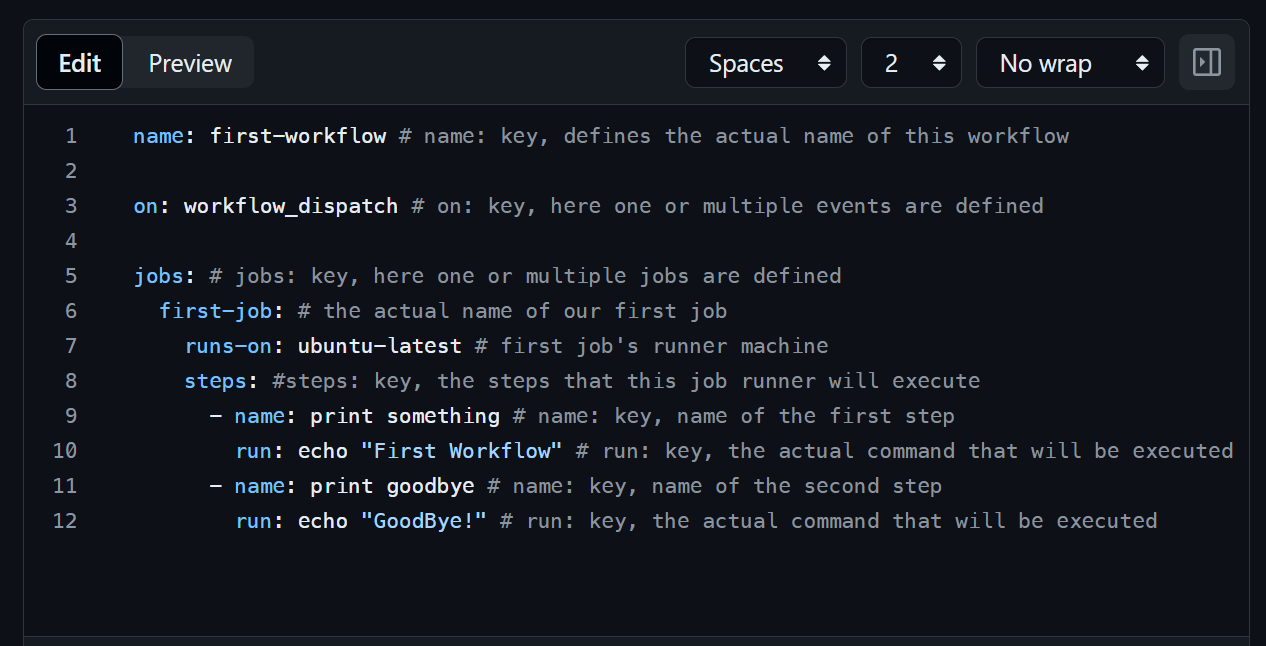
Don't worry i am going to explain each line in detail and depth. Wait! Wait! Wait!
But first see how this workflow has
name:,on:,jobs:,runs-on:,steps:,run:keys. These are important and needed.So before explaining this workflow let me explain what this workflow does in total.
It just creates a virtual machine which is running
ubuntulinux operating system. Then it runs 2shell commandson thatubuntumachine :echo "First Workflow"andecho "GoodBye!"
Then string "First Workflow" and string "GoodBye!" is printed to this ubuntu machine's terminal.
Yeah that is it guys, nothing fancy.Now let me explain each line in the workflow
name: first-workflow on: workflow_dispatch jobs: first-job: runs-on: ubuntu-latest steps: - name: print something run: echo "First Workflow" - name: print goodbye run: echo "GoodBye!"name:key. This key defines the actual real reference name to the workflow itself, dont mistake and think filename of workflow is real name. No it is just file name. Internally github uses the name defined under this key to refer to this workflow. In my case the name of my workflow isfirst-workflowon:key. This key accepts the events that will trigger this workflow. In my case, i want this workflow to run onworkflow_dispatchevent. WTH is that ? Wellworkflow_dispatchis a fancy name to say that i want to run this workflow manually by clicking the button on github website. So when i will click that button my workflow will run. These event pre-defined by the github engineers. Go to this website to know which more events can we use instead of this one : Click herejobs:key. We define all of our jobs here under this single key itself, even if a workflow has 10-20 jobs they all come under this key, indented. Each job has a name, a runner, then a single step or lot of steps. In my case i am defining just one job namedfirst-job.first-job:. This is not a pre-defined key or anything, but a custom name of a job. A job which has a namefirst-job. This name can be anything you like it can bespidermanalso but name them according to what they do. It must be indented under thejobs:key. Theruns-on:andsteps:keys come indented under this namefirst-job:runs-on:key. This key defines the virtual machine on which a certain job's steps will run. Like In my case the job namedfirst-jobits steps will run onubuntumachine. Thisruns-on:key must be indented under the name of the job.steps:key. It is defined on the same indentation level ofruns-on:key. This key takes all the different steps in it, which this runner will execute on itself. Each step must be indented under this key. This key can take any number of steps like 1 or more than 1 steps. In my case i am defining two different steps, one with nameprint somethingand other with nameprint goodbye- name:key. This key takes the name of the step itself. The name of the step can be anything. this minus sign is important to github and YAML. It indicates that a new step is created understeps:key. So whenever you make a new step it must start as minus-and thename:key and then the name itself. In my case the name of the step isprint something. Usually we write sentence as name which define what this step does or achieves. Like my stepprint somethingor i named it this way.run:key. This key takes a shell command which will be executed or it doesn't need to be a shell command it can be any command likenpm run devnpm run startpip install <something>npm install <something>or whatever that can be executed. This key must be on the same level of- name:key. In my case it am printing/echoing "First Workflow" "GoodBye!" to the terminal as can be seen in code.Now that you have this workflow code written and understood, lets commit this code to our github repository
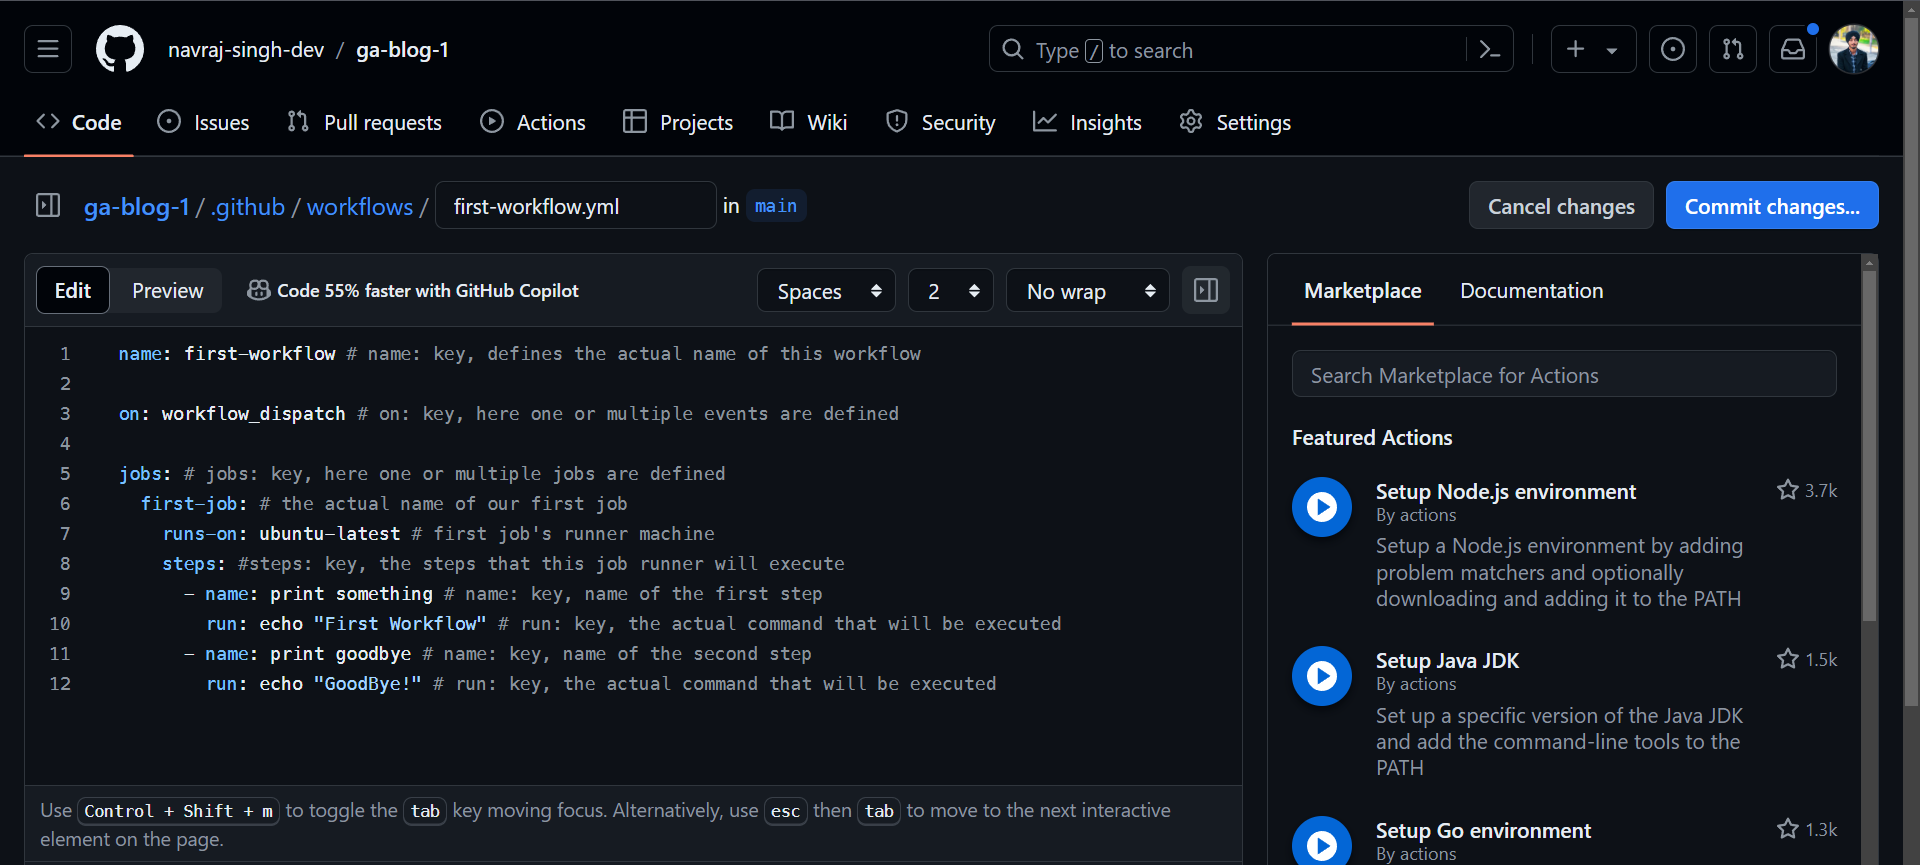
You will here as of now, now commit by clicking the blue commit button guys.
Lets' run this workflow now:
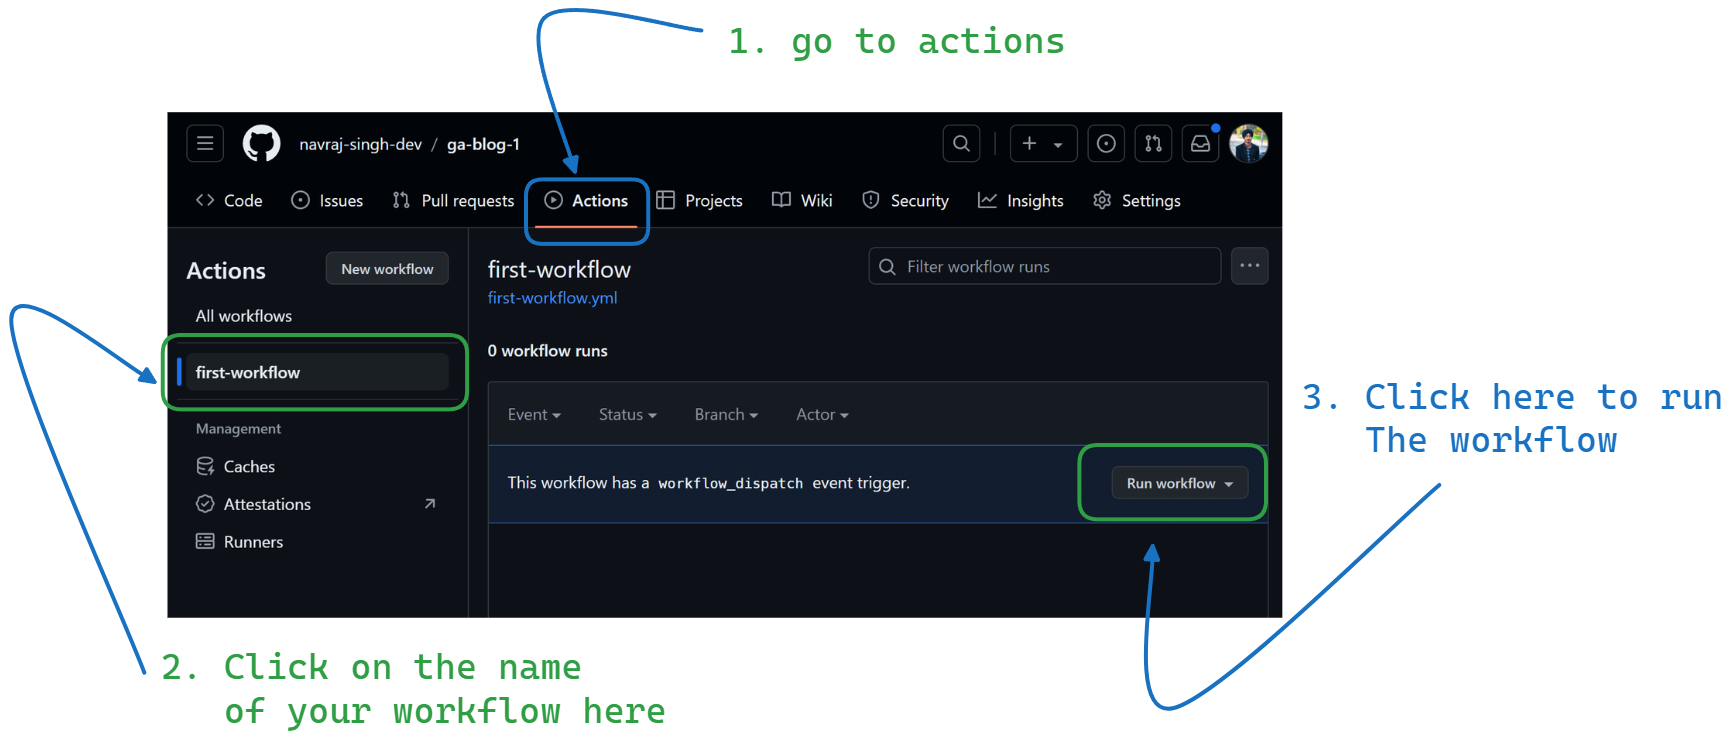
Follow what the image said above. Zoom on the website guys if image not visible clearly.
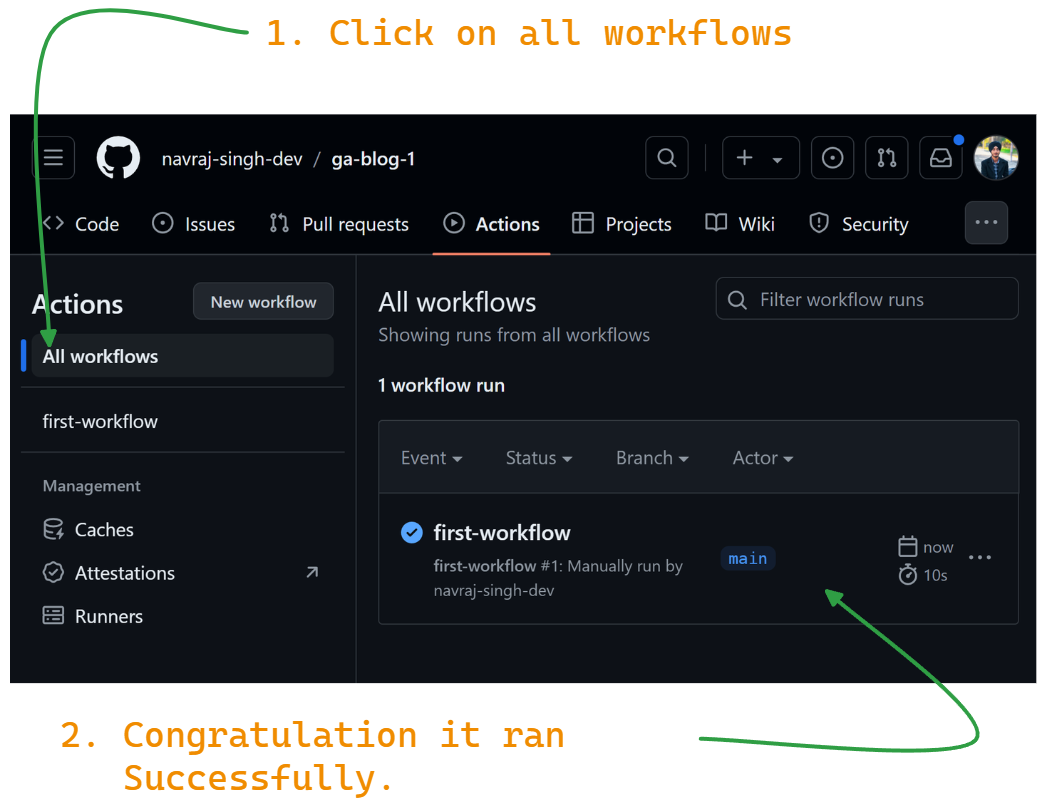
After your clicked on that
run workflowbutton as shown in previous image, click on theall workflowsbutton as shown in image and happily see your first ever workflow running.Now lets see if this workflow worked properly or not
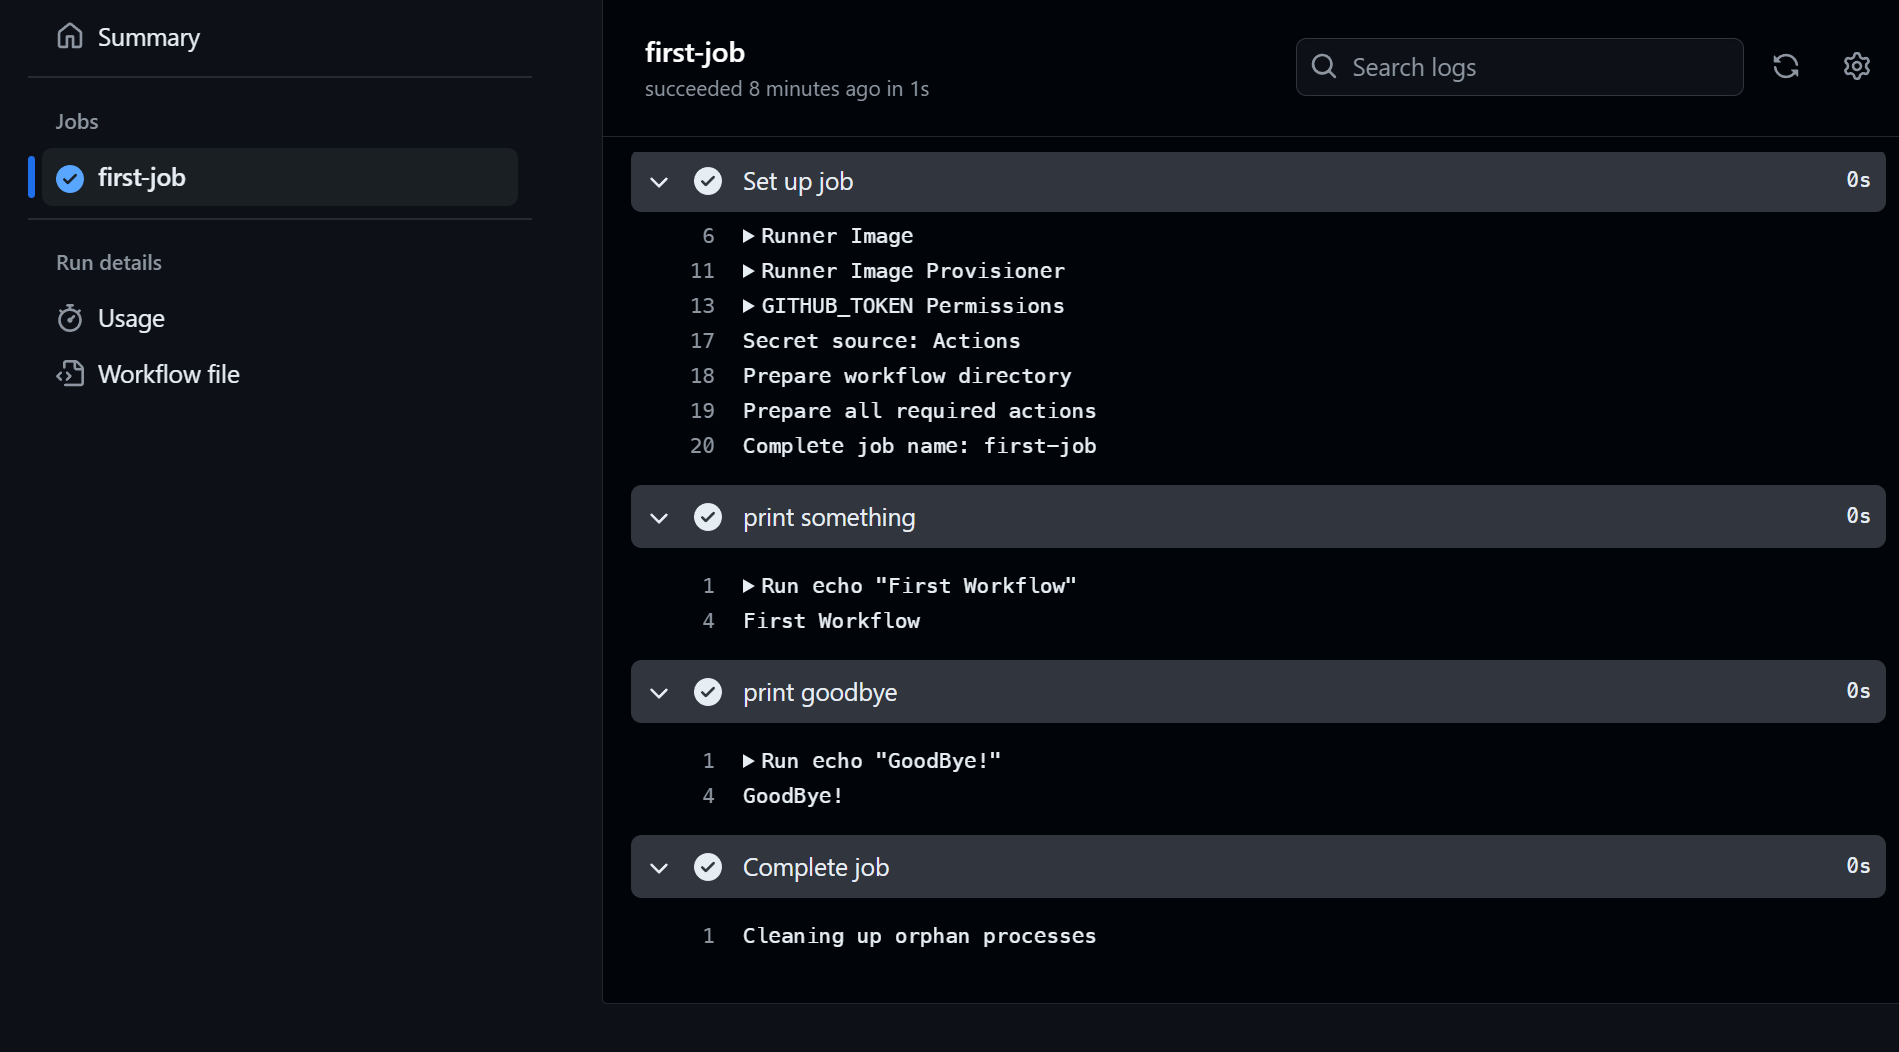
It did work properly.. hooray!! See how
GoodBye!andFirst Workfloware successfully printed in the output of this workflow.Congratulations!!! on your first workflow RUNNNN !!!! ♾️♾️♾️♾️♾️♾️♾️
I hope you guys enjoyed that is it.Please show support by liking this blog, or following me everywhere and commenting and other stuff. It took me around 9-10 hours to write this blog in shifts. So a little motivation is required ofcourse. Love u guys !!
Follow me, other wise i will be sad
About My Ongoing CI/CD Blog Series
My Blog Series : CI/CD In Github Actions :
https://navraj-blog.hashnode.dev/series/ci-cd-in-github-actions
This current blog is a part of my CI/CD in GitHub Actions series. This series blog by blog can make any devops enthusiast a power user of github-actions. So if you want to be a become a power user of github actions then follow me on hashnode and keep a eyes on this series.
Subscribe to my newsletter
Read articles from Navraj Singh directly inside your inbox. Subscribe to the newsletter, and don't miss out.
Written by

Navraj Singh
Navraj Singh
Navraj Singh is a DevOps Enthusiast with knowledge of DevOps and Cloud Native tools. He is technical blogger and devops community builder. He has background of Backend Development in NodeJS ecosystem.


