Build Your Own Private Cloud Storage
 Diwash Mainali
In today's world, many of us rely on cloud storage solutions like Google Drive, OneDrive, and other similar platforms. However, with the rapid advancement of Artificial Intelligence and growing concerns about data privacy, trusting these companies with your sensitive information can be worrisome. So, where can you securely store all your data? Imagine if there were an easy way to build your own server—well, there is! All you need is an old laptop and a reliable internet connection.
In this blog, I will guide you through the process of transforming your old laptop into a personal server. By leveraging the power of the open-source community projects, you can create your own private cloud storage at no cost. This solution offers you full control over your data without compromising on convenience or security.
What you'll need:
An old laptop, mini-PC, CPU, Raspberry Pi, or any device capable of running Linux
A stable internet connection along with stable power to keep your device powered up.
Installing Linux
To set up your own private cloud storage, you'll need to install a Linux operating system on your machine. You can choose from various Linux distributions based on your preference. In this blog, I'll be using Ubuntu Desktop (GUI version), but if you have older hardware, you might opt for Ubuntu Server. There are plenty of tutorials available on YouTube to guide you through the installation process. Simply follow along with one of those tutorials to install Linux on your device.
Once you have installed Linux, it's important to update your existing packages. Open a terminal and run the following command:
sudo apt update -y
This command will refresh the package list to ensure you have the latest versions available.
Installing samba
Samba is an open-source project licensed under the GNU General Public License (GPL). It provides seamless file and print services to SMB/CIFS clients, which allows you to share files across different operating systems over a network. With Samba, you can set up your own file server that can be accessed by multiple devices, regardless of the operating system they run on, including Windows, macOS, and other Linux distributions. For learning more about samba click more about samba.
To install samba run the following command on the terminal:
sudo apt install samba -y
This command will download and install the necessary Samba packages from the official Ubuntu repositories. Once the installation is complete, you'll need to configure Samba to set up your shared directories and define the access permissions. This involves editing the Samba configuration file and adding the details of the folders you want to share.
To verify that Samba has been installed correctly, you can use the whereis command. This command locates the binary, source, and manual page files for a command.
Run the following command in the terminal:
whereis samba
If Samba is installed correctly, this command will return the locations of the Samba files. The output should look something like this:

Directory to store data
After successfully installing Samba, you need to create a directory where you can store all your files. You can choose any location on your system, but for this example, I'll create a directory on a secondary hard drive. To create a directory, run the following command:
mkdir sambaShare
This command creates a directory named sambaShare. You can name the directory anything you prefer. Once the directory is created, navigate into it and get the full path of the directory by running the following commands:
cd sambaShare
pwd
The cd sambaShare command will move you into the sambaShare directory, and the pwd command will print the full directory path. Copy the output of pwd as you'll need it later. For example, my output is:

Modifying the samba configuration file
Next, you need to add your directory path to the Samba configuration file. Open the configuration file with the following command:
sudo nano /etc/samba/smb.conf
Scroll to the end of the file, or find the end of the [print$] configuration section, and add the following configuration text:
[sambashare]
   comment = Cloud Samba Server
   path = /media/diwash/𝐃𝐈𝐖𝐀𝐒𝐇/sambaShare
   read only = no
   browsable = yes
Make sure to modify the path line to match the path of your previously created directory. For instance, if your directory path is /media/yourusername/sambaShare, it should look like this:
path = /media/yourusername/sambaShare
After making these changes, save the file and exit the text editor. In nano, you can do this by pressing CTRL+X, then Y to confirm changes, and ENTER to save.
After modifying the smb.conf file you need to restart your samba. To restart runt the below command:
sudo systemctl restart smbd
sudo systemctl restart nmbd
To allow Samba traffic through your firewall, you need to configure UFW to allow the Samba service. To allow traffic run the below command which allows all the necessary port for samba to communicate over the network:
sudo ufw allow samba
Setting up user and password
To access the samba server you need the user. So, to create the user run the below command:
sudo smbpasswd -a diwash
Replace diwash with your ubuntu username which is basically shown at the starting of every command you enter. If you use other name it may give error. After running the above command it will ask to setup password. Setup password of your choice and then you have successfully added the samba user.
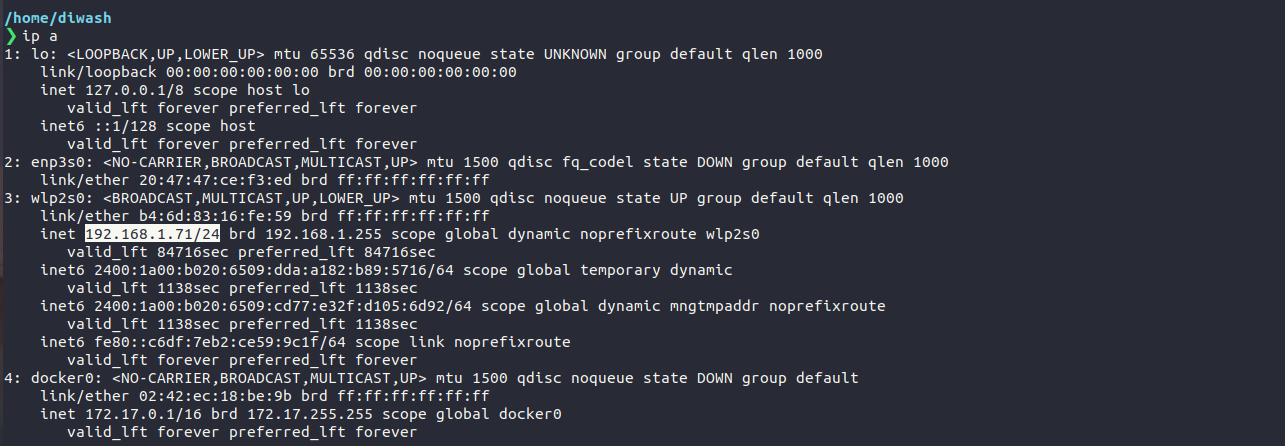
Getting the IP of device
To get the IP of your server run the below command on the terminal:
ip a
It will give you result something like this:

Note down the IP address, In my case my device IP is 192.168.1.71. Don't use 127.0.0.1 as your IP, It is the IP of your local-host.
Connecting using Windows
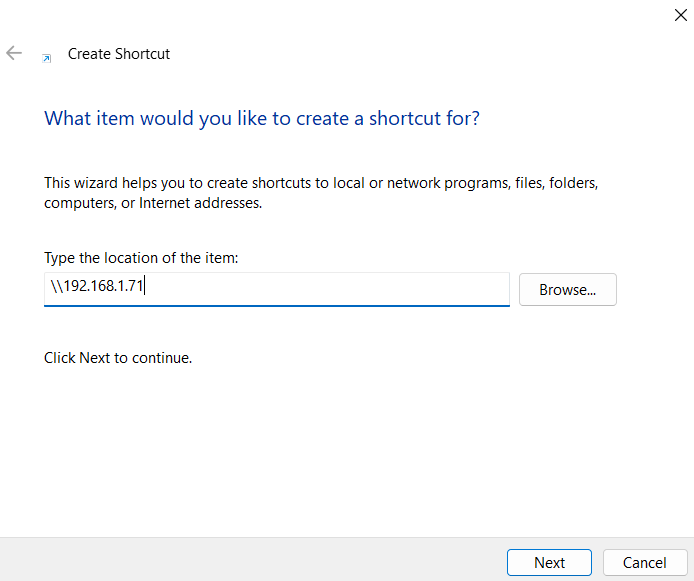
To connect to the samba server go to your desktop then rightclick and then create a new Shortcut. Enter your device IP there by adding '\\' before the IP like:

Then click Next. It will ask for you to name the shortcut. Use any name you want you can always rename it later then click Finish. After clicking finish the new icon will be available in your desktop. Open it, then it will ask for username and password. Enter the username and password of the previously created username and password of samba. Then you will be able to access the folder of another machine from any windows laptop.
Connecting using Android
I am using Samsung to connect it. Open 'My Files', then go to Network Storage section. There you will see a add icon click on it and there will be option to add Network drive (SMBv2/SMBv3). Click on that and the samba server on your network will be detected. Enter your username and password of your samba then you will be able to access it using mobile phone too.
Final and Important Notes
To access your Samba server, your device must be connected to the same local network as the server. If your devices are on different networks, you won't be able to connect to your Samba storage directly.
If you need remote access to your server from anywhere, you have a few options, though each comes with its own considerations:
Static IP Address:
- You can purchase a static IP address from your Internet Service Provider (ISP). This option can be costly but provides a reliable and secure way to access your server remotely.
Dynamic DNS (DDNS):
- Dynamic DNS services map your dynamic IP address to a domain name, allowing you to connect to your server even when your IP address changes. Some routers support DDNS natively.
Port Forwarding:
- You can set up port forwarding on your router to access your server remotely. However, this method is not recommended due to significant security risks, such as potential unauthorized access to your network.
VPN (Virtual Private Network):
- Using a VPN is a secure way to access your local network from a remote location. By connecting to a VPN, you can access your Samba server as if you were on the same local network. Many routers and third-party services offer VPN solutions.
Security Considerations
While it might be tempting to use third-party tools for port forwarding or other methods to access your server, it's important to be aware of the potential security threats. Exposing your server to the internet without proper security measures can make it vulnerable to attacks. Always prioritize security by using trusted methods and keeping your software updated.
By following these guidelines, you can ensure a secure and reliable connection to your Samba server, whether locally or remotely.
I hope you are able to setup your own private server at your home. ✌️
Subscribe to my newsletter
Read articles from Diwash Mainali directly inside your inbox. Subscribe to the newsletter, and don't miss out.
Written by
