How to Design a photo-sharing system
 Okoroafor Kelechi Divine
Table of contents
- Introduction
- What is a photo-sharing system?
- Key components of Designing a photo sharing system
- Step 1: Requirement Gathering
- Step 2: Use-case Diagram
- Step 3: Capacity Estimation
- Step 4: High-level Design
- Step 5: Low-Level Design
- Step 6: Database Design
- Step 7: Microservices
- Step 8: API used
- Step 9: Scalability
- Conclusion

Introduction
Imagine a world where every special moment, every cherished memory, and every adventure could be easily captured and instantly shared with friends and family. In today's digital era, photography isn't just about pixels on a screen it's a powerful way to tell stories, connect emotionally, and express ourselves. Each camera snap or tap on a phone screen doesn't just freeze a moment; it keeps alive that time's laughter, beauty, and essence.
Photography isn't just an art it's a lifestyle. It's about capturing the joy of family gatherings, the wonder of a stunning sunset, or the thrill of reaching a goal. Each photo tells a tale, stirs emotions, and adds to the bigger story we share with the world.
In our fast-paced connected world, there's a growing need for a simple and reliable way to share photos. Photo-sharing system is a platform where users can easily upload, organize, and share pictures. Whether you're a traveller, a well-designed traveller sharing your adventures, a new photographer showing off your work, or a parent capturing your child's first steps, you need a secure place to keep those precious memories.
What is a photo-sharing system?
A photo-sharing system is a platform or software designed for users to upload, organize, store, and share their photographs with others.
Do you know that the world's first photo-sharing website, called "Webshots," was launched in 1996? It allowed users to upload and share their digital photos with others over the internet, paving the way for the social sharing of personal photographs online. This marked a significant milestone in the evolution of digital photography and online social networking. 😃😃😃😃
Key components of Designing a photo sharing system
Back-end Infrastructure: The backend is responsible for handling the core logic of the system, including user authentication, photo storage, metadata (which includes the title, and the description) management, and interactions with the database.
Front-end User Interface: The front-end(mobile or web) is the part of the system that users interact with directly. It includes the design and development of the user interface, ensuring it's intuitive, responsive, and user-friendly.
Scalability Considerations: One of the key features of building a photo-sharing system is scalability. Scalability ensures that the system can handle growth in terms of users and data volume without degradation in performance. It involves using scalable storage solutions, load balancing, and efficient database management.
Step 1: Requirement Gathering
Effective requirements gathering is essential for the successful development of a photo-sharing system
Functional Requirements: Functional requirements specify what the system should do. They outline the specific functionalities, features, and actions that the system must perform to meet user expectations and business objectives. Examples include:
User Authentication and Authorization
Performance and Scalability
User Interface and User Experience (UI/UX)
Non-functional Requirements: Non-functional requirements define the operational characteristics of the system. These requirements describe how the system should behave in terms of performance, reliability, security, usability, and other quality attributes. Examples include:
Performance
Scalability
Security
Usability
Portability
Step 2: Use-case Diagram
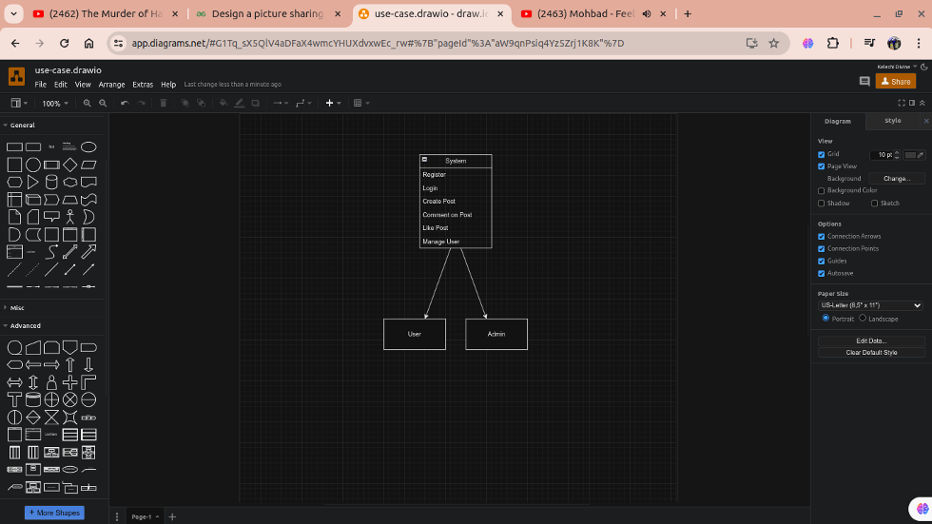
A use case diagram visually represents the system's functionalities and interactions between different actors (users or other systems) and use cases (system functions). It helps stakeholders understand the system's requirements and user interactions.
Steps to Create a Use Case Diagram
Identify Actors: Determine who interacts with the system (e.g., users, administrators).
Identify Use Cases: List the functionalities the system provides (e.g., user registration, posting content).
Draw Diagram: Use diagramming software to draw actors and use cases, connecting them with lines.

Step 3: Capacity Estimation
Capacity estimation is crucial for ensuring that the photo-sharing system can handle the expected load and store the necessary data efficiently. This involves estimating traffic and storage requirements to gather the appropriate components and resources.
Traffic Estimation: Traffic estimation involves predicting the number of users, transactions, or requests the system will handle over a specific period. This helps in determining the necessary infrastructure to support peak loads and maintain performance.
Number of Users: Estimate the number of concurrent users the system will support (e.g., "The system should support 10,000 concurrent users").
Request Rate: Predict the number of requests per second or minute (e.g., "The system should handle 500 requests per second").
Peak Traffic: Identify the expected peak traffic times and the load during these periods (e.g., "The system should handle up to 2,000 requests per second during peak hours").
Scalability Requirements: Outline the requirements for scaling the system to handle increased traffic (e.g., "The system should scale horizontally to accommodate increased traffic").
Storage Estimation: Storage estimation involves calculating the amount of data the system will store and manage. This includes user data, logs, backups, and other necessary information.
Data Volume: Estimate the total amount of data the system will store (e.g., "The system should store up to 1 TB of user data").
Data Growth Rate: Predict the rate at which data will grow over time (e.g., "Data is expected to grow at a rate of 10 GB per month").
Backup Requirements: Determine the requirements for data backups and retention policies (e.g., "Daily backups should be taken and retained for 30 days").
Storage Solutions: Identify the appropriate storage solutions to meet the system's needs (e.g., "The system should use scalable cloud storage solutions to handle data growth").
By accurately estimating traffic and storage requirements, you can ensure that the photo-sharing system is designed to handle expected loads and data volumes efficiently. This helps in selecting the right components and resources to build a robust and scalable system.
Step 4: High-level Design
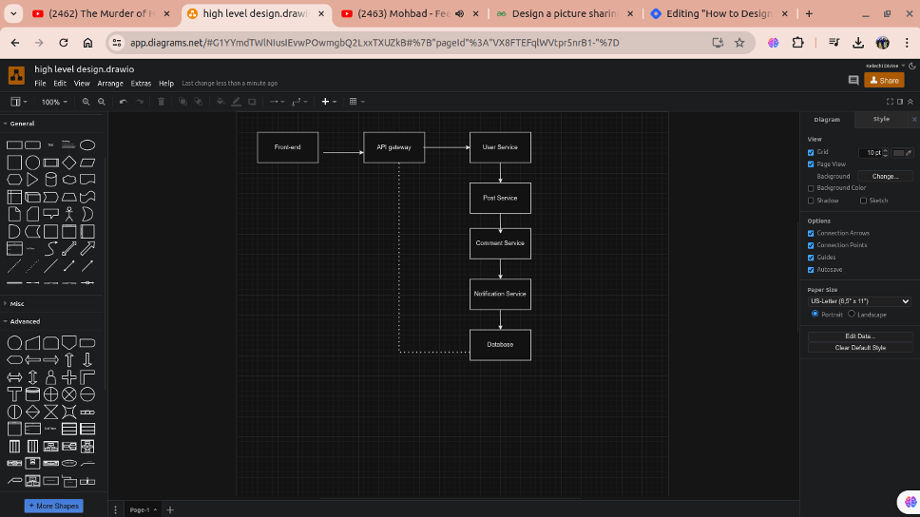
The high-level design provides an overview of the system architecture, showing major components and their interactions. This helps in understanding the system's structure and the flow of data between components.
Steps to Create a High-Level Design
Identify Major Components: List the main components (e.g., frontend, backend, database, microservices).
Define Interactions: Determine how these components interact (e.g., APIs, message queues).
Draw Diagram: Use diagramming software to illustrate components and their interactions.

Step 5: Low-Level Design
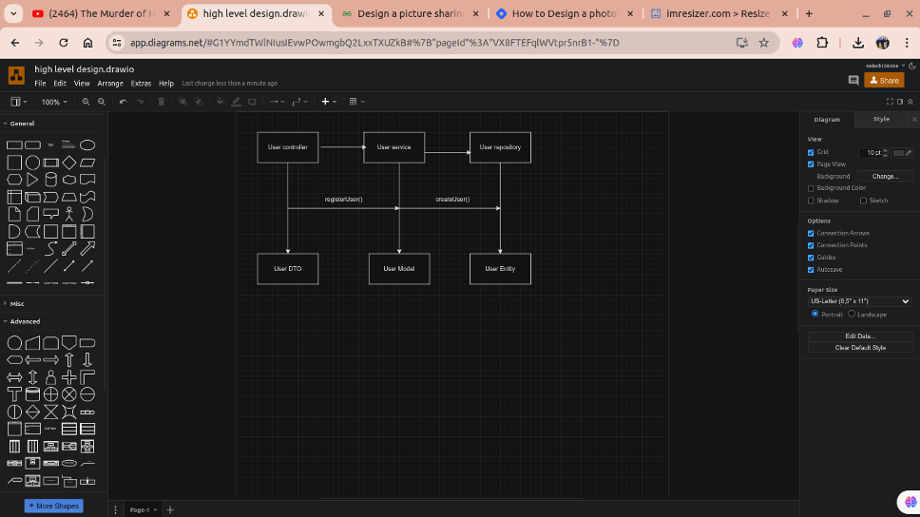
The low-level design provides detailed descriptions of individual components, including data structures, algorithms, and interactions within each component. This helps developers implement and maintain the system.
Steps to Create a Low-Level Design
Detail Each Component: Break down each high-level component into smaller parts (e.g., specific classes, and methods).
Define Data Flow: Describe how data flows within and between components.
Draw Diagram: Use diagramming software to create detailed diagrams for each component.

Step 6: Database Design
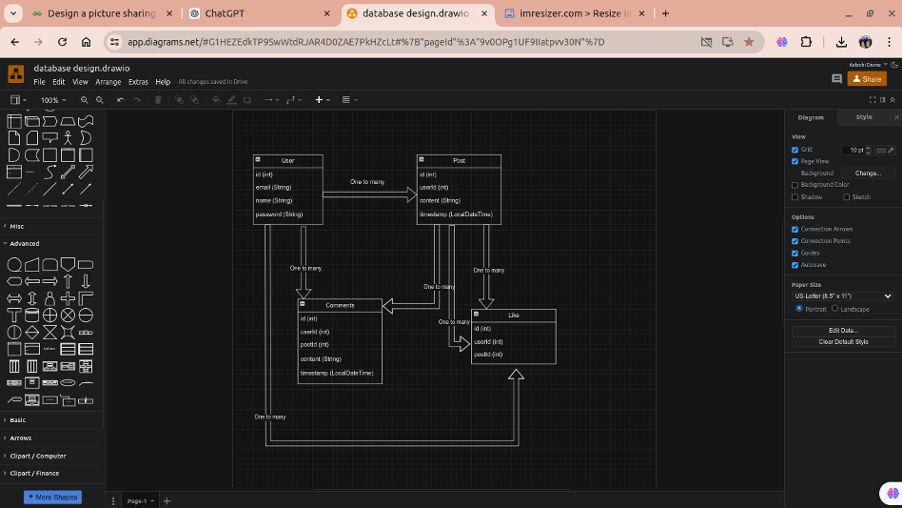
The database design is a crucial part of picture sharing system, ensuring data is stored efficiently and relationships between different data entities are well-defined. This section provides an overview of the database used and a diagram depicting the relationships between the database components.

Step 7: Microservices
In the design of the photo-sharing system, you will need to employ a microservices architecture to enhance scalability, maintainability, and flexibility. Each microservice is responsible for a specific business function and can be developed, deployed, and scaled independently.
User Service
Description: Manages user-related functionalities, including user registration, authentication, profile management, and user roles.
Endpoints:
POST /register: Register a new user.POST /login: Authenticate a user.GET /profile: Retrieve user profile information.PUT /profile: Update user profile information.
Post Service
Description: Handles creation, retrieval, updating, and deletion of posts. It manages the core content created by users.
Endpoints:
POST /posts: Create a new post.GET /posts: Retrieve a list of posts.GET /posts/{id}: Retrieve a specific post by ID.PUT /posts/{id}: Update a specific post.DELETE /posts/{id}: Delete a specific post.
Comment Service
Description: Manages comments on posts, including adding, retrieving, and deleting comments.
Endpoints:
POST /posts/{id}/comments: Add a comment to a post.GET /posts/{id}/comments: Retrieve comments for a specific post.DELETE /comments/{id}: Delete a specific comment.
Like Service
Description: Tracks likes on posts by users, allowing users to like or unlike posts.
Endpoints:
POST /posts/{id}/likes: Like a post.DELETE /posts/{id}/likes: Unlike a post.GET /posts/{id}/likes: Retrieve likes for a specific post.
Benefits of Microservices Architecture
Scalability: Each microservice can be scaled independently based on its load and performance requirements.
Maintainability: Smaller, modular services are easier to maintain, update, and deploy.
Flexibility: Teams can work on different services simultaneously using different technologies best suited for each service.
Resilience: Failure in one microservice does not impact the entire system; services can fail and recover independently.
Step 8: API used
APIs are crucial for communication between microservices and for external clients to interact with the photo-sharing system. Below, I provided examples of various APIs used in the system, along with the request and response structures.
User Service API (register a New User):
Endpoint: POST /register
Request:
{
    "name": "Kelechi Divine",
    "email": "okoroaforkelechi123@gmail.com",
    "password": "securepasswordFor@keLechi
}
Response:
{
    "id": 1,
    "name": "Kelechi Divine",
    "email": "okoroaforkelechi123@gmail.com",
    "message": "User registered successfully"
}
Source Code:
@Data
@AllArgsConstructor
public class UserResponse {
    private int id;
    private String name;
    private String email;
    private String message;
}
@Data
public class UserRequest {
    private String name;
    private String email;
    private String password;
}
@RestController
@RequestMapping("/users")
public class UserController {

    @PostMapping("/register")
    public ResponseEntity<UserResponse> registerUser(@RequestBody UserRequest userRequest) {
        UserResponse response = new UserResponse(1, userRequest.getName(), userRequest.getEmail(), "User registered successfully");
        return ResponseEntity.ok(response);
    }
}
Login API:
Endpoint: POST /register
Request:
{
    "email": "okoroaforkelechi123@gmail.com",
    "password": "securepasswordFor@keLechi"
}
Response:
{
    "id": 1,
    "name": "Kelechi Divine",
    "token": "jwt-token-here"
}
Source code:
@Data
@AllArgsConstructor
public class LoginRequest {
    private String email;
    private String password;
}
@Data
public class LoginResponse {
    private int id;
    private String name;
    private String token;
}
@PostMapping("/login")
public ResponseEntity<LoginResponse> loginUser(@RequestBody LoginRequest loginRequest) {
    LoginResponse response = new LoginResponse(1, "Kelechi Divine", "jwt-token-here");
    return ResponseEntity.ok(response);
}
Post Service API
Endpoint: POST /register
Request:
{
    "id": 1,
    "content": "Elon Musk is a better CEO than Mark"
}
Response:
{
    "id": 101,
    "userId": 1,
    "content": "Elon Musk is a better CEO than Mark",
    "timestamp": "2024-07-01T12:00:00Z",
    "message": "Post created successfully"
}
Source Code:
@Data
@AllArgsConstructor
public class PostRequest {
    private int userId;
    private String content;
}
@Data
public class PostResponse {
    private int id;
    private int userId;
    private String content;
    private String timestamp;
    private String message;
}
Retrieve Posts
Endpoint: GET /posts
Response:
[
    {
        "id": 101,
        "userId": 1,
        "content": "Elon Musk is a better CEO than Mark",
        "timestamp": "2024-07-01T12:00:00Z"
    },
    {
        "id": 102,
        "userId": 2,
        "content": "Another post",
        "timestamp": "2024-07-01T13:00:00Z"
    }
]
Source Code
@GetMapping
public ResponseEntity<List<PostResponse>> getAllPosts() {
    List<PostResponse> posts = Arrays.asList(
        new PostResponse(101, 1, "Elon Musk is a better CEO than Mark", "2024-07-01T12:00:00Z", null),
        new PostResponse(102, 2, "Another post", "2024-07-01T13:00:00Z", null)
    );
    return ResponseEntity.ok(posts);
}
Comment Service API( Add a Comment)
Endpoint: POST /posts/{id}/comments
Request:
{
    "userId": 1,
    "content": "I disagree with this post. Mark will humble Elon Musk"
}
Response:
{
    "id": 201,
    "postId": 101,
    "userId": 1,
    "content": "I disagree with this post. Mark will humble Elon Musk",
    "timestamp": "2024-07-01T12:30:00Z",
    "message": "Comment added successfully"
}
Source Code:
@Data
@AllArgsConstructor
public class CommentRequest {
    private int userId;
    private String content;
}
@Data
@AllArgsConstructor
public class CommentResponse {
    private int id;
    private int postId;
    private int userId;
    private String content;
    private String timestamp;
    private String message;
}
@RestController
@RequestMapping("/posts/{id}/comments")
public class CommentController {

    @PostMapping
    public ResponseEntity<CommentResponse> addComment(@PathVariable int postId, @RequestBody CommentRequest commentRequest) {
        CommentResponse response = new CommentResponse(201, postId, commentRequest.getUserId(), commentRequest.getContent(), "2024-07-01T12:30:00Z", "Comment added successfully");
        return ResponseEntity.ok(response);
    }
}
Like Service API(Like a Post)
Endpoint: POST /posts/{id}/likes
Request:
{
    "userId": 1
}
{
    "id": 301,
    "postId": 101,
    "userId": 1,
    "message": "Post liked successfully"
}
Source Code:
@Data
class LikeRequest {
    private int userId;
}
@Data
@AllArgsConstructor
public class LikeResponse {
    private int id;
    private int postId;
    private int userId;
    private String message;
}
Step 9: Scalability
Scalability is critical for ensuring that the photo-sharing system can handle increasing loads and demands efficiently. Below, I will discuss how to scale this system and introduce more efficient components to enhance robustness.
Scaling Strategies
Horizontal Scaling: Horizontal scaling involves adding more instances of the same service across multiple servers to distribute the load evenly.
Microservices: Deploy each microservice across multiple instances using container orchestration tools like Kubernetes or Docker Swarm.
Load Balancers: Use load balancers (e.g., Nginx, HAProxy) to distribute incoming traffic across multiple instances of the services, ensuring no single instance is overwhelmed.
Vertical Scaling: Vertical scaling involves increasing the resources (CPU, memory, storage) of the existing server or instance.
Database: Upgrade the database server to a more powerful machine to handle more queries and larger datasets.
Application Servers: Enhance the resources of the application servers to improve performance under heavy loads.
Efficient Components for Robustness
Auto-Scaling: Implement auto-scaling policies to automatically adjust the number of instances based on current traffic and load.
Kubernetes: Utilize Kubernetes’ Horizontal Pod Autoscaler (HPA) to automatically scale the number of pod replicas based on CPU utilization or other metrics.
AWS Auto Scaling: Use AWS Auto Scaling for EC2 instances to dynamically scale capacity.
Caching: Introduce caching mechanisms to reduce the load on the database and improve response times.
Redis: Use Redis as an in-memory data store to cache frequently accessed data, reducing the need to query the database for every request.
Memcached: Employ Memcached for distributed memory caching to store small chunks of arbitrary data (strings, objects).
Database Sharding: Implement database sharding to split a large database into smaller, more manageable pieces, each called a shard.
- Sharding: Distribute the data across multiple database instances to improve read and write performance. Each shard contains a subset of the data, ensuring no single database instance becomes a bottleneck.
Message Queues: Use message queues to decouple components and handle asynchronous processing.
RabbitMQ: Employ RabbitMQ to manage the communication between microservices, ensuring that messages are reliably delivered even under high loads.
Apache Kafka: Use Apache Kafka for high-throughput, low-latency message processing, suitable for real-time data pipelines and stream processing.
Distributed Tracing: Implement distributed tracing to monitor and troubleshoot the interactions between microservices.
Jaeger: Use Jaeger for end-to-end distributed tracing to visualize the flow of requests through the microservices, identify bottlenecks, and optimize performance.
Zipkin: Employ Zipkin for collecting and visualizing tracing data, helping to diagnose latency issues and errors in the system.
Monitoring and Alerting: Set up comprehensive monitoring and alerting systems to proactively manage the health and performance of the system.
Prometheus: Utilize Prometheus for real-time monitoring and alerting, collecting metrics from different services and visualizing them using Grafana.
ELK Stack: Implement the ELK Stack (Elasticsearch, Logstash, Kibana) for centralized logging and monitoring, enabling quick search and analysis of logs.
Conclusion
By implementing these scaling strategies and efficient components, the photo-sharing system can handle increased load and demand while maintaining high performance and reliability. This approach ensures that the system is robust, resilient, and capable of scaling seamlessly as user growth continues.
Finally, I built a small mobile application for a test, you can check the source code here. Thank you for reading through. Happy coding!
Subscribe to my newsletter
Read articles from Okoroafor Kelechi Divine directly inside your inbox. Subscribe to the newsletter, and don't miss out.
Written by

Okoroafor Kelechi Divine
Okoroafor Kelechi Divine
I am Okoroafor Kelechi Divine, In 2020 I decided to help solve many problems in the world through innovation and modern-day designs with software engineering and technical writing as my tool.