Everything You Always Wanted to Know About HttpClients
 Thomas Burkhart

In case you are wondering about the cover of this post, I had to share with you the incredible location I was writing this post
When starting out writing apps with Flutter or Dart, you probably, like me, just followed the examples on how to make HTTP requests and didn't think much about it. You might have noticed in the API docs of the global functions like get, post, etc., of the http package that it mentions that if you call the same server multiple times, it would be more efficient to reuse the same HttpClient. Unfortunately, this typically leads to more questions, which started me on an excursion into the wonders of HTTP implementations in Dart and Flutter.
This post will try to answer the following questions:
How many HttpClients should you use and why?
Should you close your Clients?
Why should you use the new native HttpClient implementations?
How to ensure Flutter uses the correct Clients?
Pitfalls to avoid
How many HttpClients should an App use?
If you spend some time analyzing the network traffic of your app, which I highly recommend, with either the Network Tool of the Dart Development Tools or a professional proxy like Fiddler or Charles you will see that a request consists of two phases:
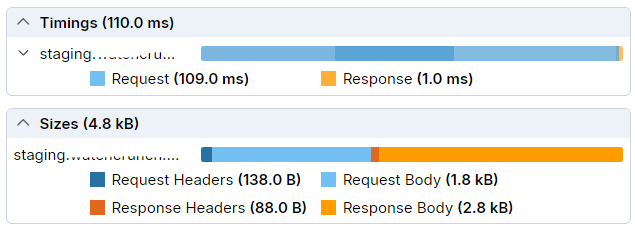
The Request and the Response phase. When you look at the timings, you'll notice that the request phase takes quite a long time. During this period, no data is transmitted to your app. In fact, most of this time is spent with
DNS resolution (35ms in this example)
TCP connect time (31ms)
HTTPS handshake (42ms)
If we look at some of the requests at the startup of our current app you will see:
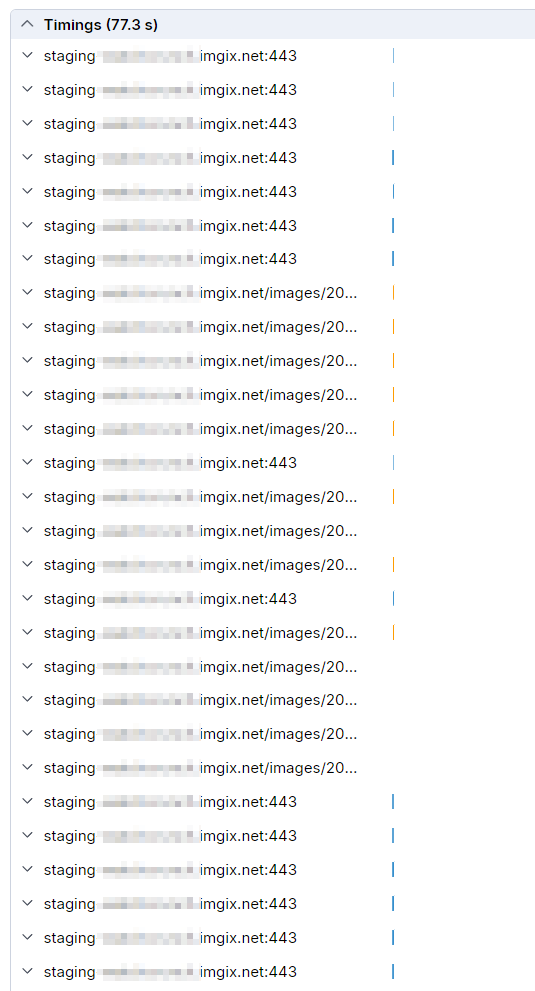
You see a lot of blue bars, which means that for every request with a new HttpClient, a new connection needs to be established, taking up a lot of time.
But what about HTTP keep-alive headers?
Indeed, since HTTP 1.1, clients can tell the server to keep a connection alive, which avoids the time needed to establish a new connection. However:
This only works if you use the same HttpClient in Dart for all connections.
Even with keep-alive, one HTTP 1.1 connection can only be used once at a time. So, when you send many async requests, like at startup, don't expect them all to use the same connection. You would have to send them sequentially, which is likely slower than establishing additional connections in parallel.
Reusing the same Client everywhere in your app
The most straightforward approach is to register one client instance in a place in your app where you can easily access it, such as using get_it (disclaimer: I'm the author of get_it) or any other service locator. Then, use that client instance throughout your app (we will later see that this isn't as straightforward in Flutter as you might think). This also means no longer using the global HTTP functions of the http package but instead using the methods of the client instance.
After we manage to do this for all requests in our app the image already starts to change:
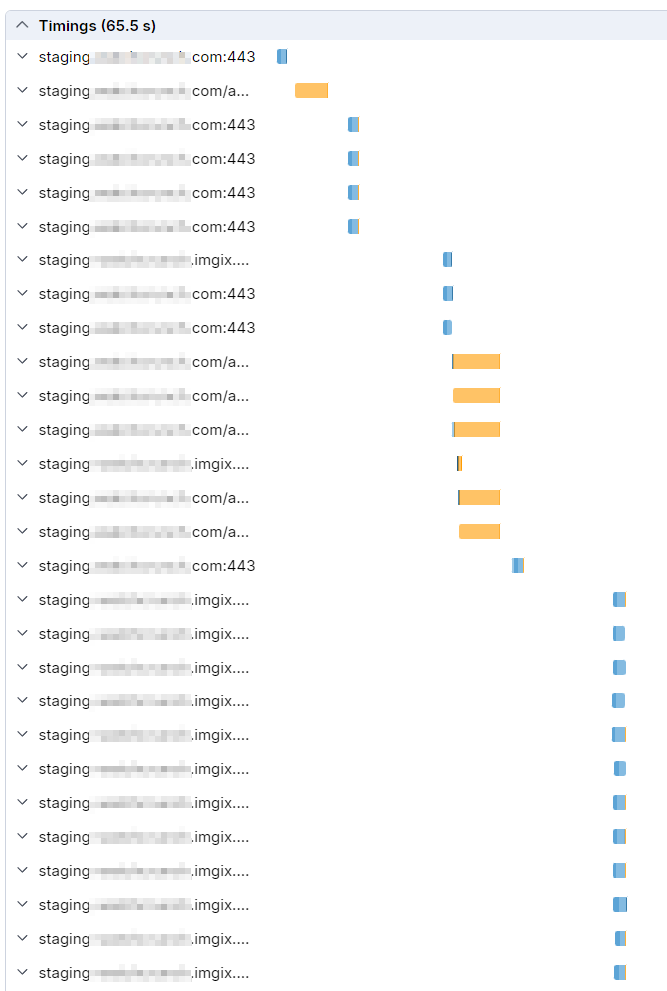

We still see many blue bars indicating new connections being created, but we also see some orange bars with little or no blue following them. This means they are using already established connections. Comparing the total time for all requests, we reduced the time by more than 10 seconds, which is remarkable since we only changed the reuse of HttpClients. One reason we didn't gain more is that we send many image requests to our imgix server in parallel.
HTTP/2 to the rescue
So far we always used the standard Dart HttpClient implementation that is part of the SDK. Let's have a closer look at the requests:
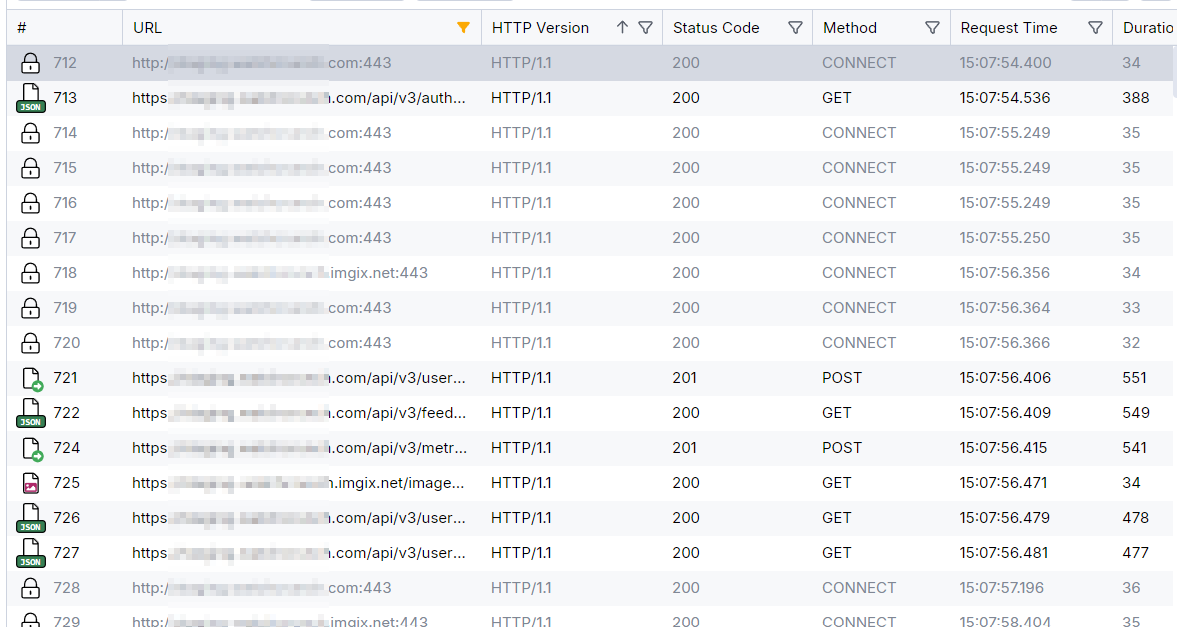

You can see that all the requests are made with the HTTP 1.1 protocol. Most of today's servers support HTTP 2, which allows multiple requests to be transmitted over one established connection. Fortunately, we now have new native HTTP clients for Flutter, at least for Android and iOS. The best part is that we don't need to change our app's logic at all, except to use the new client implementations. If we switch our app to use the new native clients, our requests will look like this:
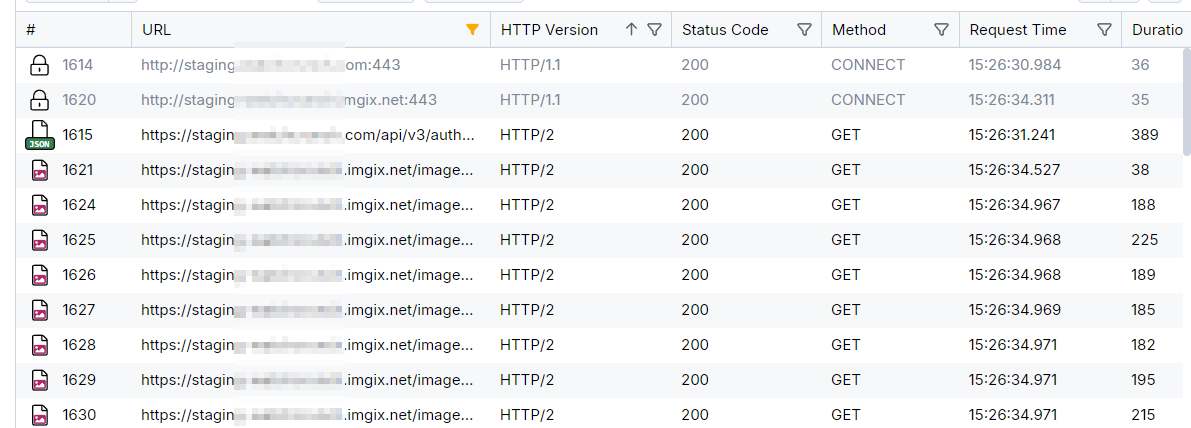
At the very top, we see two HTTP 1.1 requests needed to negotiate with the server to use HTTP 2. (Two requests are made because we connect to two different servers.) After that, everything is done using HTTP 2.
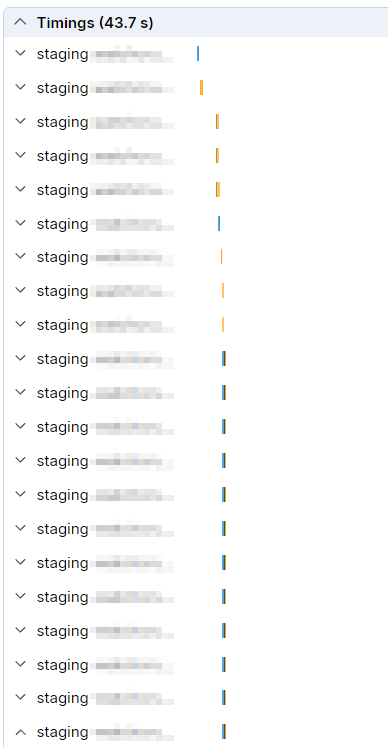

It seems that some additional connections are created due to the many image requests, but we can see several orange bars in sequence without any blue. Comparing the total time of all 247 requests to the previous charts, we reduced the loading time by another 20 seconds. This highlights the importance of using the new native clients. All this was recorded on a very fast Wi-Fi connection. Over a cellular connection with higher latencies, this effect will be even more significant.
| Setup | Time for 247 Requests |
| DartIo Client, no Client reuse | 77s |
| DartIo Client, one Client for everything | 65,5s |
| cronet Client | 43,7 |
Surely, the differences will vary depending on the type of requests your app sends, but the gains will be significant.
So clearly, you should only use one Client per app unless you need different client settings. You might want a separate client to download large assets with package:cupertino_http so that allowsConstrainedNetworkAccess can be enabled. I also tested using two clients, one for imgix and one for our own server, but it didn't improve the timing; it actually got worse than using just one.
How to setup the Client for a Flutter App correctly
The httpClientFactory
Let's start with using the new native Http2 clients. For this, we have to add two new packages:
Then you have to create a platform-specific instance of a Client which is best done by using a factory method:
const _maxCacheSize = 2 * 1024 * 1024;

Client httpClientFactory() {
  try {
    if (Platform.isAndroid) {
      final engine = CronetEngine.build(
        cacheMode: CacheMode.memory,
        cacheMaxSize: _maxCacheSize,
        enableHttp2: true,
      );
      return CronetClient.fromCronetEngine(engine);
    }

    /// 'You must provide the Content-Length' HTTP header issue
    if (Platform.isIOS || Platform.isMacOS) {
      final config = URLSessionConfiguration.ephemeralSessionConfiguration()
        ..cache = URLCache.withCapacity(memoryCapacity: _maxCacheSize);
      return CupertinoClient.fromSessionConfiguration(config);
    }
  } catch (_) {
    /// in case no Cronet is available which can happen on Android without Google Play Services
    /// not sure if there is a similar case for Cupertino but better safe than sorry
    return IOClient(HttpClient());
  }
  final httpClient = HttpClient();
  // To use with Fiddler uncomment the following lines and set the
  // ip address of the machine where Fiddler is running
  // httpClient.findProxy = (uri) => 'PROXY 192.168.1.61:8866';
  // httpClient.badCertificateCallback =
  //     (X509Certificate cert, String host, int port) => true;
  return IOClient(httpClient);
}
A similar function can be found in the documentation of the http package. What isn't mentioned there is that cronet is only available on Android devices with Google Play Services installed. Otherwise, you will encounter this exception:
java.lang.RuntimeException: All available Cronet providers are disabled. A provider should be enabled before it can be used.
That's why the above code falls back to normal Dart IO Clients if Cronet is not available.
in case you want to be sure to have cronet available see this discussion on Github
Client type confusion
One thing to note is that CronetClient and CupertinoClient only implement the http.Client interface, not dart:io.HttpClient. This means you might not be able to use these instances in code that expects an HttpClient, like many examples you find online. Usually, it's not a big problem to adapt the code to use http.Client but don't be surprised if the analyzer tells you that your client is not a compatible type.
The reason for this is likely that with the introduction of Flutter-Web, web apps could not access dart:io, where HttpClient is defined. To write code that works across different platforms, they needed to introduce a new common parent interface for HTTP clients, which is http.Client.
So we have the following Client types:
| Type | Package | compatible with http.Client | platform | HTTP |
| Client | http | ✔ | abstract interface | |
| CronetClient | cronet_http | ✔ | Android with Play Services or statically linked | 2 |
| CupertinoClient | cupertino_http | ✔ | iOS/macOS | 2 |
| IoClient | http | ✔ (uses HttpClient internally) | all platforms but web | 1.1 |
| BrowserClient | http | ✔ | only web | ?? |
| FetchClient | fetch_client | ✔ | only web | 2/3 |
| HttpClient | dart:io | (can be wrapped in IoClient) | all but web |
Your app should always use the http.Client interface to support all these client types. When creating a new client, use the Client() factory method to ensure the correct implementation is used. If you publish a package, it's best always to give users the option to pass a Client instance as an optional parameter like:
void myFuncThatNeedsAClient({Client? client}){
    final _client = client ?? Client();
Check the docs of BrowserClient and FetchClient for their specific limitations
What about the http2 package you might wonder?
There is an http2 package maintained by the Dart team, which is used as a base for the Dart gRPC package. Unfortunately, it does not implement the http.Client interface, and the documentation is almost non-existent. This StackOverflow question provides some insight on how to use it. It shouldn't be too difficult to implement http.Client based on this package, so let's hope the Dart team will do that soon. Also if you are using Dio you can use it with a special adapter.
The problem with runWithClient
According to the Dart docs, runWithClient should be the ideal solution to ensure that the app uses the new native clients everywhere. After implementing it, I became suspicious while analyzing the HTTP requests. Despite using runWithClient at the root level of our app, I noticed a large number of HTTP/1.1 requests. Upon closer inspection, all network requests for images from Image.Network were still using HTTP/1.1. After investigating further, it turns out that the underlying NetworkImage class uses some Flutter internal _HttpClient class and does not call the http.Client() factory constructor. The only alternative is to pass the client instance from httpClientFactory() directly to the parts of our code that need to make a network call.
Another pitfall with runWithClient I lately found out that if you need to create a client inside an isolate and you call Client() it won't call your provided httpClientFactory but use the default dart:io.HttpClient.
Registering the Client
Using the service locator or dependency injection of your choice, register one instance at the start of your app. Here, I demonstrate it with get_it:
  final di = GetIt.instance();
  /// note that we use additionally `runWithClient` on the project root,
  // otherwise we couldn't just call `Client()`
  di.registerSingleton(Client());

  /// without `runWithClient`
  di.registerSingleton<Client>(httpClientFactory());
We currently use
runWithClienteven though we inject the registered Client everywhere with get_it. The main reason is to prevent future packages, which might use theClient()factory method internally, from using the wrong type of Client. If you already inject your Client everywhere, you can probably go without it.
Using one Client throughout the App
After registration, we can now access our single Client instance via GetIt.I<Client>().
If you are using
watch_it, you can usedi<Client>().
Unfortunately, there is no way to set Flutter's internal _sharedClient (I tried debugNetworkImageHttpClientProvider, which is used by NetworkImage, but it expects an http.HttpClient and not an http.Client).
Luckily, there isn't much complexity behind Flutter's Image.network(), which creates an Image widget using an ImageProvider of type NetworkImage.
The naming here is unfortunate because
NetworkImagesounds like a widget but is actually anImageProvider.
The easiest solution is to add your own implementation of a NetworkImageProvider to your project by using the original NetworkImage as a blueprint.
Flutter web uses its own version of NetworkImage. The following version might not be usable with Flutter web or might be less performant.
class HttpNetworkImage extends ImageProvider<HttpNetworkImage> {
  /// Creates an object that fetches the image at the given URL.
  const HttpNetworkImage(this.url, {this.scale = 1.0, this.headers});

  final String url;

  final double scale;

  final Map<String, String>? headers;

  @override
  Future<HttpNetworkImage> obtainKey(ImageConfiguration configuration) {
    return SynchronousFuture<HttpNetworkImage>(this);
  }

  @override
  ImageStreamCompleter loadImage(
      HttpNetworkImage key, ImageDecoderCallback decode) {
    // Ownership of this controller is handed off to [_loadAsync]; it is that
    // method's responsibility to close the controller's stream when the image
    // has been loaded or an error is thrown.

    return MultiFrameImageStreamCompleter(
      codec: _loadAsync(key, decode: decode),
      scale: key.scale,
      debugLabel: key.url,
      informationCollector: () => <DiagnosticsNode>[
        DiagnosticsProperty<ImageProvider>('Image provider', this),
        DiagnosticsProperty<HttpNetworkImage>('Image key', key),
      ],
    );
  }

  Future<ui.Codec> _loadAsync(
    HttpNetworkImage key, {
    required ImageDecoderCallback decode,
  }) async {
    try {
      assert(key == this);

      final Uri resolved = Uri.base.resolve(key.url);

      final response = await  GetIt.I<Client>().get(resolved, headers: headers);

      if (response.statusCode != HttpStatus.ok) {
        // The network may be only temporarily unavailable, or the file will be
        // added on the server later. Avoid having future calls to resolve
        // fail to check the network again.
        // await response.drain<List<int>>(<int>[]);
        throw NetworkImageLoadException(
            statusCode: response.statusCode, uri: resolved);
      }

      if (response.bodyBytes.isEmpty) {
        throw Exception('NetworkImage is an empty file: $resolved');
      }

      return decode(await ui.ImmutableBuffer.fromUint8List(response.bodyBytes));
    } catch (e) {
      // Depending on where the exception was thrown, the image cache may not
      // have had a chance to track the key in the cache at all.
      // Schedule a microtask to give the cache a chance to add the key.
      scheduleMicrotask(() {
        PaintingBinding.instance.imageCache.evict(key);
      });
      rethrow;
    }
  }

  @override
  bool operator ==(Object other) {
    if (other.runtimeType != runtimeType) {
      return false;
    }
    return other is HttpNetworkImage && other.url == url && other.scale == scale;
  }

  @override
  int get hashCode => Object.hash(url, scale);

  @override
  String toString() =>
      '${objectRuntimeType(this, 'HttpNetworkImage')}("$url", scale: ${scale.toStringAsFixed(1)})';
}
If you use
providerinstead of get_it as your locator you will have to pass the client to this image provider through a parameter.
Then you can create a network image like:
Image(image:HttpImage({my_image_url})),
If you don't want to have this as part of your code, you can use the package
http_image_provider. As we are usingget_it, the above solution is more elegant because we don't have to pass the Client to every image, and IMHO it's interesting to show how an ImageProvider works.
SVG Images
If you are using flutter_svg, you're in luck because SvgPicture.network offers a client parameter where you can inject your client instance. It's probably best to create your own widget so that you don't have to pass the client everywhere:
class NetworkSvgPicture extends StatelessWidget {
  const NetworkSvgPicture(this.url,{super.key});

  final String url;

  @override
  Widget build(BuildContext context) {
    return SvgPicture.network(url,httpClient: GetIt.I<Client>());
  }
}
Using cached_network_image
Many of us use the popular and battle-tested cached_network_image to reduce the number of images our apps need to download on repeated starts. Its API unfortunately doesn't allow passing an HTTP client as a parameter, but you can pass a custom CacheManager instance, which means it's just one level of indirection more. We have to create and register our own CacheManager where we can provide the HTTP client to be used:
  const cacheKey = 'my_cache';
  final di = GetIt.instance();
  di.registerSingleton<Client>(httpClientFactory());
  di.registerSingleton<CacheManager>(
    DefaultCacheManager(
      Config(
        cacheKey,
        fileService: HttpFileService(
          httpClient: di<Client>(),
        ),
    stalePeriod: const Duration(days: 7),
    maxNrOfCacheObjects: 200,
      ),
    ),
  );
Again we create our own image widget
class CachedHtttpNetworkImage extends StatelessWidget {
  const CachedHtttpNetworkImage(this.url,{super.key});

  final String url;

  @override
  Widget build(BuildContext context) {
    return CachedNetworkImage(
        imageUrl: url,
    cacheManager:  GetIt.I<CacheManager>());
  }
}
Bonus cached network SVGs
At first glance, it seems impossible to use cached_network_image with SVG images. Luckily, Dan Field designed flutter_svg to be very flexible and elegant. Instead of an image provider, it uses a ByteLoader, which we can implement to use flutter_cache_manager, the underlying caching engine of cached_network_image.
class SvgCachedNetworkLoader extends SvgLoader<File> {
  const SvgCachedNetworkLoader(
    this.url, {
    this.headers,
    super.theme,
    super.colorMapper,
  });

  /// The [Uri] encoded resource address.
  final String url;

  /// Optional HTTP headers to send as part of the request.
  final Map<String, String>? headers;

  @override
  Future<File> prepareMessage(BuildContext? context) async {
    return await GetIt.I<CacheManager>.getSingleFile(url, headers: headers);
  }

  @override
  String provideSvg(File? message) {
    final Uint8List bytes = message!.readAsBytesSync();
    return utf8.decode(bytes, allowMalformed: true);
  }

  @override
  int get hashCode => Object.hash(url, headers, theme, colorMapper);

  @override
  bool operator ==(Object other) {
    return other is SvgCachedNetworkLoader &&
        other.url == url &&
        other.headers == headers &&
        other.theme == theme &&
        other.colorMapper == colorMapper;
  }

  @override
  String toString() => 'SvgCachedNetworkLoader($url)';
}
class CachedNetworkSvgPicture extends StatelessWidget {
  const CachedNetworkSvgPicture(this.url, {super.key});

  final String url;

  @override
  Widget build(BuildContext context) {
    return SvgPicture(SvgCachedNetworkLoader(url));
  }
}
Using dio
Many of you use the popular dio package for your HTTP requests. In that case, it is quite easy to use the new native clients because there is a dedicated package called native_dio_adapter. Here's how you can do it:
final dioClient = Dio();
dioClient.httpClientAdapter = NativeAdapter();
Unfortunately, dio doesn't use the http.Client interface internally, likely to avoid a dependency on the http package. However, they do have an adapter concept to connect to any HTTP client you can imagine.
After the publishing of this article I was told that there is a a special adapter to use the http2 package with Dio which would enable you to get all the benefits of HTTP2 on Windows and Linux. The package is called dio_http2_adapter
Avoiding Pitfalls
Att: MultipartRequests with cupertino_http
The current version 1.5.0 of cupertino_http on pub.dev has a bug when sending a MultipartRequest. It doesn't include the expected "Content-Length" header, which causes an error when uploading an image to AWS S3. This issue has been fixed, but you need to use a git reference to the package's GitHub repository until a new version is released on pub.
Should I close my Client at any time?
Despite the alarming warning in the API docs of the Client.close():
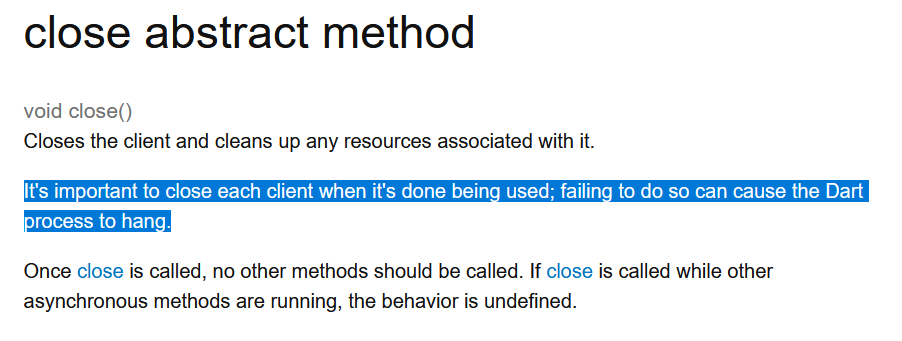
You should never close the shared instance of your Client. The warning only applies to Dart console apps. When mobile apps terminate, all resources are released automatically.
Why You Should Analyze Your Network Requests
If you don't check your network requests regularly, you might not realize that your app isn't using HTTP2, is making multiple requests when one would suffice, or is downloading more data than necessary because images are in the wrong format. Therefore, I recommend using the Dart Network tool or a debug proxy to see what your app is actually doing.
What are these weird WebSocket requests in the Dart Network tool?
When you use the Network Page of the Dart DevTools, you might have wondered about these unexpected requests:
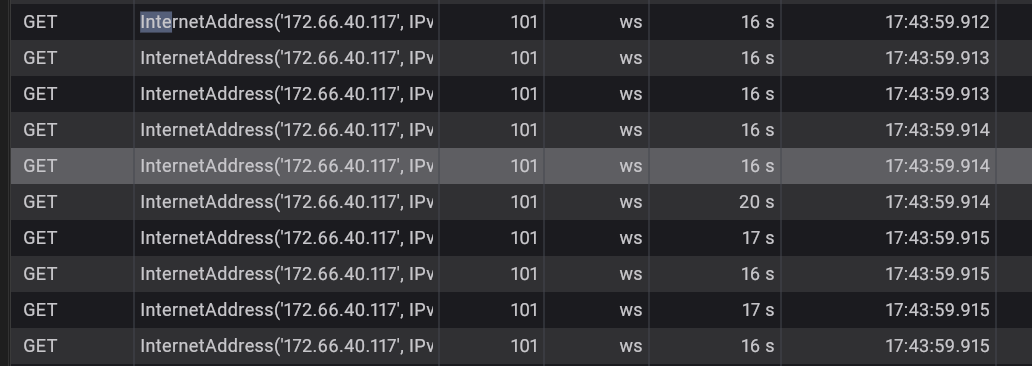
It seems that this is a bug in the Network tool because these are not WebSocket requests but actually the connection part of your requests. See this issue on GitHub for more details on why the tool lists them separately. This should definitely be fixed.
Needed preparation to use a debug proxy
If you are using one of the new native HTTP clients, using an external proxy like Fiddler or Charles is now much easier because you can set the proxy settings in the Android or iOS/MacOS network settings. However, if you are using the DartIo Client because you are building on Windows or Linux, or you don't want to use the new native clients, you will find that this Client ignores the OS proxy settings. (This is how I discovered that Flutter NetworkImages were not using the new clients. Only the image requests didn't show up in Fiddler, which made me suspicious).
To use an external debug proxy with DartIo, you have to define the proxy when creating the client:
  final httpClient = HttpClient();
  httpClient.findProxy = (uri) => 'PROXY 192.168.1.61:8866';
  httpClient.badCertificateCallback =
       (X509Certificate cert, String host, int port) => true;
  return IOClient(httpClient);
The badCertificateCallback is necessary to prevent DartIo from complaining about the certificate used by the proxy.
If you want to read the content of your requests and you are using SSL/TLS in your app(which you should), you need to install the proxy's certificates on your test device. Fiddler provides an excellent step-by-step guide on how to set up mobile devices. On Android, you need to add a network_security_config.
Subscribe to my newsletter
Read articles from Thomas Burkhart directly inside your inbox. Subscribe to the newsletter, and don't miss out.
Written by
