Handling Dialogs in a robust Flutter Application
 Peter Ewanfo
"A dialog is a widget that appears on your screen above the current content of your app, asking you to perform an action or simply displaying information"
You will probably agree with me that this is all there is to dialogs. I HOPE.
Showing dialogs in Flutter is very easy and straightforward, but managing dialogs in a robust Flutter application can be messy. In this article, we will discuss why we can't simply display dialogs as the Flutter documentation suggests. Instead, we will explore how to make better use of the tools provided in the documentation and manage our dialogs with ease.
Showing Dialogs By Documentation
Displaying dialogs in Flutter requires calling methods like showDialog, showGeneralDialog, or showModalBottomSheet. Before we dive into our application structure, let's first look at some of the problems we might encounter when using these methods to show dialogs.
To show a dialog using showDialog simply execute the code below.
// Let's create an Elevated Button to trigger the dialog
ElevatedButton(
    style: ElevatedButton.styleFrom(
        backgroundColor: Colors.green,
    ),
    onPressed: () async {
        showDialog(
            context: context,
            builder: (context) {
                return CustomDialogWidget();
            },
        );
    },
    child: const Text(
        'Click To Show Dialog',
            style: TextStyle(
                color: Colors.white,
            ),
    ),
),
In the example above, clicking the ElevatedButton triggers the onPressed function, which displays the CustomDialogWidget in a dialog.
Below is the sample code for CustomDialogWidget
import 'package:flutter/material.dart';

class CustomDialogWidget extends StatelessWidget {
  const CustomDialogWidget({super.key});

  @override
  Widget build(BuildContext context) {
    return Container(
      color: Colors.red,
      height: 300,
      width: double.infinity,
    );
  }
}
Showing a general dialog using showGeneralDialog and a BottomSheet dialog using showModalBottomSheet is also simple, just like the example above.
However, as we see in the examples above, Flutter requires a BuildContext to render a dialog in our UI. Every Flutter engineer would agree with me when I say, "BuildContext is to Flutter what water is to our body." Let's keep this in mind as we explore our robust application structure.
Application Structure
Every engineer loves to structure code in a way that separates concerns. We all appreciate separating Models from Views, and Views from ViewModels and/or Controllers, to create a fully independent application. For this article, our project folder structure looks like the example below. I will focus on Views and ViewModels.
app-base-directory/
   | - android
   | - assets
   | - build
   | - ios
   | - lib
   | - lib/
      | - data
      | - models
      | - presentation/
         | - routes
         | - styles
         | - viewModel
            | - computation_viewmodel.dart
         | - views
            | - calculator_screen.dart
      | - utils
      | - app.dart
      | - main.dart
   | - test
   | - .env
In the above structure, you would notice the viewModel folder has a computation_viewmodel.dart file and views folder has calculator_screen.dart file. Dont panic yet.
Considering the project structure above, let's dive into the code and perform basic operations that will require us to display dialogs as shown in the previous example. We'll explore how this should be better implemented.
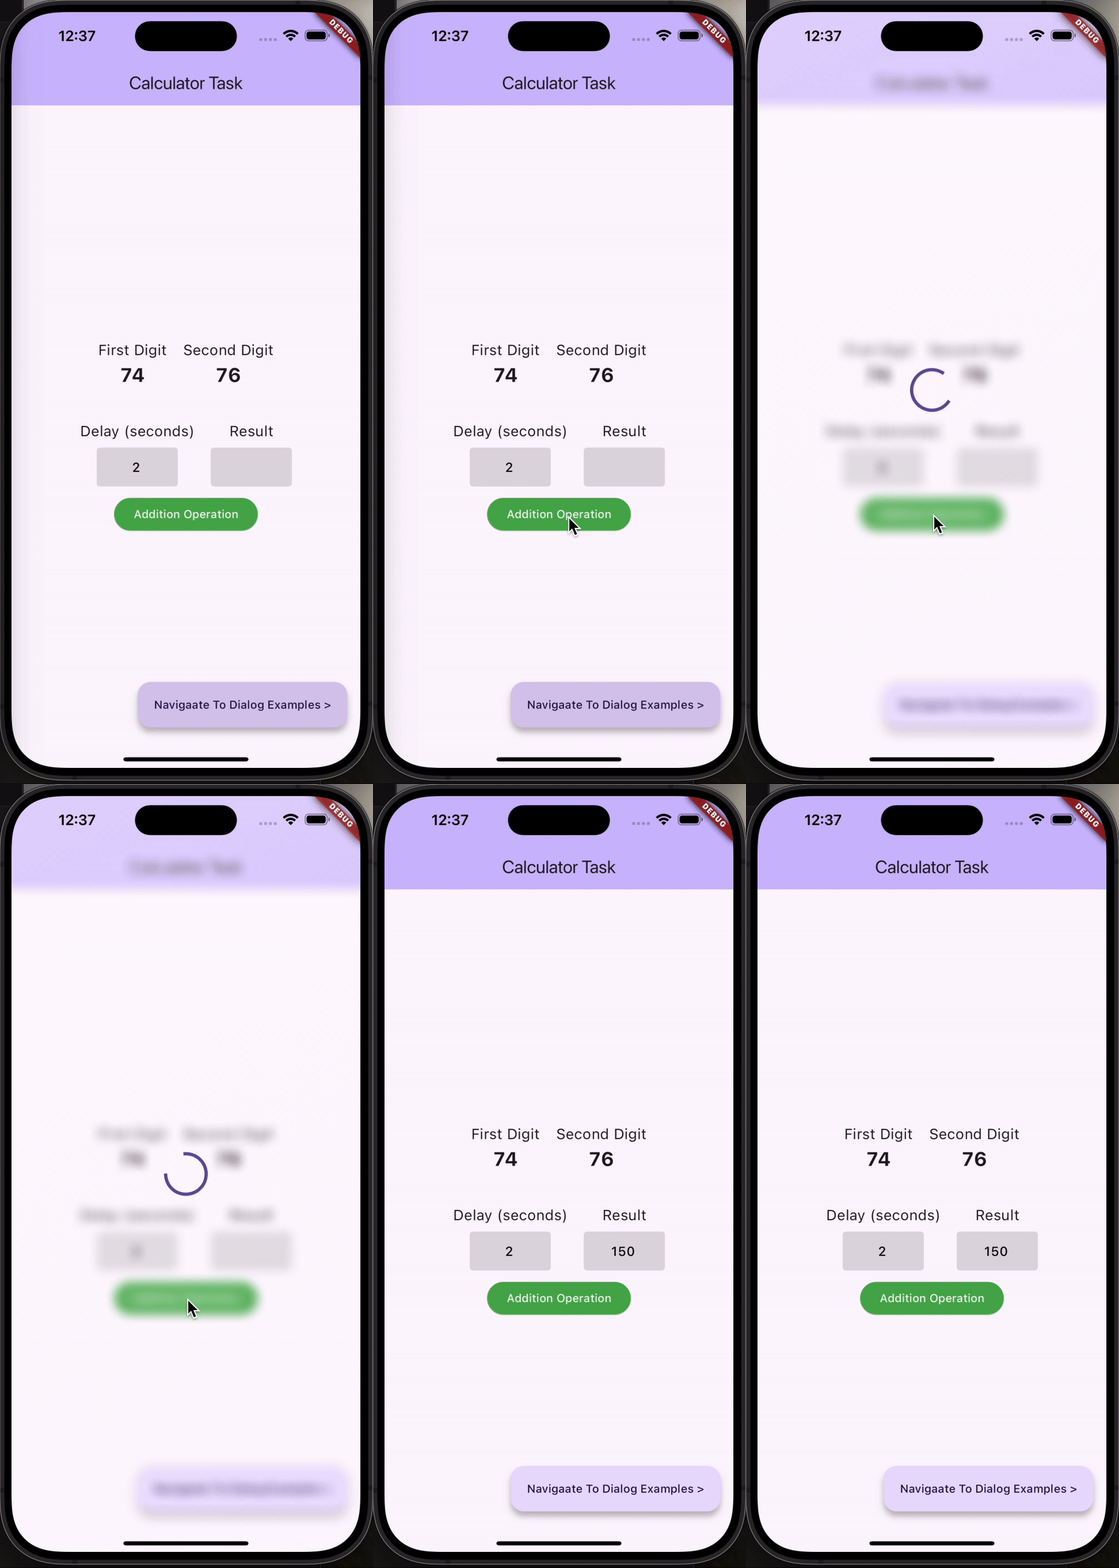
Task: Let's say I need to build a calculator app. Before performing an addition operation, I want to show a progress dialog. When the operation is successful, I need to close the progress dialog and then display another dialog if the result is even, a different dialog if the result is odd, and an error dialog when there was an exeption with performing the operation.
Task Breakdown:
Step 1: Show Progress Dialog when addition operation is triggered
Step 2: Dismiss the progress dialog when operation is done
Step 3: Show a dialog if the result of the operation is even and a different dialog if the result is odd
Step 4: Show an error dialog when the operation fails.
To help you visualize, here is a screenshot of how the user interface will look once the project is completed.

Task Solution 1 - The Wrong Approach
Say we maintain the same MVVM code structure as explain above, on click of Add Operation button in our view, the below operations should be executed.
ElevatedButton(
    style: ElevatedButton.styleFrom(
        backgroundColor: Colors.green,
    ),
    onPressed: () async {
        resultInput.text = await useComputationViewModelRef.additionOperation(
            secondsDelay: int.parse(computationDelayInput.text),
            firstDigit: firstDigit,
            secondDigit: secondDigit,
            context: context,
        );
    },
    child: const Text(
            'Addition Operation',
            style: TextStyle(
            color: Colors.white,
        ),
    ),
),
In the above code snippet, we always need to pass the context to our ViewModel because it is required to show dialogs as needed to complete the task. This approach undermines the essence of the MVVM pattern since our ViewModel depends on the context that must be injected from the view. This is the cleanest way to solve it incorrectly. Another way is to call dialogs all over the place in our view and sleep with our two eyesopen waiting for the next time we need to add features to the code.
To avoid boring you with the wrong approach, let's look at Solution 2, the correct way to use dialogs.
Task Solution 2 - The Correct Approach
Let's see what we can achieve by properly handling dialogs
We want to display/handle dialog directly and independently from the business layer without injecting context from our Views
Our dialog handler should enable us await on dialogs and receive responses returned from dialogs during dismissal.
Dialog handler should allow us auto dismiss a dialog after a Duration
We need to easily mock dialogs in business logic during tests
Dialog handler should provide functionality for nested dialogs.
To achieve all of this, we will use the DialogHandler package to manage all dialogs.
Dialog Handler is flexible to use following these steps
Install the package
Register an instance of the package using
getItshow dialog from anywhere in your app.
You can clone the complete project that implements dialogs using the proper approach by using the link below:
https://github.com/peterewanfo/task_n_examples_dialog_handler.git
Let's breakdown in details how we use it
Add dialog_handler and other packages used in this example project to pubspec.yaml file
dependencies:
  flutter:
    sdk: flutter

  dialog_handler: ^1.0.0

  get_it: ^7.7.0
  auto_route: ^8.2.0
  glass_kit: ^4.0.1
  flutter_svg: ^2.0.10+1
  flutter_screenutil: ^5.9.3
  hooks_riverpod: ^2.5.1
  flutter_hooks: ^0.20.5
Say we maintain the same MVVM code structure as our previous example, on click of Add Operation button in our view, the below operations should be executed.
ElevatedButton(
    style: ElevatedButton.styleFrom(
        backgroundColor: Colors.green,
    ),
    onPressed: () async {
        resultInput.text = await useComputationViewModelRef.additionOperation(
            secondsDelay: int.parse(computationDelayInput.text),
            firstDigit: firstDigit,
            secondDigit: secondDigit,
        );
    },
    child: const Text(
            'Addition Operation',
            style: TextStyle(
            color: Colors.white,
        ),
    ),
),
Notice how we do not need to pass context to the additionOperation function. Before we examine the ComputationViewModel and how the operation is performed and dialogs are displayed, let's first ensure that the instance of DialogHandler is registered as a lazy singleton using getIt.
import 'package:dialog_handler/dialog_handler.dart';
import 'package:get_it/get_it.dart';

import '../presentation/routes/default_app_router.dart';

GetIt locator = GetIt.instance;

Future<void> setupLocator() async {
  /// Register Dialog Handler
  locator.registerLazySingleton<DialogHandler>(
    () => DialogHandler.instance,
  );
}
setupLocator function is called in main.dart
Now, let's quickly head over to computation_viewmodel.dart and see how dialogs are displayed using dialogHandler.
import 'package:dialog_handler/dialog_handler.dart';
import 'package:flutter/material.dart';
import 'package:flutter/widgets.dart';
import 'package:glass_kit/glass_kit.dart';
import 'package:hooks_riverpod/hooks_riverpod.dart';

import '../../utils/locator.dart';
import '../custom_designs/__export__.dart';
import '../custom_designs/progress_dialog_widget.dart';

final computationViewModelRef =
    ChangeNotifierProvider<ComputationViewModel>((ref) {
  return ComputationViewModel(reader: ref);
});

class ComputationViewModel extends ChangeNotifier {

  ComputationViewModel({
    required this.reader,
  });
  late Ref reader;

  Future<String> additionOperation({
    required int secondsDelay,
    required int firstDigit,
    required int secondDigit,
  }) async {
    try {
      /// Show Progress Dialog
      locator<DialogHandler>().showDialog(
        dialogType: DialogType.overlayDialog,
        widget: const ProgressDialogWidget(),
        backgroundWidget: GlassContainer.clearGlass(
          borderWidth: 0,
          blur: 7,
        ),
      );

      /// Perform Operation
      final result = firstDigit + secondDigit;

      await Future.delayed(
        Duration(seconds: secondsDelay),
      );

      /// Dismiss Dialog
      locator<DialogHandler>().dismissDialog();

      /// Return operation result
      return result.toString();
    } catch (e) {
      /// Show Error Dialog
      locator<DialogHandler>().showDialog(
        dialogType: DialogType.overlayDialog,
        animationType: AnimationType.fromTopToPositionThenBounce,
        dialogAlignment: Alignment.topCenter,
        animationDuration: const Duration(milliseconds: 1200),
        animationReverseDuration: const Duration(milliseconds: 550),
        widget: const ErrorDialogWidgetExample(),
        autoDismissalDuration: const Duration(seconds: 2),
      );
      return "error";
    }
  }
}
DialogHandler offers a special method called showDialog that allows us to display different types of dialogs.
In this example, we used DialogType.overlayDialog, There are other types including: pageDialog, bottomSheetDialog and modalDialog
DialogHandler also provides a way to control the animation of your dialog widget using the animationType parameter. animationType can be either fadeFromTopToPosition,fadeFromBottomToPosition, fadeFromLeftToPosition, fadeFromRightToPosition, scaleToPosition, fromRightToPosition, fromLeftToPosition, fromBottomToPosition, fromTopToPosition, fromTopToPositionThenBounce, fromBottomToPositionThenBounce
In our example, we used fromTopToPositionThenBounce to display our error dialog.
DialogHandler expands on Dialog management practices as shared by Daniel Mackier, You can check his article here:
https://medium.com/flutter-community/manager-your-flutter-dialogs-with-a-dialog-manager-1e862529523a
Contribution
If you wish to contribute to this example project, please feel free to submit an issue and/or pull request to the repository below:
https://github.com/peterewanfo/task_n_examples_dialog_handler.git
You can also contribute to dialog_handler library, please feel free to also subit an issue and/or pull request to dialog_handler repository below:
https://github.com/peterewanfo/dialog_handler
Thanks for your time.

Subscribe to my newsletter
Read articles from Peter Ewanfo directly inside your inbox. Subscribe to the newsletter, and don't miss out.
Written by

Peter Ewanfo
Peter Ewanfo
Hey, Welcome to my space. I'm a Software Engineer who loves writing code in Dart/Flutter, SwiftUI and Python. Yes, I can play with Python and it won't bite me.