OTP Verification using Python
 Ashutosh Kumar
Introduction:
In this project, we have made an OTP verification System with Help of various libraries. First of all, we made use of Tkinter for creating the GUI for our project. Next to that, to generate the random Numbers as OTP we used a random module. At last, forgetting and checking the OTP we used an API Twilio.
A random number will be sent to the stated mobile number with the help of the API and then our project will check whether the OTP is valid or not, and thus this will build an OTP Verification Project using Python.
Explanation:
The main objectives that need to be fulfilled while making this projects are:
Creating a GUI for this project
Generating a random number as OTP
Sending the OTP to the stated Mobile number
Checking whether the OTP is valid or not
Resending the OTP
We will work on these objectives step by step to complete this project.
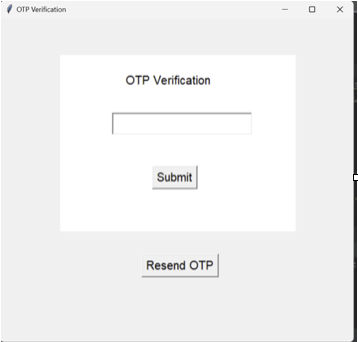
First of all, creating a GUI for our project will make use of the “tkinter” module, from “future. moves” we will import the module. The most major step is to create the instance of the tkinter frame i.e. tk(). This will help to display the window and manage all the components of the tkinter application. In addition to this, with the help of “.title()” & “.geometry()” we will set the title and dimensions for the window. With this, we will also draw the Canvas for OTP Verification with the help of “.canvas()” and by using “.place()” we will provide the dimensions as parameters for placing our canvas.
Source Code:
# Importing the libraries
import twilio.rest
import random
from future.moves import tkinter
from tkinter import messagebox

# Creating Window
root = tkinter.Tk()
root.title("OTP Verification")
root.geometry("600x550")

# Twilio account details
account_sid = ""
auth_token = ""


# resend the OTP
def resendOTP():
    n = random.randint(1000, 9999)
    client = twilio.rest.Client(account_sid, auth_token)
    client.messages.create(to=[""], from_=" ", body=n)


# Checking the OTP
def checkOTP():
    global n
    try:
        user_input = int(user.get(1.0, "end01c"))
        if user_input == n:
            messagebox.showinfo("showinfo", "Login Success")
            n = "done"
        elif n == "done":
            messagebox.showinfo("showinfo", "Already entered")
        else:
            messagebox.showinfo("showinfo", "wrong OTP")
    except:
        messagebox.showinfo("showinfo", "Invalid OTP")


# Drawing the canvas
c = tkinter.Canvas(root, bg="white", width=400, height=300)
c.place(x=100, y=60)

# Label widget
login = tkinter.Label(root, text="OTP Verification", font="bold,20", bg="white")
login.place(x=210, y=90)

# Entry widget
user = tkinter.Text(root, borderwidth=2, wrap="word", width=29, height=2)
user.place(x=190, y=160)

# Sending the otp
n = random.randint(1000, 9999)
client = twilio.rest.Client(account_sid, auth_token)
client.messages.create(to=[""], from_="", body=n)

# Submit button
submit_button = tkinter.Button(root, text="Submit", command=checkOTP(), font=('bold', 15))
submit_button.place(x=258, y=250)

# Resend Button
resend_button = tkinter.Button(root, text="Resend OTP", command=resendOTP(), font=("bold", 15))
resend_button.place(x=240, y=400)

# Event Loop
root.mainloop()
We will create a submit button and resend button with the help of “.Buttons()” to trigger the submit and resend command. With the help of this module, we will create the label widget stating OTP verification and an entry widget to provide space for the user to write.
After doing so we will see that our GUI will get ready for the project. Now, to provide the actual functionality we will use API i.e. Twilio.
In this, firstly we will use the “random. randint()” of the random module to generate the random number which will later be considered as OTP.
The next step is to send the OTP. For this process, firstly you have to make a Twilio account
After this, you will be provided with an account sid and auth token. With the help of “twilio.rest.Client(account sid, auth token)” you will first allow your query to metadata. For sending the message we will use “client. messages.create(to=[“”], from_=” “, body=” “)” . And all of this functionality is stated under UDF resendOTP()
The next step is to check the OTP. For this, firstly we will store the user input and now will run a try and except block in which under the try block we will compare that if user input is the same as the generated random number then a message box will appear stating login successfully and the random number stored variable will get updated. And again if the user entered the same OTP then the message box will say that the user has already logged in and finally when the user will enter the wrong OTP then the message box will throw the message of invalid OTP. The syntax for the message box is “messagebox. showinfo ()”. All of this is covered under UDF checkOTP().
After entering the OTP the user can click the submit button and if he/she wants the OTP again then the one can click on the Resend OTP button. In the end, we will run a mainloop for all the functionalities to get executed.
Output

& all set! 👍🏻
Let's 💌 Connect on 👉🏻 LinkedIn 🌐 Twitter X 🚀 for make a Productive Community. It will cost nothing...
Subscribe to my newsletter
Read articles from Ashutosh Kumar directly inside your inbox. Subscribe to the newsletter, and don't miss out.
Written by

Ashutosh Kumar
Ashutosh Kumar
Creative Full Stack Web Developer & Designer specializing in crafting captivating websites & apps. With a focus on user-centric design, creative development, and effective collaboration, I can elevate brand presence with my design expertise. Till Now I have built 50+ web apps. Most importantly, I'm a reliable designer you can rely on for all your design needs. Currently Building DevDisplay - Paradise For Developers!