Getting Started with Kotlin Multiplatform
 Siro Daves
Table of contents
After addressing the different tools available for cross platform development in my earlier article: Cross-Platform Development in 2024 1/3 I have decided to go forward and share the little I have learnt while exploring the KMP tooling for building cross platform apps. It is going to be an exciting journey for all of us so stay with me it right to the end.
Prerequisites
Before we start, ensure you have the following installed on your development machine:
Android Studio / IntelliJ IDEA (Up to date version)
Xcode (Optional but necessary for iOS development)
Node.js (Optional but necessary for web development)
By default if you install the latest version of Android Studio you should have JDK (Java Development Kit) 8 or higher. I could say the same thing for IntelliJ IDEA.
Project Creation
There are 2 ways of creating a KMP project:
On JetBrains' website
On Your IDE
- Creating your KMP Project from JetBrains' Website
Using your browser navigate to the address https://kmp.jetbrains.com/ and fill in as well as check the boxes appropriately as in the screenshot below before you can be allowed to download the project to your PC.
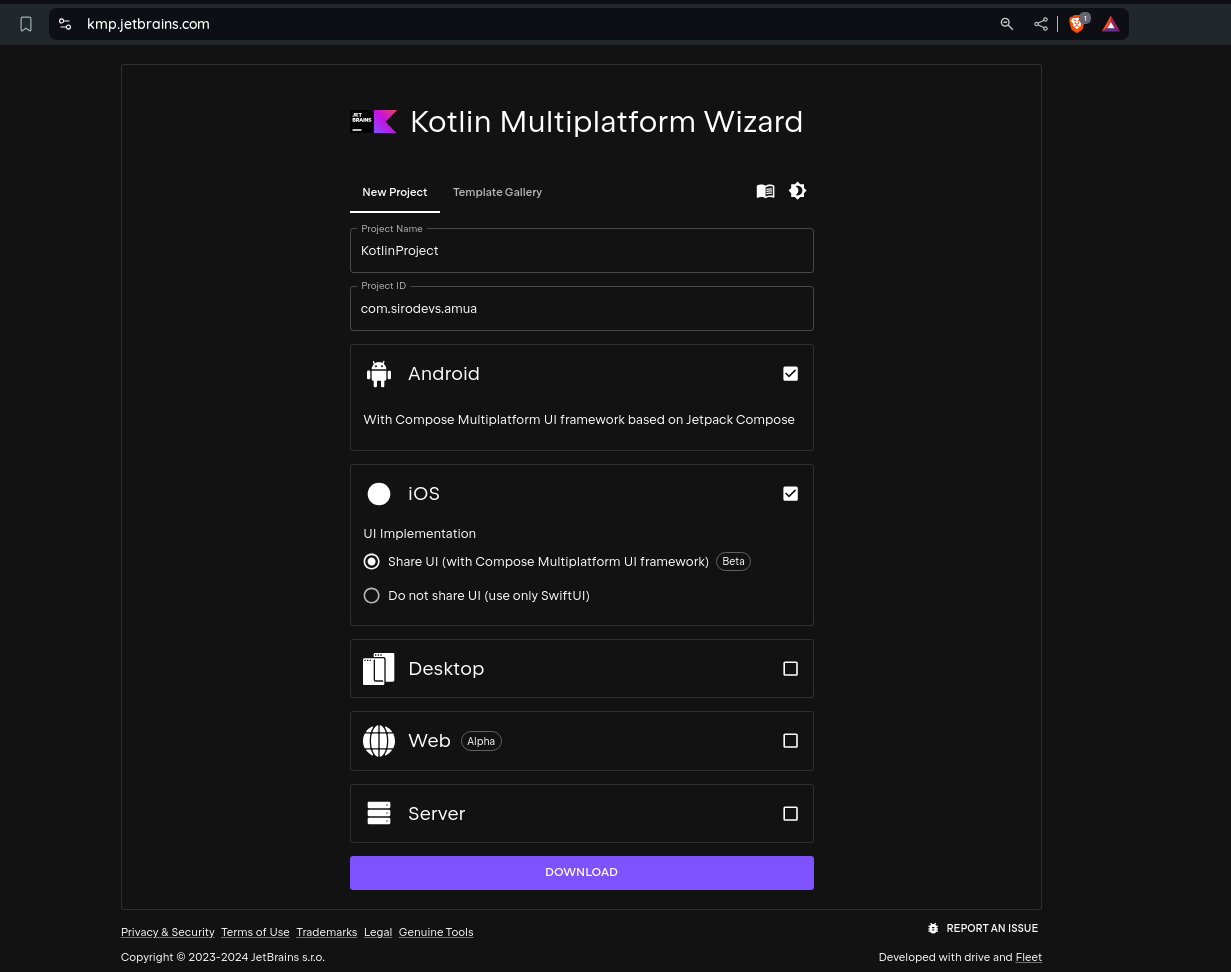
After downloading it, extract to your desired location and from there you should be able to open it from Android Studio which will be our main IDE for this project.
- Creating your KMP Project from Android Studio
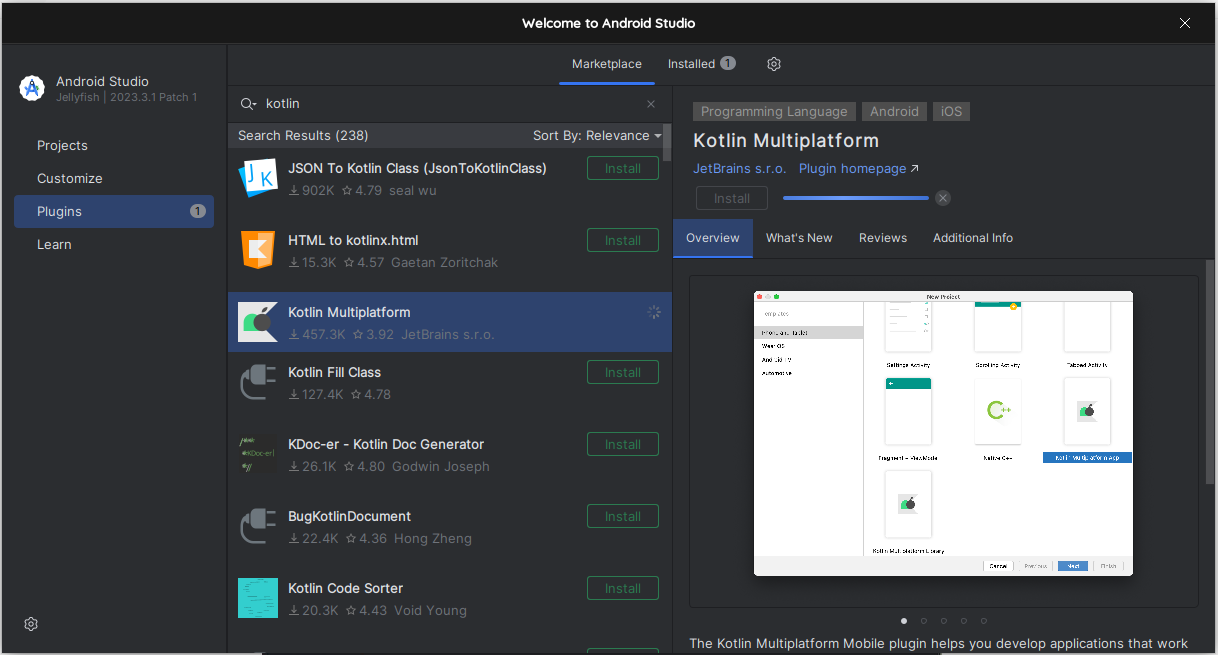
You will first have to install the Kotlin Multiplatform Mobile plugin on Android Studio before proceeding. After you are down installing restart Android Studio.
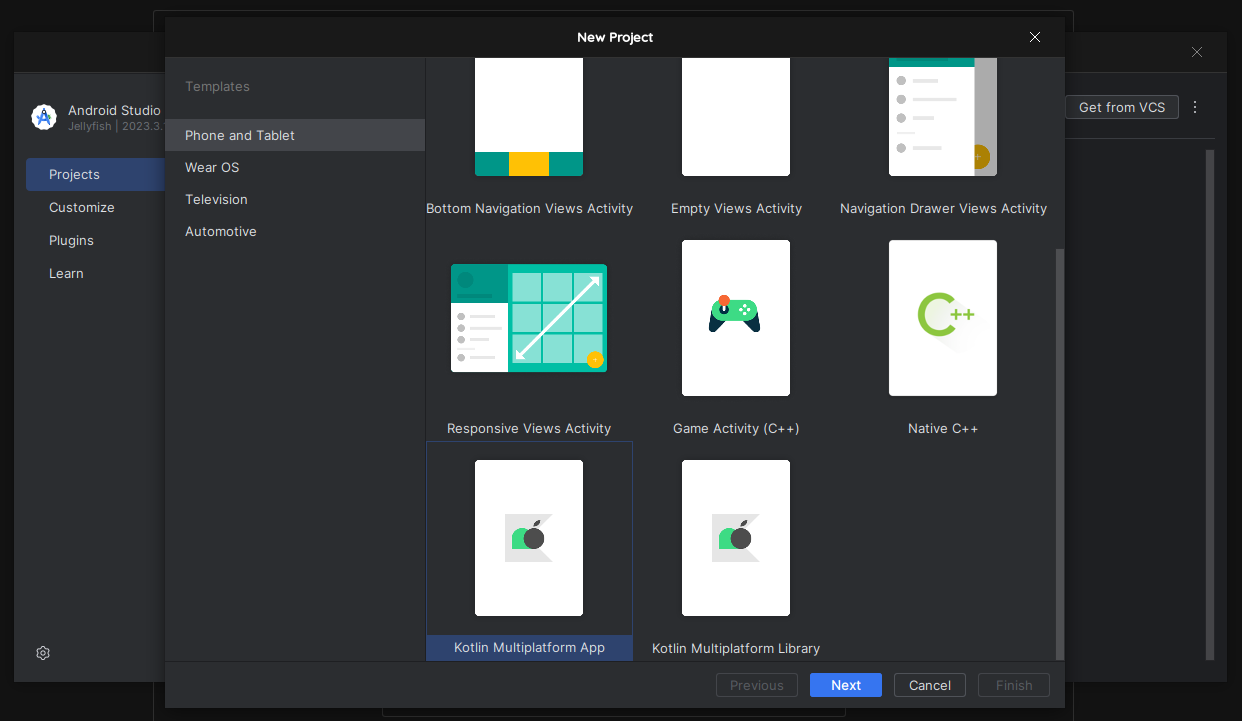
After restarting Android Studi you will find the new project templates based on the plugin you just installed. Select Kotlin Multiplatfrom App and click on next.
Project Structure
A typical Kotlin Multiplatform project structure looks like this:
root
├── commonMain
│   └── kotlin
│       └── common code
├── iosMain
│   └── kotlin
│       └── iOS specific code
├── desktopMain
│   └── kotlin
│       └── desktop specific code
├── jsMain
│   └── kotlin
│       └── web specific code
├── build.gradle.kts
└── settings.gradle.kts
But its worth noting that there is a huge disparity in terms of the project structure created on JetBrains' site and on the IDE.
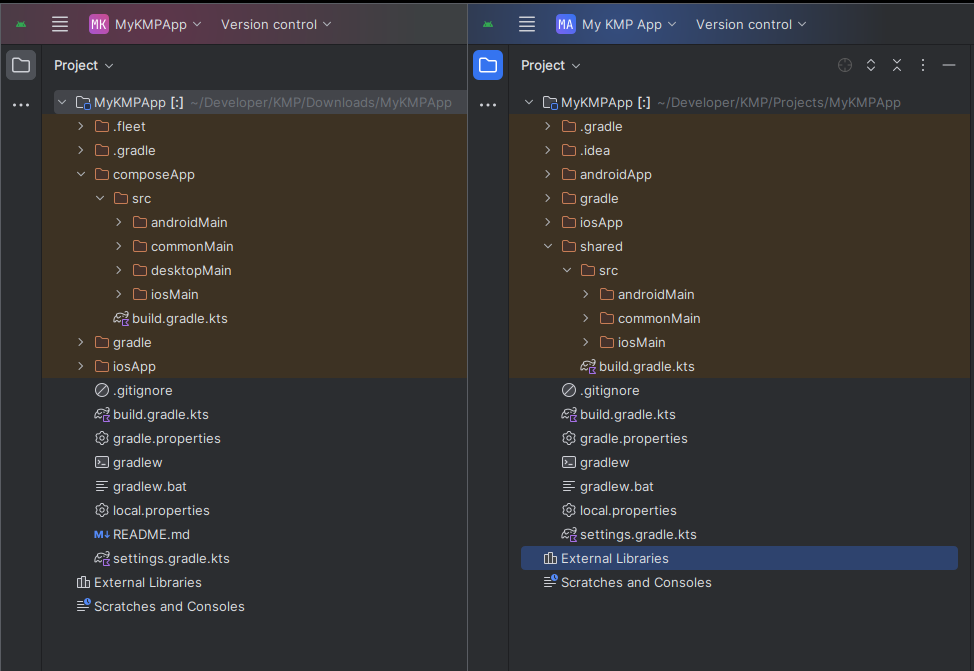
On the left is the project downloaded from JetBrains' site and on the right is one created via Android Studio. My take is the Android Studio plugins is behind what the website plugin offers. You might experience such differences if you clone someone's code and find its different with what you wanted to work with.
Configuring the Build
If you are coming from Android and Kotlin then this current section will be a walk over for you. But if you are new to Android and Kotlin altogether then let's dive into knowing some crucial files that we shall be working with as we work on our Kotlin Multiplatform project.
build.gradle.kts
settings.gradle.ktslibs.versions.toml
- build.gradle.kts
The build.gradle.kts file is the main build configuration file for the project. It is written in Kotlin DSL (Domain Specific Language) and is used to configure the build process, dependencies, plugins, and other settings for your project.
Key Responsibilities:
Plugins Configuration: Specifies which plugins are applied to the project.
Kotlin Multiplatform Configuration: Defines the targets (e.g., JVM, iOS, JS) and source sets for your KMP project.
Dependencies: Declares the libraries and frameworks that your project depends on.
Android Configuration: If your project includes Android, this section specifies Android-specific settings like SDK versions and build types.
You can proceed to open the build.gradle.kts file to configure the build script for your project. Here's a basic example based on my project to get you started:
plugins {
    alias(libs.plugins.kotlinMultiplatform)
    alias(libs.plugins.androidLibrary)
}

kotlin {
    androidTarget {
        compilations.all {
            kotlinOptions {
                jvmTarget = "1.8"
            }
        }
    }

    listOf(
        iosX64(),
        iosArm64(),
        iosSimulatorArm64()
    ).forEach {
        it.binaries.framework {
            baseName = "shared"
            isStatic = true
        }
    }

    sourceSets {
        commonMain.dependencies {
            //put your multiplatform dependencies here
        }
        commonTest.dependencies {
            implementation(libs.kotlin.test)
        }
    }
}

android {
    namespace = "com.sirodevs.mykpmapp"
    compileSdk = 34
    defaultConfig {
        minSdk = 24
    }
    compileOptions {
        sourceCompatibility = JavaVersion.VERSION_1_8
        targetCompatibility = JavaVersion.VERSION_1_8
    }
}
- settings.gradle.kts
The settings.gradle.kts file is used to configure the overall settings of your Gradle build, including defining the project structure and dependency resolution management.
Key Responsibilities:
Project Inclusion: Specifies which projects are included in the build.
Dependency Resolution Management: Configures the version catalogs for managing dependencies.
You can proceed to open the settings.gradle.kts file to configure the build script for your project. Here's a basic example based on my project to get you started:
enableFeaturePreview("TYPESAFE_PROJECT_ACCESSORS")
pluginManagement {
    repositories {
        google()
        gradlePluginPortal()
        mavenCentral()
    }
}

dependencyResolutionManagement {
    repositories {
        google()
        mavenCentral()
    }
}

rootProject.name = "MyKPMApp"
include(":androidApp")
include(":shared")
- libs.versions.toml
The libs.versions.toml file is part of the Gradle Version Catalogs feature, which allows you to centralize and manage the versions of dependencies and plugins in your project.
Key Responsibilities:
Version Management: Defines the versions of dependencies and plugins used in the project.
Libraries and Plugins: Lists the libraries and plugins along with their versions, making it easier to manage and update them.
You can proceed to open the libs.versions.toml file to configure the build script for your project. Here's a basic example based on my project to get you started:
[versions]
agp = "8.5.0"
kotlin = "2.0.0"
compose = "1.5.4"
compose-material3 = "1.1.2"
androidx-activityCompose = "1.8.0"

[libraries]
kotlin-test = { module = "org.jetbrains.kotlin:kotlin-test", version.ref = "kotlin" }
androidx-activity-compose = { module = "androidx.activity:activity-compose", version.ref = "androidx-activityCompose" }
compose-ui = { module = "androidx.compose.ui:ui", version.ref = "compose" }
compose-ui-tooling = { module = "androidx.compose.ui:ui-tooling", version.ref = "compose" }
compose-ui-tooling-preview = { module = "androidx.compose.ui:ui-tooling-preview", version.ref = "compose" }
compose-foundation = { module = "androidx.compose.foundation:foundation", version.ref = "compose" }
compose-material3 = { module = "androidx.compose.material3:material3", version.ref = "compose-material3" }

[plugins]
androidApplication = { id = "com.android.application", version.ref = "agp" }
androidLibrary = { id = "com.android.library", version.ref = "agp" }
kotlinAndroid = { id = "org.jetbrains.kotlin.android", version.ref = "kotlin" }
kotlinMultiplatform = { id = "org.jetbrains.kotlin.multiplatform", version.ref = "kotlin" }
kotlinCocoapods = { id = "org.jetbrains.kotlin.native.cocoapods", version.ref = "kotlin" }
compose-compiler = { id = "org.jetbrains.kotlin.plugin.compose", version.ref = "kotlin" }
How They Affect Your KMP Project
build.gradle.kts: This file is essential for configuring your project’s build process. It defines how your project is built, including which plugins to apply, how to configure Kotlin Multiplatform, and which dependencies to include. Any change in this file directly impacts how your project is compiled and packaged.settings.gradle.kts: This file sets up the structure of your project and manages dependency resolution. It is crucial for defining which subprojects are part of your build and ensuring that all dependencies are correctly resolved using the version catalogs.libs.versions.toml: This file provides a centralized way to manage the versions of dependencies and plugins. It makes it easier to maintain consistency across your project by defining all versions in one place. When you need to update a dependency, you only need to change it here, and it will propagate throughout your project.
Writing Common Code
Common code includes business logic, data models, and other functionalities that can be shared across platforms. Let's create a simple shared function in the commonMain source set:
import androidx.compose.animation.AnimatedVisibility
import androidx.compose.foundation.Image
import androidx.compose.foundation.layout.Column
import androidx.compose.foundation.layout.fillMaxWidth
import androidx.compose.material.Button
import androidx.compose.material.MaterialTheme
import androidx.compose.material.Text
import androidx.compose.runtime.*
import androidx.compose.ui.Alignment
import androidx.compose.ui.Modifier
import org.jetbrains.compose.resources.painterResource
import org.jetbrains.compose.ui.tooling.preview.Preview

import mykmpapp.composeapp.generated.resources.Res
import mykmpapp.composeapp.generated.resources.compose_multiplatform

@Composable
@Preview
fun App() {
    MaterialTheme {
        var showContent by remember { mutableStateOf(false) }
        Column(Modifier.fillMaxWidth(), horizontalAlignment = Alignment.CenterHorizontally) {
            Button(onClick = { showContent = !showContent }) {
                Text("Click me!")
            }
            AnimatedVisibility(showContent) {
                val greeting = remember { Greeting().greet() }
                Column(Modifier.fillMaxWidth(), horizontalAlignment = Alignment.CenterHorizontally) {
                    Image(painterResource(Res.drawable.compose_multiplatform), null)
                    Text("Compose: $greeting")
                }
            }
        }
    }
}

class Greeting {
    private val platform = getPlatform()

    fun greet(): String {
        return "Hello, ${platform.name}!"
    }
}
Platform-Specific Code
In a Kotlin Multiplatform project, you typically have a commonMain source set where you define shared code that can be used across different platforms (Android, iOS, desktop, etc.). The MyKMPApp composable function is already defined in the shared module, allowing it to be reused across multiple platforms.
Android
In Android the MainActivity class, is specific to the Android platform. It is responsible for setting up the Android-specific components and displaying the shared composable UI. The setContent function integrates Jetpack Compose with the Android activity lifecycle, allowing you to use the shared composable function within the Android app.
The preview function AppAndroidPreview is useful for development, as it allows you to see how the composable will render on an Android device without having to run the app. This improves development speed and provides immediate visual feedback.
package com.sirodaves.mykmpapp

import MyKMPApp
import android.os.Bundle
import androidx.activity.ComponentActivity
import androidx.activity.compose.setContent
import androidx.compose.runtime.Composable
import androidx.compose.ui.tooling.preview.Preview

class MainActivity : ComponentActivity() {
    override fun onCreate(savedInstanceState: Bundle?) {
        super.onCreate(savedInstanceState)

        setContent {
            MyKMPApp()
        }
    }
}

@Preview
@Composable
fun AppAndroidPreview() {
    MyKMPApp()
}
iOS
For iOS, Kotlin Multiplatform generates a framework that can be used in Xcode. To use the shared code in your iOS app, do the following:
Open the
iosMainfolder in Android Studio.Write your iOS-specific code in Kotlin.
Configure Xcode to use the generated framework.
Create a Swift file in your iOS project to call the shared code:
import androidx.compose.ui.window.ComposeUIViewController

fun MainViewController() = ComposeUIViewController { MyKMPApp() }
Desktop
For desktop applications, your basic code to get your app running on desktop might look like this:
import androidx.compose.foundation.layout.*
import androidx.compose.ui.*
import androidx.compose.ui.unit.dp
import androidx.compose.ui.window.*

fun main() {
    return application {
        Window(
            onCloseRequest = { exitApplication() },
            title = "My KMP App",
            state = rememberWindowState(
                position = WindowPosition.Aligned(Alignment.Center),
                width = 1200.dp,
                height = 700.dp,
            ),
        ) {
            Box(modifier = Modifier.fillMaxSize(), contentAlignment = Alignment.Center) {
                MyKMPApp()
            }
        }
    }
}
Web
For web applications, Kotlin Multiplatform supports Kotlin/JS. You can use Kotlin/JS with React or other JavaScript frameworks. Here's a basic example using Kotlin/JS:
- Add the dependency in your
build.gradle.kts:
implementation("org.jetbrains.kotlin-wrappers:kotlin-react:17.0.2-pre.208-kotlin-1.5.0")
implementation("org.jetbrains.kotlin-wrappers:kotlin-react-dom:17.0.2-pre.208-kotlin-1.5.0")
- Write your web-specific code in the
jsMainsource set:
import react.dom.render
import kotlinx.browser.document
import react.RBuilder
import react.dom.h1

fun main() {
    render(document.getElementById("root")) {
        MyKMPApp()
    }
}
Running the Application
Running your app on Android and iOS is pretty much easy based on either Android Studio or Xcode respectively. You can get the app to run on a simulator or a real device. Lets focus on getting it to run on a desktop.
To run your KMP Desktop application directly from Android Studio, you need to set up a run configuration.
1. Configure
build.gradle.ktsMake sure your
build.gradle.ktsfile is correctly set up for the desktop target. Here's an example configuration:kotlin { jvm("desktop") { compilations.all { kotlinOptions { jvmTarget = "11" } } } sourceSets { val desktopMain by getting desktopMain.dependencies { implementation(compose.desktop.currentOs) } } } compose.desktop { application { mainClass = "MainKt" nativeDistributions { targetFormats(TargetFormat.Dmg, TargetFormat.Msi, TargetFormat.Deb) packageName = "com.sirodevs.mykmpapp" packageVersion = "1.0.0" } } }2. Set Up Run Configuration in Android Studio
Open Run/Debug Configurations:
Go to
Run>Edit Configurations...from the top menu.
Add a New Configuration:
Click the
+button to add a new configuration.Select
Gradlefrom the list.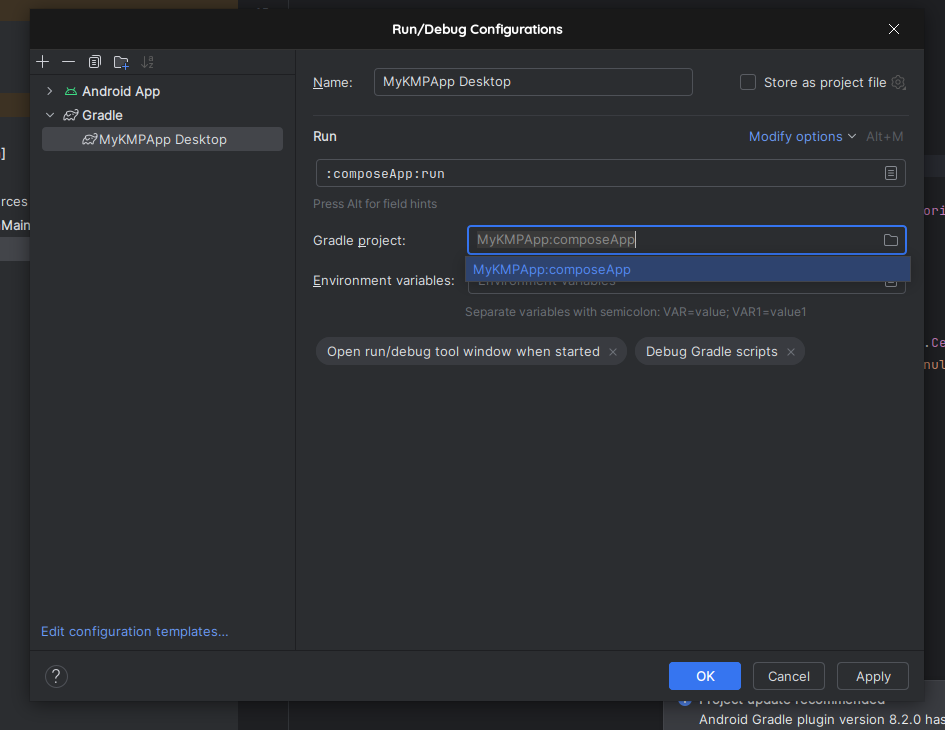
Name: Give your configuration a name, e.g.,
Run Desktop App.Gradle Project: Select your project or root module.
Tasks: Enter
:desktop:run(assuming yourdesktopmodule is nameddesktop).Script Parameters: Leave this blank.
VM Options: Optionally, you can set JVM options if needed.
Working Directory: This should be set to the root directory of your project.
- Apply and Save:
Click
Applyand thenOKto save the configuration.
Conclusion
Kotlin Multiplatform allows you to write code once and run it on multiple platforms, significantly improving productivity and maintaining consistency across different environments. By following the steps outlined in this article, you can create a robust Kotlin Multiplatform application that targets iOS, desktop, and web platforms. As the ecosystem grows, more libraries and tools will become available, making Kotlin Multiplatform an even more powerful choice for cross-platform development.
See you in my next one where I will get into more details of making a Droidcon Ke App with KMP!
Subscribe to my newsletter
Read articles from Siro Daves directly inside your inbox. Subscribe to the newsletter, and don't miss out.
Written by

Siro Daves
Siro Daves
Software engineer and a Technical Writer, Best at Flutter mobile app development, full stack development with Mern. Other areas are like Android, Kotlin, .Net and Qt