Revolutionizing Server Management with Ansible
 Anurag Kumar
In the early days of system administration, handling upgrades, security patches, and software installations was often a manual and tedious task. To make life easier, shell scripts were created, serving as powerful tools that allowed administrators to automate these processes. These scripts were a huge step forward, enabling efficient management of hundreds of servers with minimal effort.
As cloud computing and microservice architectures began to take hold, the number of servers increased, and managing them became complex. The simple shell scripts that once handled everything smoothly now faced new challenges in this expanded landscape.
This transformation led to a new age of automation, where system administrators needed to create more advanced and scalable solutions to meet the needs of modern infrastructure.
Simple scripts were no longer enough to manage the growing number of servers. Instead, they needed better tools and methods to handle the complexity and changes in cloud environments, ensuring everything ran smoothly and efficiently.
The Challenge with Traditional Shell Scripts
Initially, system administrators had to manage a variety of operating systems across their server environments. Each server could be running a different distribution, such as Alpine, Ubuntu, CentOS, or Debian, each with its own unique characteristics.
This diversity created a significant challenge. A shell script designed to perform a task on one distribution might rely on specific commands, file paths, or system behaviors that were not present or behaved differently on another distribution. For instance, a script that worked flawlessly on Ubuntu might fail on Alpine because certain packages were named differently or because the default shell behaved in an unexpected way.
These inconsistencies made it difficult to achieve a uniform and reliable server management process. System administrators had to constantly tweak and adapt their scripts to account for these differences, often resulting in a complex and error-prone codebase. Ensuring that every script worked seamlessly across all environments required extensive testing and maintenance, which consumed valuable time and resources.
This diversity often meant that a script working on one distribution might fail on another. This was a significant hurdle in ensuring consistent and reliable server management.
Configuration Management Tools
To address these challenges, configuration management tools like Puppet, Chef, and Ansible came into the picture. These tools revolutionized the way servers were managed, bringing in consistency, reliability, and scalability. Among these, Ansible has gained significant popularity. But why choose Ansible over others?
Why Ansible?
Push Mechanism Model
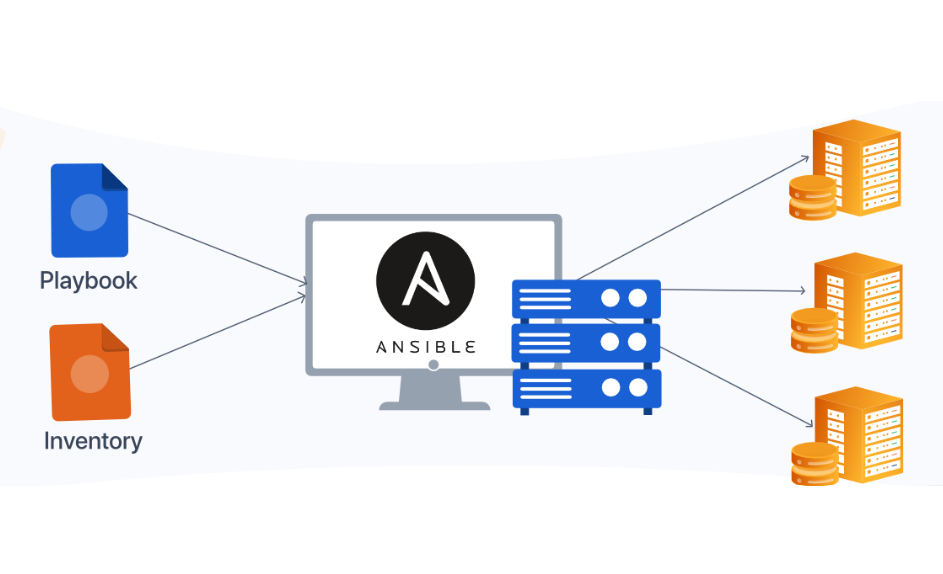
Ansible operates on a push mechanism model.
This means you can write an Ansible script on a single instance and push updates to all the worker nodes from there. This centralized approach simplifies management and reduces the risk of errors.
Agentless Architecture
One of Ansible's standout features is its agentless architecture. You don't need to install any additional software on the managed servers.
Just include the DNS or IP addresses of your servers in the inventory file, ensure SSH password-less authentication is configured, and have Python 3 installed (which is standard in most Linux distributions).
Dynamic Inventory
In cloud environments like AWS, where servers can be created and destroyed dynamically, Ansible's dynamic inventory feature is invaluable.
It can automatically detect new servers, ensuring they are immediately managed and configured according to your scripts.
Cross-Platform Support
Ansible supports various operating systems, including Windows, AIX, and all Linux distributions. This cross-platform capability makes it a versatile tool for diverse IT environments.
Simplicity and Readability
Ansible scripts are written in YAML, a human-readable data serialization standard.
This simplicity makes Ansible accessible even to those who may not have a deep programming background, enabling more team members to contribute to and manage automation tasks.
Independent of Cloud Provider
Ansible's functionality is largely independent of which cloud provider is being used. What truly matters for Ansible to work effectively is whether it has access to the target machines. Specifically:
Public Accessibility: The target machines need to be accessible over the network.
This usually means that the machines should be either publicly accessible or reachable via a private network that Ansible can connect to.
SSH or WindowsRM Access: For Linux-based systems, Ansible relies on SSH (Secure Shell) for communication.
The target machines must have SSH enabled and configured to allow Ansible to connect and execute commands.
For Windows systems, Ansible uses Windows Remote Management (WinRM). The target Windows machines must have WinRM enabled and properly configured to facilitate communication and management.
In this blog, we will focus on using Ansible with a Linux machine to gain hands-on experience. If your current setup involves a different type of machine, you can easily create and access Linux-based EC2 instances on AWS by following these steps: Click here for instructions.
Once you have set up and accessed your EC2 instance, follow the instructions below to proceed:
Creating and Setting Up Servers
In this guide, we'll walk through the process of setting up Ansible in a practical scenario. We will:
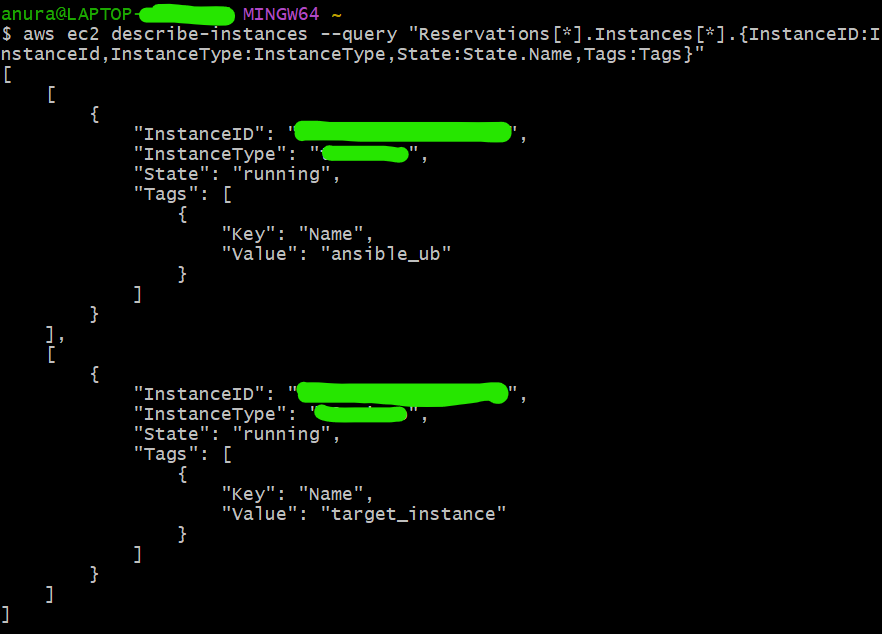
Create a Server(ansible_ub): Begin by provisioning a Linux server (for example, an EC2 instance on AWS). Set Up Ansible install and configure Ansible on this server.
Prepare a Target Server(target_instance): Provision another server to be managed by Ansible.

This setup will allow us to demonstrate how to use Ansible to automate tasks and manage configurations across multiple servers.
Setting up ansible on the "ansible_ub" server
sudo apt update
sudo apt install ansible
Configuring Passwordless Authentication Between Instances
To establish passwordless authentication between two instances within the same VPC, we'll use the private key of the target_instance. This guide assumes both instances are running Ubuntu.
Generate SSH Key Pair on
ansible_ubInstance:First, log in to the
ansible_ubEC2 instance. Then, generate an SSH key pair by running the following command:ssh-keygen -t rsa -b 4096 -f ~/.ssh/id_rsaThis command creates the following files:
Private Key:
~/.ssh/id_rsaPublic Key:
~/.ssh/id_rsa.pub
Prepare the Public Key for Target Instance:
Next, we need to copy the contents of the public key (
id_rsa.pub) to theauthorized_keysfile of thetarget_instance. This file determines which public keys are allowed to access the instance.cat ~/.ssh/id_rsa.pubCopy the output of the above command.
Log in to the
target_instance:Use the existing method to access the
target_instance. This could be through an initial SSH key or password that is already set up.Paste the content of the private key in the
authorized_keysof the target_instance and save it.vim /home/ubuntu/.ssh/authorized_keysThen log in from the
ansible_ubto thetarget_instance, by the following command:ssh <private_ip target_instance>And you'll be logged in password-less authentication way.
Ansible ad-hoc commands
Ansible ad-hoc commands are one-off commands used to perform quick tasks on remote servers without the need to write a full playbook. These commands are useful for simple operations like restarting a service, copying files, or checking the status of a system. They provide a way to execute Ansible modules directly from the command line.
Syntax
The basic syntax for an Ansible ad-hoc command is:
ansible <host-pattern> -m <module> -a "<module arguments>" [-i inventory] [other options]
Components
<host-pattern>: Specifies the target hosts or group of hosts.-m <module>: Specifies the Ansible module to be used.-a "<module arguments>": Provides the arguments required by the module.-i inventory: Specifies the inventory file (if not using the default).[other options]: Additional options like becoming a superuser (-b), defining extra variables, etc.
Examples
Ping All Hosts:
This command uses the
pingmodule to check the connectivity to all hosts in the inventory.ansible all -m pingInstall a Package:
This command uses the
aptmodule to install thegitpackage on hosts in thewebserversgroup.ansible webservers -m apt -a "name=git state=present" -bRestart a Service:
This command uses the
servicemodule to restart the Apache service on hosts in thewebserversgroup.ansible webservers -m service -a "name=apache2 state=restarted" -b
Using Inventory
By default, Ansible uses /etc/ansible/hosts as the inventory file. You can specify a different inventory file using the -i option:
inventory file -> File contains the IP address of the target servers.
Example
ansible -i /path/to/inventory all -m "shell" -a "touch file1"
In the place of touch file1 we can provide any command to execute it.
We can store the inventory file at any location. By default in Ubuntu it stored on a particular location /etc/ansible/hosts.
Whenever we write playbooks or ad-hoc commands, the inventory file is stored in the same location.
Becoming a Superuser
Many tasks require elevated privileges. You can use the -b option to become a superuser (similar to sudo):
ansible webservers -m apt -a "name=git state=present" -b

If you ever come across the above meme, it will delete all the files in all the servers as it has superuser permission(-b) for all files.😅
Running Ad-Hoc Commands on Specific Hosts
You can target specific hosts by their names :
ansible webserver1 -m ping
By patterns of the specific hosts by their names:
ansible "webserver[1:3]" -m ping
Ansible Playbooks
Just as we write scripts in shell scripting and call those files shell scripts, or write code in Python and call those files Python scripts, in Ansible, we write configuration and automation code in YAML format and refer to those files as playbooks.
Ansible playbooks serve as the primary means of defining and executing tasks to automate the configuration, deployment, and management of systems. Playbooks are the heart of Ansible's automation, enabling users to orchestrate the configuration, deployment, and management of systems in a repeatable and efficient manner.
Ansible Playbooks -> Collection of ansible ad hoc commands in the yaml file in a certain structure
Example Playbook
---
- name: Example Playbook
  hosts: webservers
  become: yes
  vars:
    http_port: 80
  tasks:
    - name: Ensure Apache is installed
      apt:
        name: apache2
        state: present

    - name: Ensure Apache is running
      service:
        name: apache2
        state: started

    - name: Copy the Apache config file
      template:
        src: /path/to/httpd.conf.j2
        dest: /etc/apache2/httpd.conf
        owner: root
        group: root
        mode: '0644'

    - name: Ensure the firewall is allowing HTTP traffic
      ufw:
        rule: allow
        name: 'Apache'
        port: "{{ http_port }}"
        proto: tcp
Components of a Playbook
Playbook Header (
---):- The three dashes at the beginning of the file indicate the start of the YAML document.
Play:
- A play is a list item (indicated by
-) that contains several key components such asname,hosts,become,vars, andtasks.
- A play is a list item (indicated by
Name:
- The
nameattribute is a human-readable identifier for the play.
- The
Hosts:
- The
hostsattribute specifies the target hosts or groups of hosts on which the play should run.
- The
State:
present: Ensures the package is installed.absent: Ensures the package is not installed.
Become:
- The
becomeattribute, when set toyes, allows tasks to run with elevated privileges (e.g., as the root user).
- The
Vars:
- The
varssection defines variables that can be used within the playbook.
- The
Tasks:
- The
taskssection is a list of actions to perform on the specified hosts. Each task is a dictionary containing at least two keys:nameand the module to execute.
- The
Commonly Used Modules
apt/yum: Manages packages on Debian-based/Red Hat-based systems.
service: Manages services.
copy: Copies files to remote locations.
template: Manages files using Jinja2 templates.
ufw: Manages firewall rules on systems using UFW.
Execution of the Ansible Playbook
ansible-playbook -i inventory dummy-playbook.yaml
If you want to see how Ansible is executing all the commands step by step in a more detailed way, you can just use the -v flag which will log detailed logs of executing commands in debug mode.
We can add more v's if we want more verbose output.
ansible-playbook -vv -i inventory dummy-playbook.yaml
Ad-Hoc Commands vs. Playbooks
Ad-Hoc Commands:
Quick, one-time tasks
Syntax Example: Run directly from the command line
  ansible all -m apt -a "name=nginx state=present" -b
  ansible all -m service -a "name=nginx state=started enabled=yes" -b
Now you'll see how the same command is written in the Ansible playbook.
Playbooks:
Purpose: Complex, reusable automation tasks
Syntax Example: Defined in YAML files
  ---
  - name: Install and configure nginx
    hosts: all
    become: yes
    tasks:
      - name: Install nginx
        apt:
          name: nginx
          state: present

      - name: Ensure nginx is running
        service:
          name: nginx
          state: started
          enabled: yes
Ad-hoc commands are useful for quick and simple tasks, while playbooks offer a more powerful, flexible, and maintainable way to automate complex workflows and ensure consistency across multiple runs.
You might be thinking that these commands are too lengthy and difficult to learn, no worries we shouldn't need to remember these, whenever we require any command to execute we can go through this Ansible Documentation Click me.
Grouping Servers in Ansible Inventory
In Ansible, you can group servers in the inventory file to organize and manage them more effectively. Here's an example of how to define groups in the inventory file:
inventory
[dbservers]
172.31.62.28
172.31.64.28

[webservers]
172.31.62.101
172.31.62.105
Executing Commands on Grouped Servers
To execute commands on specific groups of servers, use the following syntax:
ansible -i inventory groupName -m shell -a "df"
Here groupName can be webservers, or dbservers.
On executing the following command ansible goes in the inventory file and then it finds out on which of the IP it have to execute the certain commands.
Ansible Role
An Ansible role is a pre-defined set of tasks and configurations that can be applied to a host or a group of hosts. Roles allow you to:
Organize: Break down playbooks into reusable components.
Reuse: Share and reuse common configurations across different playbooks.
Distribute: Easily distribute roles across different environments or teams.
Creating and Managing Roles
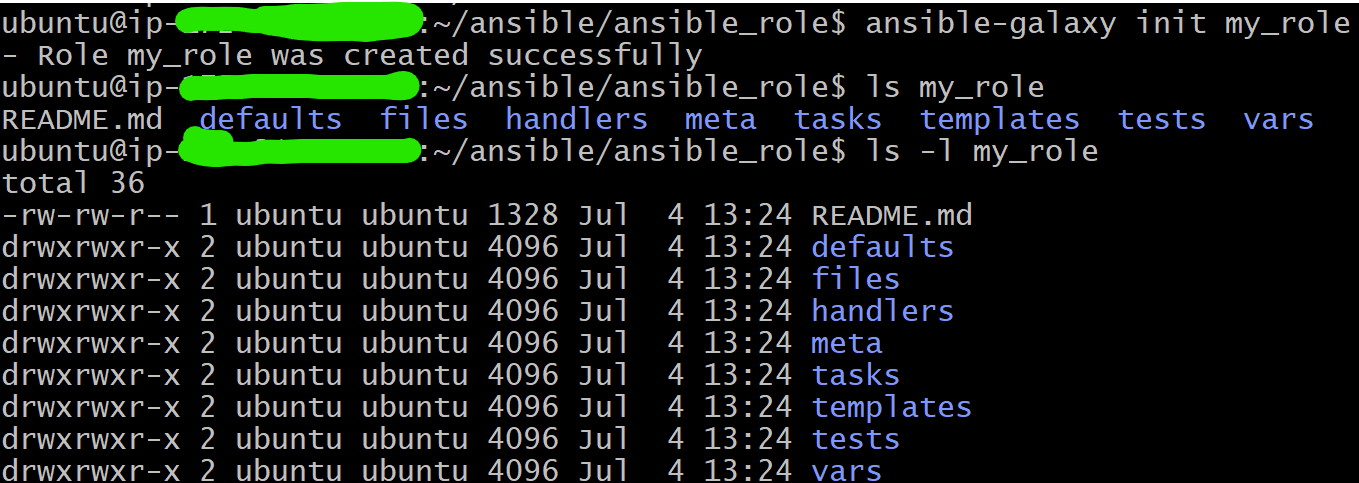
You can create a role manually using the directory structure or use the ansible-galaxy command to generate a role skeleton:
ansible-galaxy init my_role
This command creates the necessary directory structure and sample files for a new role.

Structure of an Ansible Role
An Ansible role is typically organized into a directory structure with several standard subdirectories and files. Here’s a basic layout:
roles/
  my_role/
    defaults/
      main.yml
    files/
    handlers/
      main.yml
    meta/
      main.yml
    tasks/
      main.yml
    templates/
    vars/
      main.yml
Key Directories and Files
defaults/:Contains default variables for the role.
File:
main.ymlExample:
  # roles/my_role/defaults/main.yml
  ---
  some_variable: "default_value"
files/:Contains files that can be copied to remote hosts.
Example:
config_file.conf
handlers/:Contains handlers that are called by other tasks (e.g., to restart services).
File:
main.ymlExample:
  # roles/my_role/handlers/main.yml
  ---
  - name: Restart service
    service:
      name: my_service
      state: restarted
meta/:Contains metadata about the role, including dependencies.
File:
main.ymlExample:
  # roles/my_role/meta/main.yml
  ---
  dependencies:
    - { role: another_role }
tasks/:Contains the main tasks for the role.
File:
main.ymlExample:
  # roles/my_role/tasks/main.yml
  ---
  - name: Install package
    apt:
      name: my_package
      state: present

  - name: Ensure service is running
    service:
      name: my_service
      state: started
templates/:Contains Jinja2 templates that can be used to generate configuration files dynamically.
Example:
config.j2
vars/:Contains variables specific to the role that override defaults.
File:
main.ymlExample:
  # roles/my_role/vars/main.yml
  ---
  some_variable: "specific_value"
Using Roles in a Playbook
To use a role in a playbook, you can reference it in the roles section of your playbook. Here’s an example:
---
- name: Apply My Role
  hosts: all
  become: yes
  roles:
    - my_role
To wrap things up, Ansible is a game-changer for configuration management and automation. Whether you're just starting out or you're a seasoned pro, its simplicity, flexibility, and powerful features make it a must-have tool in your DevOps toolkit. By leveraging Ansible's capabilities, you can streamline your workflows, reduce manual tasks, and improve the overall efficiency of your infrastructure management. Keep exploring, experimenting, and harnessing the full potential of Ansible to transform the way you work.
If you like this blog, please do like it.
Check out my Portfolio website for connecting with me or just to say Hi !!.
Happy automating!
Subscribe to my newsletter
Read articles from Anurag Kumar directly inside your inbox. Subscribe to the newsletter, and don't miss out.
Written by

Anurag Kumar
Anurag Kumar
Hi, I’m Anurag Kumar, a Software Engineer who loves exploring the latest technologies and sharing insights to help others grow. With a focus on web development and DevOps, I enjoy writing about practical tips, emerging trends, and tools that make developers' lives easier. My goal is to keep my blogs simple, engaging, and useful for everyone—whether you're just starting out or looking to level up your skills. Follow me for friendly and accessible content that bridges the gap between learning and doing! Connect me on twitter : https://x.com/AnuragS41695054