No JavaScript, No Problem! Building Web Apps with HTMX and Go
 DonvitoCodes
Table of contents

In this tutorial, we'll dive into using HTMX with Go to create a simple dynamic web application without the need for JavaScript. Our example will focus on a translation service application, demonstrating how to leverage HTMX to make API calls to a Go backend application.
What is HTMX?
HTMX is a modern JavaScript library that extends HTML through attributes, allowing you to define behaviour directly in your html. This can simplify the process of adding interactivity to your web pages, making it an excellent tool for developers looking to enhance their applications with minimal fuss.
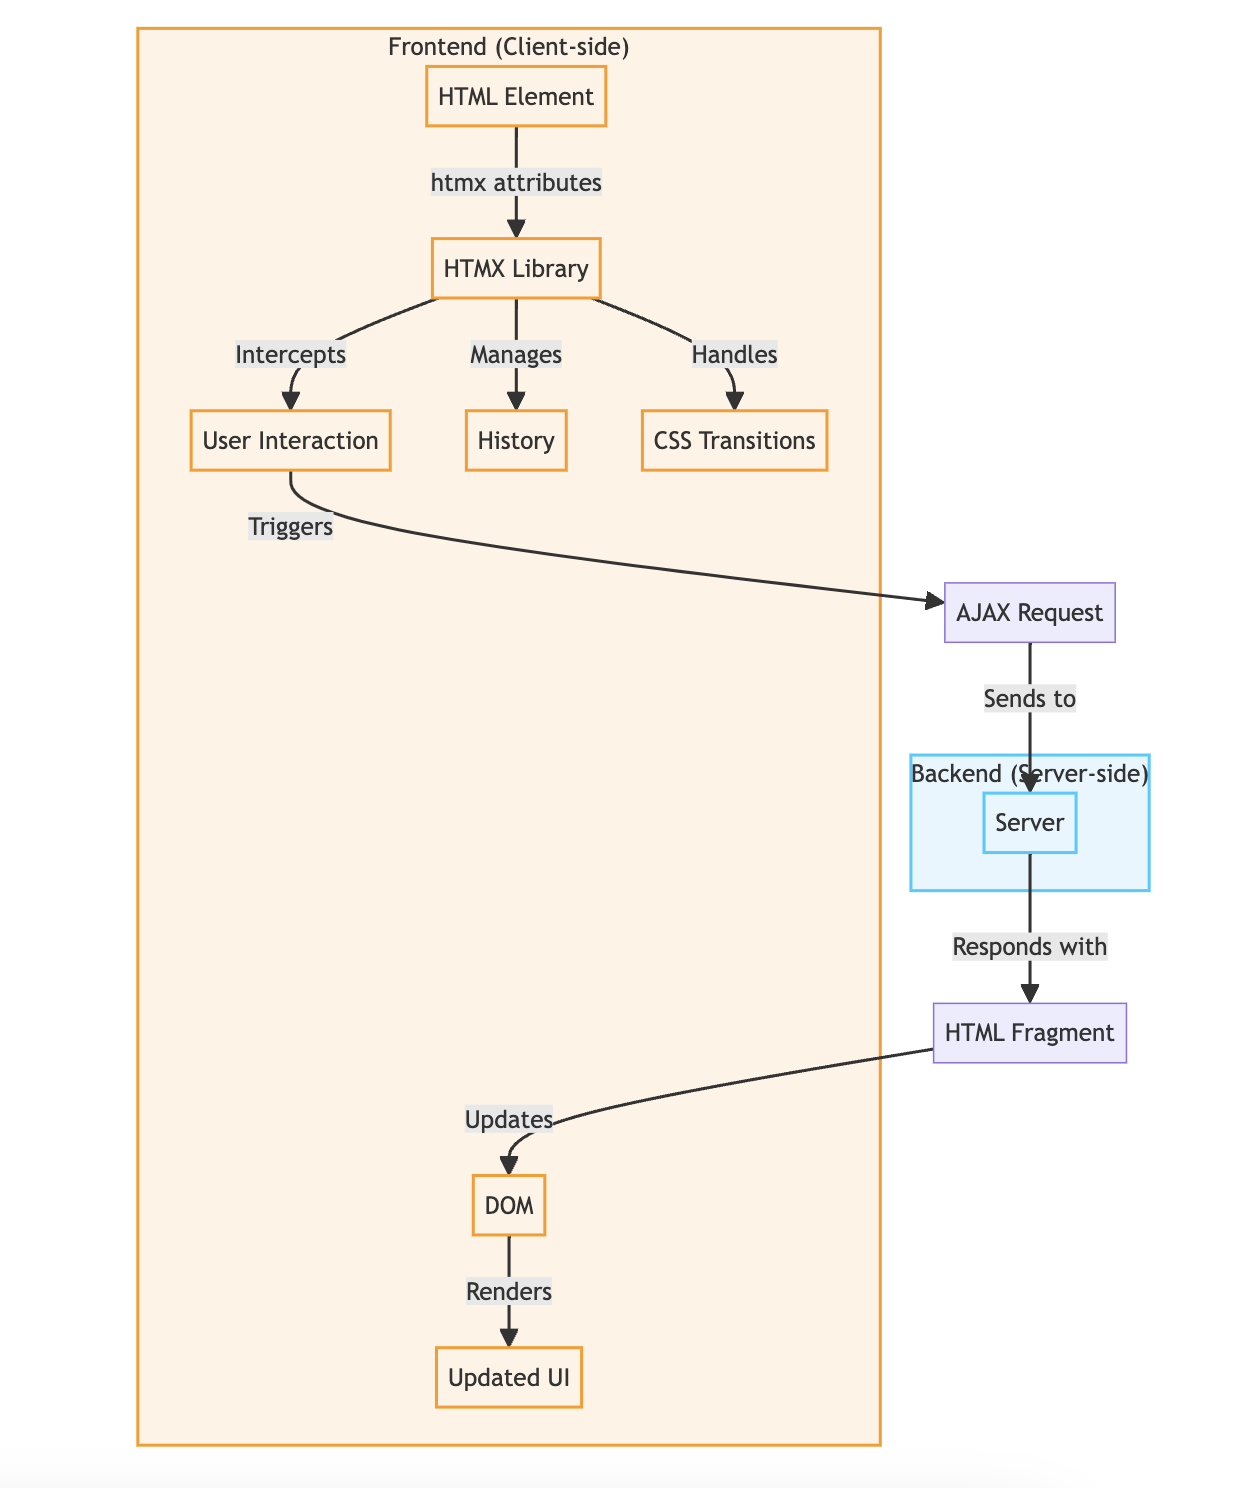
Here's a diagram generated by Claude AI to show how HTMX works.

While HTMX provides significant benefits in terms of performance, rapid prototyping, and enhanced user experience, it may not be suitable for all projects. Complex, large-scale applications might still benefit from more comprehensive frameworks. However, for many web applications that prioritize simplicity, performance, and rapid development, HTMX offers a great alternative to traditional JavaScript-heavy implementations.
How to use HTMX
In this example, we have 3 main files index.html, translate.html and main.go
index.html
This file contains the clients side code which has a form which submits to a /translate API endpoint.
<html lang="en">
    <head>
        <title>HTMX + Go Example</title>
    </head>
    <body>
        <script src="https://unpkg.com/htmx.org@2.0.0"></script>
        <div class="container">
            <h2>HTMX + Go</h2>
            <p>This simple example calls an LLM using Groq Completion API for the translation.</p>
        <form hx-post="/translate" hx-target="#translated-text" hx-swap="replace">
            <label for="text-to-translate">Enter text to translate</label><br/>
            <textarea id="text-to-translate" name="textToTranslate" rows="10" cols="50"></textarea>
            <br/><br/>
            <label for="translate-form"></label>
            <select id="translate-form" name="languageToTranslateTo">
                <option value="english">English</option>
                <option value="tagalog">Tagalog</option>
                <option value="french">French</option>
                <option value="korean">Korean</option>
                <option value="japanese">Japanese</option>
            </select><br/><br/>
            <button type="submit">Submit</button>
        </form>
        <div id="translated-text"></div>
        </div>
    </body>
</html>
HTMX Integration
<script src="https://unpkg.com/htmx.org@2.0.0"></script>
This line imports the HTMX library from a CDN. HTMX is a library that allows you to access AJAX, CSS Transitions, WebSockets, and Server Sent Events directly in HTML, without writing JavaScript.
The Form
<form hx-post="/translate" hx-target="#translated-text" hx-swap="replace">
This form uses HTMX attributes:
hx-post="/translate": When submitted, it will make a POST request to the "/translate" endpoint.hx-target="#translated-text": The response will be inserted into the element with id "translated-text".hx-swap="replace": The response will replace the content of the target element.
main.go
func main() {

    // Set up the http handlers
    http.HandleFunc("/", handleHome)
    http.HandleFunc("/translate", handleTranslate)

    // Start the server
    err := http.ListenAndServe(":8080", nil)
    if err != nil {
       return
    }

}
This handleHome() function will serve index.html. This is the entrypoint of our web server which renders the html form with htmx enabled. This code is ready if you want to load data into htmx. I'll show that in a different example so we don't complicate it right now. For this example, we just want to show how we can submit a form and update the UI dynamically using the response of the API.
func handleHome(w http.ResponseWriter, r *http.Request) {
    tmpl := template.Must(template.ParseFiles("index.html"))

    err := tmpl.Execute(w, nil)
    if err != nil {
        return
    }
}
The handleTranslate() function handles the form submission. It writes translation.html into the response.
func handleTranslate(w http.ResponseWriter, r *http.Request) {
    textToTranslate := r.FormValue("textToTranslate")
    languageToTranslateTo := r.FormValue("languageToTranslateTo")
    translatedText := translateText(textToTranslate, languageToTranslateTo)

    type Translation struct {
        TextToTranslate string
        TranslatedText  string
    }

    t := Translation{
        TextToTranslate: textToTranslate,
        TranslatedText:  translatedText,
    }

    tmpl := template.Must(template.ParseFiles("translation.html"))
    err := tmpl.Execute(w, t)
    if err != nil {
        return
    }

}
Before sending the response back, it adds the translated text into the template.
t := Translation{
    TextToTranslate: textToTranslate,
    TranslatedText:  translatedText,
}
tmpl := template.Must(template.ParseFiles("translation.html"))
err := tmpl.Execute(w, t)
translation.html looks like this
<div id="translated-text" class="translated-text">
    {{.TranslatedText}}
</div>
So what is happening?
The form submission calls the endpoint /translate
The Go API processes the request and retrieves the form values textToTranslate and languageToTranslateTo
After retrieving it, the flow calls the translation function using the Groq client to translate the text from the user.
It gets the response and populates the Translation struct named t.
Then, it populates the translation.html template using the struct. Basically tmpl.Execute() will get the values from the struct and and update the template. tmpl.Execute() will also save the response to w http.ResponseWriter
The response will then be received by the client and processed by HTMX. HTMX will update the UI.
hx-target="#translated-text": The response will be inserted into the element with id "translated-text".hx-swap="replace": The response will replace the content of the target element.Here's the reference to the list of supported HTMX attributes you can use
All of these actions, which would traditionally require custom JavaScript, are accomplished using just HTML attributes. This approach can significantly simplify your front-end code, reduce the amount of JavaScript you need to write and maintain, and make your application more accessible and easier to understand.
You can go through the entire example in my Github repo. Don't forget to leave a ⭐
If you're interested in learning more about developing with Go, subscribe to my blog for more tutorials and sample code. You can also follow me in Twitter.
Subscribe to my newsletter
Read articles from DonvitoCodes directly inside your inbox. Subscribe to the newsletter, and don't miss out.
Written by

DonvitoCodes
DonvitoCodes
I decided to take a career break and try out building apps using Generative AI. I am also learning NextJS and developing LaunchStack, starter code which I will use for my web projects