Mastering Git Bash: Creating and Pushing Your First Index File to GitHub
 Rabiatu Mohammed
Table of contents

Hello there! If you're looking to get a handle on Git Bash and GitHub, you're in the right place. In this guide, I'll take you through the process of setting up a Git repository, creating an Index file, and pushing your changes to GitHub. This is perfect for both beginners and those who want a quick refresher on using Git and GitHub effectively.
Cloning a Git Repository
First, let's clone your repository using the git clone command. Here’s what the terminal output should look like when the process completes successfully.

The ls command in Git Bash on you Windows system to see what's in you current directory. Your directory might look something like this

- Configuring Git User Details
Now, let’s set up Git with your user details. Input the following commands:

This command sets your Git username.

And this sets your email. These steps ensure that all your commits are linked to your name and email.

- Navigate and Explore Your Repository
a) First, change into the LearnCloudApp directory by using the cd command: cd LearnCloudApp/
b) List all files, including hidden ones, in the LearnCloudApp directory to see what's inside. Use the ls -a command: ls -a This shows all files and directories, including the hidden .git directory and a README.md file.
c) To see the contents of the .git directory, use the ls .git command: sh ls .git This command lists all the configuration files and metadata stored in the .git directory, which includes HEAD, config, hooks, info, objects, refs, and more.
d) Finally, navigate back to the previous directory by using the cd .. command: cd ..

This sequence helps you navigate through your directories and inspect the contents of your repository.
- Create Your Folder/Directory
a) To create your directory, input the command mkdir, leave a space, and give it a name. The mkdir command stands for "make directory". For example: mkdir learnazure
b) Next, input the command cd (your directory) and press enter to open your directory. In this case, it would be: cd learnazure
These steps will create a new directory named learnazure and navigate into it.

- Initialize Your Git Repository
a) Now, to initialize a new Git repository in your current directory, input the command git init and press enter.

- Create and Edit an HTML File
b) To create a new file named index.html in your directory, use the touch command: touch index.html.
c) Next, open the index.html file in the vi editor by entering the following command: vi index.html

d) To continue with your commands, press the Esc button on your keyboard.
e) To save the index.html file and exit the vi editor, input :wq and press enter.

f) To view your code, input the command cat <file name>

- Adding a Remote Repository
a) To link your local repository to a remote repository on GitHub, use the git remote add command followed by the name you want to give the remote (commonly origin) and the URL of the remote repository.

This command sets up a remote repository called origin that points to the specified GitHub URL. This will allow you to push and pull changes between your local repository and the remote repository on GitHub.
Adding and Checking Your Files
b) To add the file, input the following command and press enter: git add index.html
c) To check if the file has been added, type: git status From the information provided, we can see that the new file has been added and can be tracked.

d) To create a new commit in your Git repository with a commit message, input the following command and press enter: git commit -m "my first commit message

Checking Status and Pushing to GitHub
e) You can check the status by inputting the git status command.
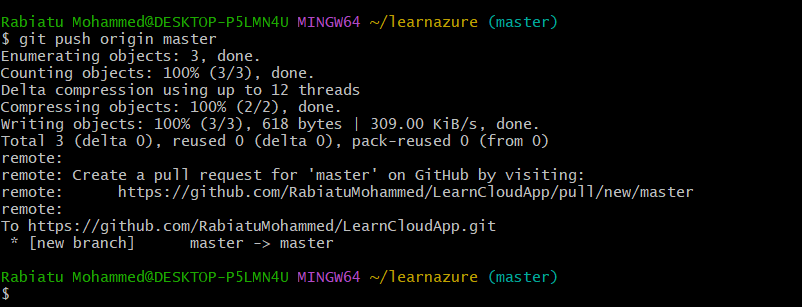
f) The next stage is to input the command git push origin master and press enter.

After executing the push command, Git will upload your local commits to the GitHub repository in your master branch as shown in the generated command output.

When you return to your repository's code page, you'll notice that the default branch is set to main.
To view your index.html file, click on the branch selector and choose the master branch


You can see the index.html file and our commit message displayed here.


The content of the file is shown in the annotated capture below.

Well done! You've successfully navigated through the essential steps of using Git and GitHub. From cloning your repository to making and pushing changes, you've taken solid steps toward mastering version control and collaborative development.
Subscribe to my newsletter
Read articles from Rabiatu Mohammed directly inside your inbox. Subscribe to the newsletter, and don't miss out.
Written by

Rabiatu Mohammed
Rabiatu Mohammed
I work on securing, automating, and improving cloud environments. Always exploring better ways to build reliable, secure infrastructure.