Scaling your ML API to One Million Requests per day
 Suvrakamal Das
Many ML developers focus on making their ML models better, improving it's performance and etc, obviously, there is a lot it, also you don't focus on it because there are solutions like HF spaces to host your ml models on the internet just to share it with the world.
For an ML lifecycle ML Serving is also important and what if there is a way to easily deploy your models on production on the cloud using efficient tools without worrying about vendor lock in?
Today we will be learning how to take a model train it on a dataset and achieve 90% accuracy which is pretty simple.
Also we will then talk about how to create an API Endpoint for it using FastAPI.
And we will talk about how to improve it's accuracy and reducing the API latency which is crucial for high volume API request handling.
Finally we will talk about how to scale and API using K8s pods and how to set it up on AWS Amazon Elastic Kubernetes Service.
We will finally test it out and see if this can handle 1 million requests per day and we will do an API testing for it.
So Let's get started ...
For the sake of training a model we are taking a simple Standford IMDB dataset and training a BERT model with this dataset.
I provided an access to a Jupyter Notebook that have achieved a 91% accuracy in on the PyTorch model which means, during inferencing the model will be 91% accurate on the dataset. To be accurate we can use trained models from hugging face itself.
#use this code to draw inference from this hugging face model trained on IMDB dataset
from transformers import BertForSequenceClassification, BertTokenizer, TextClassificationPipeline
model_path = "JiaqiLee/imdb-finetuned-bert-base-uncased"
tokenizer = BertTokenizer.from_pretrained(model_path)
model = BertForSequenceClassification.from_pretrained(model_path, num_labels=2)
pipeline = TextClassificationPipeline(model=model, tokenizer=tokenizer)
print(pipeline("I like the movie, it was awesome"))
We can simply create a FastAPI endpoint for this, and start deploying it on K8s right?
Creating a FastAPI Endpoint
So let's do the easiest job in the world.
#using huggingface model

from fastapi import FastAPI
from pydantic import BaseModel
from transformers import BertForSequenceClassification, BertTokenizer, TextClassificationPipeline

app = FastAPI()

# Load the model and tokenizer
model_path = "JiaqiLee/imdb-finetuned-bert-base-uncased"
tokenizer = BertTokenizer.from_pretrained(model_path)
model = BertForSequenceClassification.from_pretrained(model_path, num_labels=2)
pipeline = TextClassificationPipeline(model=model, tokenizer=tokenizer)

class TextInput(BaseModel):
    text: str

@app.post("/classify/")
def classify_text(input: TextInput):
    result = pipeline(input.text)
    return {"label": result[0]['label'], "score": result[0]['score']}

if __name__ == "__main__":
    import uvicorn
    uvicorn.run(app, host="0.0.0.0", port=8000)
This code will setup a Fast Api endpoint `/classify` for you. you can try by sending an API request to this endpoint and try for yourself.
I have tested this on postman and the API latency came around 120-160 ms which is very high for serving 1 million requests per day.
So there are a couple methods to reduce to API latency, here are some of the ways we can optimize the API latency time
Download the Pytorch model instead of calling the HF API
Use
BertTokenizerFastUse ONNX (Open Neural Network Exchange) Model
Reduce Model Size (no implementation here)
Use Asynchronous FastAPI (no implementation here)
I have implemented a few methods to reduce API Latency which shows significant reduction in API Response Time.
Using the downloaded Pytorch Model
Just download the Pytorch model contents and replace the model path in the previous code to the directory where you saved the model.
This reduced the API latency by 10-12 ms and shows that we are moving in the right direction.
#replace the model_path with the directory of your saved model
model_path = "./model"
Using BertTokenizerFast for faster API response times
#rest of the imports
from transformers import BertTokenizerFast
.
.
.
tokenizer = BertTokenizerFast.from_pretrained(model_path)
#rest of the code
.
.
This claims to reduce API latency drastically but in my case this has been successful to a small extent, where the latency reduced around another 10-12 ms bringing down the overall latency to 90 ms.
Using ONNX models
ONNX is so famous that I don't need to introduce you to the world of ONNX, it has integration with Pytorch and you can easily convert a Pytorch Model to an ONNX model. Given below is a code implementation.
from transformers import BertForSequenceClassification, BertTokenizer
import torch

model_path = "JiaqiLee/imdb-finetuned-bert-base-uncased"
tokenizer = BertTokenizer.from_pretrained(model_path)
model = BertForSequenceClassification.from_pretrained(model_path, num_labels=2)

# Create a dummy input for tracing
dummy_input = tokenizer("This is a dummy input", return_tensors="pt")

# Export the model to ONNX format
torch.onnx.export(model,
                  (dummy_input['input_ids'], dummy_input['attention_mask']),
                  "model.onnx",
                  input_names=["input_ids", "attention_mask"],
                  output_names=["output"],
                  dynamic_axes={"input_ids": {0: "batch_size"},
                                "attention_mask": {0: "batch_size"},
                                "output": {0: "batch_size"}})

print("Model successfully converted to ONNX format and saved as 'model.onnx'.")
We can use the saved model and run it, and also we can create a similar API endpoint of it using FastAPI and run it.
#running an onnx model .
import onnxruntime as ort
from transformers import BertTokenizer
import numpy as np

model_path = "./model"
tokenizer = BertTokenizer.from_pretrained(model_path)

# Load the ONNX model
onnx_model_path = "model.onnx"
ort_session = ort.InferenceSession(onnx_model_path)

# Check the expected sequence length
expected_seq_len = ort_session.get_inputs()[0].shape[1]

# Define a function to perform inference
def classify_text(text):
    inputs = tokenizer(text, return_tensors="np", padding='max_length', truncation=True, max_length=expected_seq_len)
    ort_inputs = {k: np.array(v) for k, v in inputs.items() if k in ["input_ids", "attention_mask"]}
    ort_outs = ort_session.run(None, ort_inputs)
    label_id = ort_outs[0].argmax(axis=1)[0]
    labels = ["NEGATIVE", "POSITIVE"]  # Assuming binary classification
    return {"label": labels[label_id], "score": float(ort_outs[0].max())}

# Test the function with a sample input
sample_text = "The movie was fantastic! I really enjoyed it."
result = classify_text(sample_text)
print(result)

#expected output
{'label': 'POSITIVE', 'score': 2.6588470935821533}
This has reduce the model API latency by a drastic amount of 30-40 ms from 90-100ms which is huge.
We can further optimize the ONNX model or quantize the model(which reduces the performance) to reduce the API response time.
Code for optimizing the model
import onnx
from onnxruntime.transformers import optimizer

# Load the ONNX model
onnx_model_path = "model.onnx"
onnx_model = onnx.load(onnx_model_path)

# Optimize the ONNX model
optimized_model = optimizer.optimize_model(onnx_model, model_type='bert')

# Save the optimized model
optimized_model_path = "model2.onnx"
optimized_model.save_model_to_file(optimized_model_path)

print("Model has been further optimized and saved.")
This will reduce the model response time and API Response time by another 10-12 ms which will finally bring our API response time in around 20-30 ms
Here is an awesome repo to help you with optimization , have a look - https://github.com/ELS-RD/transformer-deploy
transformer-deploy by Lefebvre Dalloz
Now that we have brought down the API response time, let's focus on Model Serving.
I have used Ray Serve for my own purpose, which needs a separate introduction of its own but we will continue with simply serving this model with AWS (EKS) and use Kubernetes Horizontal Pod Autoscaler.
The HPA automatically scales the number of pods in a deployment or replication controller based on observed CPU utilization (or other select metrics).
Setup your AWS EKS and containerize your FastAPI Application and push it on Docker Hub (you can use AWS too or anything else)
You can use my Docker Image for example - subhro2084/fastapi-app general | Docker Hub
After you dockerize your fastapi image, make sure you get the endpoint right and it works. Only then upload it on dockerhub.
If your EKS cluster is created, fire your AWS cloud shell terminal and get started with these steps, try a little bit doesn't works at one go (it works on my machine 🙂 feelings ....yk)
OKAY, Let's get started 😊

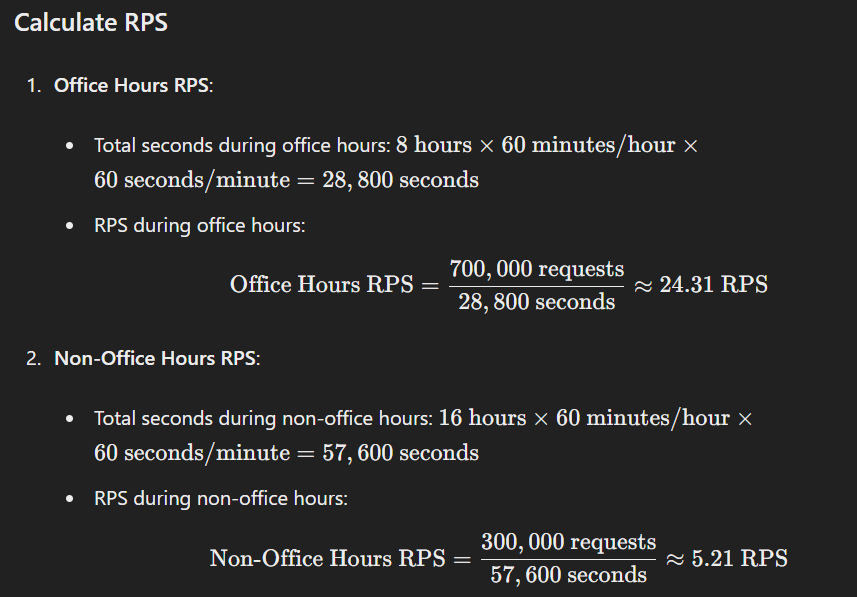
First, have a look around how much is ONE MILLION REQUESTS PER DAY??

At it's peak you should be able to handle 25 RPS, and you have to keep your pods ready till that. The following infra was tested on 40 RPS which it handles easily.
Create a file fastapi-app.yaml and add this content:
apiVersion: apps/v1
kind: Deployment
metadata:
  name: fastapi-app
  labels:
    app: fastapi-app
spec:
  replicas: 1
  selector:
    matchLabels:
      app: fastapi-app
  template:
    metadata:
      labels:
        app: fastapi-app
    spec:
      containers:
      - name: fastapi-app
        image: subhro2084/fastapi-app:latest #depends on what image you are using
        ports:
        - containerPort: 8000
        resources:
          requests:
            memory: "512Mi" #depends on the type of machine you have used
            cpu: "250m"
          limits:
            memory: "1Gi"
            cpu: "500m"
---
apiVersion: v1
kind: Service
metadata:
  name: fastapi-service
spec:
  selector:
    app: fastapi-app
  type: LoadBalancer
  ports:
    - protocol: TCP
      port: 80
      targetPort: 8000
---
apiVersion: autoscaling/v1
kind: HorizontalPodAutoscaler
metadata:
  name: fastapi-app-hpa
spec:
  scaleTargetRef:
    apiVersion: apps/v1
    kind: Deployment
    name: fastapi-app
  minReplicas: 1
  maxReplicas: 10
  targetCPUUtilizationPercentage: 50
You need to save this YAML file in your AWS Cloudshell and apply the configuration:kubectl apply -f fastapi-app.yaml
Verify the deployment using -
kubectl get pods Ensure your pods are running kubectl get hpa to monitor the HPA status
Test the Application ->
curl -X POST "http://<EXTERNAL-IP-OF-YOUR-AWS-POD>/classify/" -H "accept: application/json" -H "Content-Type: application/json" -d '{"text": "I love you"}'
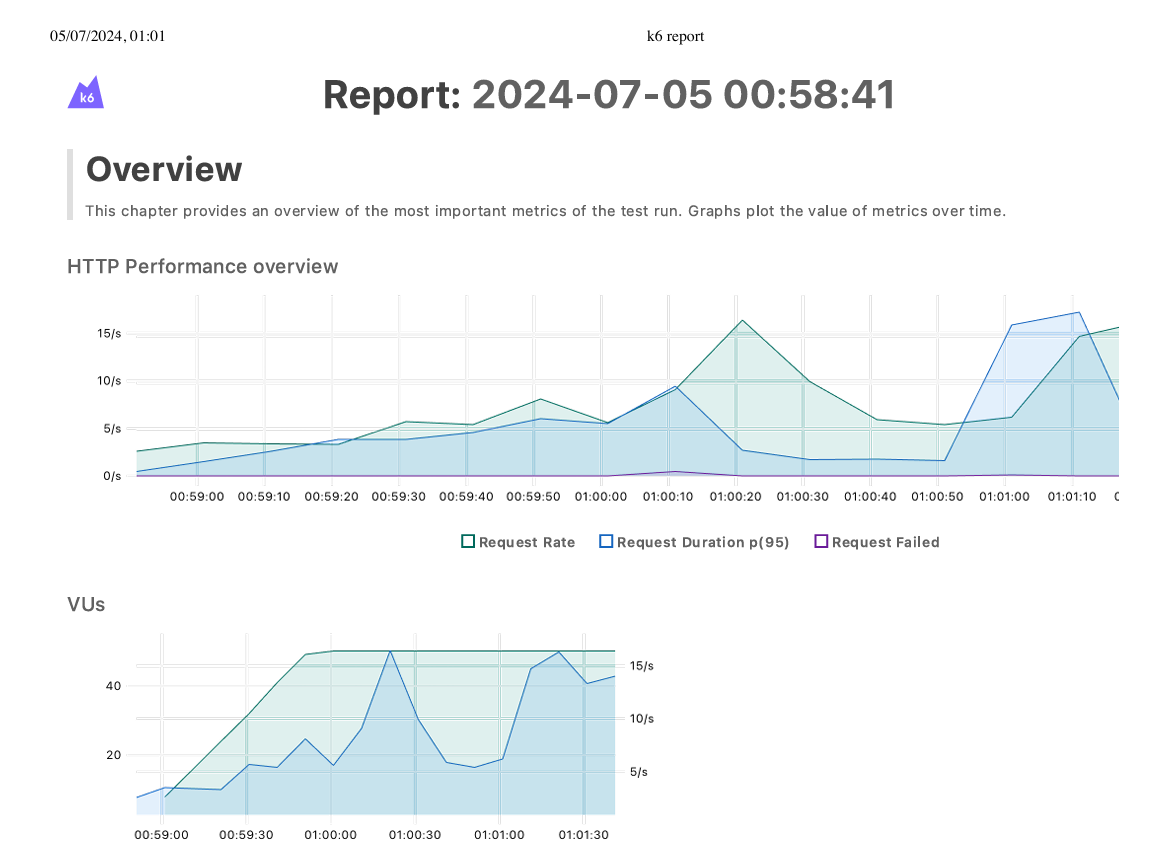
You can use K6 which is famous for load testing and run it locally.
Use this script.js file and save it
import http from 'k6/http';
import { check, sleep } from 'k6';

export let options = {
  stages: [
    { duration: '5m', target: 40 }, // Ramp-up to 25 RPS over 5 minutes
    { duration: '8h', target: 40 }, // Stay at 25 RPS for 8 hours (office hours)
    { duration: '5m', target: 5 }, // Ramp-down to 5 RPS over 5 minutes
    { duration: '15h', target: 5 }, // Stay at 5 RPS for 15 hours (non-office hours)
  ],
};

export default function () {
  let res = http.post('http://a4ee008522b7547aaaa5c7a338f1123d-1605357505.ap-south-1.elb.amazonaws.com/classify/', JSON.stringify({ text: 'I love you' }), {
    headers: { 'Content-Type': 'application/json' },
  });
  check(res, { 'status was 200': (r) => r.status === 200 });
  sleep(1);
}
Run it on your machine using k6 run --out web-dashboard script.js
We will get a similar report like this -

Iterate and change the number of pods.
Adjust the Horizontal Pod Autoscalers (HPAs).
Use better machines.
Opt for smaller model sizes.
Implement asynchronous API.
These are some of the steps we can take to reduce the API limit, this a work under progress , I will still need to add a wonderful tool called Ray Serve which runs on top of K8s, which changes the game.

Thanks for reading till here❤️❤️, if you like this, please tell how to improve, here are my socials links if you find I made an embarrassing mistake here 😎.
Subscribe to my newsletter
Read articles from Suvrakamal Das directly inside your inbox. Subscribe to the newsletter, and don't miss out.
Written by

