Build a Github Actions Workflow Pipeline From Scratch ( CI/CD )
 Navraj Singh
Table of contents
- Our project
- Setting up the project and GitHub repository
- Creating workflow and running the workflow
- Purpose and goal of this workflow
- Create a new .yml workflow file
- Lets code the entire workflow
- Understanding workflow
- Running the workflow ( jobs run parallelly )
- Results of the workflow ( jobs run parallelly )
- Running the workflow ( jobs run in serial one by one )
- Results of the workflow ( jobs run in serial one by one )
- My Social Handles & This Blog's END

Our project
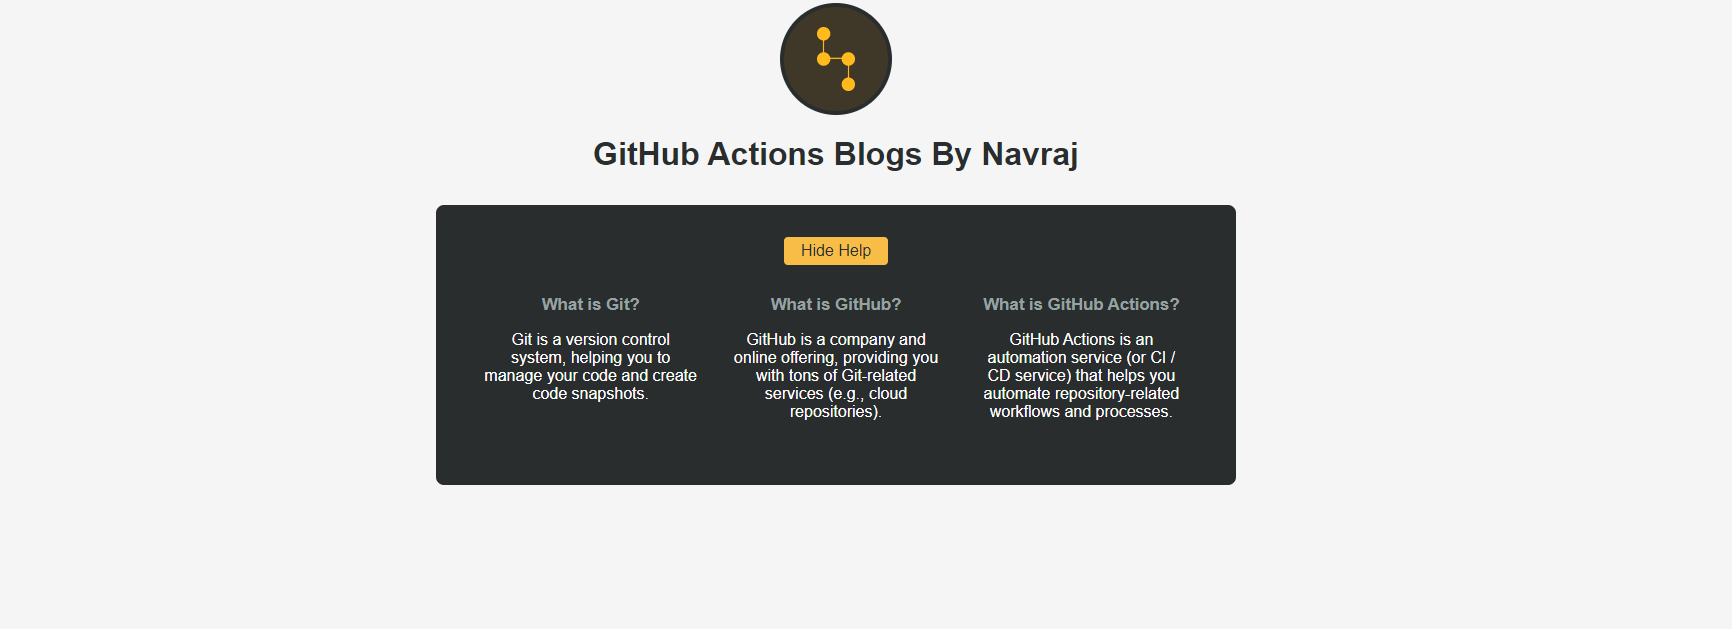
Project is just a simple react webpage nothing much. This project contains test file to test the code in project and lint command in package.json to lint the code, we will talk about this in later sections.
We will together take this project and build a easy but little complex github actions workflow with multiple steps and multiple jobs.
This blog will give a lot more clarity about how continuous integration ( CI ) is performed in github actions specifically.
Remember or not? This blog is not a individual blog, it is a part of my CI/CD in github blog series: Click this link to get to the whole series . In this series i will make you a pro in github actions blog by blog.
So before this blog read the previous blogs, even though not strictly required but still reading previous blogs helps you to know about github actions more.
So before continuing this blog the pre-requisite is that you must know basics of github actions like :
How to setup github actions
What are workflows, events, jobs, steps, runners, actions, shell command etc.
Git and GitHub ofcourse.
As these fundamentals of github actions are easily explained in most simple english in my previous blogs of the series i will not explain these concepts in this blog. So go the series to understand all fundamentals of github actions.
Setting up the project and GitHub repository
Description
In this section i will guide you on creating the remote github repository for this project, how you can download the project code and set it up on your local machine then perform continuous integration on this project using github actions.
So our main goal here in this section is not to create the workflow but successfully setup the whole project and remote github repository so that we can start creating our workflow for this project. Workflow will be created and run in next sections of this blog.
Setting up the remote github repository
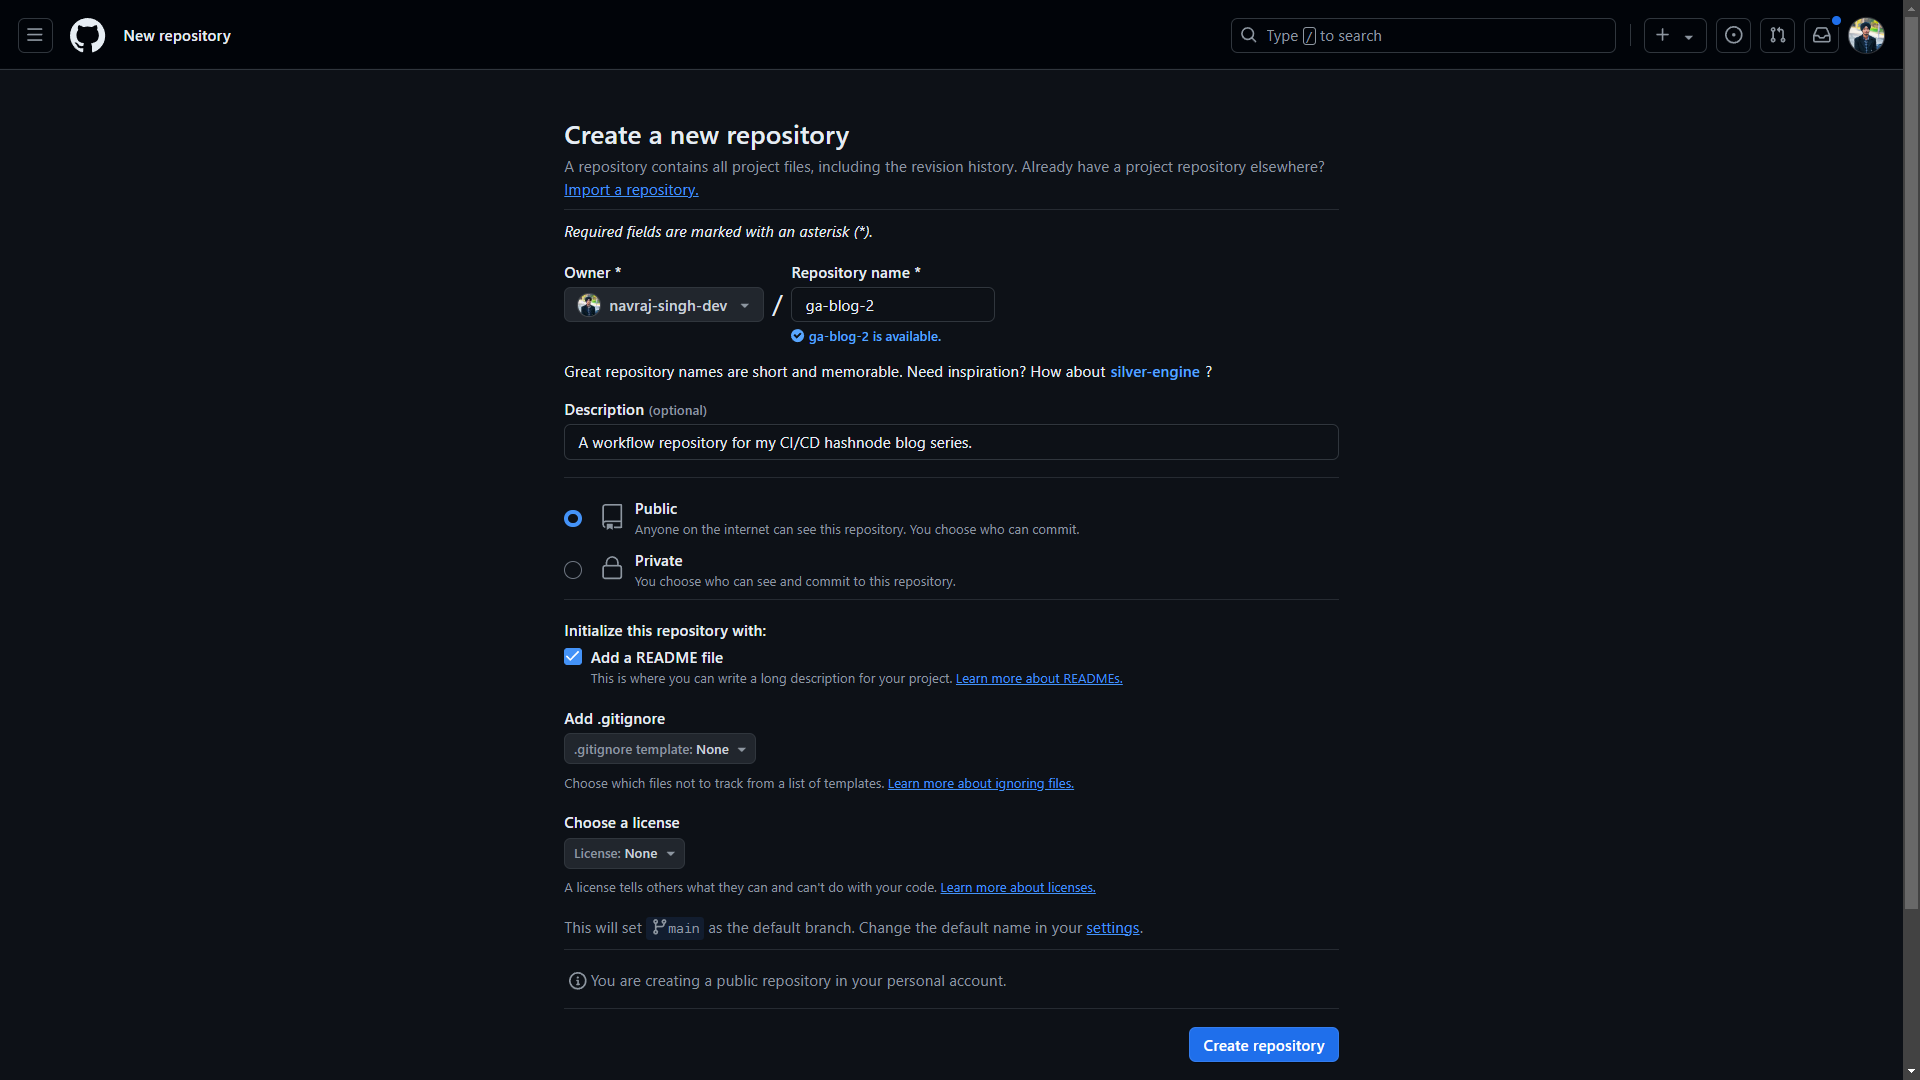
As we know from my previous github actions blogs that a remote repository is must required for running github actions.
So just go to the github website and create a new repository on it.
Give the repository a good name that can be understood by you at least, name can be anything but is should make sense to you.
Done, that is it.
The only remaining task is that we now setup the project in VS Code and initialize a local empty git repository into it. Then setup a remote connection between this local project repository with our remote newly created github repository.
Setting up our project in VS Code
Go to this link of github repository and download the project code, choose download as zip option : download the code as zip here
Now you have the project zip file, extract it and open the project in VS Code. Delete the already existing
.githubfolder in the project now, as we will create it from scratch again.Run the
npm cicommand so that you get thenode_modulesfolder. Basically we are installing the dependencies frompackage-lock.json. Don't runnpm iornpm install.Now initialize a new git repository in this project using
git initcommand.Here in the root of this project folder, create a folder called
.github. Then go inside this.githuband create a another folder calledworkflows. Now you have setup github actions in this project. If you forgot then let me remind we write our workflows in .github/workflows folder path, because github automatically searches for this path to run our workflows.Make sure no spelling mistake and no upper-case/lower-case mistake in naming of these above two folders. Just copy and paste the exact characters i said and make these folders in your local VS code project.
Now till this point we have a remote github repo and a local git repo. Now connect these two using the
git remote add origin <ssh/https link of your remote repo>. Basically you must know how to connect a 'local repo' with 'remote repo' somehow, so that when we rungit pushandgit pulland other git commands they make changed in remote repo also. These are basic stuff so do this fast and easy, if you are struggling here then learn git and github first okay, CI/CD is a way big fish for you now.Now run the project using
npm run devcommand. The project will run on porthttp://localhost:5173/of your machine. This is just to check if the project runs, if it doesn't run that mean you have followed the above steps incorrectly.
Okay now you have a remote github repo and the local git repo. Your remote and local repositories are also connected through ssh or https or whatever. You have installed the dependencies also. Your VS Code Terminal can now push and pull changes to and from the remote repo on github.
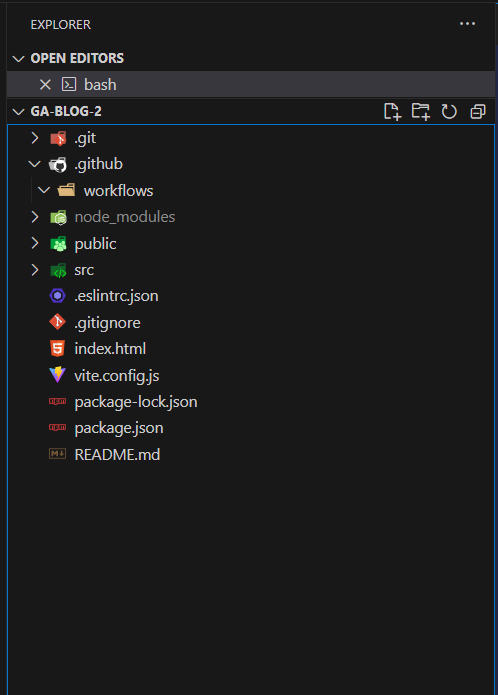
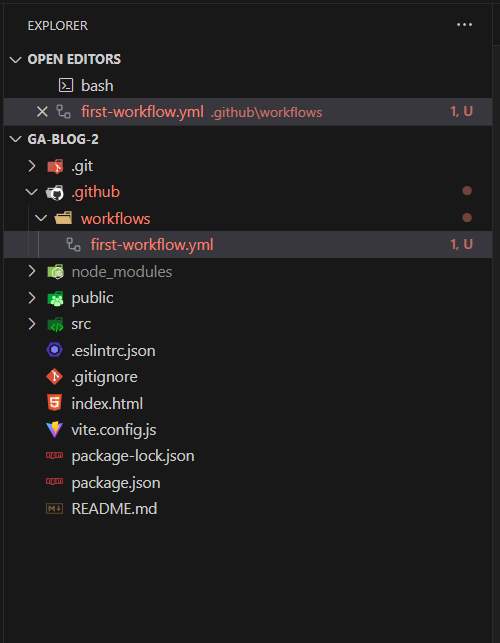
By this time this is what your vscode should kind-of look like (image is just for example):
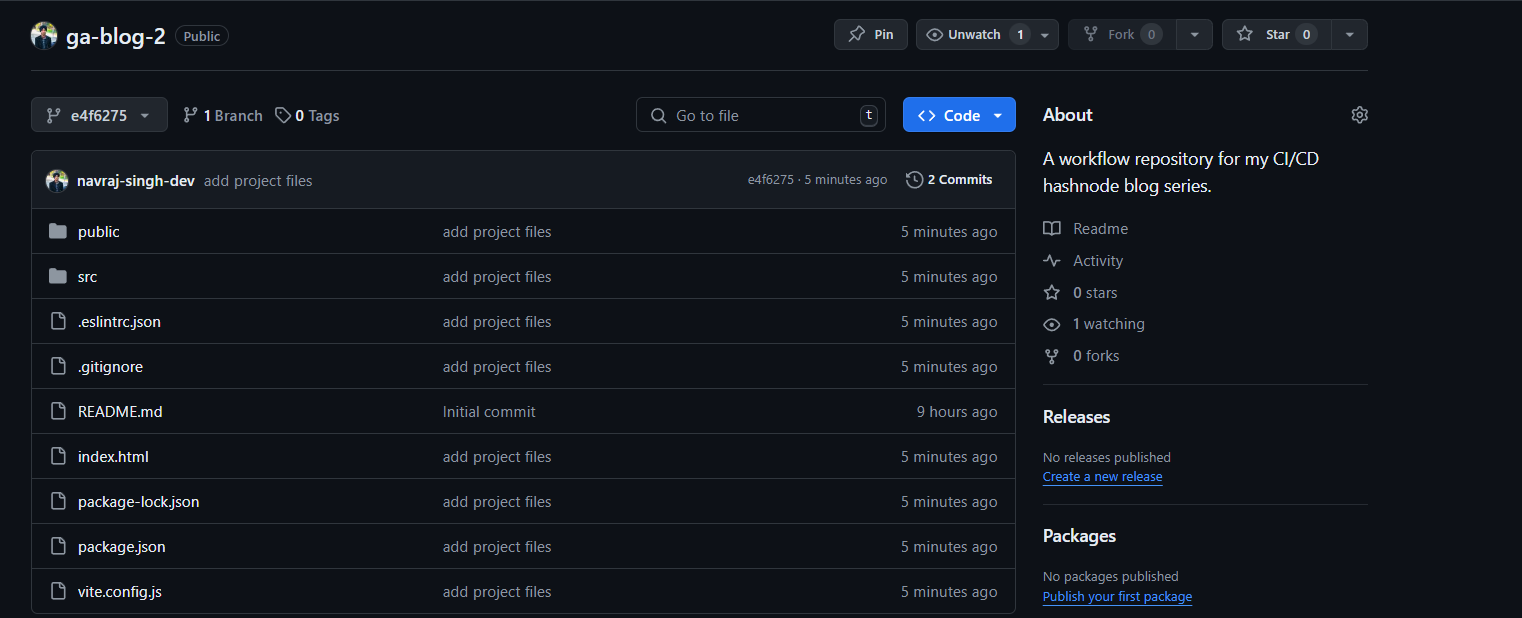
This is how your github repository kind-of should look like (image is just for example):
Now you are ready to write the workflow.
Creating workflow and running the workflow
Purpose and goal of this workflow
Well what will our workflow gonna do? What is its purpose huh? Well here is what it is gonna do:
The workflow will have 4 jobs :
lint,test,build,deploy(we will mimic a fake deploy no actual deployment is happening).
The first three mentioned jobs above will run a pre-existing script from the project. Like
lintjob will runlint scriptto lint the code,testjob will run thetest scriptto test the code and so on.In
deployjob we will just print a text in the console "deploying..." or something, no actual deployment is happening here in this blog.
Okay now as purpose of the workflow is clear lets code it, see the blow steps.
Create a new .yml workflow file
Ok go the local project in vs-code, and inside .github/workflows folder make a new workflow (.yml file) with any name you like. For example for my workflow i chose the name 'first-workflow.yml'.
Lets code the entire workflow
Now open this workflow file in vscode and let's staring making it up from scratch.
Define the real internal name for this workflow and the event that will trigger this workflow.
name: lint-test-build-deploy-workflow # the internal name of workflow on: push # this workflow will get triggered automatically when a push event happens, like when a git push is runname:key is used to define the internal name of workflow.on:key is used to define the events that will trigger this workflow.Let's define jobs one by one, define first job called '
lint' it lints the entire codename: lint-test-build-deploy-workflow # the internal name of workflow on: push # this workflow will get triggered automatically when a push event happens, like when a git push is run jobs: # under this key we define all of our jobs lint: # this is a custom name of our job, name can be anything decided by us runs-on: ubuntu-latest # it means which runner (a machine) will be used to run the 'lint' job specifically. steps: # all steps are defined under this key - name: install nodejs # name of the first step uses: actions/setup-node@v4 # the action to be run, it install nodejs on for us on the runner machine - name: get the code of repository # name of the second step uses: actions/checkout@v4 # this action downloads our current github repository code to the runner machine - name: install dependencies # name of third step run: npm ci # this is a command which will install dependencies in the runner machine - name: run linting # name of fourth step run: npm run lint # a command which runs a lint script from the project to lint the code in runner machineOkay so this job name is 'lint' and it lints our code. Read the comments they define every line of code. If you cannot understand this
steps:key,- name:key andruns-on:key,runnerand other stuff it means your fundamentals are very weak in github actions please read my previous blogs of this series to understand all of this.Define next job called '
test', it will test our codename: lint-test-build-deploy-workflow # the internal name of workflow on: push # this workflow will get triggered automatically when a push event happens, like when a git push is run jobs: # under this key we define all of our jobs lint: # this is a custom name of our job, name can be anything decided by us runs-on: ubuntu-latest # it means which runner (a machine) will be used to run the 'lint' job specifically. steps: # all steps are defined under this key - name: install nodejs # name of the first step uses: actions/setup-node@v4 # the action to be run, it install nodejs on for us on the runner machine - name: get the code of repository # name of the second step uses: actions/checkout@v4 # this action downloads our current github repository code to the runner machine - name: install dependencies # name of third step run: npm ci # this is a command which will install dependencies in the runner machine - name: run linting # name of fourth step run: npm run lint # a command which runs a lint script from the project to lint the code in runner machine test: # second job, separate job to run test script runs-on: ubuntu-latest # defining the runner machine on which this test job will run steps: # all the steps of this job - name: install nodejs # again on this runner machine install the nodejs uses: actions/setup-node@v4 - name: get the code of repository # again on this runner machine download the repository code uses: actions/checkout@v4 - name: install dependencies # again install dependencies on the runner run: npm ci - name: run test # now as we have everything, run the test script using this command and test the code run: npm run testThis test job test's our code. Now you might think why both of these jobs have many similar initial steps? Like both test job and lint job have their own runner machine defined, we have to download nodejs and the project code and install dependencies again in both of these jobs.
Well the reason is very simple, as i said this in the previous blog itself also, each job needs its own machine to run, all jobs cannot run in same machine, jobs are isolated from each other they cannot each other machine's data by default. So we need to download and specify these things in the steps again and again each time.
Define next job called 'build', it builds our code/project and creates a
distfolder which can be deployed to cloudname: lint-test-build-deploy-workflow # the internal name of workflow on: push # this workflow will get triggered automatically when a push event happens, like when a git push is run jobs: # under this key we define all of our jobs lint: # this is a custom name of our job, name can be anything decided by us runs-on: ubuntu-latest # it means which runner (a machine) will be used to run the 'lint' job specifically. steps: # all steps are defined under this key - name: install nodejs # name of the first step uses: actions/setup-node@v4 # the action to be run, it install nodejs on for us on the runner machine - name: get the code of repository # name of the second step uses: actions/checkout@v4 # this action downloads our current github repository code to the runner machine - name: install dependencies # name of third step run: npm ci # this is a command which will install dependencies in the runner machine - name: run linting # name of fourth step run: npm run lint # a command which runs a lint script from the project to lint the code in runner machine test: # second job, it runs test script to test the code runs-on: ubuntu-latest # defining the runner machine on which this test job will run steps: # all the steps of this job - name: install nodejs # again on this runner machine install the nodejs uses: actions/setup-node@v4 - name: get the code of repository # again on this runner machine download the repository code uses: actions/checkout@v4 - name: install dependencies # again install dependencies on the runner run: npm ci - name: run test # now as we have everything, run the test script using this command and test the code run: npm run test build: # third job, it runs build script to build the code runs-on: ubuntu-latest # defining runner machine for this job steps: # all steps of this job - name: install nodejs # installing node in this runner machine uses: actions/setup-node@v4 # action to install nodejs - name: get the code of repository # downloading code in this runner machine uses: actions/checkout@v4 # action to download the code - name: install dependencies # installing dependencies in runner machine run: npm ci # command to install dependencies - name: build the code # buiding the code run: npm run build # command to build the codeThis third job 'build' builds our code. Read comments to understand each line of code in this job.
Define next and last job called '
deploy', it just prints out some text in the console of the runner machine which is 'deploying...'. So we are not deploying our code but just faking it out, as CD - continuous deployment is a very vast and complex topic which can be discussed in later blogs. So for now lets define this fourth and last job.name: lint-test-build-deploy-workflow # the internal name of workflow on: push # this workflow will get triggered automatically when a push event happens, like when a git push is run jobs: # under this key we define all of our jobs lint: # this is a custom name of our job, name can be anything decided by us runs-on: ubuntu-latest # it means which runner (a machine) will be used to run the 'lint' job specifically. steps: # all steps are defined under this key - name: install nodejs # name of the first step uses: actions/setup-node@v4 # the action to be run, it install nodejs on for us on the runner machine - name: get the code of repository # name of the second step uses: actions/checkout@v4 # this action downloads our current github repository code to the runner machine - name: install dependencies # name of third step run: npm ci # this is a command which will install dependencies in the runner machine - name: run linting # name of fourth step run: npm run lint # a command which runs a lint script from the project to lint the code in runner machine test: # second job, it runs test script to test the code runs-on: ubuntu-latest # defining the runner machine on which this test job will run steps: # all the steps of this job - name: install nodejs # again on this runner machine install the nodejs uses: actions/setup-node@v4 - name: get the code of repository # again on this runner machine download the repository code uses: actions/checkout@v4 - name: install dependencies # again install dependencies on the runner run: npm ci - name: run test # now as we have everything, run the test script using this command and test the code run: npm run test build: # third job, it runs build script to build the code runs-on: ubuntu-latest # defining runner machine for this job steps: # all steps of this job - name: install nodejs # installing node in this runner machine uses: actions/setup-node@v4 # action to install nodejs - name: get the code of repository # downloading code in this runner machine uses: actions/checkout@v4 # action to download the code - name: install dependencies # installing dependencies in runner machine run: npm ci # command to install dependencies - name: build the code # buiding the code run: npm run build # command to build the code deploy: # fourth job, it fakes the deployment of our project code runs-on: ubuntu-latest # defining runner machine for this job steps: # all steps of this job - name: install nodejs # installing node in this runner machine uses: actions/setup-node@v4 # action to install nodejs - name: get the code of repository # downloading code in this runner machine uses: actions/checkout@v4 # action to download the code - name: install dependencies # installing dependencies in runner machine run: npm ci # command to install dependencies - name: deploy the code # fake deploying the code run: echo "deploying..." # command to fake deploy the codeLast job it is. It just echoes out deploying... to the console/terminal of the runner machine and that is it.
With this our coding part has ended and this is the complete and complex workflow that we created.
Done. Don't push the code wait, read the next parts of the blog.
Understanding workflow
It defines 4 jobs.
lint,test,build,deploy.It overall
lints the code,test the code,builds the codeand thenfake deploy the code.You learned how to define
multiple jobsin one workflow, how to define theirsteps, how to useshell commands/npm commandsin the steps, how to useactionsfrom thegithub marketplaceanddownload the codeandinstall nodejsusing theseactions.
Running the workflow ( jobs run parallelly )
To run the workflow we must trigger the any of the events defined in the workflow. If you see our workflow we defined a event in the on: key which is called 'push'.
It means anytime we push the code or anything to the remote repository, github will automatically run this workflow we created.
The coding part is done right, we have created our workflow and coded it completely, now its time to run it, so to run it.. please push the code to the remote repository now. Run the commands
git add .|git commit -m "<your commit message>"|git push. Now your workflow file is pushed to the remote github repository.Yes you are right! Github saw that you pushed the code to the repository and it knew to automatically run this workflow on a push event, as we have pushed the code by running the above define commands our workflow is already running guys.
Results of the workflow ( jobs run parallelly )
To see it running go to your github repository and then click actions button, see the image:

See how it automatically started running the workflow, because
pushevent got triggered.The title of the workflow run is nothing but our commit message we gave.
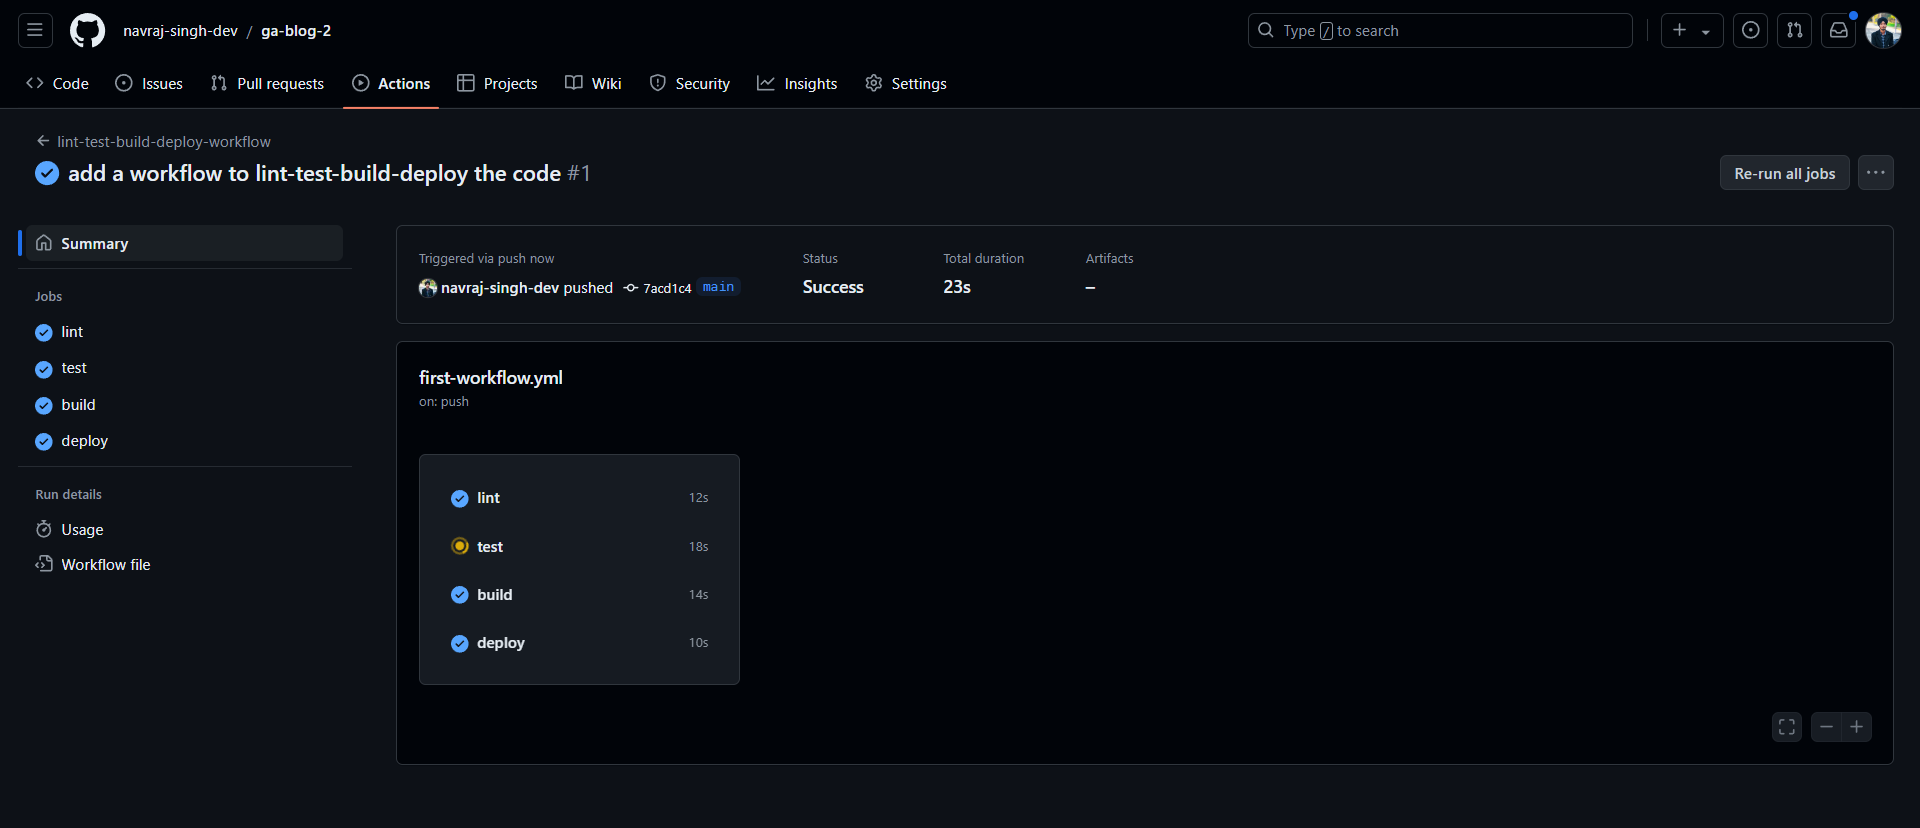
See how jobs are running parallelly, meaning
lint,test,build,deployjobs were triggered at the same time. This is parallelism. This is the default nature of github actions, it runs all jobs in parallel by default. Meaning any job do not care about waiting for other jobs to successfully run they just start their own execution parallelly.If you do not want this parallelism, like you want that first lint job runs only and other 3 wait, then test job run only then other 2 wait, then build job run only and other one wait, then deploy job run and ends the workflow. If you want this kind of serial execution of jobs then read the next section.
Running the workflow ( jobs run in serial one by one )
Why would you want to run jobs one by one in serial manner?
Well, one example can be that : What if first you just want to lint the code using lint job, then after making sure code is linted you just want to test the code using test job, because if code is not tested first the deploy job can deploy the buggy code accidently.
So to make sure that things are smooth and each job has completed successfully before deploying the code using deploy job we need serial wise execution of jobs.
In short if you have x amount of jobs and you want to make sure that only one job run at a time and after successful run of this job.. the next job should run and so on.. then needs: key must be used.
To run the jobs serial wise one by one and not parallelly use the key called '
needs:' under dependent job in this workflow.Dependent jobs means those jobs which need a certain job to finish first and then they will start their own execution. Example can be that
deployjob is dependent onbuildjob,buildjob is dependent ontestjob and so on. Meaningdeployjob will only run ifbuildjob successfully runs,buildjob will only run iftestjob successfully runs and so on.Add
needs:key to this existing workflow code something like this:name: lint-test-build-deploy-workflow # the internal name of workflow on: push # this workflow will get triggered automatically when a push event happens, like when a git push is run jobs: # under this key we define all of our jobs lint: # this is a custom name of our job, name can be anything decided by us runs-on: ubuntu-latest # it means which runner (a machine) will be used to run the 'lint' job specifically. steps: # all steps are defined under this key - name: install nodejs # name of the first step uses: actions/setup-node@v4 # the action to be run, it install nodejs on for us on the runner machine - name: get the code of repository # name of the second step uses: actions/checkout@v4 # this action downloads our current github repository code to the runner machine - name: install dependencies # name of third step run: npm ci # this is a command which will install dependencies in the runner machine - name: run linting # name of fourth step run: npm run lint # a command which runs a lint script from the project to lint the code in runner machine test: # second job, it runs test script to test the code runs-on: ubuntu-latest # defining the runner machine on which this test job will run needs: lint # this job depends on lint job, if lint job is successfully run only then this job will run steps: # all the steps of this job - name: install nodejs # again on this runner machine install the nodejs uses: actions/setup-node@v4 - name: get the code of repository # again on this runner machine download the repository code uses: actions/checkout@v4 - name: install dependencies # again install dependencies on the runner run: npm ci - name: run test # now as we have everything, run the test script using this command and test the code run: npm run test build: # third job, it runs build script to build the code runs-on: ubuntu-latest # defining runner machine for this job needs: test # this job depends on test job, if test job is successfully run only then this job will run steps: # all steps of this job - name: install nodejs # installing node in this runner machine uses: actions/setup-node@v4 # action to install nodejs - name: get the code of repository # downloading code in this runner machine uses: actions/checkout@v4 # action to download the code - name: install dependencies # installing dependencies in runner machine run: npm ci # command to install dependencies - name: build the code # buiding the code run: npm run build # command to build the code deploy: # fourth job, it fakes the deployment of our project code runs-on: ubuntu-latest # defining runner machine for this job needs: build # this job depends on build job, if build job is successfully run only then this job will run steps: # all steps of this job - name: install nodejs # installing node in this runner machine uses: actions/setup-node@v4 # action to install nodejs - name: get the code of repository # downloading code in this runner machine uses: actions/checkout@v4 # action to download the code - name: install dependencies # installing dependencies in runner machine run: npm ci # command to install dependencies - name: deploy the code # fake deploying the code run: echo "deploying..." # command to fake deploy the codeSee how i added
needs:key on the same level of indentation ofsteps:andruns-on:key.needs:key require the name of the job on which this current job is dependent on.Read the comments for explanation.
needs: key and runs the jobs in serial sequence one by one manner, just make a new commit and then push this code to the remote repository using git push command. Now github will run this workflow automatically. To get the results of this workflow go to your repository on github website and see the results of this workflow there.Results of the workflow ( jobs run in serial one by one )
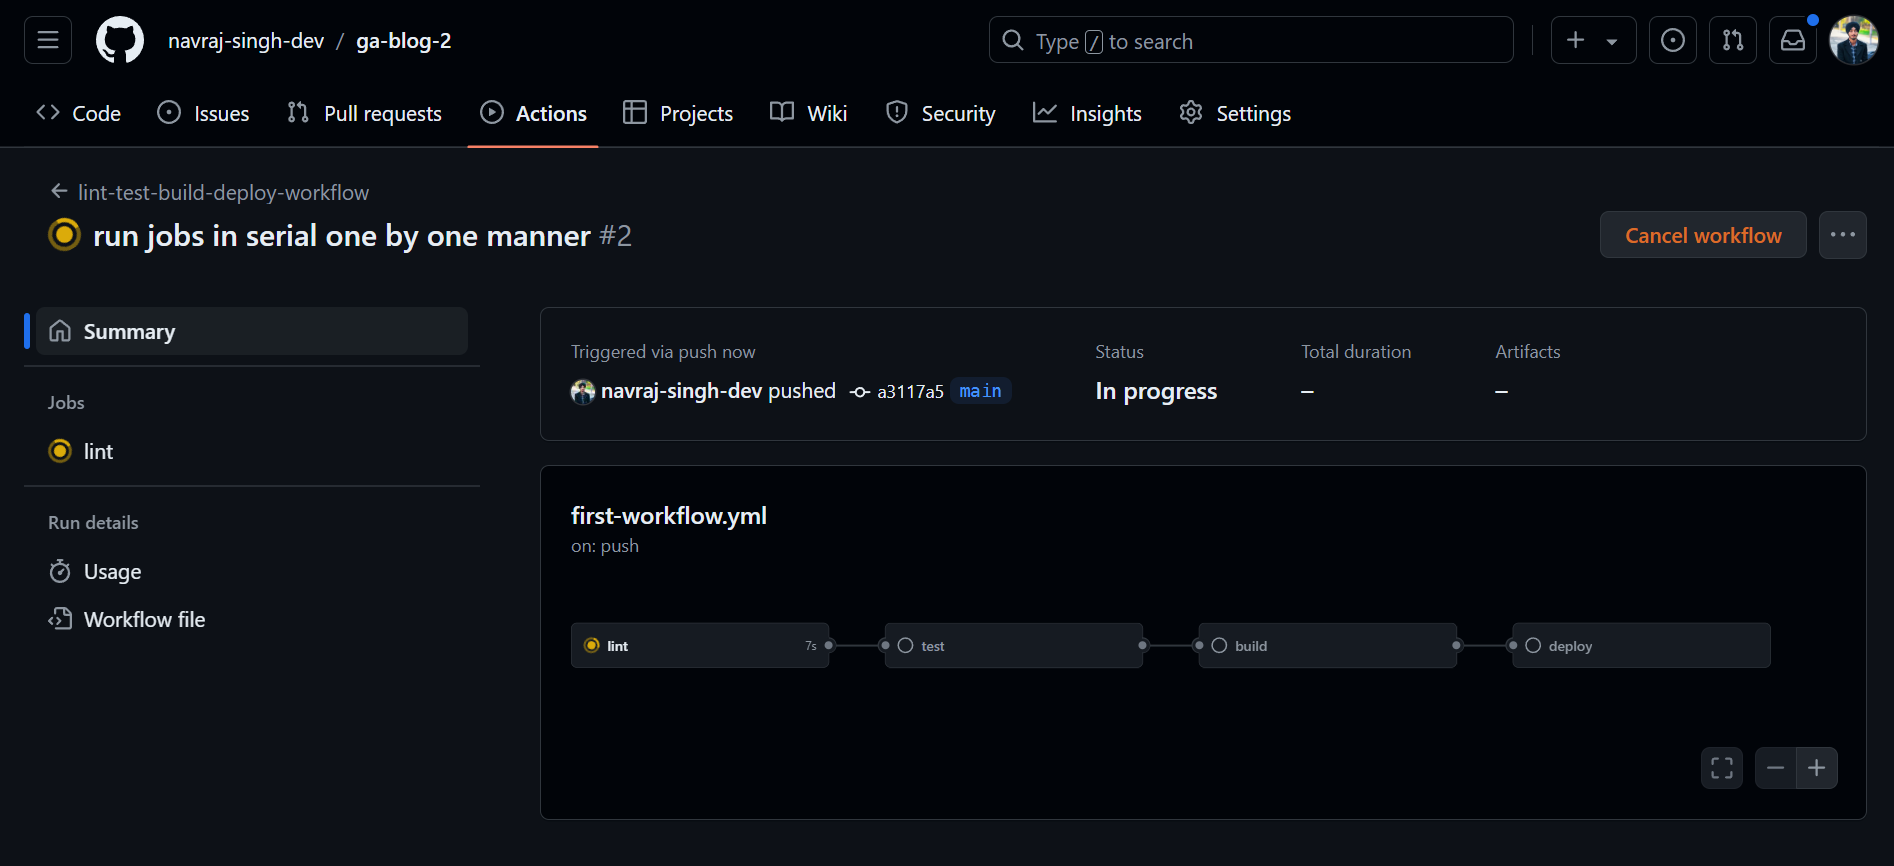
See in the image above, how the user interface is different now.
It shows a straight graph where a chain of jobs are to be executed in a serial wise manner.
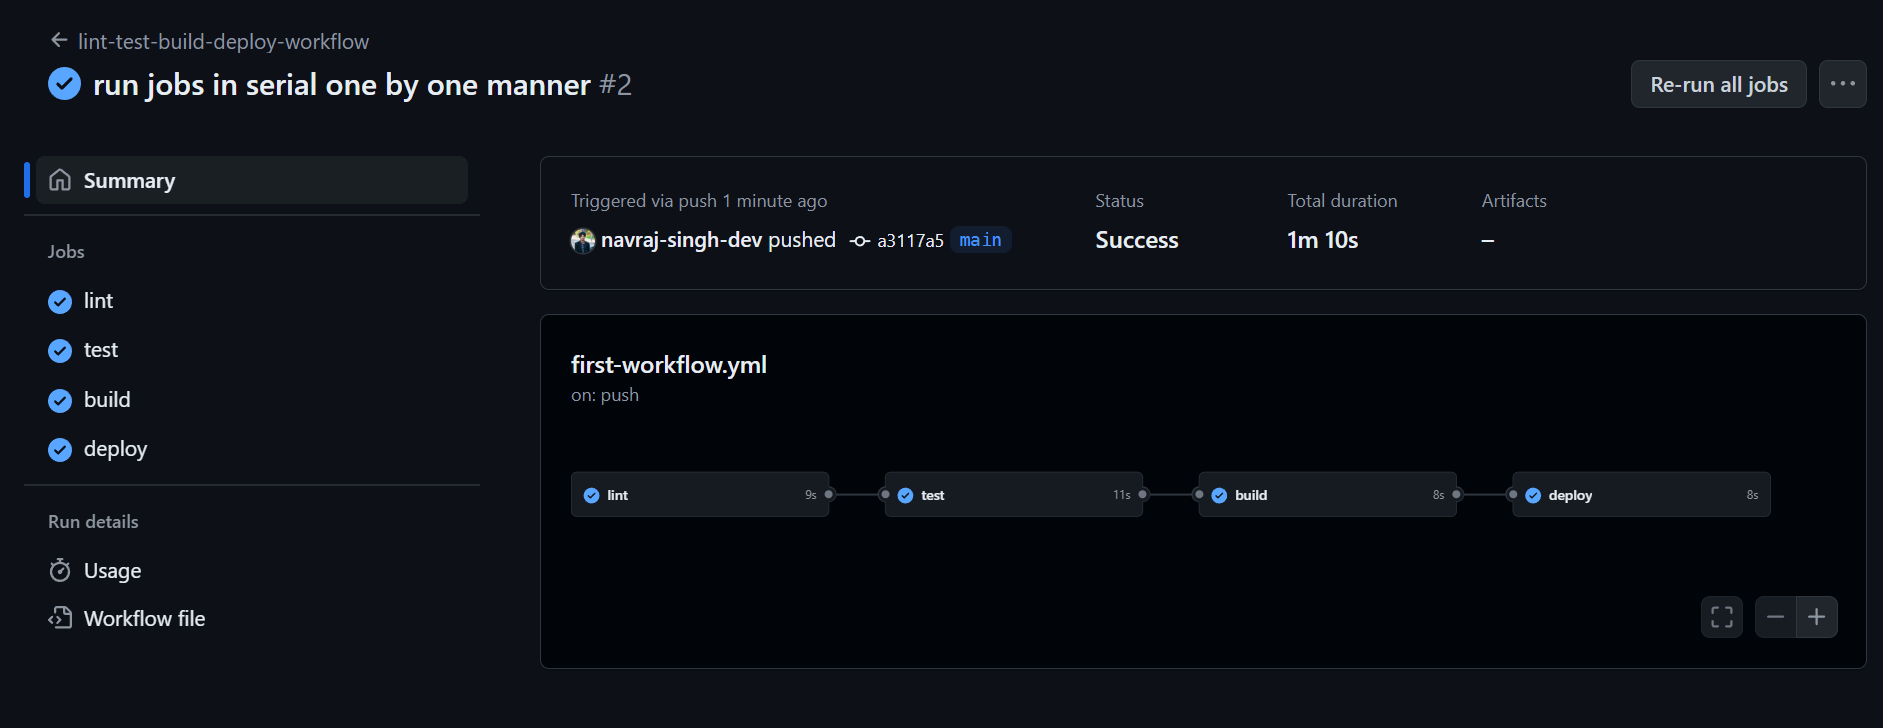
- All the jobs are now successfully run.
My Social Handles & This Blog's END
Thanks for reading this blog, i hope you did your best and learned a lot.
Please follow me here, if my blog added any value:
Like the blog, share the blog, subscribe to the newsletter.
Subscribe to my newsletter
Read articles from Navraj Singh directly inside your inbox. Subscribe to the newsletter, and don't miss out.
Written by

Navraj Singh
Navraj Singh
Navraj Singh is a DevOps Enthusiast with knowledge of DevOps and Cloud Native tools. He is technical blogger and devops community builder. He has background of Backend Development in NodeJS ecosystem.