Creating and Deploying Your React-Flask App to Render
 Adnan Wazwaz
Introduction
Tired of spending months working your butt off a web application project at school, only to never come back to it, because you were never taught what to do with it after finishing it? The great news is that those grievances will be put to an end with this article. I will walk you through creating a full stack web application using React and Flask, and deploying your website to the PaaS, Render, so that it can be used live.
Assumptions
Before doing so, I need to give a few disclaimers. At the time I write this article, I am assuming you already know JavaScript, React, Python, and Flask, and PostgreSQL. I also assume that you are familiar with the Linux terminal and GitHub. If you aren't up to date on the aforementioned technologies, then you are not ready for this article. Please go back and learn about them before proceeding if need be.
And it goes without saying that you have all the needed technologies installed onto your machine to program in React, Flask, and PostgreSQL. However, this is outside the scope of this article. There are numerous tutorials on how to get them all installed. Please install them if need be before proceeding.
With all that being said, I will provide at the end of this article a list of references and articles that are relevant to this topic, including ones that I have written before. Now let's get to it.
Terminology
Before actually, proceeding, it's important to define a couple of terms so that you are understanding what you are doing.
Deployment
Deployment is simply making applications available for use. Application deployment is the programmer's term for publishing his/her app. This could be making your website live, or publishing your application to an app store, such as App Store, Google Playstore, or Microsoft Store.
Platform as a Service (PaaS)
A PaaS is a development and deployment platform that makes building, updating, and running applications easier. They come with a wide range of services. Render, which is the PaaS that we will be using, is one such example. Render is great for small applications.
Now that you have a general idea of what's going on, we can proceed to the next section: application setup.
Application Setup
The first thing that needs to be done is to create a new project on Visual Studio Code. We subsequently need to set up the front end using React + Vite, and the backend using Python and Flask.
The setup will involve a few instances of copying code into certain files. The code provided includes comments that meticulously explain that each part of the code does. Be sure to understand the intent of every piece of code that I implement for deployment. Thanks in advance.
One last recommendation is to follow this guide from top to bottom instead of skipping steps.
Frontend Setup
On your terminal, create a new directory. Then, navigate to that directory and open Visual Studio code.
On VSCode, type the command npx create-vite@latest. Name your app "client" and follow along with the prompts to select the appropriate values.
    # Steps 1 and 2

    mkdir <directory-name>
    cd <directory-name>
    code .

    npx create-vite@latest
      # type the name client in place of vite-project
      ? Project name: › client
      # select React for the framework
      ? Select a framework: › - Use arrow-keys. Return to submit.
          Vanilla
          Vue
      ❯   React
          Preact
          Lit
          Svelte
          Solid
          Qwik
          Others
      # select either Javascript or Javascript + SWC, whichever you prefer.
      ? Select a variant: › - Use arrow-keys. Return to submit.
          TypeScript
          TypeScript + SWC
      ❯   JavaScript
          JavaScript + SWC
          Remix ↗
Navigate to the client folder; open the file vite.config.js; replace the contents with the following code and comments. Note that you can set the port number to whatever desired:
    import { defineConfig } from 'vite'
    import react from '@vitejs/plugin-react'

    // https://vitejs.dev/config/

    /**
     * PLEASE BE CAREFUL ABOUT MANUALLY UPDATING THIS FILE.
     * THERE EXISTS A COMMON JS FILE CALLED configureRouteSettings.cjs
     * WHICH WILL ALTER THE CONTENTS OF THIS FILE ITSELF!
     *
     * MAKING ANY MANUAL CHANGES MAY CAUSE UNWANTED ADDITIONS OR DELETIONS
     * TO THIS FILE!
     */
    export default defineConfig({
      plugins: [react()],
      server: {
        // changes our vite to launch out of port 3000
        port: 3000,
        // this allows the app to be accessed from outside the localhost
        cors:true,
        // we write our fetches to /api/route and it will go through this proxy
        // PROXY ONLY WORKS IN DEVELOPMENT AND WONT WORK IN PRODUCTION/DEPLOYED
        // proxy: {
        //   "/api":{
        //     // we can adjust the target based on our backend port
        //     target: "http://127.0.0.1:5000",
        //     changeOrigin:true,
        //     secure: false,
        //     rewrite: (path)=>path.replace(/^\/api/,"")
        //   }
        // }
      }
    })
Under the client folder, open package.json; add the following packages under the dependencies object; save and close the file.
    "react-router-dom": "^6.23.1",
    "inquirer": "^8.2.6"
Under the src folder, create a new file called helpers.js; Then, open it and copy and paste the following code (including the comments) into the file. Save and close the file afterwards.
    /**
     * The prefix to append the routes to when making fetch request.
     *
     * WARNING: THIS IS AUTOMATICALLY SET BY configureClient.cjs!
     * PLEASE DO NOT ALTER THE DECLARED VARIABLE MANUALLY!
     */
    const routePrefix = "";

    /**
     * Adds the correct route prefix to a given route and returns it.
     * This is meant to be used during fetched requests.
     *
     * @param {String} route the route.
     * @returns the route prepended with the prefix.
     */
    function correctRoute(route) {
        const correctedRoute = `${routePrefix}${route}`;
        // console.log(correctedRoute);
        return correctedRoute;
    }

    export { correctRoute }
In the root of your project, create a text file called configType.txt. You do not need to open it. DO NOT AT ANY POINT DELETE OR MANUALLY THIS FILE.
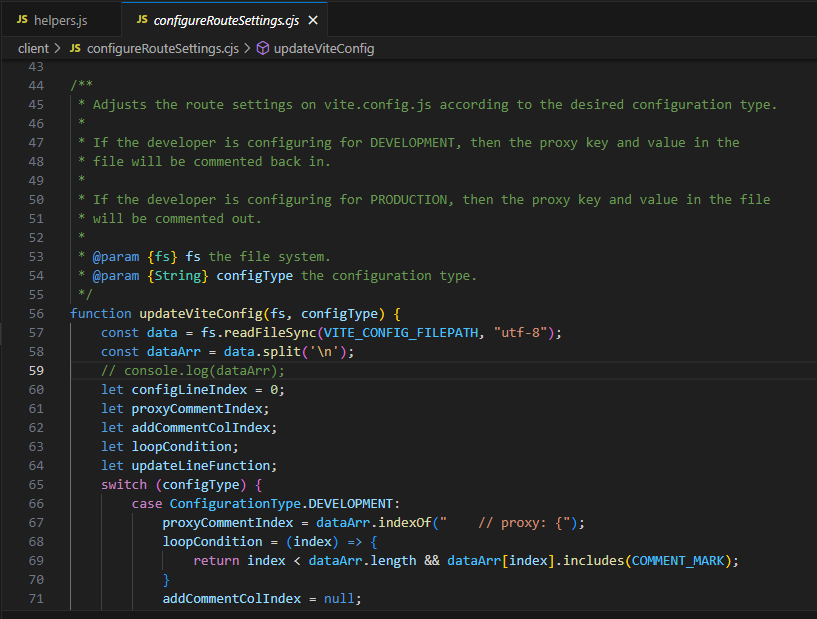
The reason why we apply these configurations in place is because routes run differently in the deployment server than they do in the development server. In the development server, we need to add a proxy to the vite configuration file. But this won't work in deployment, as noted in the comments. To make the proxy work in deployment, we would have to add it in the package.json file, and comment out the proxy in the vite.config.js file. As you can imagine, this can be quite the hassle to do it manually each every single time. The Common JS script here will solve this issue. It's too long to be included in the article. Create a new file under the client folder called configureRouteSettings.cjs. Then, copy and paste the linked code into the file. Finally, save and close.
Now you need to install all the needed React and JS dependencies.
Then, run the configureRouteSettings.cjs script. Select Development. If the script doesn't work, you have done something wrong. Running this script will programatically rewrite the vite.config.js, package.json, and helper.js files so that the route settings are configured for the correct type. Selecting Development will configure the route settings for the development server.
Finally, run the React application to make sure that everything is working.
    # Steps 8 through 10.

    # Install dependencies
    npm install --prefix client

    # Configure routes for development server.
    node client/configureRouteSettings.cjs
    ? Select the configuration type:  Development
    Routes have been configured for Development!

    # Run the application
    npm run dev --prefix client
Backend Setup
Now, we have to set up the backend. I will be referencing the article that my colleague, Anna Cole, has written about creating full stack web applications for some of the steps.
While you're still in the root directory of your project, run pipenv install to install all Python dependencies and create the Pipfile. This may take about a couple of minutes.
pipenv install
Open your Pipfile and add the following Python libraries under the packages section and the python versions under the requires section. Make sure that you have at least Python 3.9.17 installed on your machine. Save and close the file.
    [packages]
    flask = "*"
    flask-sqlalchemy = "*"
    flask-migrate = "*"
    sqlalchemy-serializer = "*"
    flask-restful = "*"
    flask-cors = "*"
    faker = "*"
    flask-bcrypt = "*"
    gunicorn = "*"
    honcho = "*"
    importlib-metadata = "*"
    psycopg2-binary = "*"
    python-dotenv = "*"

    [requires]
    python_version = "3.9"
    python_full_version = "3.9.17"
Now run pipenv install && pipenv shell to install all the Python libraries on your workspace and to generate the pipenv virtual environment.
Once you've entered the shell, create a folder called server.
    # Steps 3 and 4

    pipenv install && pipenv shell
    mkdir server
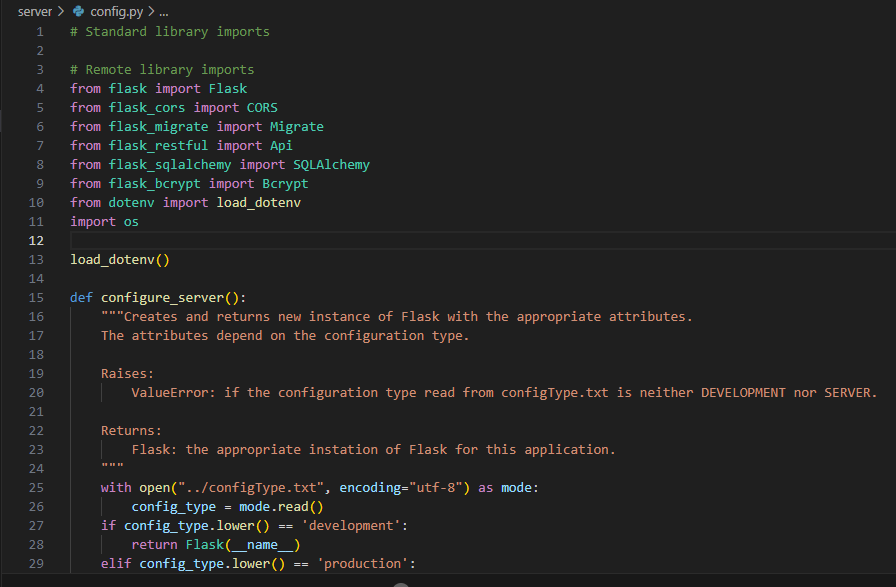
Under the server folder, create a Python file called config.py. Then copy and paste the linked code here to the file. Adjust the file by adding or removing code according to your needs. Save and close the file afterwards.
Next create your models. For the purposes of this tutorial, we will be creating a single models.py file for two simple models: language classifications and languages. Save the file.
   from sqlalchemy_serializer import SerializerMixin
   from sqlalchemy.orm import validates

   from config import db

   class LanguageClassification(db.Model, SerializerMixin):

       __tablename__ = 'classifications'

       id = db.Column(db.Integer, primary_key = True)
       name = db.Column(db.String, nullable=False)
       geographic_location = db.Column(db.String, nullable=False)
       # Relationships
       # languages = db.relationship('Language', back_populates='classification', cascade='all, delete-orphan')

       def __repr__(self):
           return f"<Language Classification {self.id}, {self.name}, {self.geographic_location}>"

   class Language(db.Model, SerializerMixin):

       __tablename__ = 'languages'

       id = db.Column(db.Integer, primary_key = True)
       name = db.Column(db.String, nullable = False)
       number_of_speakers = db.Column(db.Integer, db.CheckConstraint('number_of_speakers >= 0', name='check_speakers_constraint'), nullable=False)
       country_of_origin = db.Column(db.String, nullable=False)
       status = db.Column(db.Enum('ALIVE', 'ENDANGERED', 'DEAD', 'EXTINCT', name="status_enum"), nullable=False)
       # Foreign Key & Relationships
       # classification_id = db.Column(db.Integer, db.ForeignKey('classifications.id'))
       # classification = db.relationship('LanguageClassification', back_populates='languages')

       def __repr__(self):
           return f"<Language {self.id}, {self.name}, {self.number_of_speakers}, {self.country_of_origin}, {self.status}, {self.classification_id}"

       @validates("status")
       def validate_status(self, key, status):
           status = status.upper()
           if status not in ["ALIVE", "ENDANGERED", "DEAD", "EXTINCT"]:
               raise ValueError(f"{status} is not a valid {key}.")
           return status
Under the server folder, create another Python file called app.py. Cop and paste the following starter code into the file. Make sure the port number matches the port number used in the frontend. Save the file.
- ```python from config import app, db, api from flask import send_from_directory from flask_restful import Resource from models import LanguageClassification, Language
class Index(Resource): """The first resource that a request is made to in production mode."""
def get(self): """Renders the index.html document from the frontend.
Returns: Response: the index.html document. """ return send_from_directory("../client/dist", "index.html")
api.add_resource(Index, "/", endpoint="index")
if name == "main": app.run(port=5000, debug=True)
8. Go to [Render](https://dashboard.render.com/). Create an account if you don't already have one. Once you're in the dashboard, click on the ***\+ New*** dropdown menu on the top right of the page and select ***PostgreSQL*** to create a new PostgreSQL database.
1. 
9. Fill out the information needed and then click save.
1. 
10. By default, PostgreSQL databases will not show on your VSCode workspace. But we can install an extension to fix that problem. On VSCode, install the extension PostgreSQL. Look for the one by Chris Kolkman.
11. Once that's installed, you should see the PostgreSQL logo appear at the bottom of your toolbar. Navigate to it. Then, click on the "+" button to create a new connection. Enter the information below.
1. 
12. Under the root folder of your project, create a .env file. Add the following information. To retrieve your external database URI, go back to the top of your db instance on Render. Click on the ***Connect*** button. Navigate to the external tab and copy the external database URL.
1. <div data-node-type="callout">
<div data-node-type="callout-emoji">💡</div>
<div data-node-type="callout-text">Make sure your URI starts with "postgresql://...". If not, change it to so in the .env file.</div>
</div>
2. ```python
DATABASE_URI=[ADD EXTERNAL DATABASE URI HERE]
PYTHON_VERSION=3.9.17
Go back to the VSCode terminal. While still in the pipenv virtual environment, initialize the database, and run your first migration. Then uncomment the lines establishing a relationship between the models and run another migration. Once this is successfully done, you will be able to view your database tables with the PostgreSQL extension.
   cd server
   flask db init
   flask db migrate -m "Create tables"
   # Review migration version
   flask db upgrade head
   # Uncomment relationship lines in models
   flask db migrate -m "Add relationships"
   # Review migration version
   flask db upgrade head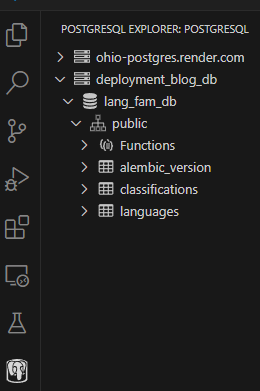
Add serialization rules to your models to prevent infinite recursion errors.
   class LanguageClassification(db.Model, SerializerMixin):

       serialize_rules = ('-languages.classification',)

       # Rest of the code here...

   class Language(db.Model, SerializerMixin):

       serialize_rules = ('-classification.languages',)

       # Rest of the code here...
The last thing that needs to be done in this section is to run the Flask application to make sure everything is working. Then, we can open another terminal to run the frontend. Make sure that you are in the server directory when you're running your Flask application.
   # If not in server folder...
   cd server
   export FLASK_APP=app.py
   export FLASK_RUN_PORT=5000
   python app.py

   # Open second terminal
   npm run dev --prefix client
Full Stack Setup
As you are thinking to yourself, running two terminals at once just to set up an application is such a drag. What if there was a program that allows us to run multiple processes at the same time. Wouldn't that be amazing?
It definitely would be amazing. And the more amazing part is that such a program actually exists. It's a Python library called Honcho. You should already have Honcho installed in your workspace when you copied the libraries above to your Pipfile and ran pipenv install again. If not, go back to that section and make sure it along with Gunicorn (a WSGI server) are both installed.
In the root of your project, create a file called Procfile.dev. Add the following code in the file. Then save and close.
   web: npm run dev --prefix client
   api: gunicorn -b 127.0.0.1:5000 --chdir ./server app:app
Close one of the terminals. Make sure you are not in the pipenv virtual environment. Run your full stack application using Honcho to ensure everything is working.
honcho start -f Procfile.dev
# Won't be outputted with Honcho
print("Hi, I\'m John")

# Will be outputted with Honcho
print("Hi, I\'m John", flush=True)
GitHub Setup
Of course, you gotta have a GitHub repository for this. Otherwise this whole ordeal would be pointless.
On GitHub, create a new repository.
In VSCode, initialize Git using the command: git init.
git init
This will prepare all files to be pushed into GitHub. However, you don't want to push EVERYTHING. Edit your .gitignore file that is generated by adding .env at the next available line, so that your .env file, which contains sensitive information is not pushed to GitHub.
Use the commands from GitHub to push your local repository into GitHub.
On GitHub, create a second branch called development. That way, you can preserve your live website and focus on local testing, whenever you need to. It's great since if something fails locally, those changes won't automatically sync to the main branch, which will be connected to your web service. (More on that later.)
And that's all there is for application setup. Now onto the next section.
Developing Your Application
In the context of testing in the development server and deploying your full stack web application, here are a few guidelines that you should follow.
Remember the helpers.js file that you created? The one with the function, correctRoute()? This function will add the proxy name to the route that you want to make a fetch request to. In development, you have to append all your routes on the frontend with "/api". But in the backend, you don't have to do that at all. In fact, in both servers, you'll have a proxy so you don't have to type in the full backend URL. You just have to type the route name when coding. So when you are coding your fetch requests, make sure to pass your routes in the correctRoute() function so that the request will successfully execute.
      import { correctRoute } from "./helpers";

        function myFunction() {
          fetch(correctRoute("/my_route"))
            .then((response) => response.json())
            .then((data) => console.log(data));
        }
You're most likely going to use React Router DOM to create an SPA to navigate between your routes, which is good. But since you're using Render, there's a catch. The way Render configures their route settings, unfortunately, they will return JSON even if you try to type the route as a page. One mitigation is to add all your frontend routes to the index resource so that they will always render your desired webpage. For routes that involve parameters, you will have to add an optional argument to the get method in the resource to accomodate for all routes.
```python class Index(Resource): """The first resource that a request is made to in production mode."""
def get(self, parameter=None): """Renders the index.html document from the frontend.
Returns: Response: the index.html document. """ return send_from_directory("../client/dist", "index.html")
api.add_resource( Index, "/", "/page_route_1", "/page_route_2", "/page_route_3/", endpoint="index" )
---

# Deployment

Once you are at a good spot to test your website live, here are the steps to follow.

1. On your VSCode terminal, navigate to the root of your project. Exit the pipenv shell too, if needed.

2. Run the Common JS script, **configureRouteSettings.cjs**. In the menu, select ***Production*** to configure your route settings for production.

    1. ```bash
          # Run from the root folder
          node client/configureRouteSettings.cjs
          ? Select the configuration type:  Production
          Routes have been configured for Production!
If you installed any additional Python libraries at any point, make sure to add them all to the Pipfile. Then run pipenv install on your terminal again.
Run the following pipenv command to generate a requirements file for all the Python libraries and dependencies needed, so that your live application can import them all.
Next, run the following npm command to create a distribution folder. This command builds your frontend modules for production by generating difficult to read frontend files inside a "distribution folder", or dist for short.
   # Steps 4 and 5

   # Generate requirements
   pipenv requirements > requirements.txt
   # Build files for production
   npm run build --prefix client
Commit your changes to the main branch of GitHub.
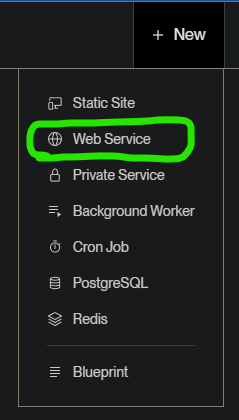
On Render, click on the + New drop down menu on the top right of the page and select Web Service.
Select "Build and deploy from a Git repository". Then click Next*.*
Connect your Render account with GitHub. Then use it's account configuration feature to load the repository of the website you wish to deploy.
Once your repository is loaded, click the Connect button next to it.
Set your web service name to whatever you want.
Set your build and start commands to the following:
   # Build Command
   pip install -r requirements.txt && npm install --prefix client && npm run build --prefix client

   # Start Command
   gunicorn --chdir server app:app
Go to your .env file and copy all the variables in the environment variables section.
Click Deploy Web Service to deploy your website. This will take a little time, so sit back, relax, and enjoy the show.
Once your service is live, click on the link to open the website and you should see it running.
If you want to push changes to production, simply repeat steps 1 through 6. The other steps you only have to do once.
Conclusion
And that's pretty much how you deploy a full stack web application. You can use any PaaS and follow similar instructions. React and Flask are very compatible with each other to the point that they work so well together in production. Let me know what you guys think of this experiment in the comments below, and follow me to stay tuned for more well-put documentation like this. Happy coding.
Sources
Subscribe to my newsletter
Read articles from Adnan Wazwaz directly inside your inbox. Subscribe to the newsletter, and don't miss out.
Written by

