A Beginner's Guide on Using JavaScript Local Storage API
 Bello Joseph

Imagine you were filling a form or shopping from an online store. Then, your browser accidentally refreshed. You lost all the progress you made while filling the form and your cart got cleared. That can be infuriating, right? Well, worry no more, JavaScript has provided a way to solve this problem through the local storage API.
The local storage API (Application Programming Interface) is a built-in property from JavaScript's windows object. Local storage allows web applications to persist data even after closing your browser. In this article, we would discuss in detail how the local storage API functions, its uses and limitations, how to access its various methods and finally, we're going to use what we have learnt in a simple To-Do app.
What is Local Storage?
In the windows object, the local storage property enables the browser to store data using key-value pairs. It works like a regular JavaScript object. It is one of several Web storage methods where data is stored locally without the need for a server.
Local storage eliminates the hassle of setting up a server or creating a database to store data offline. With local storage, users can persist data across multiple tabs within a browser.
The Web Storage API provides the local storage and session storage API for storing data. They're very similar in how they store data(key-value pairs) but differ greatly in how long they persist data in the browser.
Differences between Local Storage and Session Storage
As we discussed earlier, local storage and session storage both store data using key-value pairs. Now, what are the differences between them? Well, let's examine them below:
Storage Duration: Data stored in local storage is not session-dependent and persists in the browser unless it is deleted with JavaScript, in contrast to session storage. Data stored in session storage in a browser is automatically deleted, once the user closes that tab.
Data Accessibility: Data stored with local storage is shared across different tabs or windows of the same origin, whereas, data stored in session storage is locally scoped and unavailable to other tabs/windows, regardless of having the same origin.
Advantages of Storing Data with Local Storage
Performance Enhancement: Many web applications generate excessive server requests, leading to increased server load and a slowdown in web application performance. By utilizing local storage, you can store data on the client-side, reducing the need for server requests and improving the speed and performance of your application.
Data Synchronization: Local storage enables cross-tab communication. This feature allows us to sync data within different tabs and windows of the same origin.
Offline Data Access: Data stored in local storage is accessible without an internet connection. When you save data in local storage, your browser immediately creates and manages a database file. This file holds all the data you store in local storage and remains available unless deleted on the client-side.
Disadvantages of Storing Data with Local Storage
Security Concerns: Data stored in local storage can be accessed by any JavaScript code, posing a security risk as attackers can inject malicious code to read and modify the stored data. Avoid storing sensitive user information or authentication tokens using local storage.
Stores Data in String Formats Only: Local storage only stores data in the UTF-16 string format. If you want to store data structures like objects or arrays, you need to use the
JSON.stringify()method to serialize it, andJSON.parse()to retrieve your original object or array. However, there are better alternatives that can store such data without requiring serialization, such as the IndexedDB API.Limited Storage Space: Local storage has a maximum capacity of about 5MB per browser. Exceeding this storage limit would lead to your application potentially crashing and encountering issues. You should consider other alternatives and resource-efficient method of storing data.
When Should you use Local Storage?
Due to its vulnerabilities and limited storage space, you might be cautious about storing data using local storage. However, there are several scenarios where its benefits outweigh its disadvantages.
Local Storage is a preferred method for storing personal data in web applications. For instance, it should be used for storing a user's language preference, theme choice, and other settings.
How to view Local Storage in Dev Tools
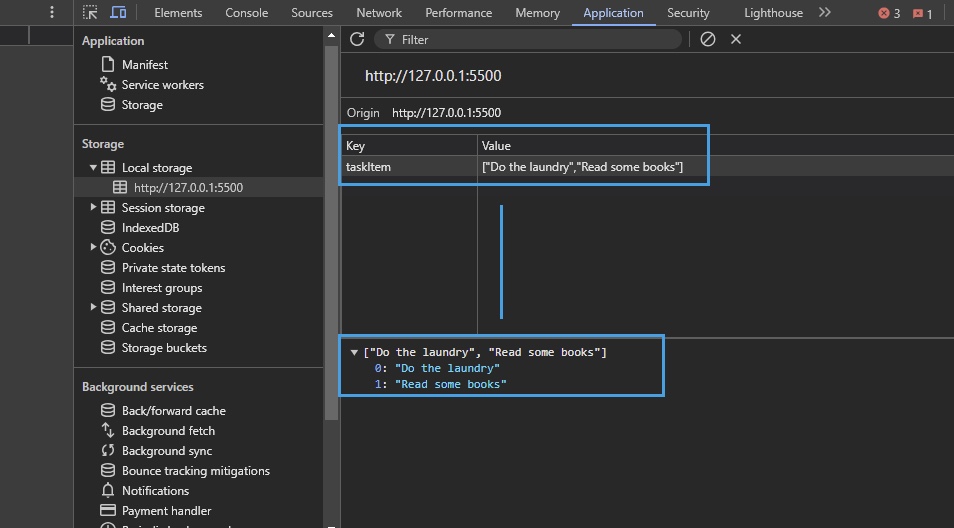
Later in this article, we'll use Dev Tools to access local storage. Follow these steps to access local storage in your browser.
Right-click on the page and select "Inspect" or press F12 to open the developer tools.
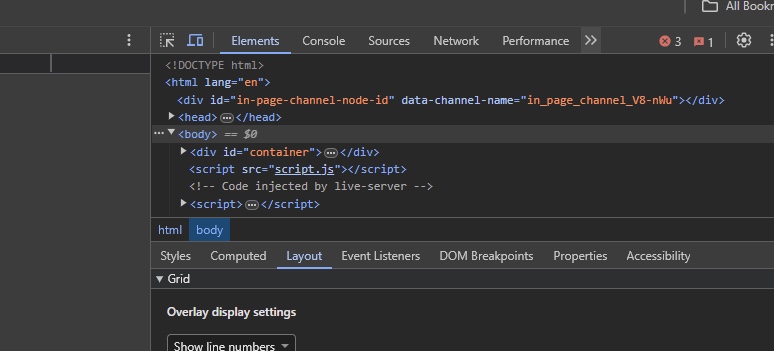
In the Dev Tools panel, locate the "Application" tab on the top right-hand side and click it.
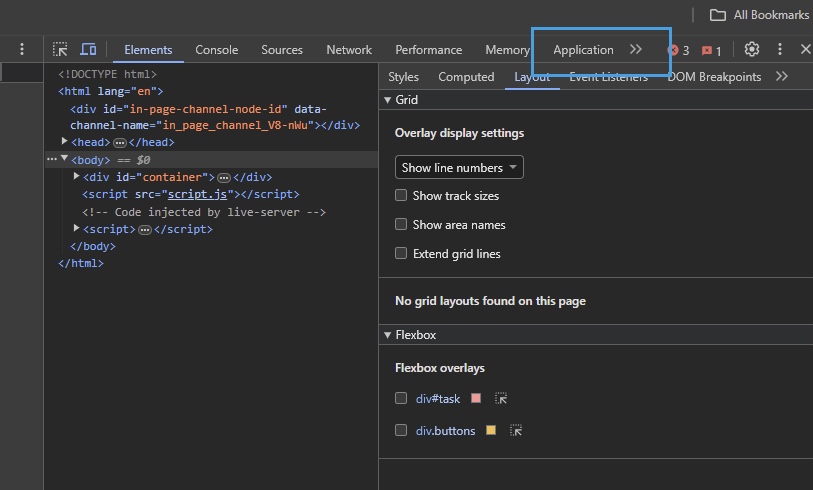
Under the Application tab, click on "Storage" to access various storage options.
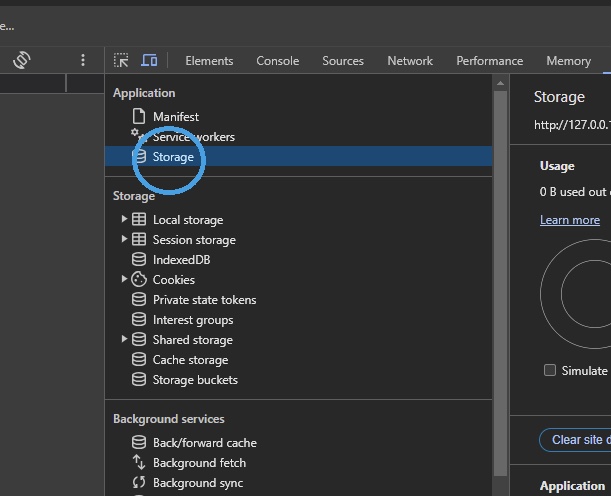
Locate local storage and expand its content.
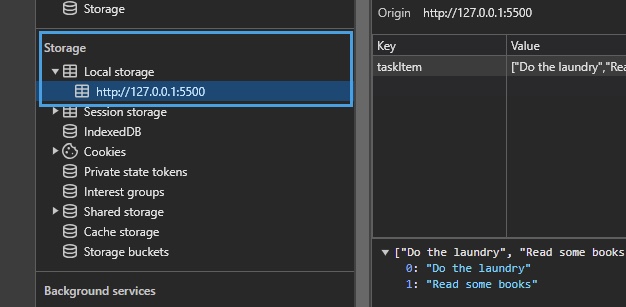
Finally, you can access your page's local storage content.
Local Storage Methods
Local storage, which is a component of the global Window object, provides a number of methods for creating, accessing, and updating data. A method is a function within an object that performs actions relating to it.
Local storage has 5 main methods, which are the:
setItem()
getItem()
removeItem()
clear()
key()
Using Local Storage to Store Data
Local storage provides us with the setItem() method, which takes in two parameters: a key and a value. This method allows us to store data in a key-value pair, just like regular objects.
localStorage.setItem("Age", "18");
The first parameter, "Age", represents the identifier or key to the value being stored, in this case "18" is the value to the key "Age". In situations where the key already exists in local storage, the key's value would be updated.
Using Local Storage to Retrieve Data
Local storage provides us with the getItem() method, which takes a single parameter: a key. This method allows us to retrieve the corresponding value of that key. If the key is not found in local storage, the getItem() method returns null.
let Age = localStorage.getItem("Age");

console.log(Age) // Output: "18";
In the example below, we tried to access a key ("Age3") that hadn't been defined. This would lead to an error and log in "null" to the browser's console.
localStorage.setItem("Age1", "16");
localStorage.setItem("Age2", "18");

let Age3 = localStorage.getItem("Age3");
console.log(Age3); // Output: null
Using Local Storage to Delete Data
With local storage you can delete data in two ways. The first approach allows you to remove a specific item from local storage using the removeItem() method, while the clear() method removes all items.
removeItem(): removeItem() takes in a key as the only parameter, and removes the corresponding key-value pair associated with the key passed in as a parameter.
To explain this scenario better, let's add multiple items to local storage.
localStorage.setItem("username", "Joseph");
localStorage.setItem("gender", "Male");
localStorage.setItem("age", "18");
localStorage.setItem("email", "Joseph@example.com");
Now, let's remove the gender key along with its corresponding value only from our list in local storage. To achieve this, we are to use the removeItem() method.
localStorage.removeItem("gender");
Let's confirm if the gender key still exists in local storage. Use the getItem() method to retrieve it and check the console. Since we removed the gender key, it should output "null."
console.log(localStorage.getItem("gender"))
// Output : null
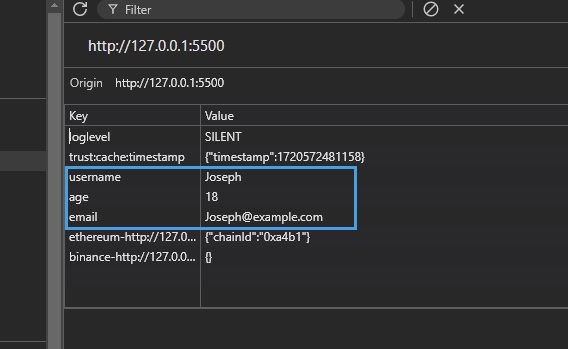
Another way to confirm is through the developer tools. Copy the code below, paste it into your IDE, then check local storage in your dev tools for the result.
localStorage.setItem("username", "Joseph");
localStorage.setItem("gender", "Male");
localStorage.setItem("age", "18");
localStorage.setItem("email", "Joseph@example.com");

localStorage.removeItem("gender");
You should get a result like this, notice that only the gender's key and it's value are missing ?
clear() : The clear() method removes all key-value pairs in local storage for the current origin. Test the code below in your IDE, then check the Developer Tools to see the result.
localStorage.setItem("username", "Joseph");
localStorage.setItem("gender", "Male");
localStorage.setItem("age", "18");
localStorage.setItem("email", "Joseph@example.com");

localStorage.clear()
Getting the name of a key in Local Storage
There are many situations where you need to access specific items in local storage or manipulate its data. A common example is looping through your storage. By using the key() method, you can retrieve the name of a key at a specific index.
The key() method takes in an index as its parameter, and returns the associated key's name at the specified index you provided.
localStorage.key(index)
The example below shows how to retrieve a key's name from a list of items in local storage.
localStorage.setItem("FirstName", "Joseph");
localStorage.setItem("gender", "Male");
localStorage.setItem("age", "18");

let KeyName = localStorage.key(0)
console.log(KeyName);

// Output : "FirstName"
In the example above, we used the key() method to retrieve the key name at index 0. Note that local storage utilizes zero-based indexing.
Implementing Local Storage for a Simple To-Do App
What's the usefulness of theories without application? With all we have discussed above, you should have a solid understanding of how the local storage API works. Now it's time to put into practice what we have learned so far.
In the example below, we would start by creating our basic HTML structure for our To-Do app.
<div id="container">
  <div id="task">
    <h1>
      Todo App
    </h1>
    <input id="input" type="text" placeholder="Add an item to list">
    <div class="buttons">
      <button class="addBtn">Add To List</button>
      <button class="clearBtn">Clear List</button>
    </div>
  </div>
  <div id="tasks">
    <ul id="list-items">
    </ul>
  </div>
</div>
Let's break down the code snippet above together:
We created an input field with the ID "input" to collect users' input.
Next, we created two button elements: one for adding items to the list (addBtn) and the other for clearing all items present in the list (clearBtn).
Finally, we added the
ultag to display the list items from our to-do app.
Next, we've added some styling with CSS; here is the resulting layout below:
Feel free to copy the code and style it according to your preference.
const input = document.getElementById("input")
const addBtn = document.querySelector(".addBtn")
const clearBtn = document.querySelector(".clearBtn")
const ul = document.getElementById("list-items");
From the snippet above, we selected the input, addBtn, clearBtn and ul elements with JavaScript DOM methods querySelector and getElementById.
Next, let's create an array to hold all items in our To-do list:
let taskItem = JSON.parse(localStorage.getItem("taskItem")) || [];
Let's break down the example above:
First, we used the
getItem()method to check if there are any items present in thetaskItemarray.If there are no items present (i.e. getItem returns null), we set
taskItemto an empty array [] by using the logical OR operator ||.
Now, let's continue by adding our to-do's to our taskItem array.
function addToList(){
    const inputValue = input.value.trim();
    taskItem.push(inputValue);
    localStorage.setItem("taskItem", JSON.stringify(taskItem));
}

addBtn.addEventListener("click", addToList);
From the code above, we've added a click eventListener to the addBtn element, and passed in a callback function addToList. With the addToList function, we performed the following operations:
Took the user's input and trimmed it to remove extra whitespace.
Added the user's input into the
taskItemarray by using thepush()method.Then used the
setItem()method to save the user's input in local storage.
At this stage, every To-do item created is only present in local storage, now let's make it visible in our app.
 function createListItems() {
    ul.innerHTML = "";
    taskItem.forEach((item) => {
      const li = document.createElement("li");
      li.textContent = item;
      ul.appendChild(li);

    });
  }
First, we looped through all the items in the
taskItemarray.Next, for each item present, we created a new
lielement in thetaskItemarray.We assigned the text content of each list item to its corresponding item in the array.
Next, we've appended each list item as a child node to the ul element.
Finally, each item is visible on our app; the next thing on our list is to add the functionality to clear all items from our list.
 function clearAll(){
    taskItem = [];
    localStorage.clear()
    ul.innerHTML = '';
  }

clearBtn.addEventListener("click", clearAll)
The clearBtn element listens for a click event and activates the clearAll() function, once active, the clearAll() function removes all items from the array.
Here is a preview of the To-Do app you created.
You can also view the full code here and edit it if you desire to.
Great job! You've successfully learned how to use local storage in a simple To-Do app. But that's not all – local storage can also be used to save user preferences on your website, like light or dark mode settings, language preferences, and more.
Just remember: never store sensitive information in local storage. This is because local storage is vulnerable to XSS attacks, as it's stored on the client side.
Conclusion
Thank you for reading. I am sure you have learned a lot from this article. Now, you should know what local storage is, the differences between local storage and session storage, its uses, features, and limitations.
In this article, we also explored several local storage methods and learned how to apply them by building a simple to-do app and storing data with local storage.
Happy coding! I hope this isn't the last time you use local storage.
Subscribe to my newsletter
Read articles from Bello Joseph directly inside your inbox. Subscribe to the newsletter, and don't miss out.
Written by

Bello Joseph
Bello Joseph
Hi, I'm Joseph, a front-end developer and technical writer. When I'm not coding, I specialize in transforming complex technical concepts into clear and accessible content for all audiences. My passion lies in making tech easy to understand, ensuring that everyone can grasp and enjoy it.