Fragments in Android
 Yashraj Singh Jadon
What are Fragments?
In Android, a fragment is a reusable portion of your app's user interface. You can think of a fragment as a mini-activity within an activity. Like activities, fragments have their own lifecycle, meaning they go through stages such as creation, starting, pausing, stopping, and destroying. A fragment receives its own input events, and you can add or remove it while the activity is running.
Why Use Fragments?
Here are some key reasons why fragments are useful:
Modularity: Fragments allow you to divide your UI into smaller, manageable pieces. This makes your code easier to manage and maintain.
Reusability: You can reuse fragments in multiple activities, reducing redundancy and saving time.
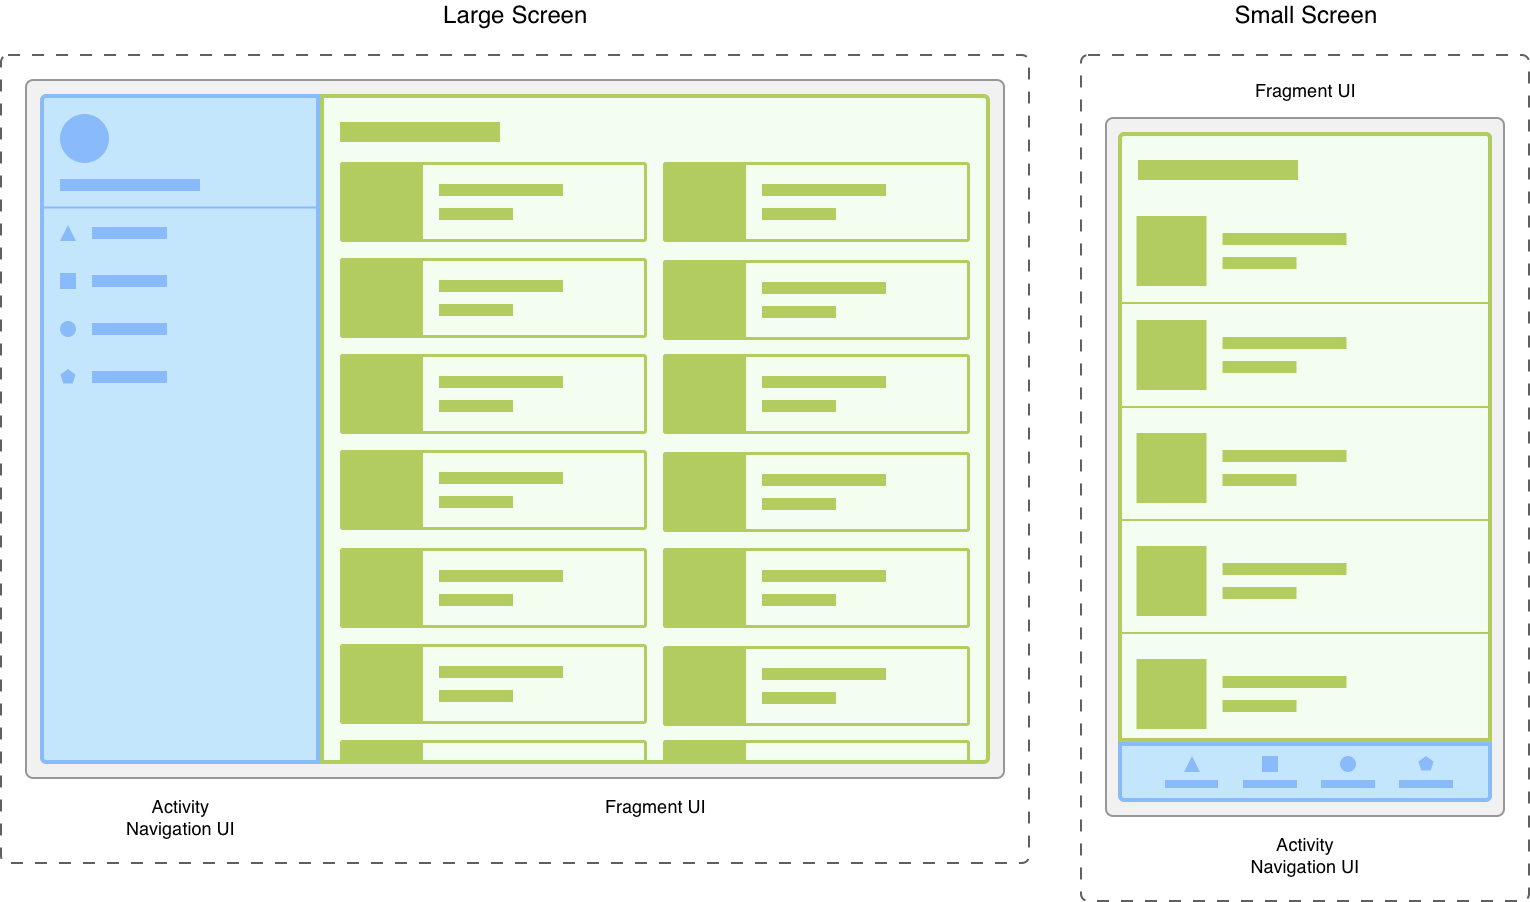
Adaptability: Fragments help you create flexible UIs that work on different screen sizes and orientations.
For example, a tablet can display multiple fragments side by side, while a phone might show them one at a time.

Image Source: https://developer.android.com/guide/fragments
How to Create a Fragment?
Creating a fragment is similar to creating an activity. Here’s a basic example:
- Create a new class
DemoFragmentthat extendsFragmentand override its methods to insert your app logic.
class DemoFragment : Fragment() {

    private val TAG = "DemoFragment"

    override fun onAttach(context: Context) {
        super.onAttach(context)
        Log.d(TAG, "onAttach: Fragment attached to activity")
    }

    override fun onCreate(savedInstanceState: Bundle?) {
        super.onCreate(savedInstanceState)
        Log.d(TAG, "onCreate: Fragment create")
    }

    override fun onCreateView(
        inflater: LayoutInflater, container: ViewGroup?,
        savedInstanceState: Bundle?
    ): View? {

        Log.d(TAG, "onCreateView: Fragment create view")
       // Inflate the layout for this fragment
        return inflater.inflate(R.layout.fragment_demo, container, false)
    }

    override fun onViewCreated(view: View, savedInstanceState: Bundle?) {
        super.onViewCreated(view, savedInstanceState)
        Log.d(TAG, "onViewCreated: Fragment view created")
    }

    override fun onStart() {
        super.onStart()
        Log.d(TAG, "onStart: Fragment started")
    }

    override fun onResume() {
        super.onResume()
        Log.d(TAG, "onResume: Fragment resumed")
    }-

    override fun onPause() {
        super.onPause()
        Log.d(TAG, "onPause: Fragment paused")
    }

    override fun onStop() {
        super.onStop()
        Log.d(TAG, "onStop: Fragment stopped")
    }

    override fun onDestroyView() {
        super.onDestroyView()
        Log.d(TAG, "onDestroyView: Fragment view destroyed")
    }

    override fun onDestroy() {
        super.onDestroy()
        Log.d(TAG, "onDestroy: Fragment destroyed")
    }

    override fun onDetach() {
        super.onDetach()
        Log.d(TAG, "onDetach: Fragment detached from activity")
    }

}
- In your activity, instantiate and add the fragment using
FragmentManager.
class FragmentHolderActivity : AppCompatActivity() {

    private val TAG = "FragmentHolderActivity"

    override fun onCreate(savedInstanceState: Bundle?) {
        super.onCreate(savedInstanceState)
        setContentView(R.layout.activity_fragment_holder)

        if (savedInstanceState == null) {
        // Get the FragmentManager to interact with fragments associated with this activity
            val fragmentManager: FragmentManager = supportFragmentManager
        // Begin a new fragment transaction
            val fragmentTransaction: FragmentTransaction = fragmentManager.beginTransaction()
        // Create a new instance of DemoFragment
            val fragment = DemoFragment()
        // Add the fragment to the container specified by its ID (R.id.fragment_container)
            fragmentTransaction.add(R.id.fragment_container, fragment)
        // Commit the transaction to apply the changes
            fragmentTransaction.commit()
        }
        Log.d(TAG, "onCreate: Activity created")
    }

    override fun onStart() {
        super.onStart()
        Log.d(TAG, "onStart: Activity started")
    }

    override fun onResume() {
        super.onResume()
        Log.d(TAG, "onResume: Activity resumed")
    }

    override fun onPause() {
        super.onPause()
        Log.d(TAG, "onPause: Activity paused")
    }

    override fun onStop() {
        super.onStop()
        Log.d(TAG, "onStop: Activity stopped")
    }

    override fun onRestart() {
        super.onRestart()
        Log.d(TAG, "onRestart: Activity restarted")
    }

    override fun onDestroy() {
        super.onDestroy()
        Log.d(TAG, "onDestroy: Activity destroyed")
    }
}
Note: The fragment transaction is created only when
savedInstanceStateis null. This ensures the fragment is added just once when the activity starts initially. When a configuration change happens and the activity is recreated,savedInstanceStateisn't null anymore. In this case, the fragment isn't added again; it's automatically restored fromsavedInstanceState.
- Include a
FragmentContainerViewin your activity's layout file where the fragment will be placed.
<?xml version="1.0" encoding="utf-8"?>
<androidx.fragment.app.FragmentContainerView
    xmlns:android="http://schemas.android.com/apk/res/android"
    android:layout_width="match_parent"
    android:layout_height="match_parent"
    android:id="@+id/fragment_container" />
FragmentManager: The main class to manage fragment operations like adding, removing, replacing fragments, and handling the fragment back stack.
FragmentTransaction: Used to perform a set of fragment operations (like adding, replacing, or removing fragments) in a single atomic action.
Adding Fragments: Attach fragments to an activity.
Removing Fragments: Detach fragments from an activity.
Replacing Fragments: Replace existing fragments with new ones.
Finding Fragments: Find fragments by their ID or tag.
Fragment Lifecycle
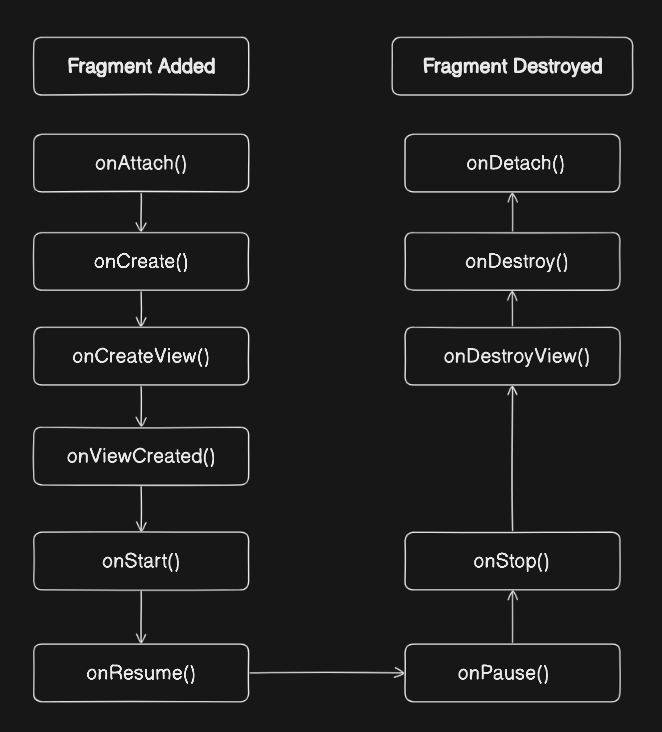
The lifecycle of fragment goes through the following stages:

onAttach(): Called when the fragment is first attached to its host activity.
onCreate(): The fragment is created. The saved instance state can be used to restore the fragment's previous state.
onCreateView(): Called to create the view hierarchy associated with the fragment.
onViewCreated(): Called immediately after
onCreateView(). You can perform any additional setup of the fragment's view here.onStart(): Called when the fragment is visible to the user.
onResume(): Called when the fragment is visible and actively running.
onPause(): Called when the fragment is not actively running.
onStop(): Called when the fragment is no longer visible to the user.
onDestroyView(): Called to clean up resources associated with the view.
onDestroy(): Called when the fragment is destroyed.
onDetach(): Called when the fragment has been detached from the activity.
- Lifecycle methods execution when the app is launched (refer to the code above on how to create a fragment):


This demonstrates the sequence of fragment and activity lifecycle methods executed when the app is launched.
- Lifecycle methods execution when the app is closed and removed from the background (refer to the code above on how to create a fragment).


This demonstrates the order of fragment and activity lifecycle methods executed when the app is closed and removed from the background.
Conclusion
Fragments serve as modular components that allow you to build dynamic and flexible UIs in Android. They make it easier to manage complex interfaces and ensure your app works well on various devices. By using fragments, you can create better and more adaptable Android applications.
Subscribe to my newsletter
Read articles from Yashraj Singh Jadon directly inside your inbox. Subscribe to the newsletter, and don't miss out.
Written by

Yashraj Singh Jadon
Yashraj Singh Jadon
Hello, I'm an Android developer passionate about creating mobile apps.