How to securely access and transfer files to an EC2 instance in a private subnet of VPC in AWS?
 Yobroda
Table of contents
- Steps for IT Team Administrator (IAM user with admin privileges)
- Step 1.0: Create a Mandatory MFA policy in IAM before on-boarding Dev Team as IAM users.
- Step 1.1: Ensure the following in VPC Settings.
- Step 1.2: Create a CloudWatch log group.
- Step 1.3: Create a KMS Key to encrypt CloudWatch log group using CloudShell:
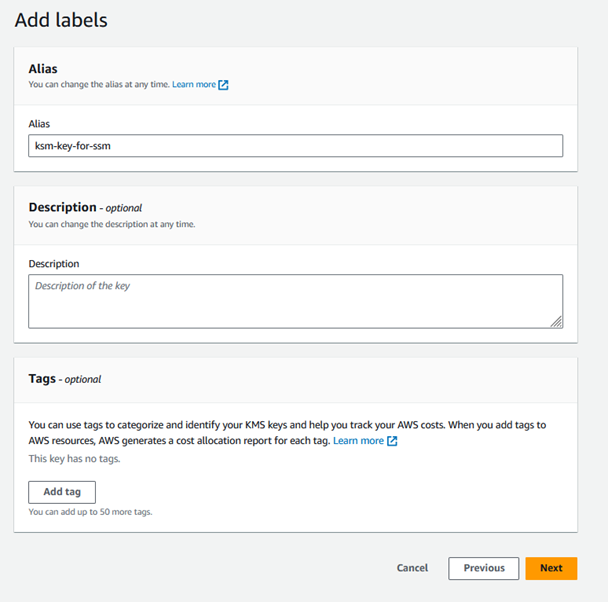
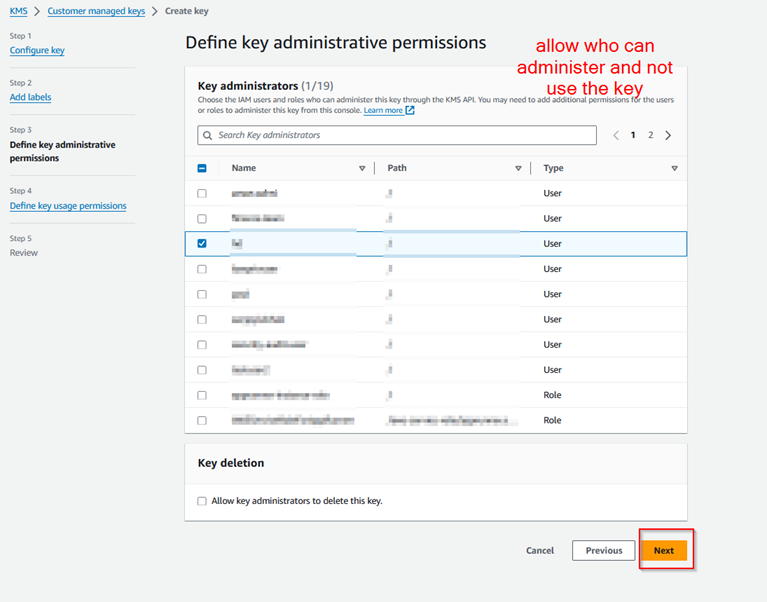
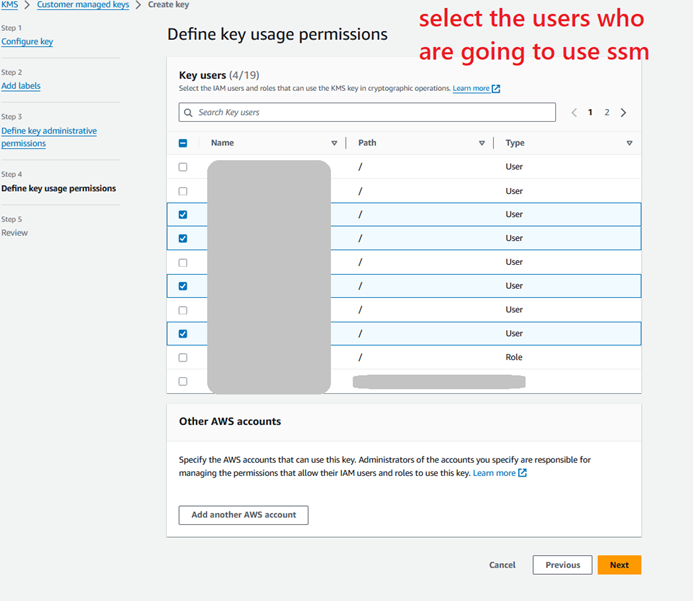
- Step 1.4: Create another KMS key that is going to be used for encrypting the SSM sessions.
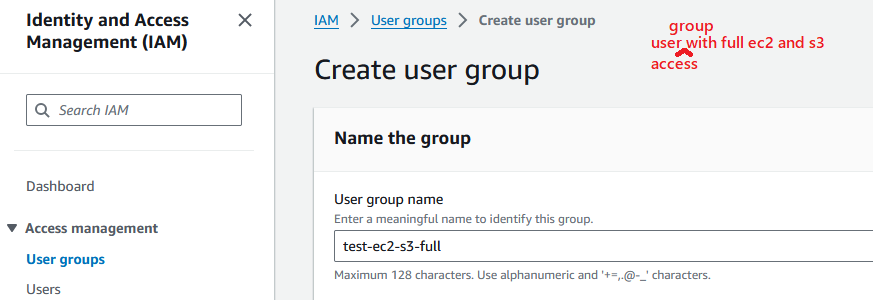
- Step 1.5: Create an IAM user group and create a user in that group for the Dev Team.
- Step 1.6: Create an IAM role for EC2 SSM Access to attach as IAM instance profile.
- Step 1.7: Create a Security group with inbound and outbound HTTPS Access.
- Step 1.8: Create an EC2 instance such that SSM access can be taken.
- Step 1.9: Create VPC Endpoints for SSM Access.
- Step 1.10: Create User on EC2.
- Step 1.11: Modify the role that is attached to IAM instance profile, so that SSM sessions can also have encrypted sessions using KMS and CloudWatch logging once set in the next step.
- Step 1.12: Configure SSM Preferences.
- Step 1.13: The administrator has to ensure that SSM key tag is now added to his/her IAM user profile tags to use SSM to connect to EC2 instance in a secure manner.
- Step 1.14: Adding SSM permissions to testuser2.
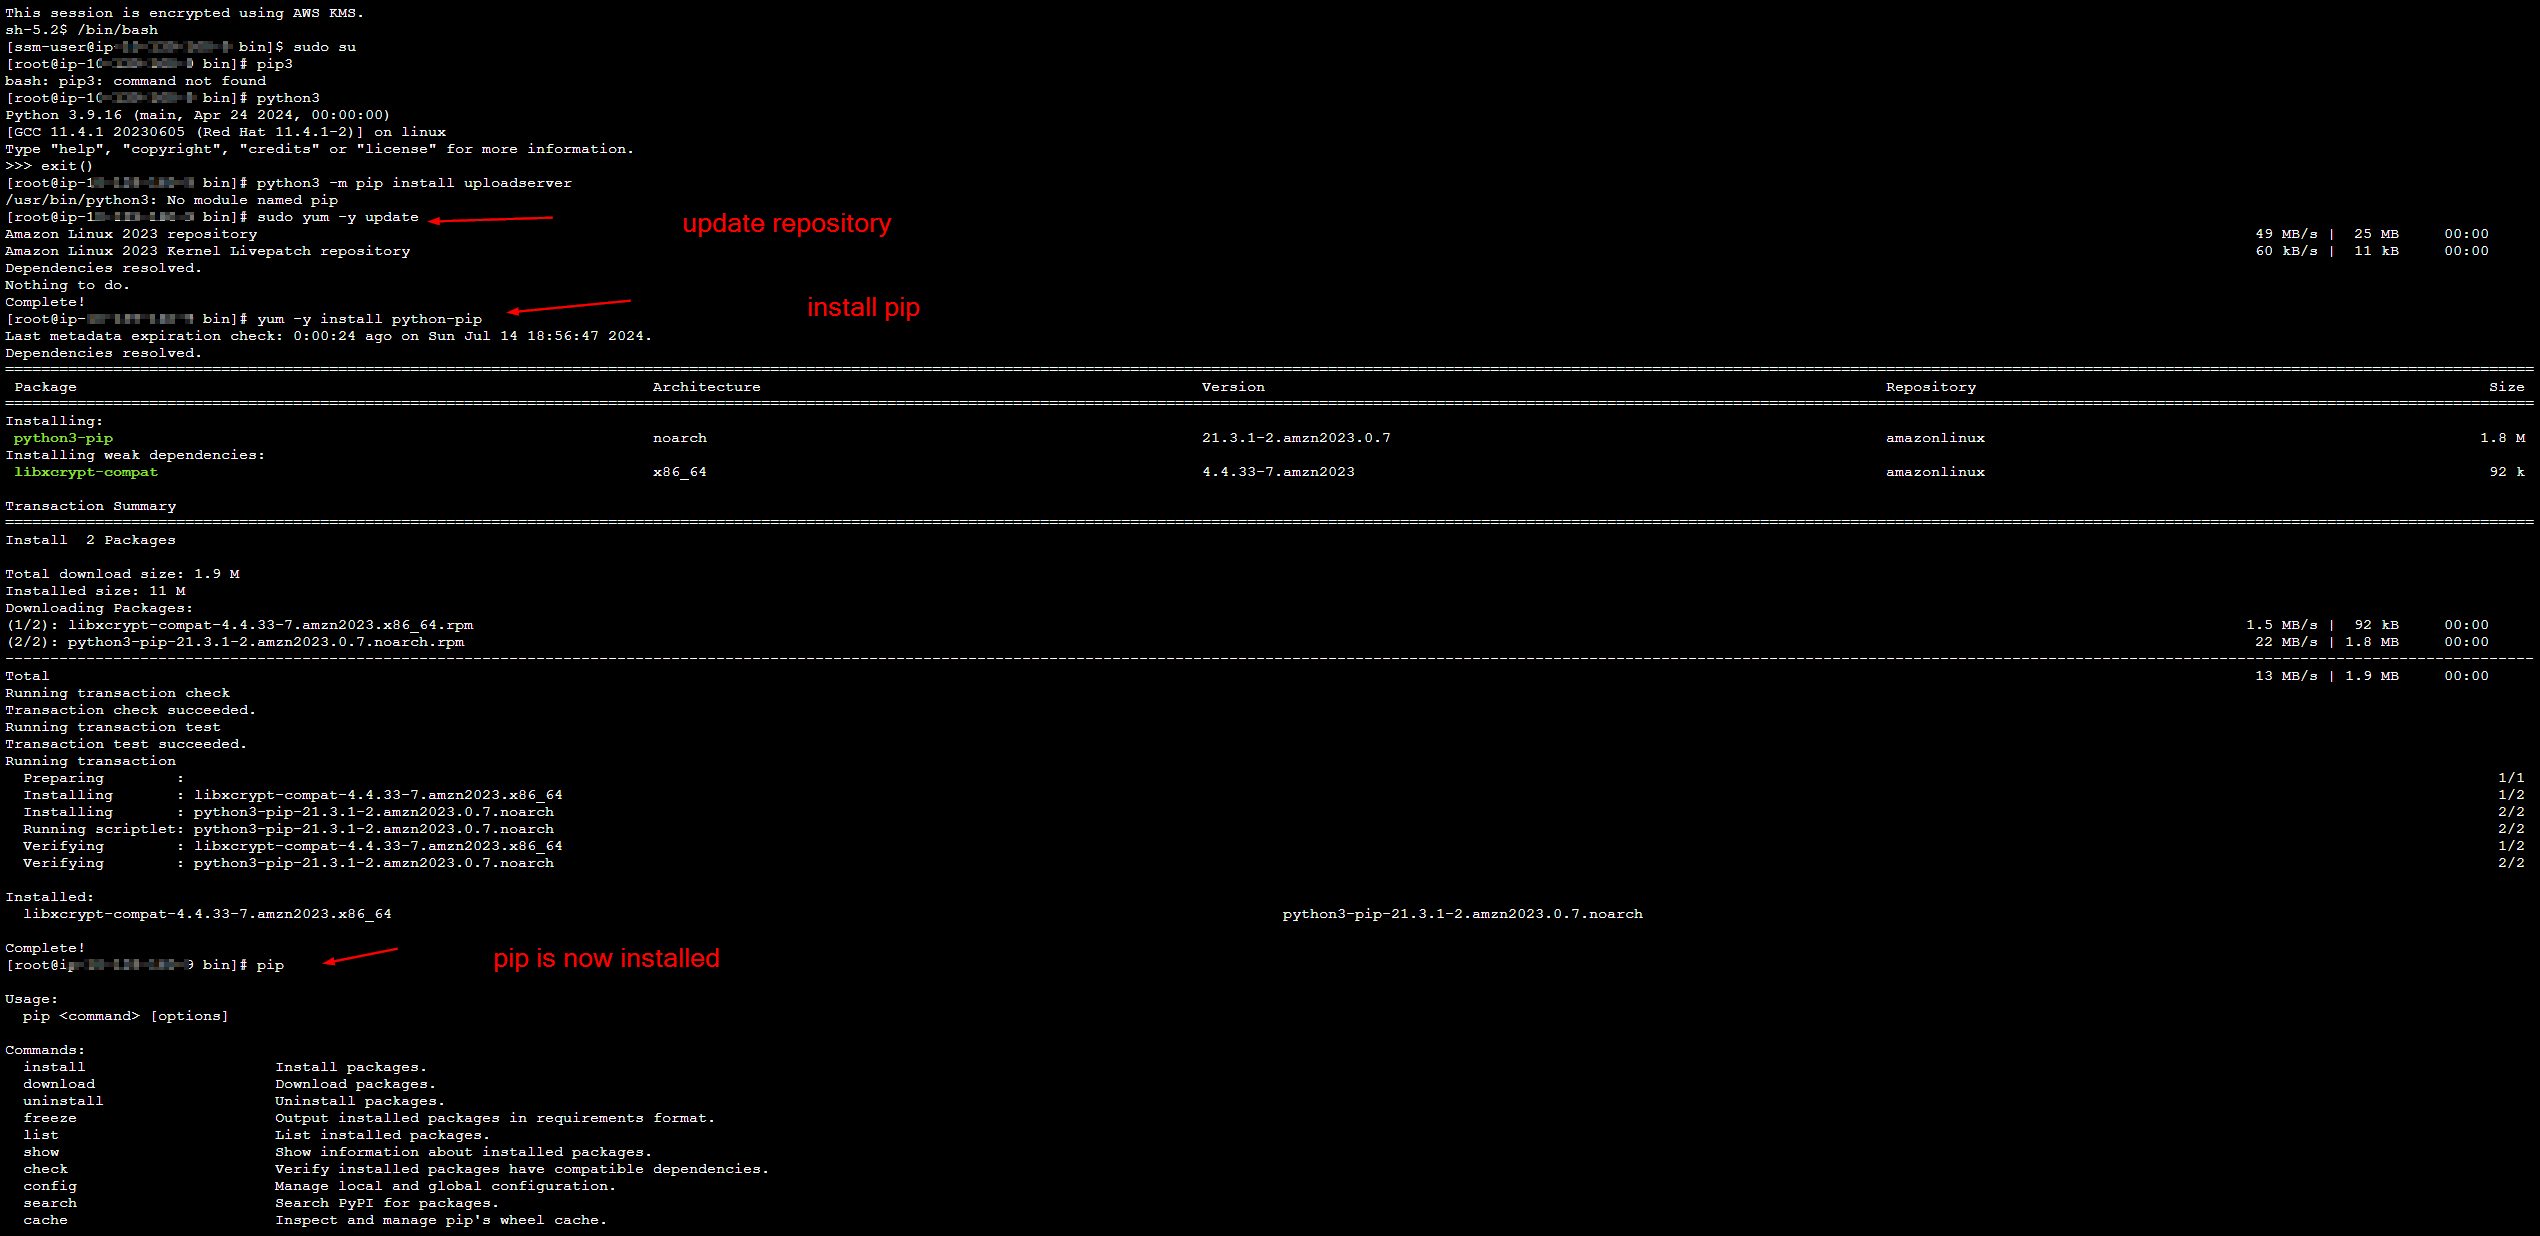
- Step 1.15: Setting up tmux and python-uploadserver for dev team users
- Steps for Dev Team User (IAM user with limited privileges in AWS)
- Step 2.0: The user must install AWS CLI onto his/her system.
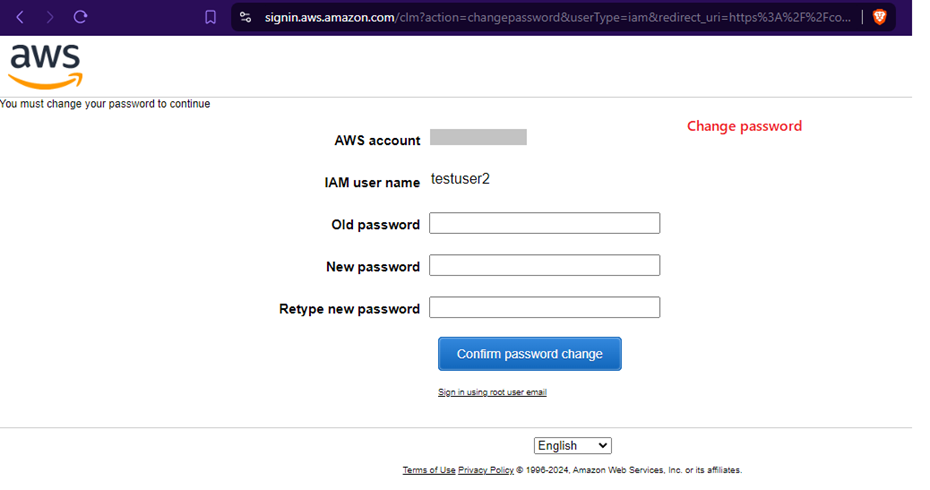
- Step 2.1: The credentials that would be received by Dev Team for his IAM user profile would be temporary. So, it needs to be changed.
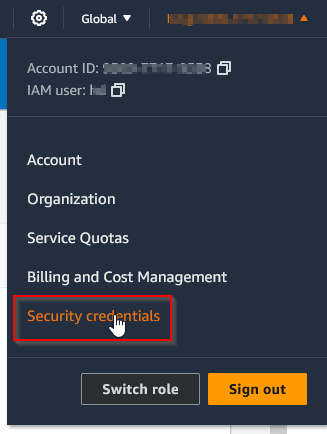
- Step 2.2: Navigate to security credentials and add MFA.
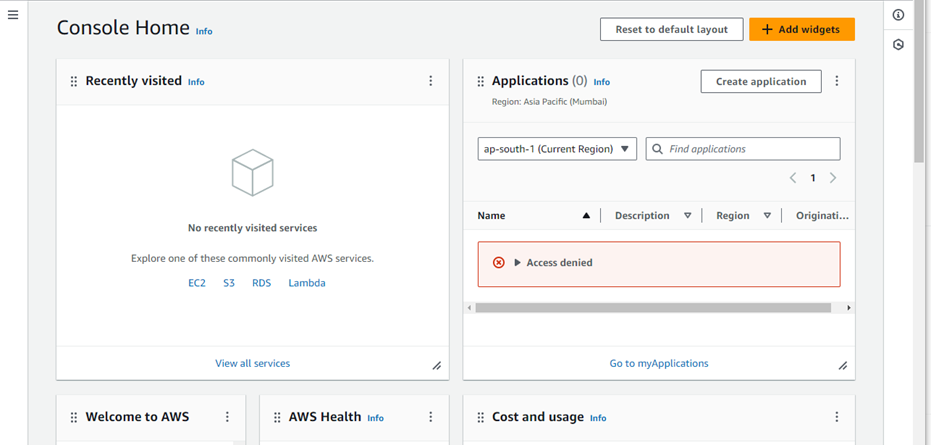
- Step 2.3: Post MFA re-login, check access of EC2 instance through console.
- Step 2.4: For access via awscli, more work is necessary
- Step 2.5: Dev Team users to create an ssh key-gen pair for themselves for transferring files locally from their laptops to the Dev server via WinSCP post creating a temporary creds profile
- Step 2.6: Using tmux, python uploadserver over AWS SSM Port forwarding to access a locally hosted webserver to download and upload files
Here, the common belief that pictures speaks a thousand words, is not only accepted but also put into practice !!
Hello readers, in this hands-on guide, we will learn how can we administer the AWS cloud for the following situation:
Consider there is an organization where the development team is in requirement of a UAT server to host their development environment in AWS Cloud and now it is the role of the IT Administration team to provide them with their needs. The IT Admin team take stalk of the situation, looks at the all the available options and decides to have the following environment:
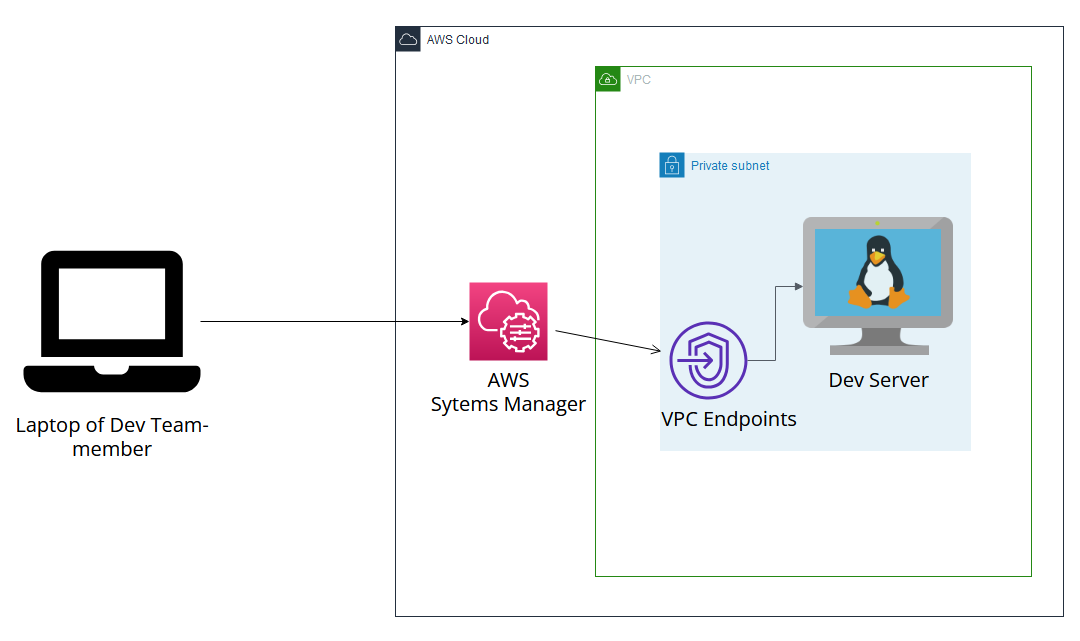
Here the IT Admin team would provide access to Dev Server via AWS SSM which is part of AWS Systems Manager via VPC Endpoint. Because of this method, they won't even need to open port 22 towards Internet or deal with SSH keys. VPC Endpoint will intake the commands from AWS Systems Manager's SSM service to take inbound traffic and redirect to Dev Server.
The head of IT Admin Team knows that cyber-attacks are rampant in today's world, hence he has asked the team to secure every connection with MFA signing and use AWS CloudWatch, in case logs are required for any incident that may occur. The head of the Development team have also stressed that multiple user accounts should be created for different team members on the Dev server such that all has the ability to transfer files too. To facilitate these requests, the IT Admin team decided to set the preferences of "Run as Support for Linux" in SSM.
Following is the S.O.P guide that the IT Admin can follow to fulfill the requirement along with keeping the points put forward by departments heads.
Note that it is assumed that a private subnet is already created in a non-default VPC
Steps for IT Team Administrator (IAM user with admin privileges)
Step 1.0: Create a Mandatory MFA policy in IAM before on-boarding Dev Team as IAM users.
  {
    "Version": "2012-10-17",
    "Statement": [
        {
            "Sid": "AllowViewAccountInfo",
            "Effect": "Allow",
            "Action": [
                "iam:GetAccountPasswordPolicy",
                "iam:GetAccountSummary",
                "iam:ListVirtualMFADevices"
            ],
            "Resource": "*"
        },
        {
            "Sid": "AllowManageOwnPasswords",
            "Effect": "Allow",
            "Action": [
                "iam:ChangePassword",
                "iam:GetUser"
            ],
            "Resource": "arn:aws:iam::*:user/${aws:username}"
        },
        {
            "Sid": "AllowManageOwnAccessKeys",
            "Effect": "Allow",
            "Action": [
                "iam:CreateAccessKey",
                "iam:DeleteAccessKey",
                "iam:ListAccessKeys",
                "iam:UpdateAccessKey",
                "iam:GetAccessKeyLastUsed"
            ],
            "Resource": "arn:aws:iam::*:user/${aws:username}"
        },
        {
            "Sid": "AllowManageOwnSigningCertificates",
            "Effect": "Allow",
            "Action": [
                "iam:DeleteSigningCertificate",
                "iam:ListSigningCertificates",
                "iam:UpdateSigningCertificate",
                "iam:UploadSigningCertificate"
            ],
            "Resource": "arn:aws:iam::*:user/${aws:username}"
        },
        {
            "Sid": "AllowManageOwnSSHPublicKeys",
            "Effect": "Allow",
            "Action": [
                "iam:DeleteSSHPublicKey",
                "iam:GetSSHPublicKey",
                "iam:ListSSHPublicKeys",
                "iam:UpdateSSHPublicKey",
                "iam:UploadSSHPublicKey"
            ],
            "Resource": "arn:aws:iam::*:user/${aws:username}"
        },
        {
            "Sid": "AllowManageOwnGitCredentials",
            "Effect": "Allow",
            "Action": [
                "iam:CreateServiceSpecificCredential",
                "iam:DeleteServiceSpecificCredential",
                "iam:ListServiceSpecificCredentials",
                "iam:ResetServiceSpecificCredential",
                "iam:UpdateServiceSpecificCredential"
            ],
            "Resource": "arn:aws:iam::*:user/*"
        },
        {
            "Sid": "AllowManageOwnVirtualMFADevice",
            "Effect": "Allow",
            "Action": [
                "iam:CreateVirtualMFADevice",
                "iam:DeleteVirtualMFADevice"
            ],
            "Resource": "arn:aws:iam::*:mfa/*"
        },
        {
            "Sid": "AllowManageOwnUserMFA",
            "Effect": "Allow",
            "Action": [
                "iam:DeactivateMFADevice",
                "iam:EnableMFADevice",
                "iam:ListMFADevices",
                "iam:ResyncMFADevice"
            ],
            "Resource": "arn:aws:iam::*:user/${aws:username}"
        },
        {
            "Sid": "DenyAllExceptListedIfNoMFA",
            "Effect": "Deny",
            "NotAction": [
                "iam:CreateVirtualMFADevice",
                "iam:EnableMFADevice",
                "iam:GetUser",
                "iam:ListMFADevices",
                "iam:ListVirtualMFADevices",
                "iam:ListAccountAliases",
                "iam:GetAccountSummary",
                "iam:ResyncMFADevice",
                "iam:ListAccessKeys",
                "sts:GetSessionToken",
                "iam:ChangePassword",
                "iam:GetUser"
            ],
            "Resource": "*",
            "Condition": {
                "BoolIfExists": {
                    "aws:MultiFactorAuthPresent": "false"
                    "aws:ViaAWSService": "false"
                }
            }
        }
    ]
}
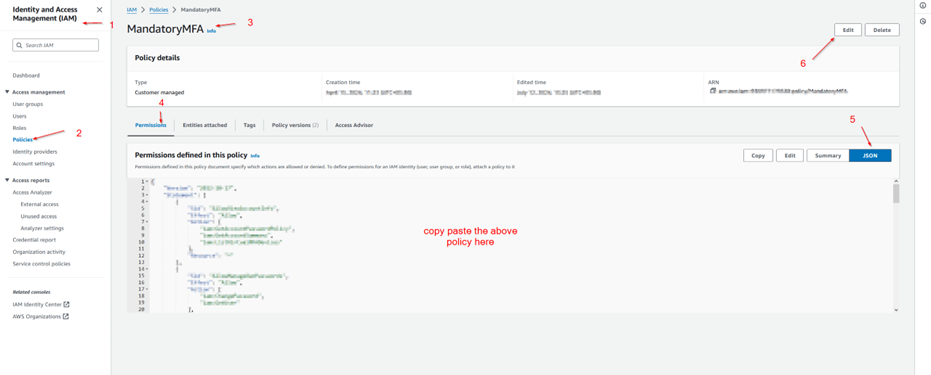
Step 1.1: Ensure the following in VPC Settings.
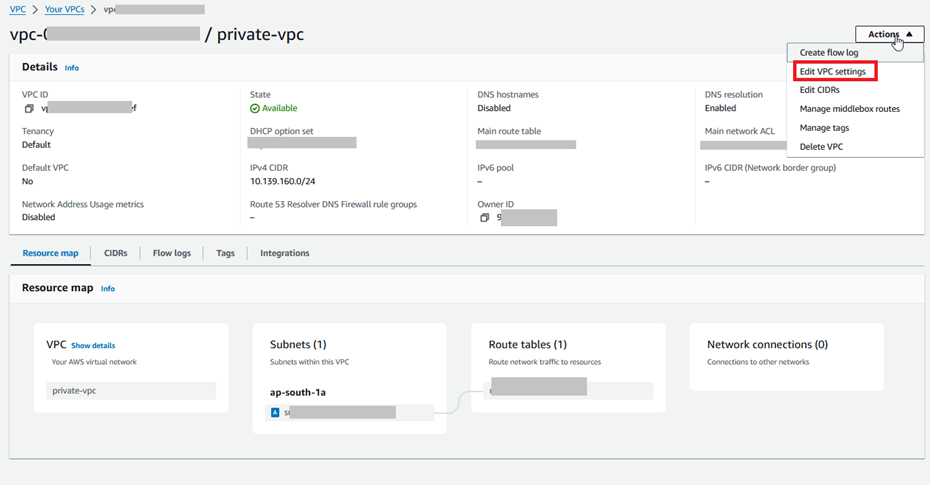
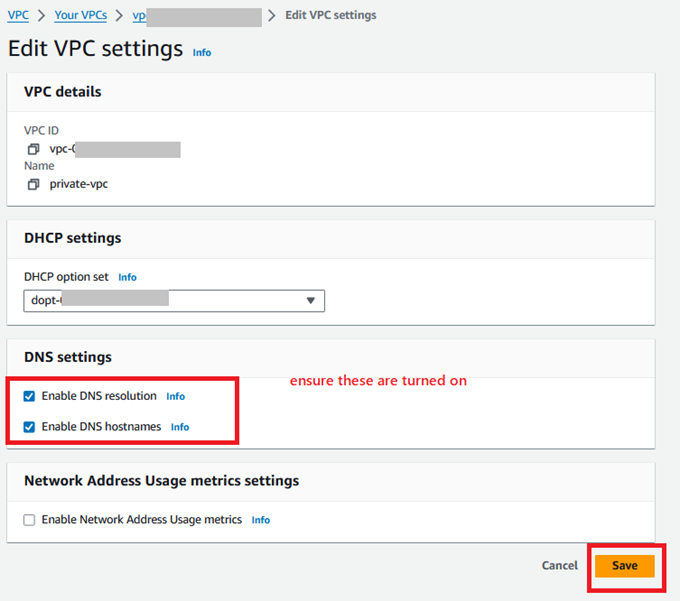
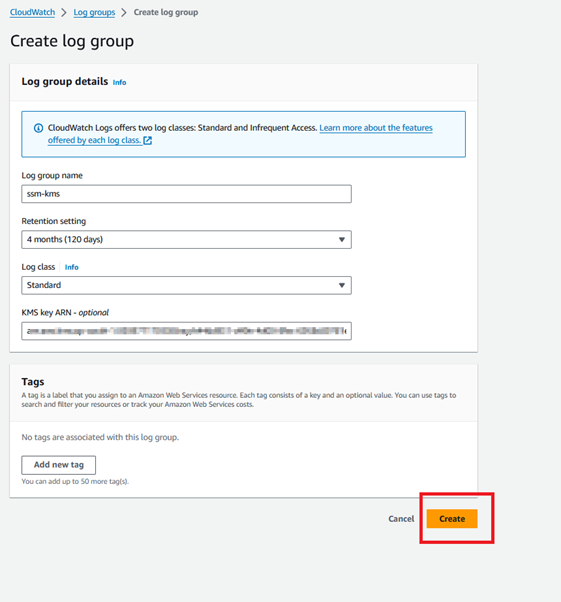
Step 1.2: Create a CloudWatch log group.

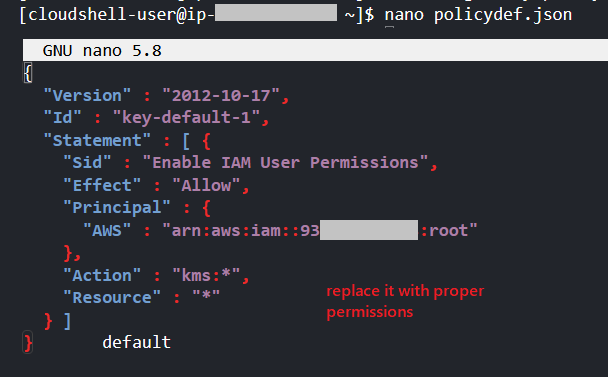
Step 1.3: Create a KMS Key to encrypt CloudWatch log group using CloudShell:
We will be considering region as ap-south-1 for example purpose. One can change it as per their situation.
aws kms create-key

aws kms get-key-policy --key-id <key-id> --policy-name default --output text > policydef.json

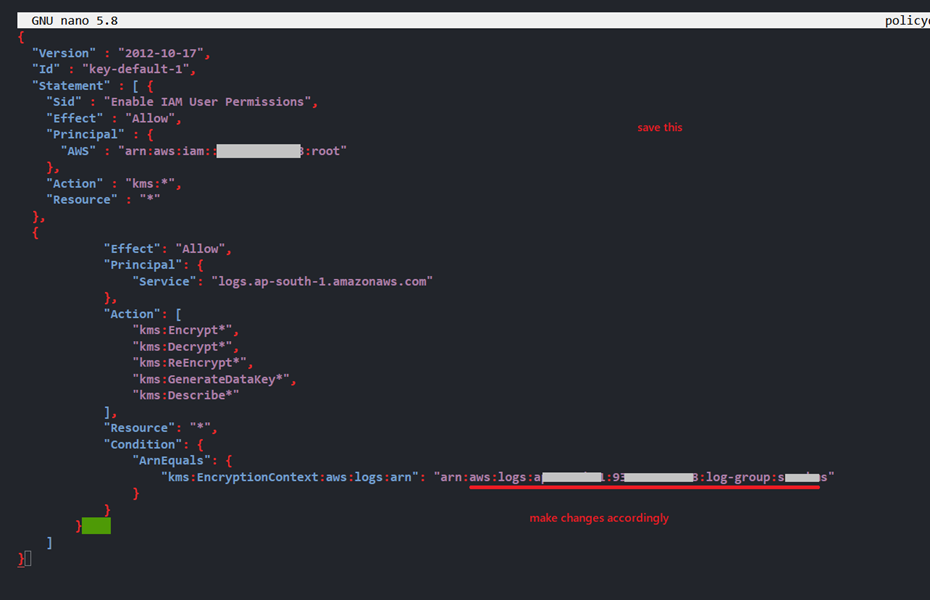
nano policydef.json

<--------------Use the policy given below---------------->

aws kms put-key-policy --key-id <key-id> --policy-name default --policy file://policydef.json

aws logs associate-kms-key --log-group-name <name-of-log-group> --kms-key-id "arn-of-key-id"
{
  "Version" : "2012-10-17",
  "Id" : "key-default-1",
  "Statement" : [ {
    "Sid" : "Enable IAM User Permissions",
    "Effect" : "Allow",
    "Principal" : {
      "AWS" : "arn:aws:iam::<account-id>:*"
    },
    "Action" : "kms:*",
    "Resource" : "*"
  },
  {
            "Effect": "Allow",
            "Principal": {
                "Service": "logs.ap-south-1.amazonaws.com"
            },
            "Action": [
                "kms:Encrypt*",
                "kms:Decrypt*",
                "kms:ReEncrypt*",
                "kms:GenerateDataKey*",
                "kms:Describe*"
            ],
            "Resource": "*",
            "Condition": {
                "ArnEquals": {
                    "kms:EncryptionContext:aws:logs:arn": "arn:aws:logs:ap-south-1:<account-id>:log-group:<group-name>"
                }
            }
        }
    ]
}


Step 1.4: Create another KMS key that is going to be used for encrypting the SSM sessions.
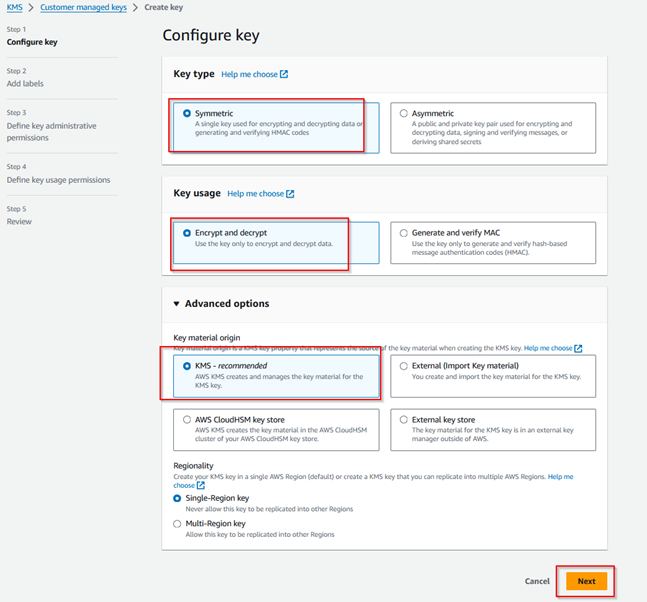
Step 1.5: Create an IAM user group and create a user in that group for the Dev Team.
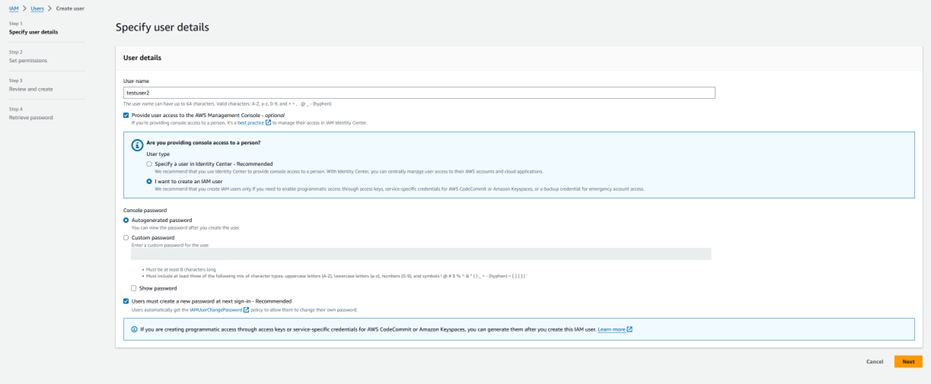
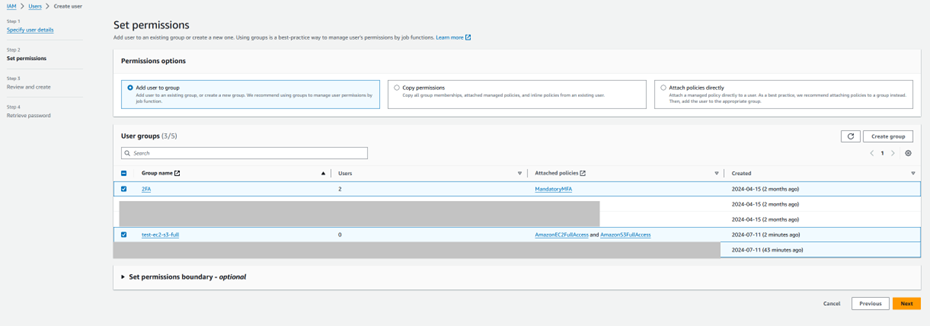


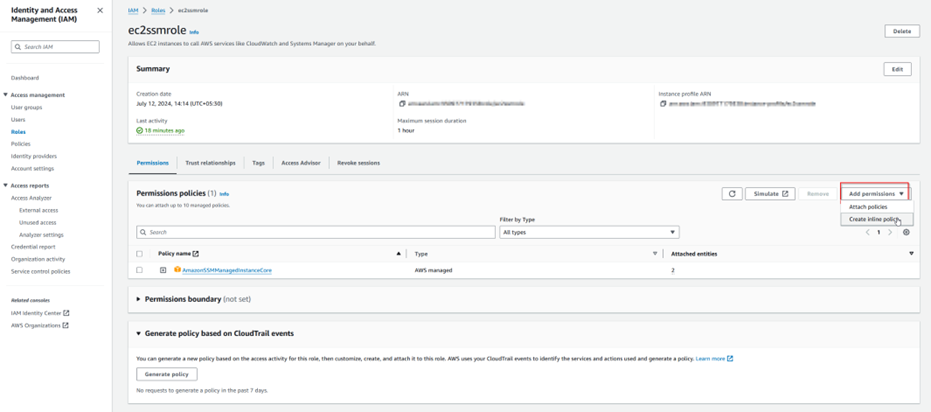
Step 1.6: Create an IAM role for EC2 SSM Access to attach as IAM instance profile.

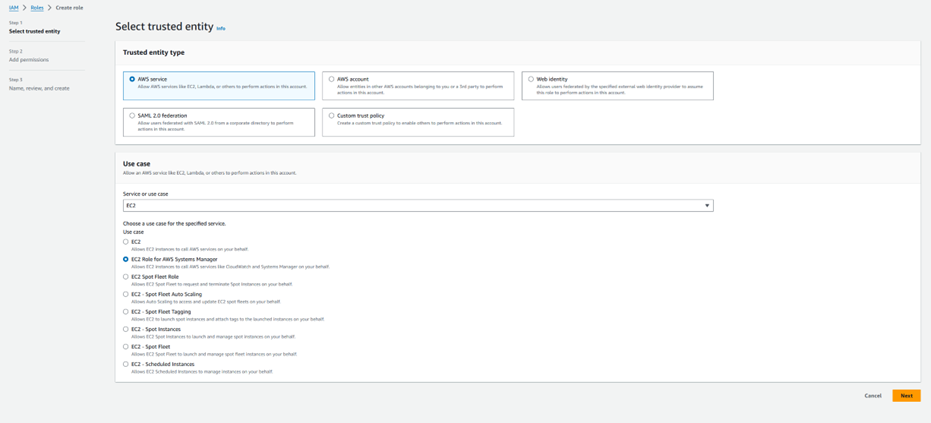

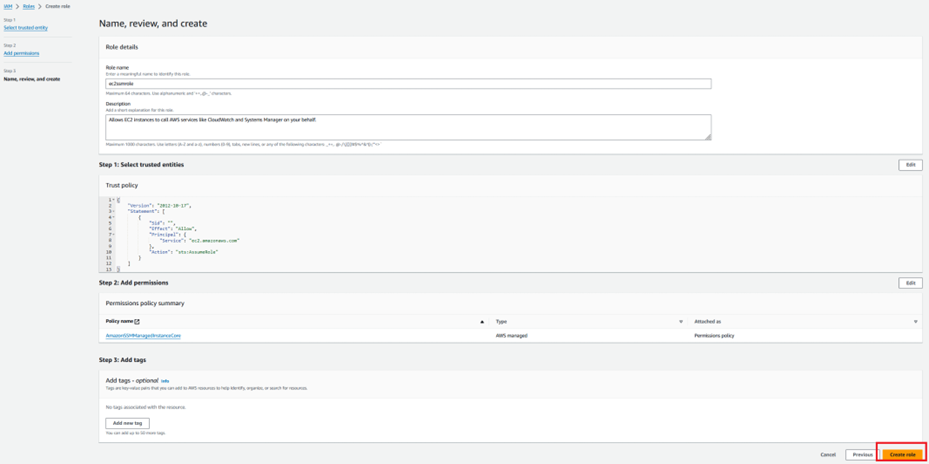
Step 1.7: Create a Security group with inbound and outbound HTTPS Access.
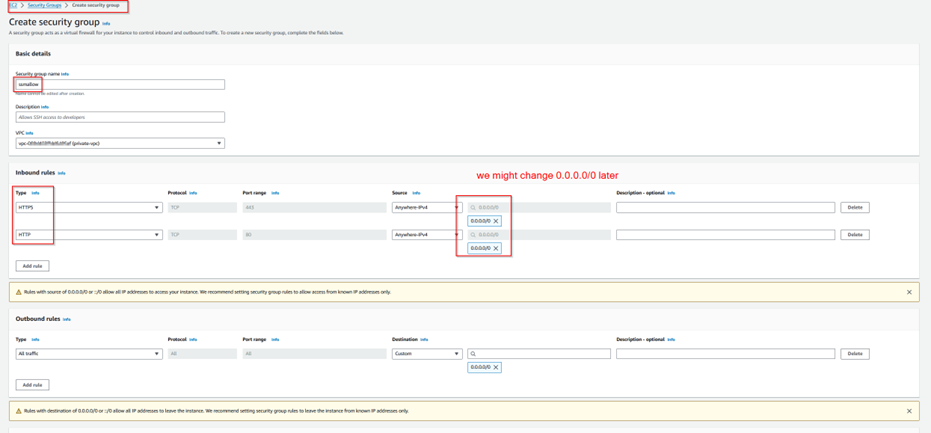
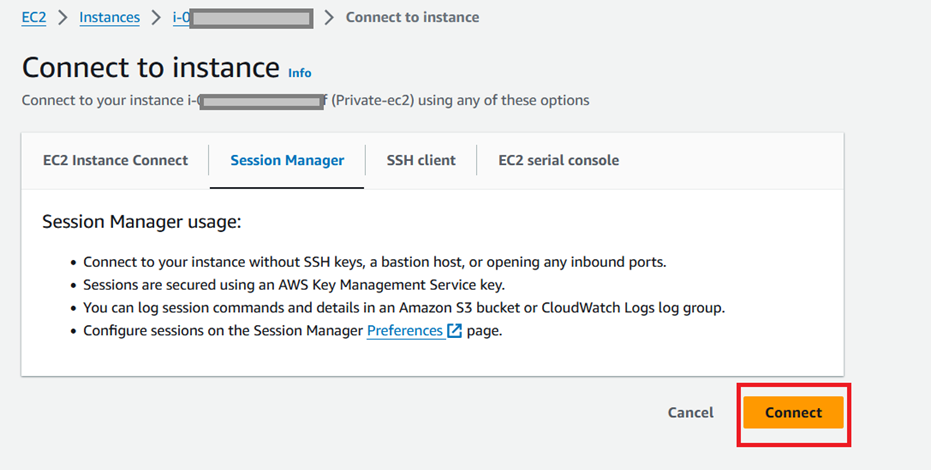
Step 1.8: Create an EC2 instance such that SSM access can be taken.
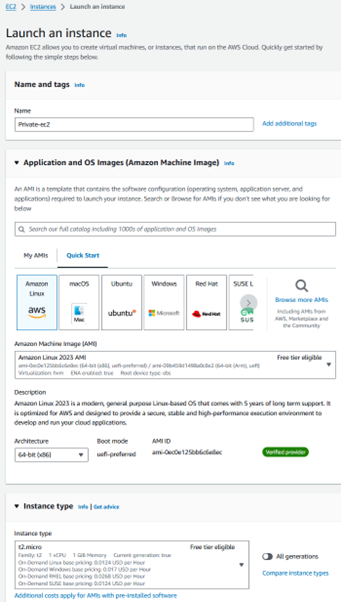
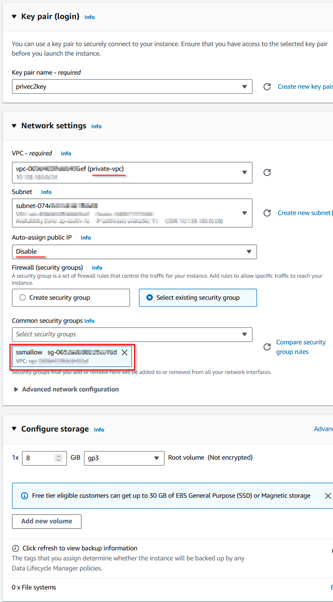
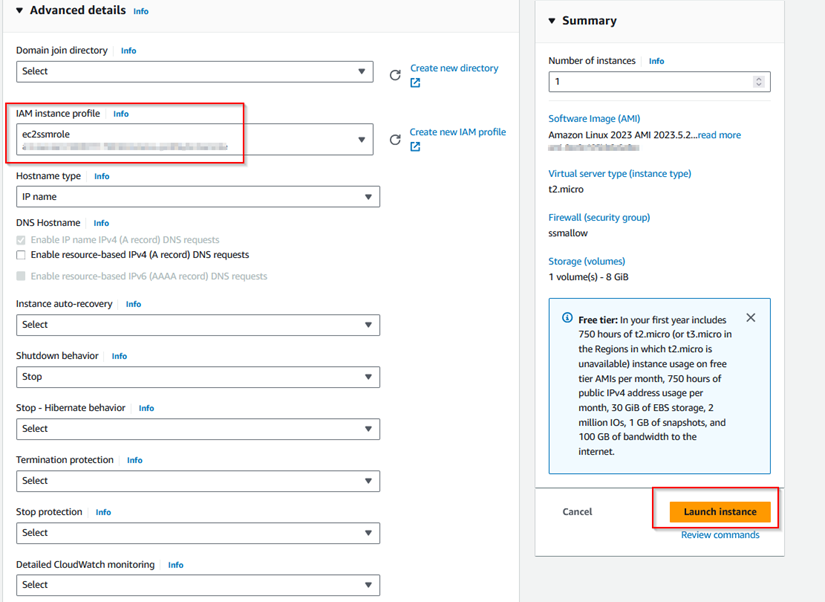
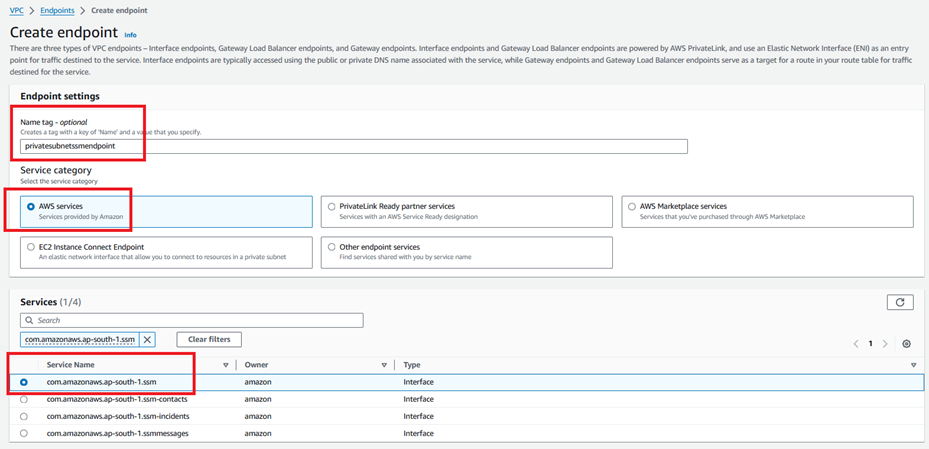
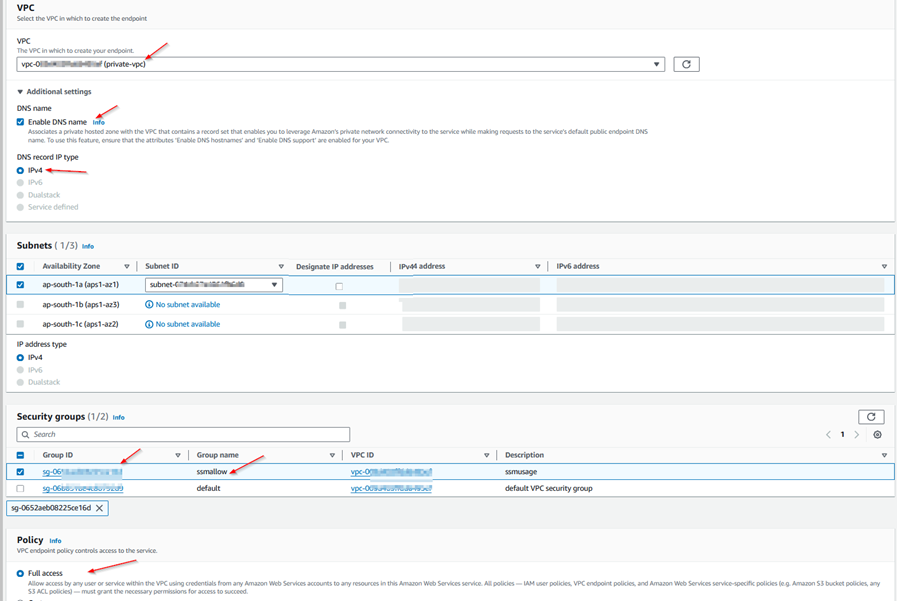
Step 1.9: Create VPC Endpoints for SSM Access.



Step 1.10: Create User on EC2.


Step 1.11: Modify the role that is attached to IAM instance profile, so that SSM sessions can also have encrypted sessions using KMS and CloudWatch logging once set in the next step.
{
    "Version": "2012-10-17",
    "Statement": [
        {
            "Effect": "Allow",
            "Action": [
                "logs:CreateLogStream",
                "logs:PutLogEvents",
                "logs:DescribeLogGroups",
                "logs:DescribeLogStreams"
            ],
            "Resource": "*"
        },
        {
            "Effect": "Allow",
            "Action": [
                "kms:Decrypt"
            ],
            "Resource": "<arn-of-kms-key>"
        },
        {
            "Effect": "Allow",
            "Action": "kms:GenerateDataKey",
            "Resource": "*"
        }
    ]
}
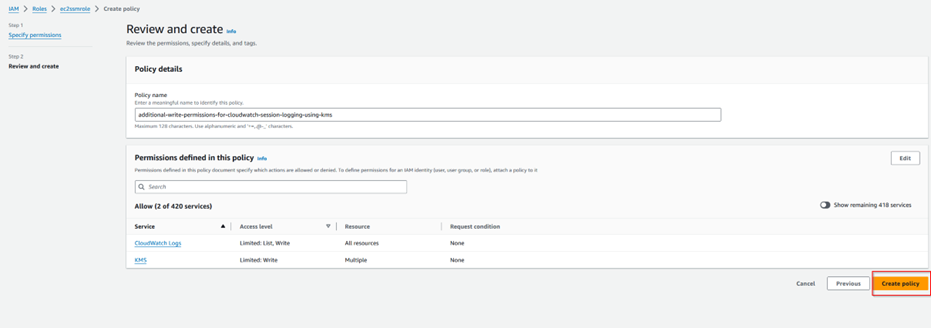
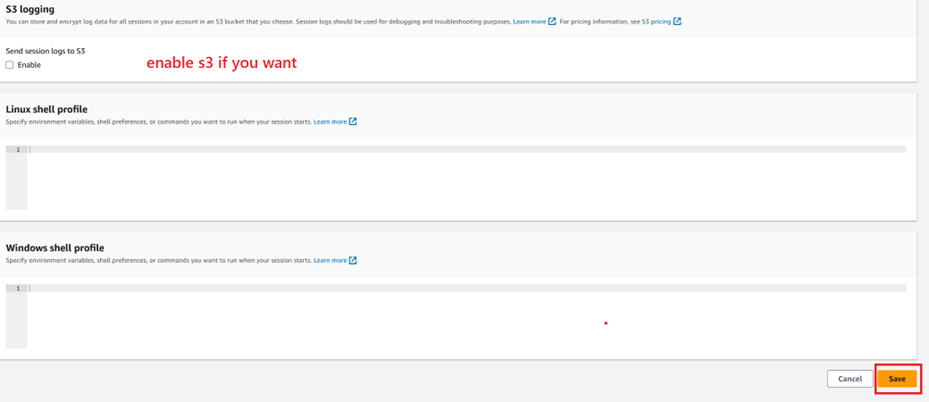
Step 1.12: Configure SSM Preferences.
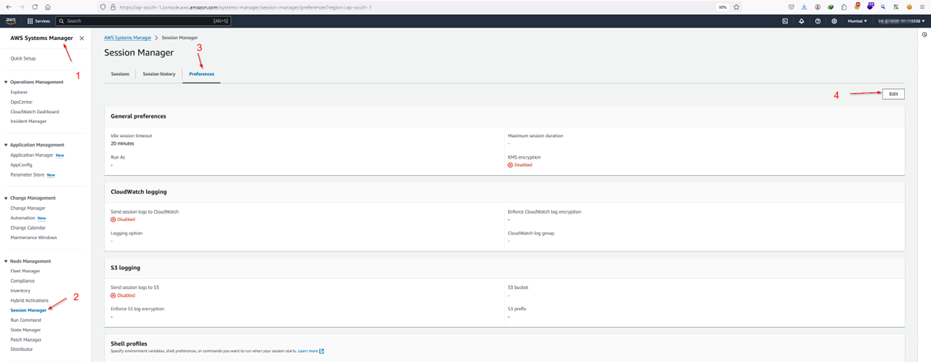
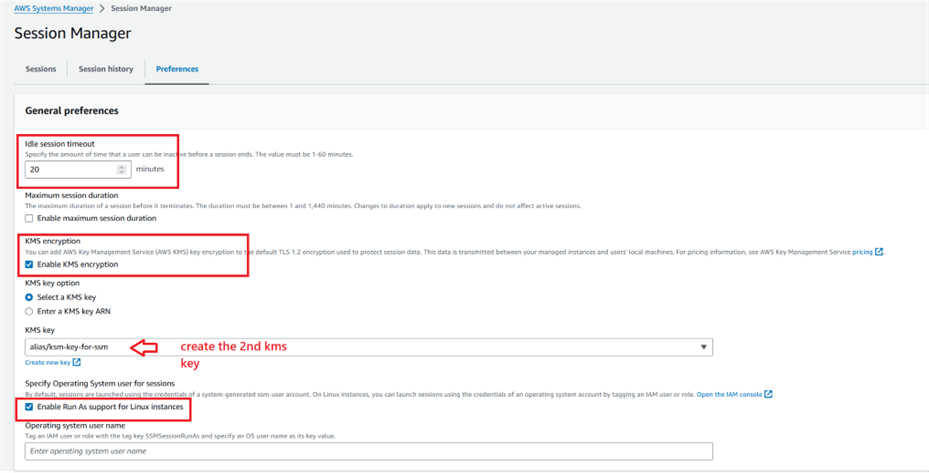
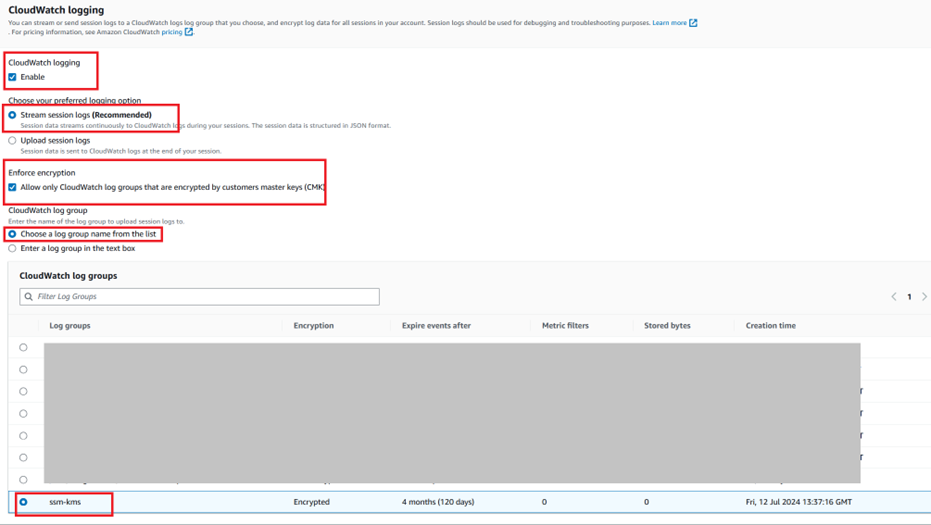
Step 1.13: The administrator has to ensure that SSM key tag is now added to his/her IAM user profile tags to use SSM to connect to EC2 instance in a secure manner.


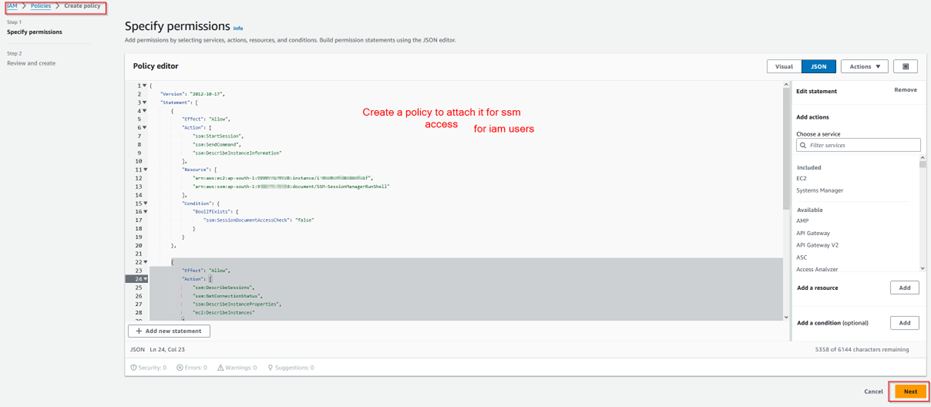
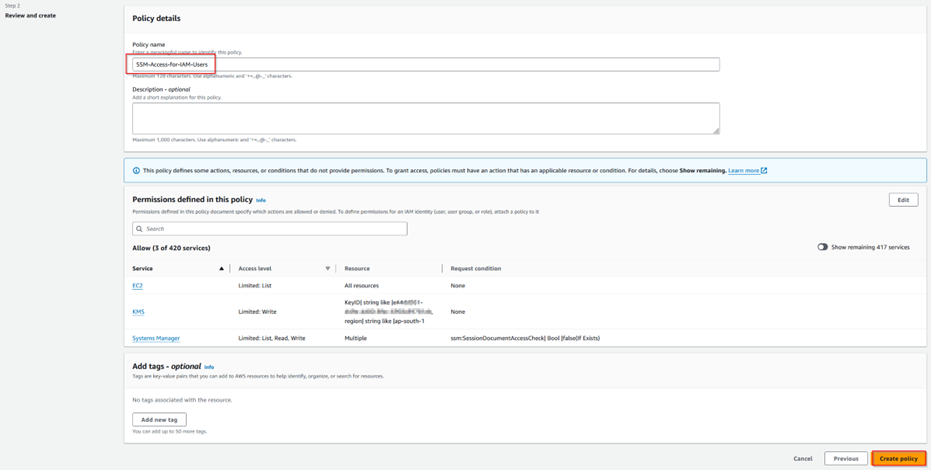
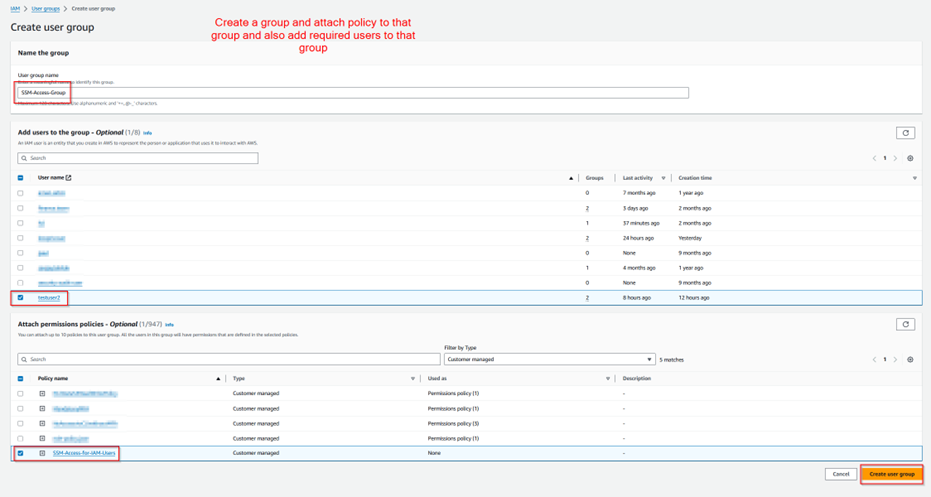
Step 1.14: Adding SSM permissions to testuser2.
Note that in the following policy, apart from usual, SSM documents such as AWS-StartPortForwardingSession and AWS-StartSSHSession are added to support file transfer.
{
    "Version": "2012-10-17",
    "Statement": [
        {
            "Effect": "Allow",
            "Action": [
                "ssm:StartSession",
                "ssm:SendCommand",

            ],
            "Resource": [
                "arn:aws:ec2:ap-south-1:<account-id>:instance/<instance-id>",
                "arn:aws:ssm:ap-south-1:<account-id>:document/SSM-SessionManagerRunShell",
                "arn:aws:ssm:ap-south-1::document/AWS-StartPortForwardingSession",
                "arn:aws:ssm:ap-south-1::document/AWS-StartSSHSession"
            ]
        },

        {
            "Effect": "Allow",
            "Action": [
                "ssm:DescribeSessions",
                "ssm:GetConnectionStatus",
            "ssm:DescribeInstanceInformation"
                "ssm:DescribeInstanceProperties",
                "ec2:DescribeInstances"
            ],
            "Resource": "*"
        },

        {
            "Effect": "Allow",
            "Action": [
                "ssm:TerminateSession",
                "ssm:ResumeSession"
            ],
            "Resource": [
                "arn:aws:ssm:*:*:session/${aws:username}-*"
            ]
        },
        {
            "Effect": "Allow",
            "Action": [
                "kms:GenerateDataKey"
            ],
            "Resource": "<arn-of-kms-key>"
        }
    ]
}
Step 1.15: Setting up tmux and python-uploadserver for dev team users
Here it is assumed that NAT-GW is setup in private subnet and Internet-GW is setup in public subnet for providing outbound internet connection to Dev Server
Suggested Link for setting up the same, if not done already:
https://notes.radifine.com/v/aws/networking-and-content-delivery-in-aws/aws-vpc#nat-gateway-in-vpc


Steps for Dev Team User (IAM user with limited privileges in AWS)
Step 2.0: The user must install AWS CLI onto his/her system.
Reference Links:
Step 2.1: The credentials that would be received by Dev Team for his IAM user profile would be temporary. So, it needs to be changed.
Step 2.2: Navigate to security credentials and add MFA.

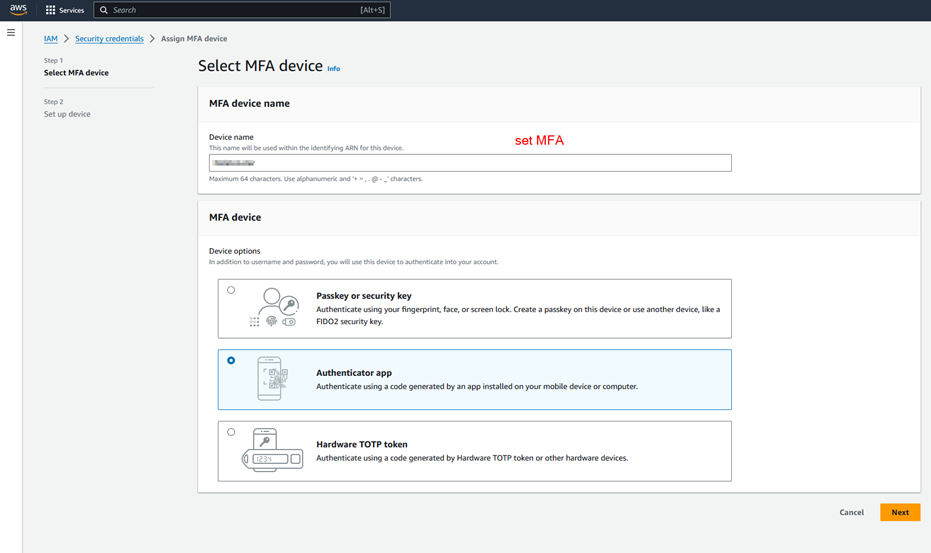
Step 2.3: Post MFA re-login, check access of EC2 instance through console.


Step 2.4: For access via awscli, more work is necessary
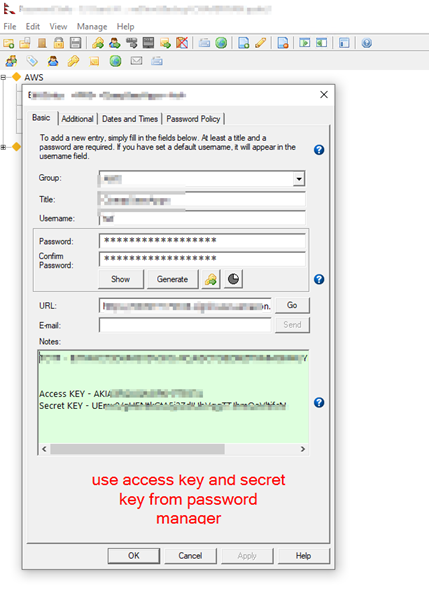
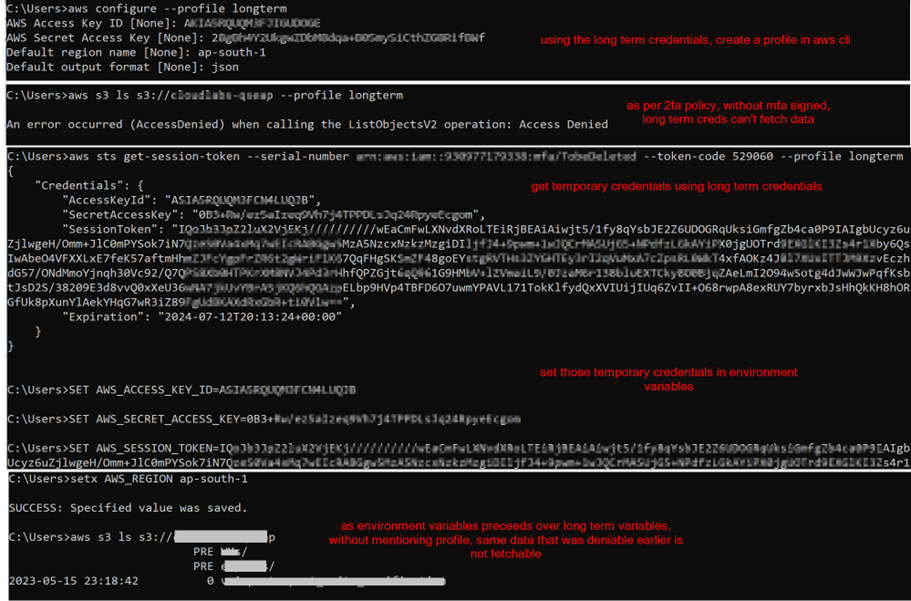
See, the IAM policy of MFA that was created in step 1.0 was made in such a manner that without 2FA setup and then subsequent relogin, the IAM user from the dev team cannot perform any action. Hence, the access key that is created in this step is only required to create temporary sts credentials that would be MFA signed.
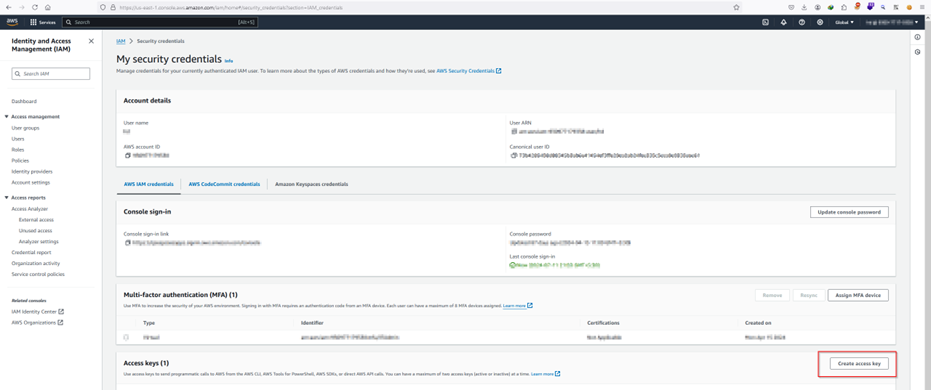
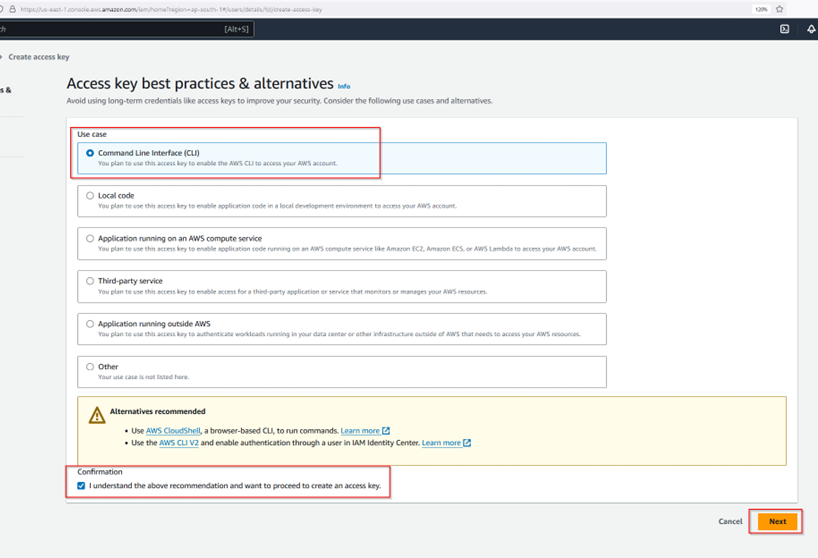

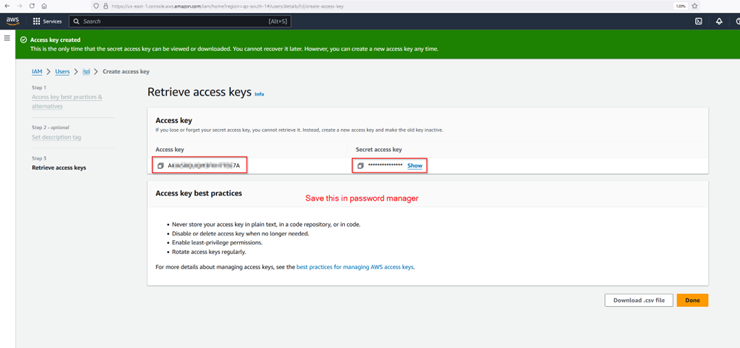
The password manager used in this guide can be downloaded from https://pwsafe.org/
Commands are for Windows cmd:

aws configure --profile longterm
aws sts get-session-token --serial-number <arn-of-mfa-device> --token-code <otp> --profile longterm
SET AWS_ACCESS_KEY_ID=
SET AWS_SECRET_ACCESS_KEY=
SET AWS_SESSION_TOKEN=
setx AWS_REGION ap-south-1
aws ssm start-session --target <instance-id>

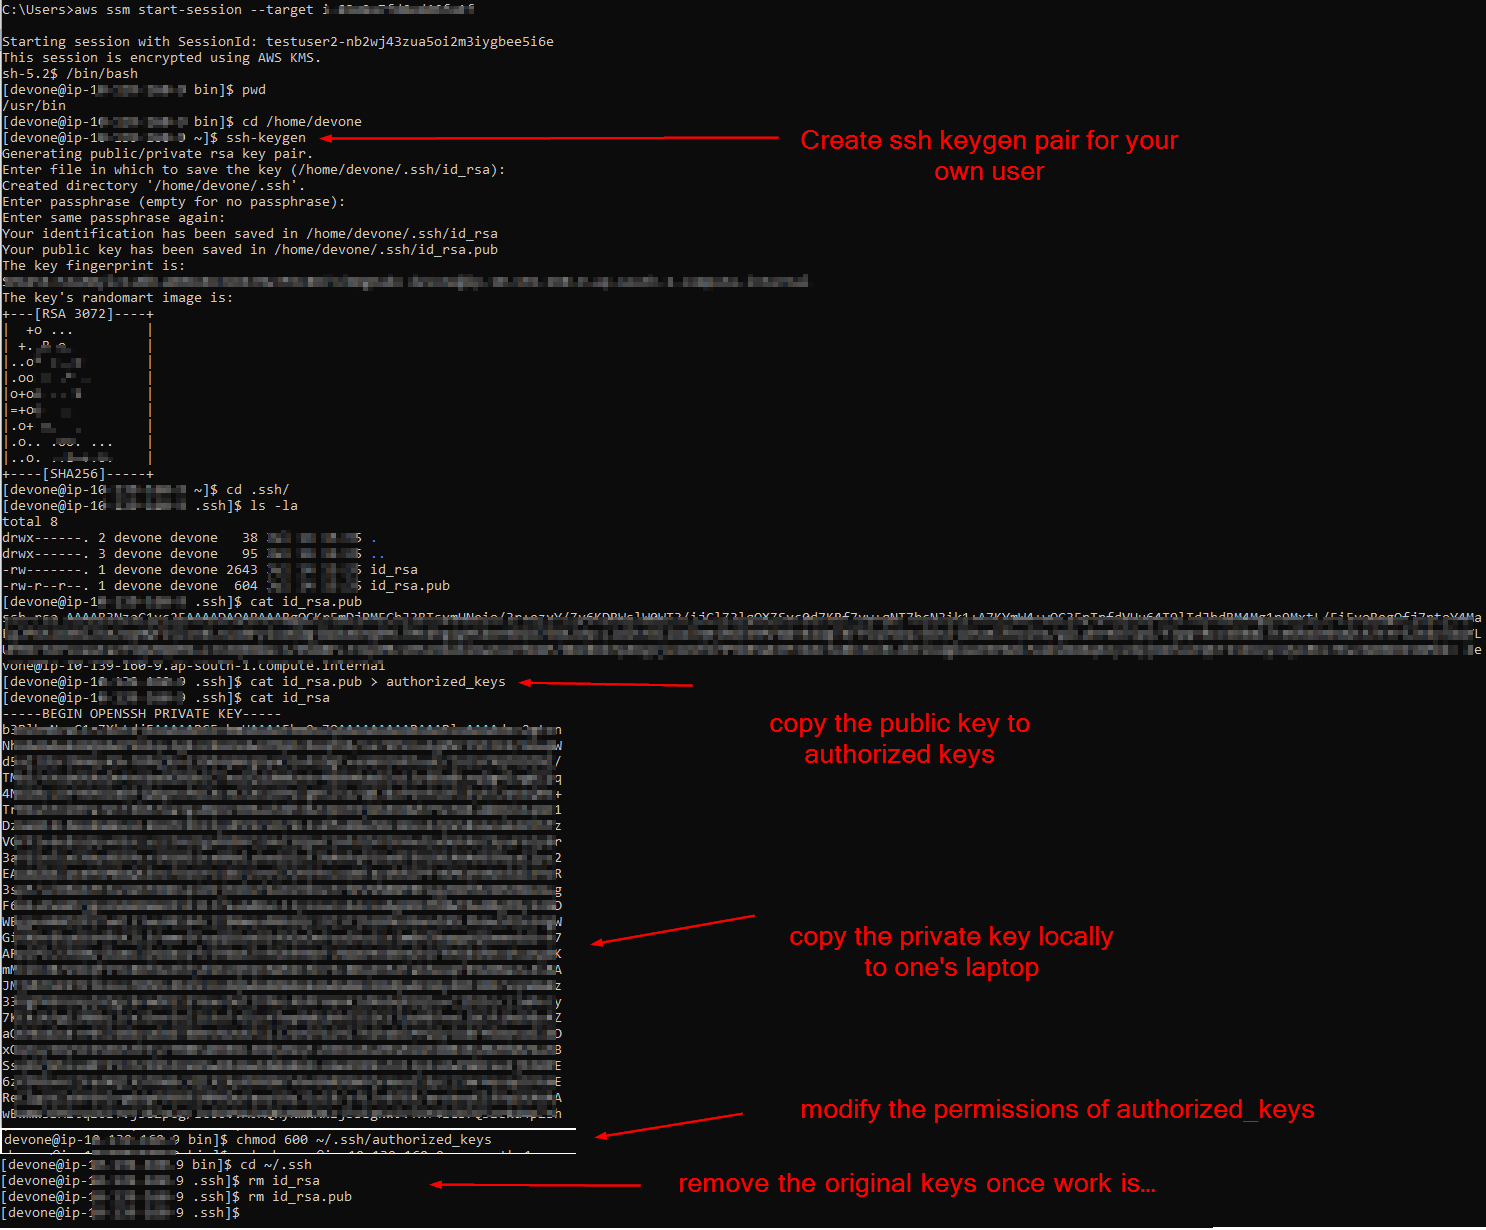
Step 2.5: Dev Team users to create an ssh key-gen pair for themselves for transferring files locally from their laptops to the Dev server via WinSCP post creating a temporary creds profile
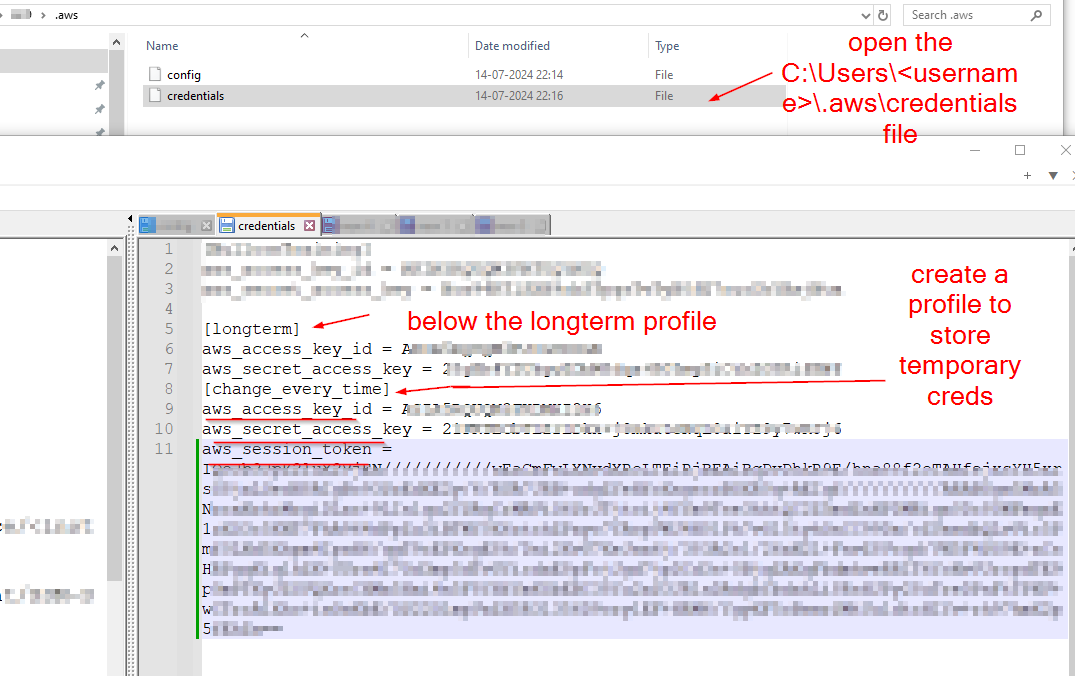

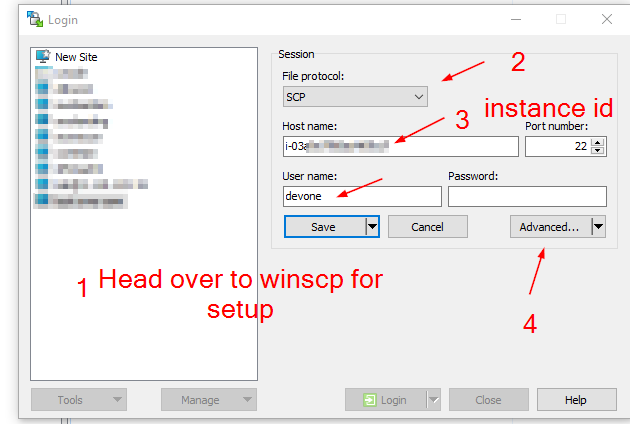
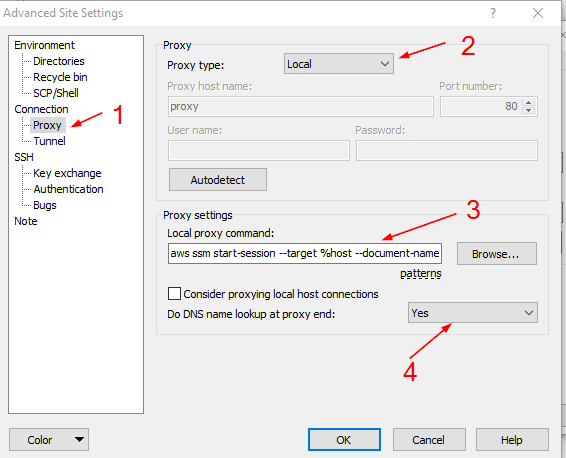
// Here, the profile change_every_time is used for connecting to Dev server via SSM and over SCP and this is to be copied in winscp at point 3 of the above screenshot
aws ssm start-session --target %host --document-name AWS-StartSSHSession --parameters "portNumber=%port" --profile change_every_time --region ap-south-1
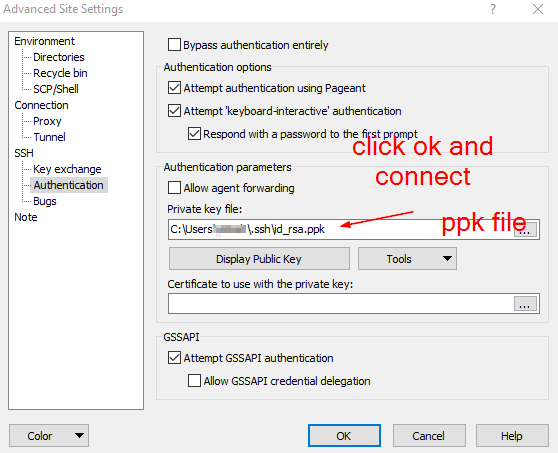

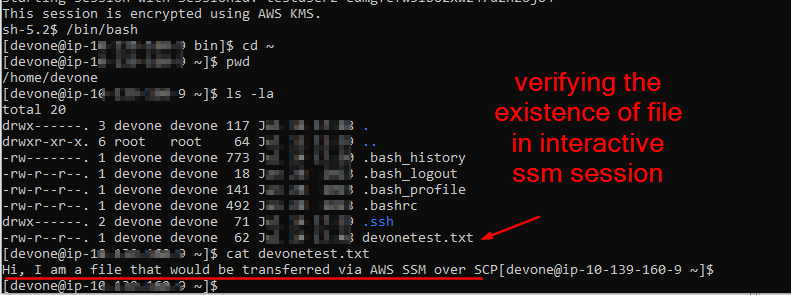
Step 2.6: Using tmux, python uploadserver over AWS SSM Port forwarding to access a locally hosted webserver to download and upload files

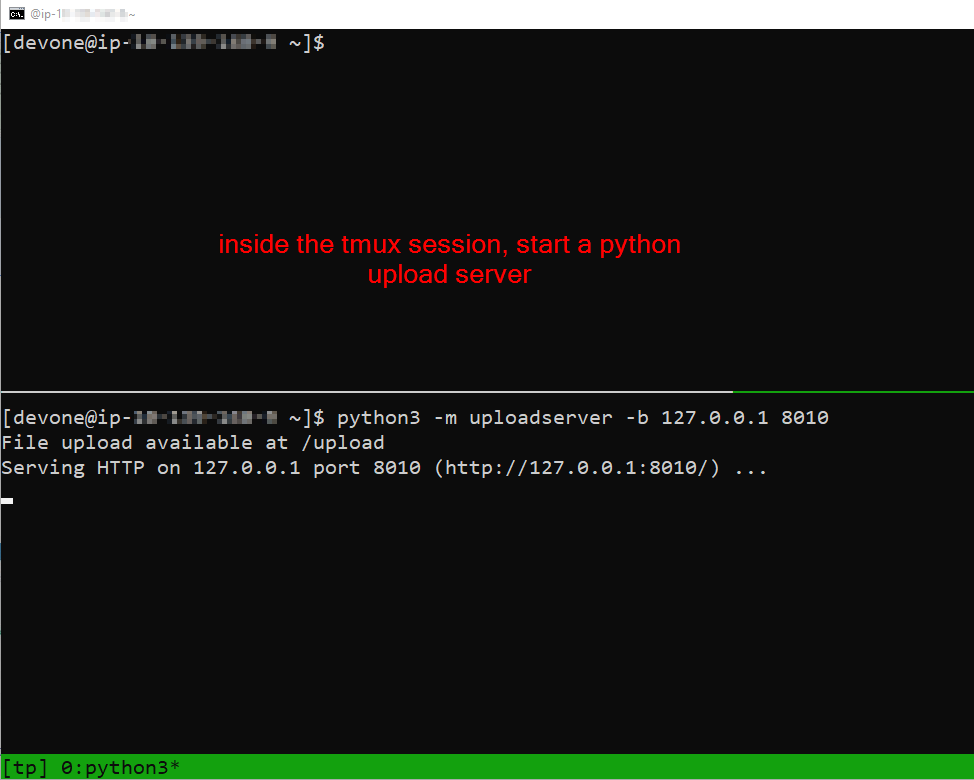
For those in needing guidance with how to use tmux, it is suggested to follow quick reference here: https://notes.radifine.com/v/linux-fundamentals/linux-commands#tmux

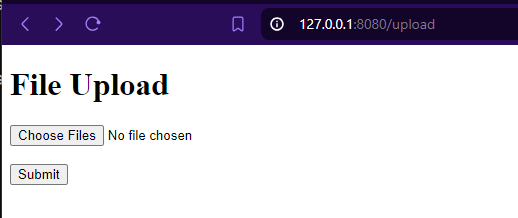
// Use the following command to setup port forwarding
(Localhost:8080)<-->(DevServer:8010)

aws ssm start-session --target <instance-id> --document-name AWS-StartPortForwardingSession --parameters portNumber="8010:,localPortNumber="8080"

Congratulations and thanks for reading till here. Hope, the guide was useful !!
Subscribe to my newsletter
Read articles from Yobroda directly inside your inbox. Subscribe to the newsletter, and don't miss out.
Written by
