Automated Deployment of AWS Lambda Using GitLab CI/CD and Terraform
 Rahul wath
Introduction
AWS Lambda Functions are incredibly useful for running code in the cloud without worrying about infrastructure and resource consumption. Lambda runs the source code on a high-availability compute infrastructure and handles all the administration of compute resources, including server and operating system maintenance, capacity provisioning, automatic scaling, and logging. You can choose your preferred programming language, create the source code in the Lambda console in AWS, and execute your code there. It’s easy to maintain if your source package is light and contains a few files or a small amount of code.
However, managing and deploying solutions with multiple packages and files containing several hundred lines of code can be challenging. In this discussion, we will explore how to deploy AWS Lambda Functions to cloud infrastructure using GitLab CI/CD pipelines and Terraform. This approach enables us to maintain the source code following GitOps principles
Architecture
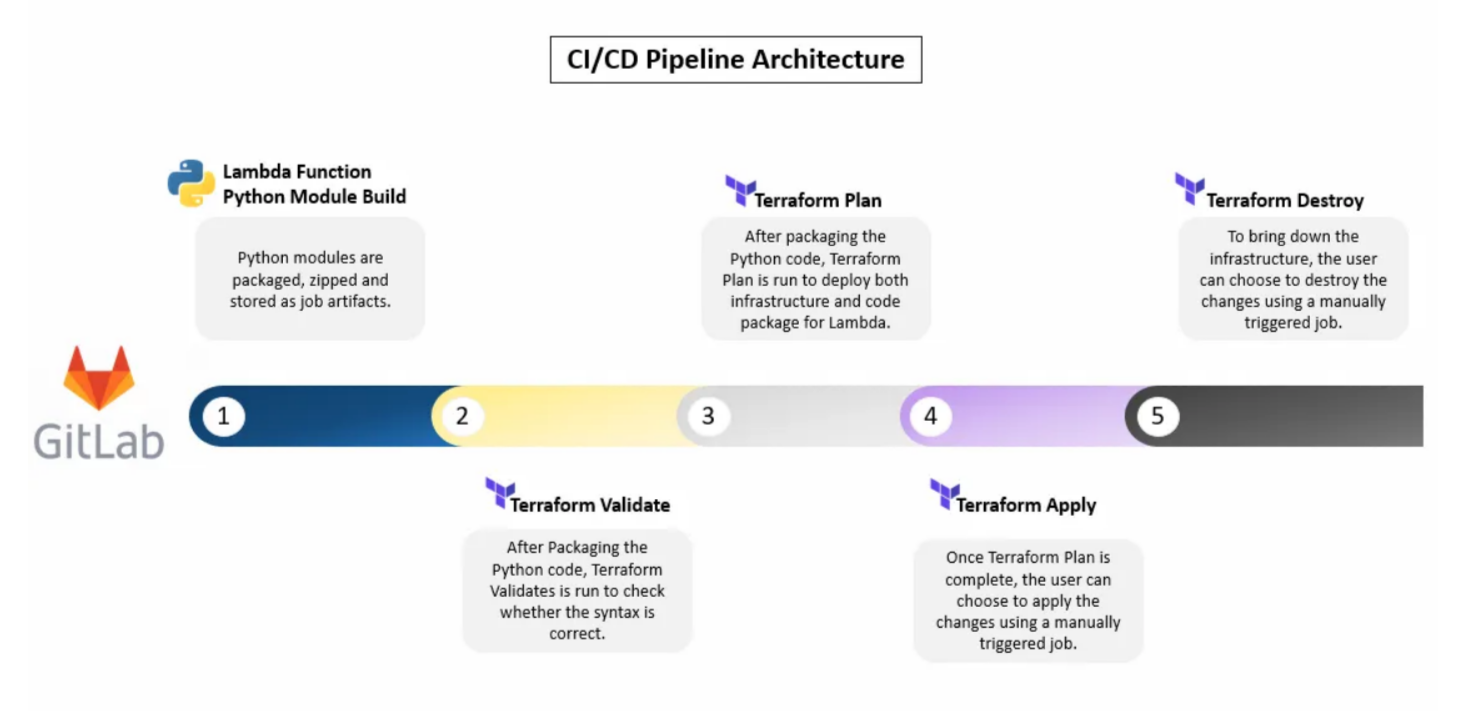
The whole delivery pipeline is configured using GitLab CI/CD. First the Python modules are packaged, zipped and stored as job artifacts. Next, using the artifact and Terraform modules, ‘terraform validate’ is run and checked if there’s any syntax error. After this, the next pipeline job runs ‘terraform plan’ to validate with the ‘tfstate’ file and gives the output of the possible changes that can be implemented to the infrastructure. The next job runs ‘terraform apply’ and implements the required changes to the infrastructure. This job is run manually since this is something that affects the infrastructure right away. The last job which is the ‘terraform destroy’ is also supposed to be triggered manually since it’s run only if the infrastructure needs to be brought down.
Prerequisites
First and foremost, you will need an AWS free tier subscription. Link
You need to create a personal account in GitLab. Link
Initial Configuration Setup
1. Setting up the GitLab CI/CD Runner
First we need to setup a GitLab runner in the AWS account that we need to deploy the Lambda Function using CI/CD. The steps are as follows.
First you will need to login to GitLab and create a new project.
Next, we need to setup the GitLab CI/CD Runner.
Log into AWS. In the AWS console, create a new EC2 instance with an Ubuntu latest AMI.(Note that a t2.micro is enough)

Log into the EC2 instance and run the following commands:
sudo apt-get update -y
sudo apt-get install docker.io -y
5. Next, go to the GitLab project → Settings → CI/CD → Runners and click on ‘Show runner installation instructions’ and run the mentioned steps. Choose ‘Linux’ as the preferred environment.
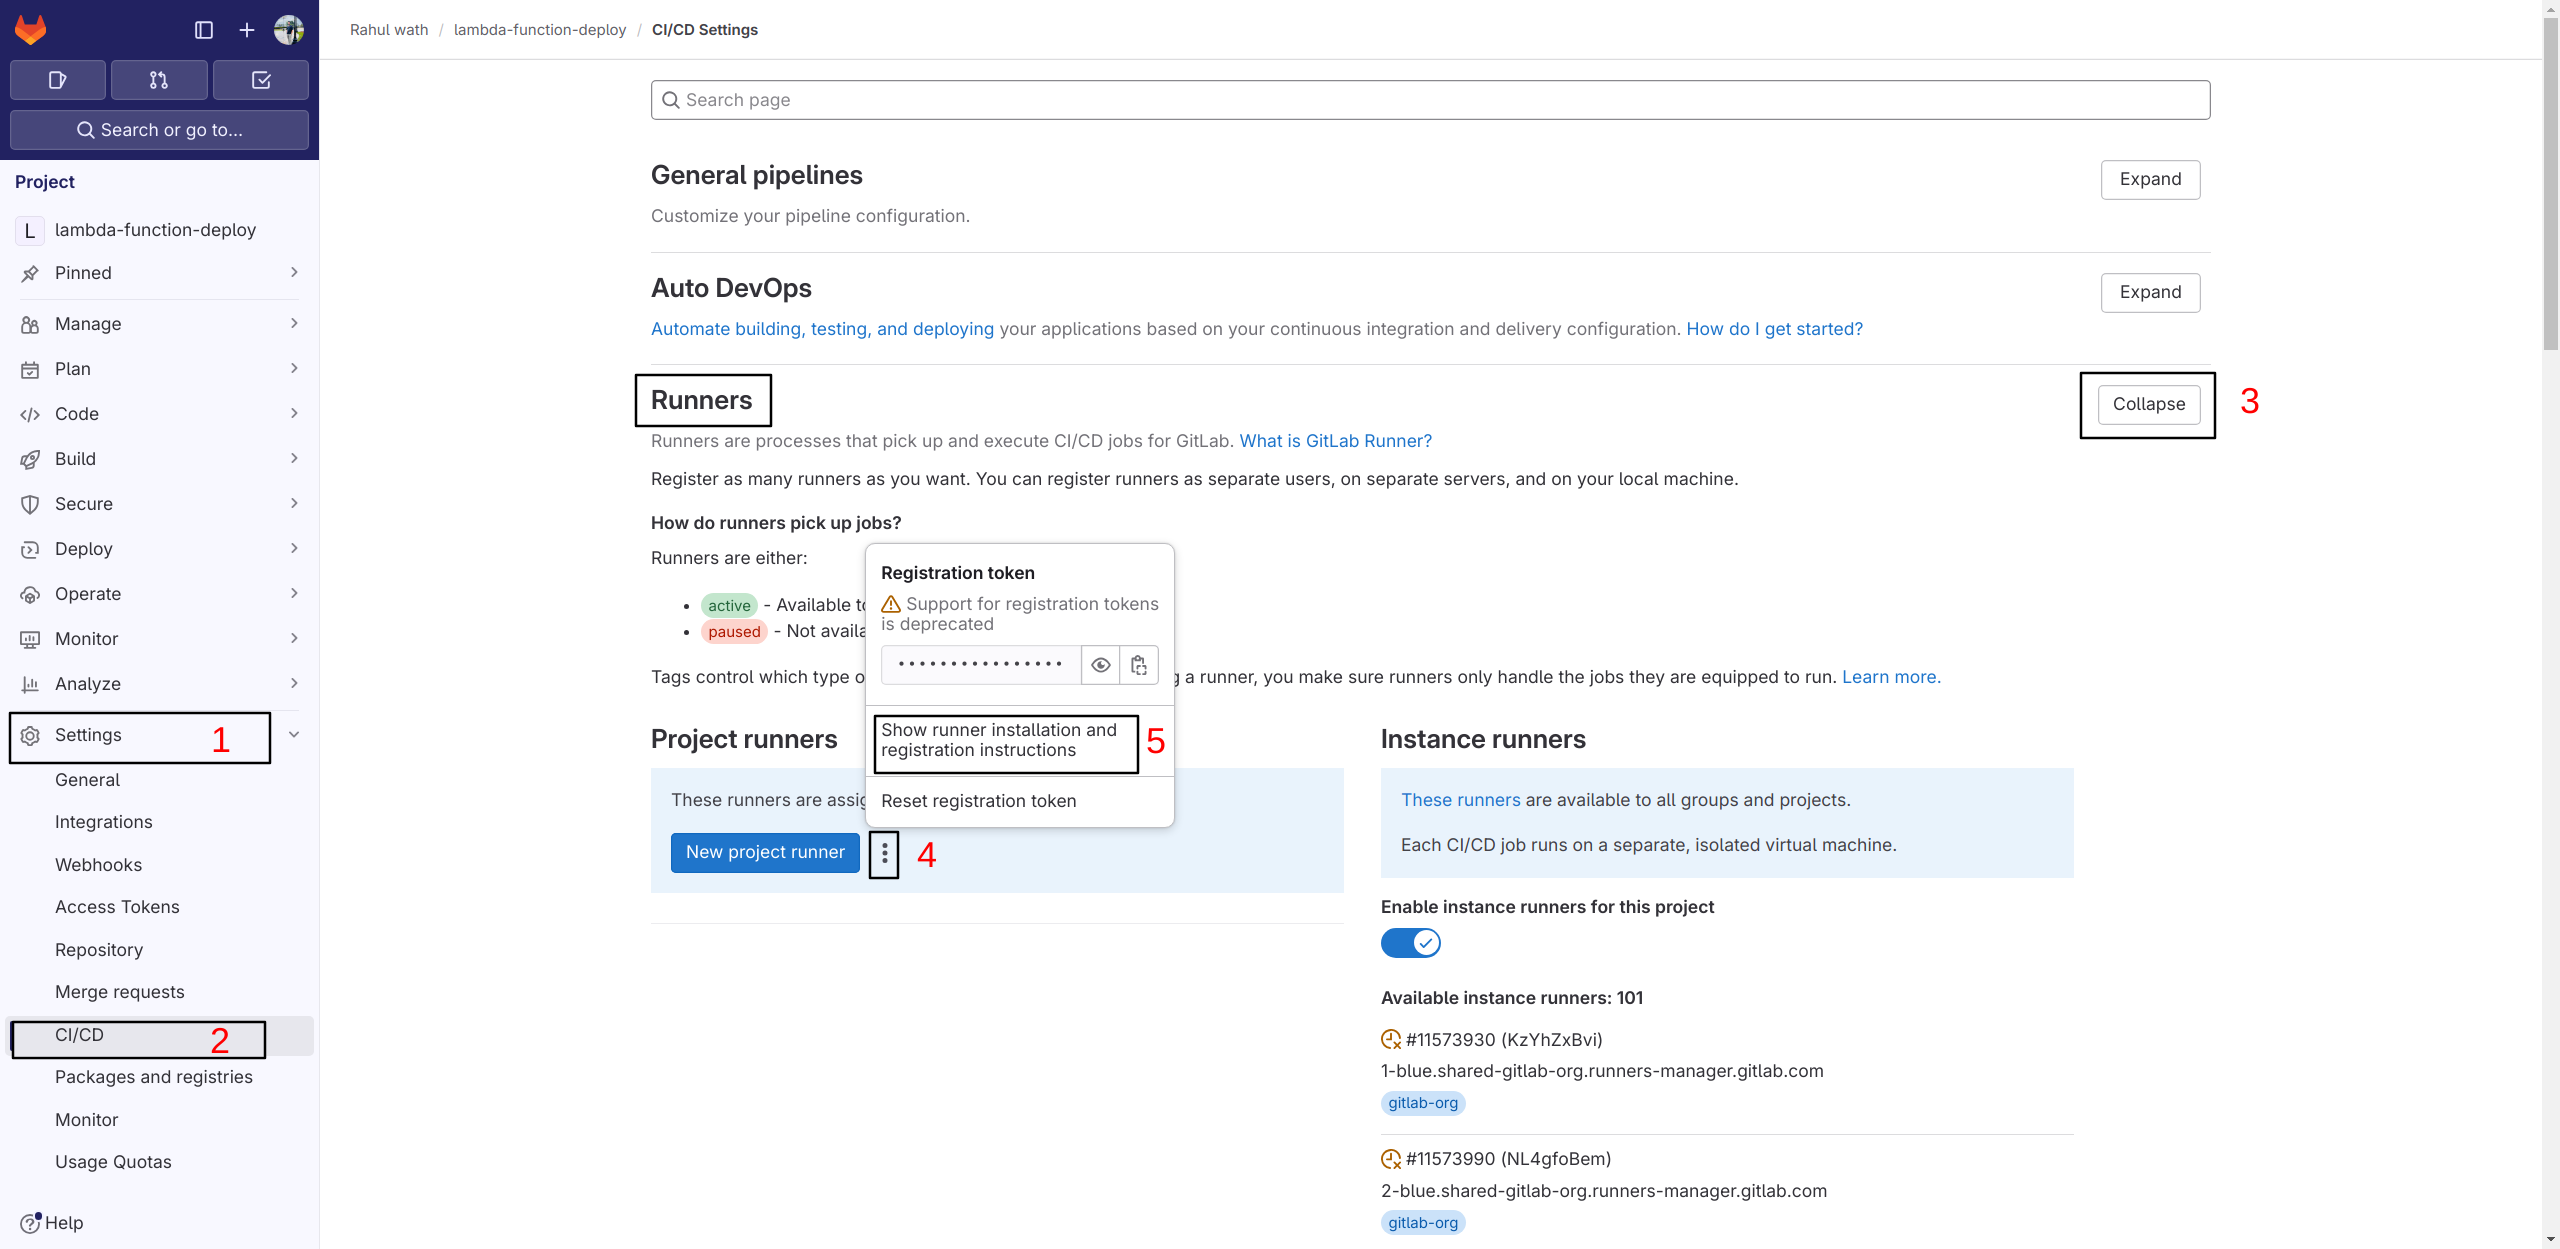
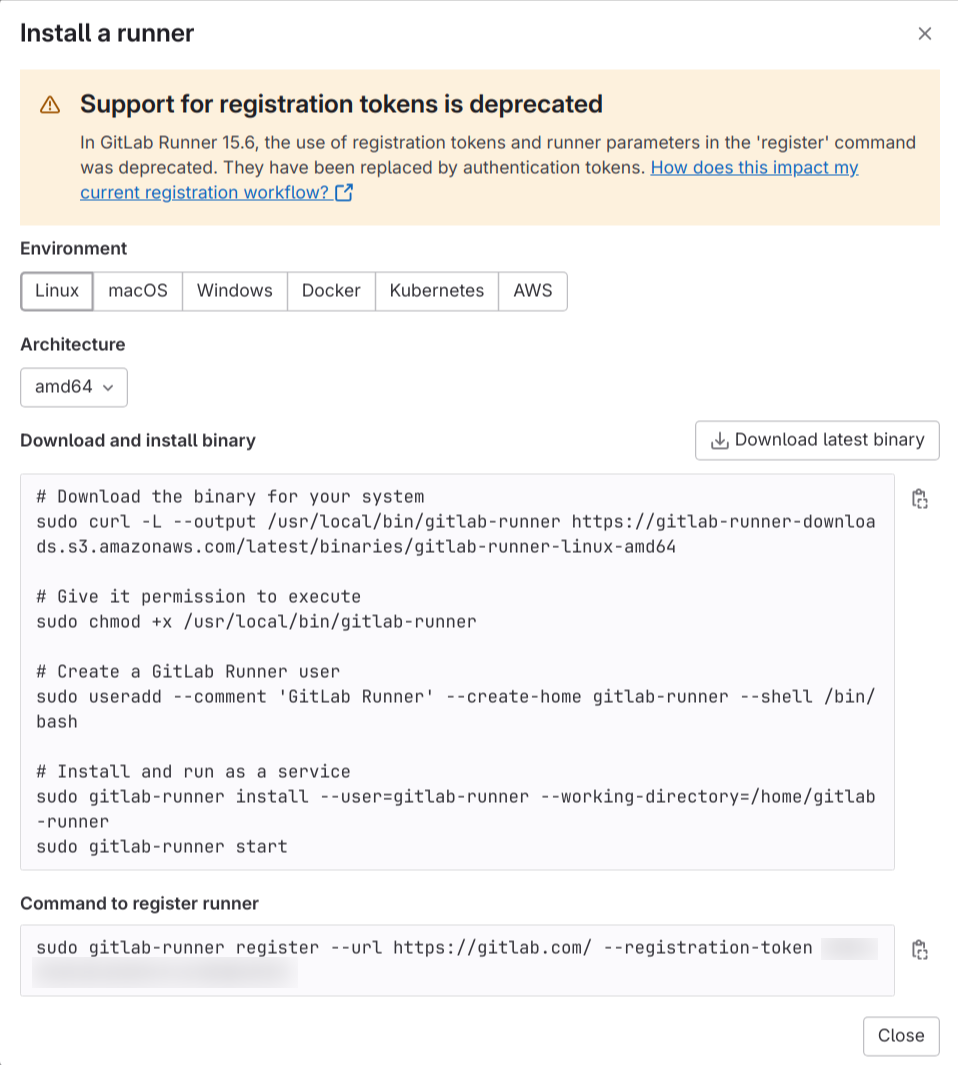
6. While registering the runner, give the description of the runner to whatever name you want to name the runner, make sure to set the executor to ‘docker’ and make sure to provide the docker image as ‘docker:dind’.

7. Next, edit the file ‘/etc/gitlab-runner/config.toml’ and apply the following changes
vi /etc/gitlab-runner/config.toml
Change ‘privileged’ to true and add one more volume ‘/var/run/docker.sock:/var/run/docker.sock’ and save the file.

8. Next, run the following command to verify the runner.
gitlab-runner verify
9. Now, if you go over to the GitLab runner settings page in GitLab, you would be able to see that the runner was registered.

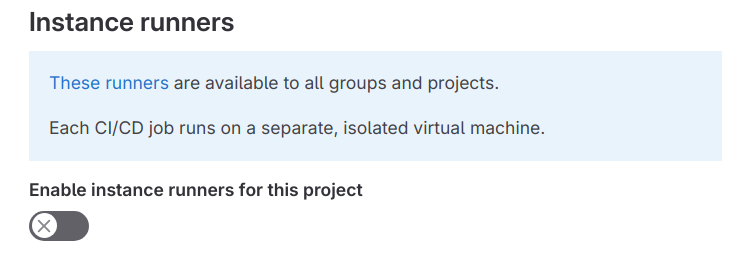
10. Make sure to disable the use of Instance runners for the project.
2. Providing AWS IAM Permissions for the GitLab Runner EC2 Instance
Now that we have set up our GitLab runner in an EC2 instance and registered it to our project, we need to provide the relevant IAM permissions to the EC2 instance to execute Terraform operations seamlessly. Follow these steps:
Go to the AWS Management Console → IAM → Policies → Create Policy.
Click on the ‘JSON’ tab and paste in the following data:
 jsonCopy code{
     "Version": "2012-10-17",
     "Statement": [
         {
             "Sid": "VisualEditor0",
             "Effect": "Allow",
             "Action": [
                 "iam:GetPolicyVersion",
                 "events:EnableRule",
                 "events:PutRule",
                 "iam:DeletePolicy",
                 "iam:CreateRole",
                 "iam:AttachRolePolicy",
                 "iam:ListInstanceProfilesForRole",
                 "iam:PassRole",
                 "iam:DetachRolePolicy",
                 "iam:SimulatePrincipalPolicy",
                 "iam:ListAttachedRolePolicies",
                 "events:RemoveTargets",
                 "iam:CreatePolicyVersion",
                 "iam:ListRolePolicies",
                 "events:ListTargetsByRule",
                 "iam:ListPolicies",
                 "iam:GetRole",
                 "events:DescribeRule",
                 "iam:GetPolicy",
                 "iam:ListRoles",
                 "iam:DeleteRole",
                 "iam:CreatePolicy",
                 "events:DeleteRule",
                 "events:PutTargets",
                 "iam:ListPolicyVersions",
                 "lambda:*",
                 "events:ListTagsForResource",
                 "iam:GetRolePolicy",
                 "iam:DeletePolicyVersion"
             ],
             "Resource": "*"
         }
     ]
 }
Give a relevant name to the IAM policy, such as ‘lambda-test-iam-policy’.
Next, go to IAM → Roles and create a new role.
Select ‘AWS service’ and then choose ‘EC2’.
Attach the IAM policy that we just created.
Provide a relevant name for the IAM role and create it.
Head over to the GitLab Runner EC2 instance. Select it, click on ‘Actions’ → ‘Security’ → ‘Modify IAM role’.
Provide the name of the IAM role that we created and update it.
Now lets get down to business!
Now that we have configured out GitLab Runner registration and IAM permission part, we can deep dive into the CI/CD pipeline area. The following are the files and folders that should be there in GitLab for this setup.
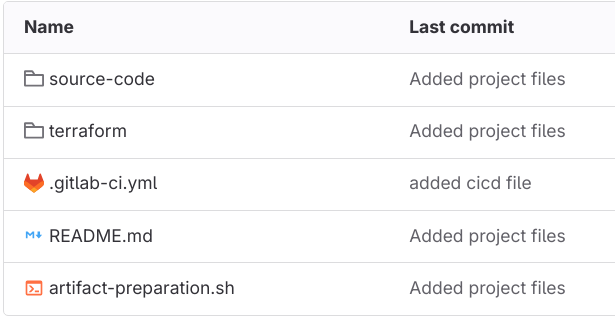
The ‘source-code’ folder contains the Python files and modules that should run inside the Lambda function. The ‘terraform’ folder contains the Terraform modules, ‘main.tf’ file and variable files, etc. Also, we have our ‘.gitlab-ci.yml’ file for the pipeline configuration and also a simple shell script for packaging the job artifact.
For a GitLab CI/CD pipeline, the whole pipeline mechanism is written into the ‘.gitlab-ci.yml’ file. The following is the configuration file. The whole GitLab project for reference can be accessed from:
https://gitlab.com/rahulwath/lambda-function-deploy OR https://github.com/rahulwath/lambda-function-deploy
stages:
  - package-build
  - terraform-validate
  - terraform-plan
  - terraform-apply
  - terraform-destroy

lambda package import:
  image: python:3.8-slim
  stage: package-build
  cache:
    key: ${CI_COMMIT_REF_SLUG}
    paths:
      - cache_modules/
  before_script:
    - apt-get update -y
    - apt-get install zip git wget unzip -y
  script:
    - cd source-code
    - zip -r $CI_PIPELINE_ID.zip *
    - cd -
    - mkdir artifacts
    - mv source-code/$CI_PIPELINE_ID.zip artifacts/
  allow_failure: false
  artifacts:
    paths:
      - artifacts/*
    expire_in: 1 week
  only:
    - tags

terraform validate:
  image:
    name: registry.gitlab.com/gitlab-org/terraform-images/releases/1.3:latest
    entrypoint:
      - '/usr/bin/env'
      - 'PATH=/usr/local/sbin:/usr/local/bin:/usr/sbin:/usr/bin:/sbin:/bin'
  stage: terraform-validate
  dependencies:
    - lambda package import
  variables:
    PLAN: plan.tfplan
    JSON_PLAN_FILE: tfplan.json
    STATE: dbrest.tfstate
  cache:
    paths:
      - .terraform
  before_script:
    - apk add --no-cache jq tree
    - alias convert_report="jq -r '([.resource_changes[]?.change.actions?]|flatten)|{\"create\":(map(select(.==\"create\"))|length),\"update\":(map(select(.==\"update\"))|length),\"delete\":(map(select(.==\"delete\"))|length)}'"
    - cd terraform
    - terraform --version
    - cp -R ../artifacts/* ./
    - ls modules/
    - pwd
    - terraform init -backend-config=address=${TF_ADDRESS} -backend-config=username=${TF_USERNAME} -backend-config=password=${TF_PASSWORD} -backend-config=retry_wait_min=5
  script:
    - sed -i 's/<PAYLOAD_FILE>/'${CI_PIPELINE_ID}'/g' global_vars.tf
    - terraform validate
    - tree -f
  allow_failure: false
  artifacts:
    paths:
      - artifacts/*
    expire_in: 1 week
  needs: ['lambda package import']
  only:
    - tags

terraform plan:
  image:
    name: registry.gitlab.com/gitlab-org/terraform-images/releases/1.3:latest
    entrypoint:
      - '/usr/bin/env'
      - 'PATH=/usr/local/sbin:/usr/local/bin:/usr/sbin:/usr/bin:/sbin:/bin'
  stage: terraform-plan
  dependencies:
    - terraform validate
  variables:
    PLAN: plan.tfplan
    JSON_PLAN_FILE: tfplan.json
    STATE: dbrest.tfstate
  cache:
    paths:
      - .terraform
  before_script:
    - alias convert_report="jq -r '([.resource_changes[]?.change.actions?]|flatten)|{\"create\":(map(select(.==\"create\"))|length),\"update\":(map(select(.==\"update\"))|length),\"delete\":(map(select(.==\"delete\"))|length)}'"
    - cd terraform
    - terraform --version
    - cp -R ../artifacts/* ./
    - terraform init -backend-config=address=${TF_ADDRESS} -backend-config=username=${TF_USERNAME} -backend-config=password=${TF_PASSWORD} -backend-config=retry_wait_min=5
  script:
    - sed -i 's/<PAYLOAD_FILE>/'${CI_PIPELINE_ID}'/g' global_vars.tf
    - terraform plan -out=plan_file
    - terraform show --json plan_file > plan.json
  artifacts:
    paths:
      - artifacts/*
    expire_in: 1 week
  allow_failure: false
  needs: ['terraform validate']
  only:
    - tags

terraform apply:
  image:
    name: registry.gitlab.com/gitlab-org/terraform-images/releases/1.3:latest
    entrypoint:
      - '/usr/bin/env'
      - 'PATH=/usr/local/sbin:/usr/local/bin:/usr/sbin:/usr/bin:/sbin:/bin'
  stage: terraform-apply
  dependencies:
    - terraform plan
  variables:
    PLAN: plan.tfplan
    JSON_PLAN_FILE: tfplan.json
    STATE: dbrest.tfstate
  cache:
    paths:
      - .terraform
  before_script:
    - alias convert_report="jq -r '([.resource_changes[]?.change.actions?]|flatten)|{\"create\":(map(select(.==\"create\"))|length),\"update\":(map(select(.==\"update\"))|length),\"delete\":(map(select(.==\"delete\"))|length)}'"
    - cd terraform
    - terraform --version
    - cp -R ../artifacts/* ./
    - terraform init -backend-config=address=${TF_ADDRESS} -backend-config=username=${TF_USERNAME} -backend-config=password=${TF_PASSWORD} -backend-config=retry_wait_min=5
  script:
    - sed -i 's/<PAYLOAD_FILE>/'${CI_PIPELINE_ID}'/g' global_vars.tf
    - terraform apply --auto-approve
  when: manual
  allow_failure: false
  artifacts:
    paths:
      - artifacts/*
    expire_in: 1 week
  needs: ['terraform plan']
  retry: 2
  only:
    - tags

terraform destroy:
  image:
    name: registry.gitlab.com/gitlab-org/terraform-images/releases/1.3:latest
    entrypoint:
      - '/usr/bin/env'
      - 'PATH=/usr/local/sbin:/usr/local/bin:/usr/sbin:/usr/bin:/sbin:/bin'
  stage: terraform-destroy
  dependencies:
    - terraform apply
  variables:
    PLAN: plan.tfplan
    JSON_PLAN_FILE: tfplan.json
    STATE: dbrest.tfstate
  cache:
    paths:
      - .terraform
  before_script:
    - alias convert_report="jq -r '([.resource_changes[]?.change.actions?]|flatten)|{\"create\":(map(select(.==\"create\"))|length),\"update\":(map(select(.==\"update\"))|length),\"delete\":(map(select(.==\"delete\"))|length)}'"
    - cd terraform
    - terraform --version
    - cp -R ../artifacts/* ./
    - terraform init -backend-config=address=${TF_ADDRESS} -backend-config=username=${TF_USERNAME} -backend-config=password=${TF_PASSWORD} -backend-config=retry_wait_min=5
  script:
    - terraform destroy --auto-approve
  when: manual
  allow_failure: false
  needs: ['terraform apply']
  only:
    - tags
The first job which is the ‘lambda package import’, installs zip, unzip, git, python, etc into the runner environment, zips the Python files/module in the source-code folder and stores them as the pipeline job artifact. The rest of the jobs which are ‘terraform validate’, ‘terraform plan’, ‘terraform apply’ and ‘terraform destroy’ use the job artifact and deploy it to the AWS infrastructure. The pipeline is triggered only if a GIT tag is created in GitLab since all the jobs have ‘- only: tags’ configured. Also, note that the Terraform ‘tfstate’ file is stored in GitLab itself (back-end: GitLab Managed Terraform tfstate). The pipeline is run inside a Docker container with base image of Terraform. This is possible because we choose the GitLab Runner executor as ‘Docker’ and used the Docker image ‘docker:dind’. The ‘artifact-preparation.sh’ shell script simply creates a folder named ‘artifacts’, zips the Python source code and stores it as the job artifact.
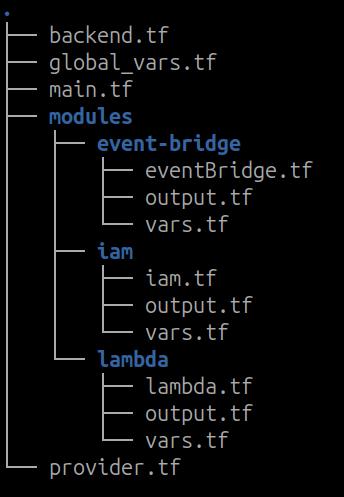
Next, coming down to the Terraform modules, there are actually three modules.
Lambda module: This is where the Lambda function is defined. It only creates the Lambda Function.
EventBridge module: This is where the AWS EventBridge is defined. It is directly mapped to the Lambda Function as a form of source trigger.
IAM module: This is where the IAM Role and Policy for the Lambda Function is defined. The IAM policy permission is defined in JSON format. The IAM role attachment is written in such a way that it’s associated with the AWS Lambda Function.
The following is how the file directory looks like
You can clone the GitLab project from https://gitlab.com/rahulwath/lambda-function-deploy OR https://github.com/rahulwath/lambda-function-deploy and use all of it in the GitLab project that you have created. Also, you can make necessary changes in the Terraform module and also the GitLab configuration file to modify the pipeline architecture.
In the ‘backend.tf’ file, make sure to update your GitLab project ID correctly.
terraform {
  backend "http" {
    address = "https://gitlab.com/api/v4/projects/<Project ID>/terraform/state/gitlab-managed-terraform"
  }
}
In the ‘global_vars.tf’ file, you can provide the name of the Lambda function and also, the other details like AWS region, Lambda runtime, EventBridge, cron expression, etc.
variable "AWS_REGION" {
    type = string
    default = "us-east-1"
}

variable "GLOBAL_ENVIRONMENT_NAME" {
  type = string
  default = "test-env"
}
variable "GLOBAL_APPLICATION_NAME" {
    type = string
    default = "Test-Lambda-Function"
}

variable "GLOBAL_APPLICATION_NAME_LOWER_CASE" {
    type = string
    default = "test-lambda-function"

}


variable "GLOBAL_LAMBDA_MEMORY_SIZE" {
    type = string
    default = "256"
}

variable "GLOBAL_LAMBDA_TIMEOUT" {
    type = string
    default = "600"
}

variable "GLOBAL_LAMBDA_RUNTIME" {
    type = string
    default = "python3.9"
}

variable "GLOBAL_LAMBDA_CODE_PACKAGE_FILE" {
    type = string
    default = "<PAYLOAD_FILE>.zip"
}

variable "GLOBAL_EVENT_BRIDGE_CRON_EXPRESSION" {
    type = string
    default = "cron(* * ? * 2-6 *)"
}
Push all these changes to your GitLab project.
The next thing is to create an Access Key Token in GitLab and also configure the GitLab CI/CD variables. To create a GitLab Access Key Token, follow the steps mentioned in the official document: Click Here
After creating the Access Key Token, follow the steps below.
First go to GitLab →Settings →CI/CD →Variables and add the following:
Key: CI_JOB_TOKEN, Value: Provide the Access Key Token value.
Key: TF_ADDRESS, Value: https://gitlab.com/api/v4/projects/<project ID>/terraform/state/gitlab-managed-terraform (Make sure to provide the correct project ID)
Key: TF_PASSWORD, Value: Provide the Access Key Token value.
Key: TF_USERNAME, Value: GitLab Username.
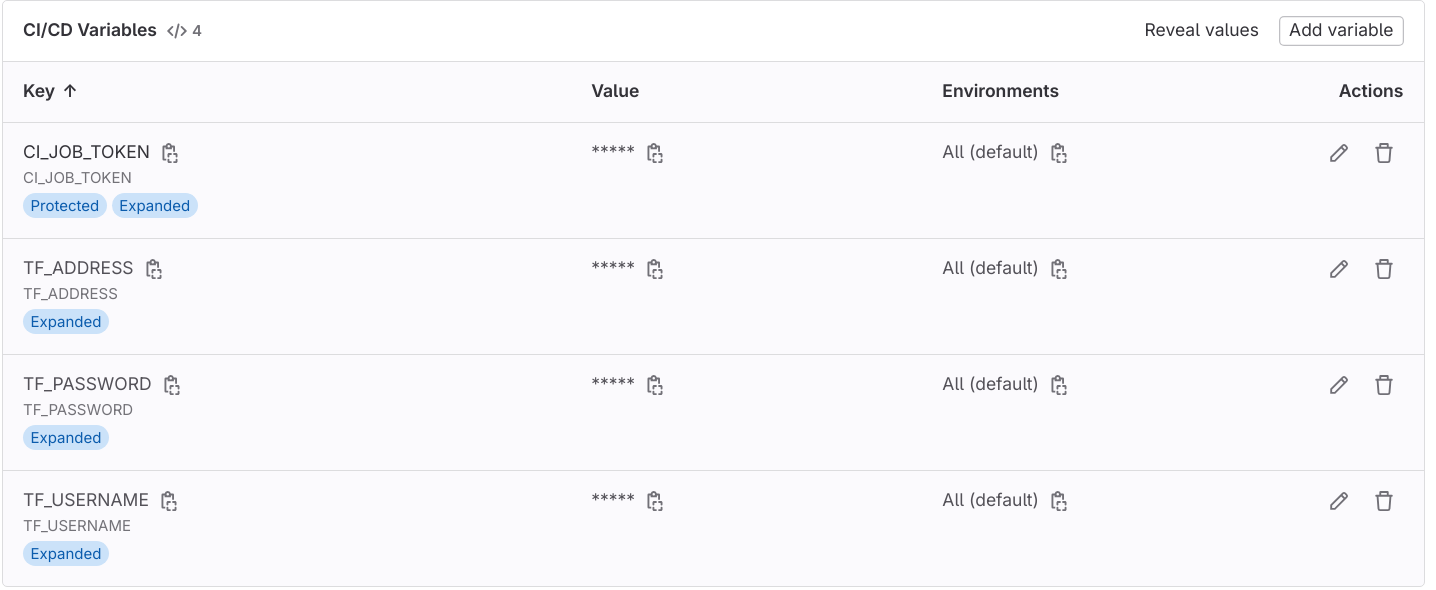
After this, all the steps are complete. All you have to do as a form of final touch is to go to GitLab → Tags and create a new tag. The pipeline will be triggered and the Lambda Function will be deployed to the AWS infrastructure.

Conclusion
The above illustrated mechanism involves the use of GitLab and Terraform combined to deploy AWS resources to the cloud infrastructure. What actually happens in the background is that, when the pipeline runs, it creates a Docker container(Uses Terraform based docker image) in the GitLab Runner Server EC2 instance in the targeted AWS account. Since the IAM permissions for creating the AWS resources is attached directly to the AWS EC2 instance, it’s easy for Terraform to deploy the infra without using any ACCESS_KEY or SECRET_KEY which decreases the threat of any sensitive keys getting exposed.
It is also advised to tag the GitLab runner with a keyword and use the keyword in the ‘.gitlab-ci.yml’ file by using the ‘tags’ functionality. This makes sure that the changes get deployed only to the targeted infrastructure. Also, you can make changes to the existing CI/CD pipeline and modify according to the requirement and also modify the Terraform module to deploy additional cloud resources.
Subscribe to my newsletter
Read articles from Rahul wath directly inside your inbox. Subscribe to the newsletter, and don't miss out.
Written by

Rahul wath
Rahul wath
An experienced DevOps Engineer understands the integration of operations and development in order to deliver code to customers quickly. Has Cloud and monitoring process experience, as well as DevOps development in Windows, Mac, and Linux systems.