🛠️ Day 5: Advanced Linux Shell Scripting for DevOps Engineers 💻with User Management 👥🔐
 Rhythm Mishra

Introduction
Welcome to Day 5 of the #90DaysOfDevOps challenge!
Today, we will cover several topics related to Linux system administration and shell scripting. We'll start with creating dynamic directories using the command line, followed by an automated backup script, and then we'll learn how to schedule the backup script with the help of Cron. Additionally, we'll explore user management in Linux, including creating and displaying usernames. Finally, we'll conclude our blog with a script to create multiple directories with dynamic names based on user input.
As a DevOps engineer, efficient shell scripting is a crucial skill to automate routine tasks and enhance productivity. In this blog post, we will delve into advanced Linux shell scripting with a focus on user management. We'll cover the creation of multiple directories using a script, backup strategies, and user management.
In an IT Company your manager tells you to create 90 directories. So, what did you think, how did I create 90 directories? Manually one by one or using a script, or a command?
You can create all 90 directories within seconds using a simple command.

Tasks: -
TASK 1:
- You have to do the same using Shell Script i.e using either Loops or command with start day and end day variables using arguments -
So Write a bash script create directories.sh that when the script is executed with three given arguments (one is the directory name and second is start number of directories and third is the end number of directories ) it creates a specified number of directories with a dynamic directory name.
Example 1: When the script is executed as
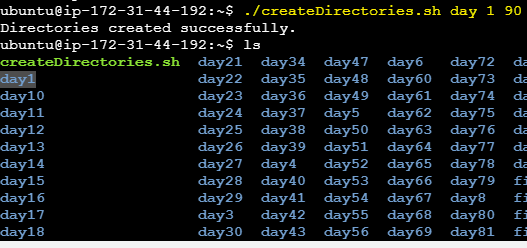
./createDirectories.shday 1 90
then it creates 90 directories as day1 day2 day3 .... day90
Example 2: When the script is executed as
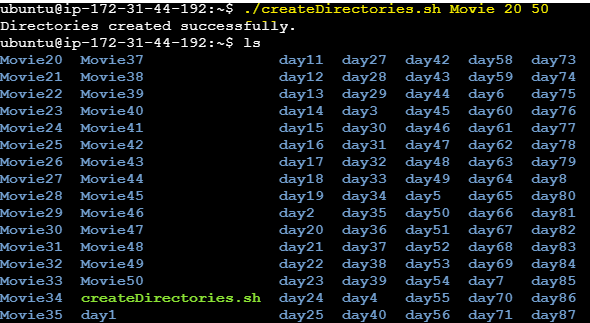
./createDirectories.shMovie 20 50 then it creates 50 directories as Movie20 Movie21 Movie23 ...Movie50
SOLUTION 1 -
Create the script file using vim:

Enter insert mode by pressing i and then run the following bash script:
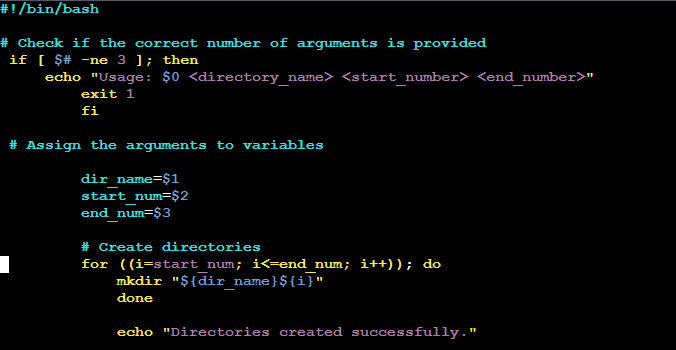
Save the script and exit
vim:Press
ESCto exit insert mode.Type
:wqand pressEnterto save and quitvim.
4. Make the script executable:

5. Run the script with the required arguments:
Or
TASK 2:
- Create a Script to backup all your work done till now.
Backups are an important part of DevOps Engineer's Day to Day activities .
SOLUTION 2 -
Create the script file:

Enter insert mode by pressing
iand then run the below script: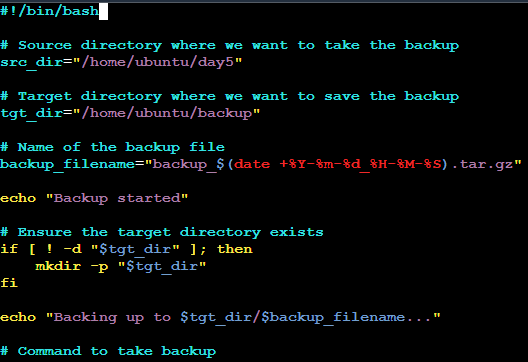

Save the script and exit
vim:Press
ESCto exit insert mode.Type
:wqand pressEnterto save and quitvim.
Make the script executable: chmod +x backup.sh
Run the script:
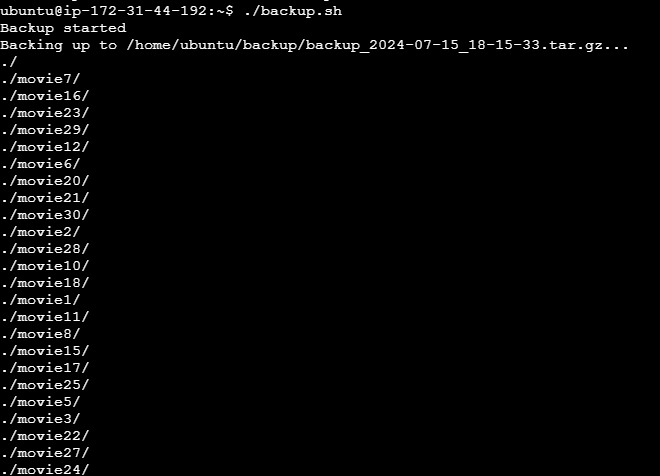
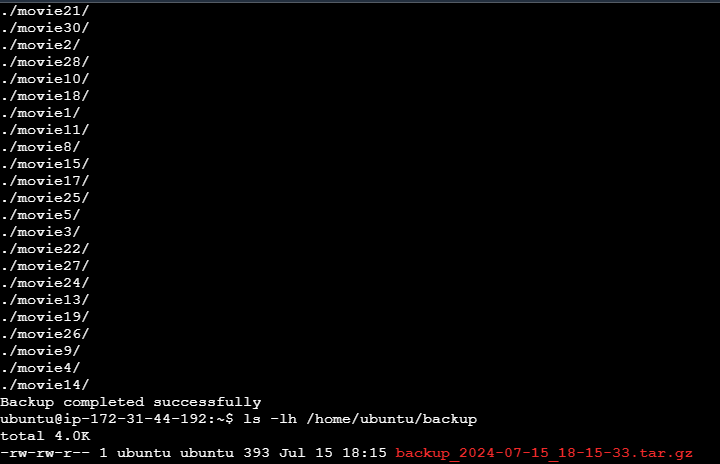
- To Check the Backup File

What is Cron?
Cron is a service provided by Linux which helps us in scheduling tasks and automating them. It is a Unix based job-scheduler that schedules and performs tasks according to the instruction provided to it.
Suppose we need to take keep a track and backup the logs exactly at 3 am. Instead of doing it manually, we can set a "Cron Job" that does it for us.
What is a Cron Job?
A Cron Job is a set of instructions or Linux Commands given to the Cron in order to schedule tasks. It allows users to automate and perform repetitive tasks at a given time, date and frequency at which a particular command, script, or program should be executed.
Mostly it is used for keeping a track of logs, system maintenance and other routine operations, enabling users to automate processes without manual intervention.
Important: A Cron Job is managed by the cron daemon.
What is a crontab?
A crontab is a configuration file that holds the set of instruction for a cron job. Crontab stands for “cron table" . The crontab file contains lines with scheduling information and the corresponding commands to be executed.
Important: Crontabs are stored in /etc/crontab folder.
Understanding the Crontab Syntax
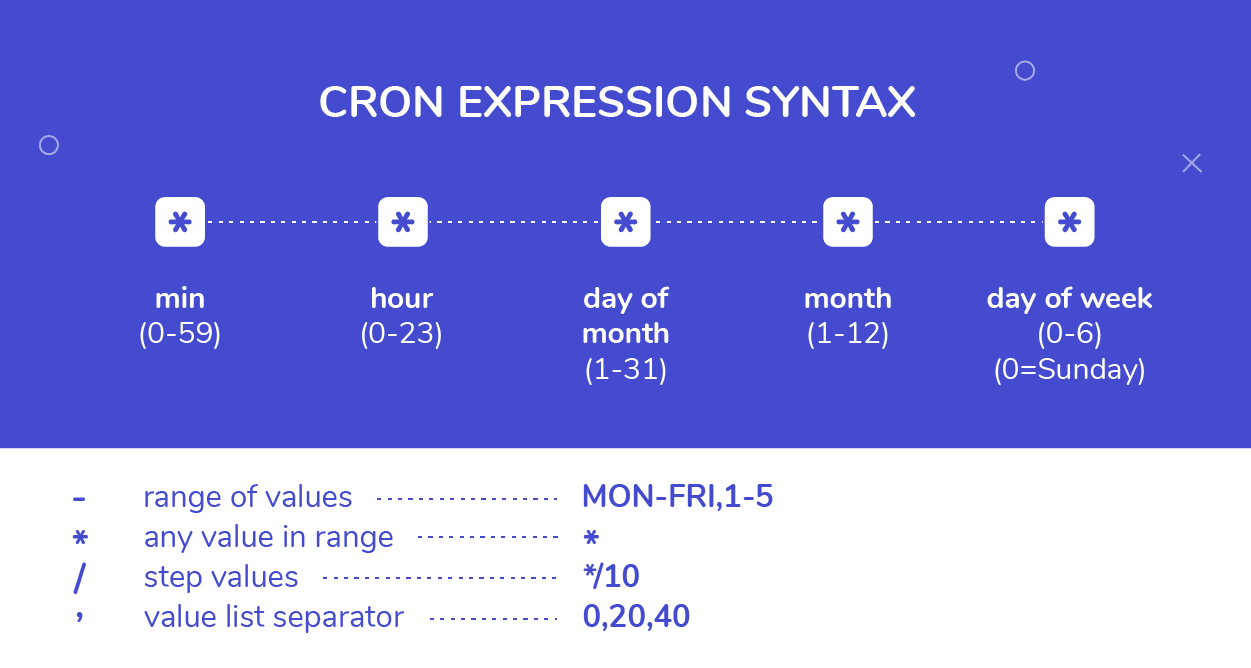
The Linux Crontab Format is represented by the following syntax:
MIN HOUR DOM MON DOW Command
| Field | Description | Range |
| MIN | Minute. Specifies the minute for the command to run | 0-59 min |
| HOUR | Specifies the hour of the day when the command will run | 0-23 hr |
| DOM | Day of Month. Specifies the day of the month for the task. | 1-31 |
| MON | Month. For the month in which the command will run | 1-12 |
| DOW | Day of Week. Specifies the day of the week for the tasks to run. | 0 - 6 |
| Command | the actual command or script that will run at the scheduled time. | - |
How to set a Cron Job?
Some basic commands:
crontab -e : This command opens the crontab file in the default text editor specified by your system.
crontab -l : This command lists all the cronjobs of the current user. It displays the contents of your crontab file, showing the scheduled tasks and their associated commands.
    crontab -l

    #OUTPUT

    # Example cron job
    * * * * * /path/to/your/command.sh
Setting up your first cronjob:
Step - 1
use crontab -e to open your default text editor.
crontab -eStep -2
Write the cronjob in the syntax mentioned above. Example:
30 14 * * * /path/to/your/script.shThis Cronjob means that the process will run at 2:30 pm on every day of the month, every month and every week.
Step - 3
Save and exit the editor.
The cron job is now set up, and it will run according to the schedule you defined. To View the cronjob, use crontab -l.
crontab -l
What is Cron and Crontab 📝
Cron is a time-based job scheduler in Unix-like operating systems, including Linux. It enables users to schedule tasks (commands or shell scripts) to run periodically at fixed times, dates, or intervals. These tasks can be system maintenance, backups, or any other repetitive tasks that need to be performed automatically.
Crontab is the command used to interact with the cron daemon. It allows users to create, view, edit, and delete cron jobs. Each user on a Unix system can have their own crontab file, which contains the schedule of commands to be executed by cron.
Here's a brief overview of how to use crontab to automate the backup script:
Open your terminal and run the following command to open the crontab editor:
crontab -e
Some useful commands crontab commands to use in the terminal :
crontab -e: Edit the crontab file, or create one if it doesn’t already exist.crontab -l: Display crontab file contents.crontab -r: Remove your current crontab file.crontab -i: Remove your current crontab file with a prompt before removal.
If this is your first time editing the crontab, you'll be prompted to choose an editor (e.g., nano, vim). Select your preferred editor.
Once the crontab editor opens, you can add a new line at the end of the file to schedule your backup script. The syntax for a cron job is as follows:
 * * * * * command_to_execute
  - - - - -
  | | | | |
  | | | | +----- Day of the week (0 - 7) (Sunday is 0 or 7)
  | | | +------- Month (1 - 12)
  | | +--------- Day of the month (1 - 31)
  | +----------- Hour (0 - 23)
  +------------- Minute (0 - 59)
For example, if you want to run your backup script every day at 3:00 AM, you would add the following line:
0 3 * * * /path/to/your/backup_script.sh
Replace /path/to/your/backup_script.sh with the actual path to your backup script.
After adding the line, save and exit the crontab editor. In nano, you can do this by pressing Ctrl + X, then Y to confirm, and finally Enter to save.
Your backup script will now run automatically according to the schedule specified in the crontab file.
Explanation:
0- Minute field, specifying that the task should run when the minute is 0 (on the hour).3- Hour field, specifying that the task should run at 3 AM.*- Wildcard character, meaning "every" for the day of the month and month fields.0- Day of the week field, specifying that the task should run on Sunday./path/to/backup-script.sh- The command or script to be executed.
User Management
What is a user?
A user is an entity in Linux that has the power to execute and perform tasks on the linux machine and perform several other operations. Each user is assigned an ID that is unique for each user in the operating system.
IMPORTAN: ID 0 is assigned to the root user and the IDs 1 to 999 both included are assigned to the system users and hence the ids for local user begins from 1000 onwards.
System User Vs Local User:
| System User | Local User |
| System users are created to run specific system processes or services. They are not meant for interactive logins. | Local users are created for human users who interact with the system. They may have home directories and can log in to the system. |
| No home directory | Local users usually have a home directory where they can store personal files and configurations. |
| No Interactive Login | Local users can log in and interact with the system directly |
| services like Apache, Nginx, or databases are examples of System users. | Humans who needs access to the system are example of Local Users. |
User Management Commands:
Creating user:
To create a new User, use the "useradd" command.
sudo useradd <username>Setting Password for the user:
To set password for the user, use "passwd" command.
sudo passwd <username>This will allow you to set the password for the given user.
IMPORTANT: Remember to use sudo to execute commands with administrative privileges.
User management in Linux 🧑
User management in Linux involves creating, modifying, and deleting user accounts, as well as managing user permissions and groups. Here's an overview of some common commands and concepts related to user management:
Creating Users: To create a new user, you can use the
adduseroruseraddcommand. For example:sudo adduser usernameModifying Users: The
usermodcommand is used to modify user account properties such as username, home directory, shell, etc.sudo usermod -d /new/home/directory usernameDeleting Users: To delete a user account, you can use the
deluseroruserdelcommand.sudo deluser usernameUser Information: To display information about a user, you can use the
idcommand.id usernameChanging User Password: To change a user's password, you can use the
passwdcommand.passwd usernameManaging User Groups: Users can belong to one or more groups. To manage group membership, you can use commands like
groups,usermod, andgroupmod.Sudo Access: Users can be granted sudo (superuser) access to perform administrative tasks. This is configured in the
/etc/sudoersfile.User Home Directories: Each user has a home directory where they store their files by default. The home directory path typically follows the format
/home/username.User IDs (UIDs): Each user is assigned a unique User ID (UID) in Linux. The root user has a UID of 0, while regular users typically have UIDs starting from 1000 onwards.
Group IDs (GIDs): Each group is assigned a unique Group ID (GID) in Linux. Groups are used to manage file permissions and group membership.
Task 3:
- Create 2 users and just display their Usernames
To create two users and display their usernames, you can use the following commands:
sudo adduser user1
sudo adduser user2
These commands will prompt you to set passwords and provide additional information for each user. Once the users are created, you can simply display their usernames using the id command:
id -nG user1
id -nG user2
The -n option in the id command is used to display only the usernames, and the -G option specifies the primary group for each user. Alternatively, you can also use the getent command to display user information:
getent passwd user1 | cut -d: -f1
getent passwd user2 | cut -d: -f1
This will display the usernames of the users user1 and user2.
Thank you for taking the time to read this blog. I hope you found valuable insights! If you enjoyed the content, please consider giving it a like, sharing it, and following for more insightful posts in the future. Your support means a lot! Looking forward to sharing more knowledge with you! 🚀
🙌A special thanks to Shubham Londhe #TrainWithShubham and the DevOps community for organizing this fantastic initiative. Let's learn, grow, and make a difference through DevOps!
#TrainWithShubham #90daysofdevops #automation #Devops #Scaling #Infrastructure #ContinuousLearning #DevOpsJourney #CommunityDriven #LinkedInPost #shubhamlondhe #devopsengineer #awsdevops #AWS #Azure #Shell #Linux #ubuntu #crontab #cronjob #backup #scripting
Let's Connect..!
🌐GitHub
:)Happy Learning...
Thank you for reading! 💚
Subscribe to my newsletter
Read articles from Rhythm Mishra directly inside your inbox. Subscribe to the newsletter, and don't miss out.
Written by

Rhythm Mishra
Rhythm Mishra
🛠️ DevOps Engineer 🛠️ with a focus on streamlining deployments 🚀 and fostering collaboration 🤝 between development and operations teams. Specializing in automating pipelines ⚙️ and implementing scalable cloud solutions ☁️. Committed to lifelong learning 📚 and sharing practical insights into DevOps challenges and solutions 💡.