AI - Swap Faces in Group Photos with ComfyUI: The Easy Guide
 Gianpiero Vecchi
Imagine your group photos are like a deck of cards. With ComfyUI, you can reshuffle the faces, creating hilarious new combinations and unexpected visual twists.
What is ComfyUI? It is a visual Interface for Stable Diffusion: At its core, ComfyUI is a graphical user interface (GUI) specifically designed for Stable Diffusion. Stable Diffusion is a powerful AI model capable of generating images based on textual descriptions (prompts). However, interacting with Stable Diffusion typically requires coding knowledge or working through command lines. ComfyUI provides a user-friendly alternative by offering a visual interface with nodes and connections. This allows users to build workflows for image generation without needing to write code.
While ComfyUI was initially designed for image generation, its workflow allows for iterative refinement of generated images. Various models with different training sets can be employed to produce diverse image styles. For instance, a common practice involves using a model like revAnimated to generate a scene and then applying an epicRealism model to transform it into a realistic photograph. In this particular case, we can start with an existing photo (sourced from the TV series "Suits") and replace the faces using real-life photographs (kindly provided by my colleagues at Optimus Via: Eric and Robert).
Before: Original picture from Suits
After the face swap!
It's amazing how the style, color, and shadows remain so intact!
What You'll Need
ComfyUI – the main tool for creative image editing – is open-source, free, and easy to install. Download it here.
The ReActor Node: ComfyUI allows you to install custom nodes, extending its functionality. ReActor is one such node, specializing in face-swapping tasks. You can download it directly from here. Alternatively, the ComfyUI Manager provides a convenient way to explore and install various custom nodes.
Face Images: This process involves the main photo (the group picture) and photos containing the faces you want to swap into it.
Step-by-Step Guide
Create a new Workflow.
Add 'Load Image' nodes: one for the original picture and one for each face you want to swap.
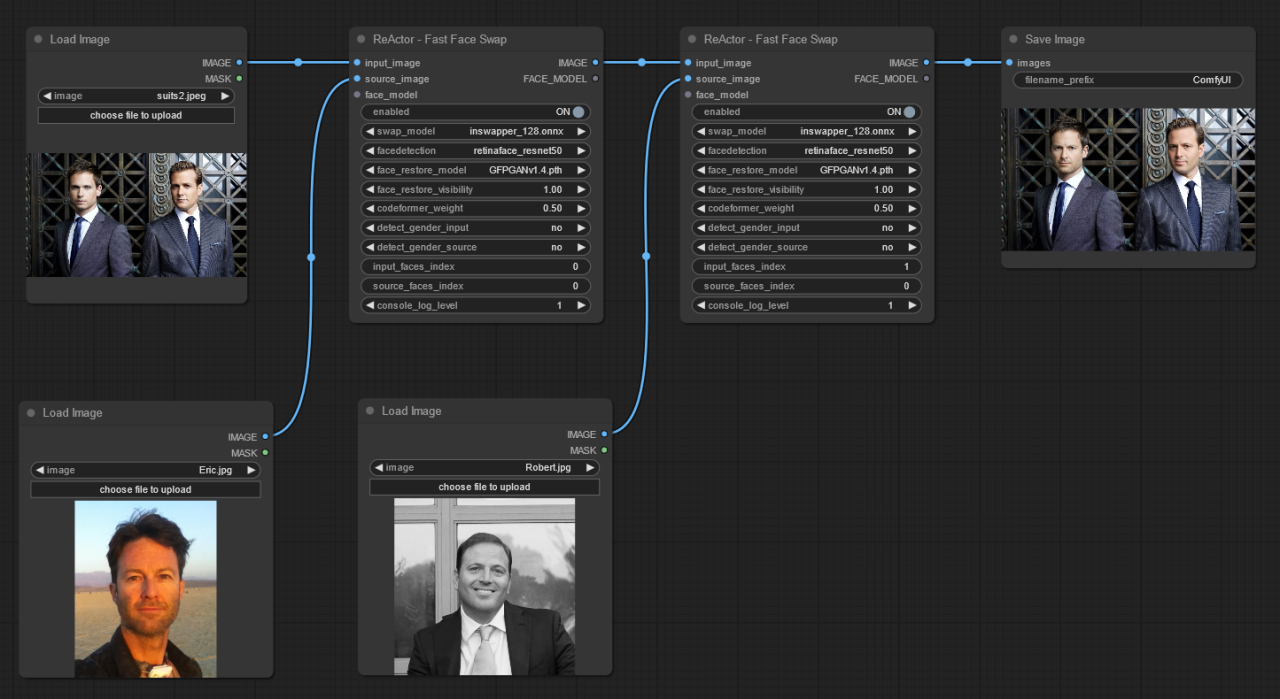
Add a ReActor Node: You'll need one ReActor node for each face you want to swap. If you encounter any issues, you can adjust the 'Face Detection' property within the ReActor node. As the workflow image shows, 'input_image' refers to the picture containing the original face, and 'source_image' refers to the picture containing the face you want to replace. The most important property is 'input_face_index'. The model detects faces automatically and assigns them an index from left to right, starting with 0.
ReActor node with the parameters I used
Every ReActor node produces an output IMAGE that can be used as a source (input_image) for the next ReActor node if you have multiple faces to swap (remember to always check the index) or can be sent to a Save Image node at the end of the process. You can use Preview Image if you don't want to save on the disk the picture every time you run the workflow.
4. Start the process: Click 'Queue Prompt' on the main menu to generate the image.
A section of ComfyUI main menu
Tips and Tricks
Image Quality: It is important to have a clear, well-lit source face images for the best results.
Variety of Faces: Having a diverse collection of source faces enhances your options.
Experiment: The best results come from experimentation! Play around with ComfyUI's settings – it's fun, and you might discover unique effects and styles you never imagined possible.
Example Workflow
This workflow is identical to the main picture of this article, with the only change being the Preview Image at the end.
Conclusion
Of course, ComfyUI offers much more than this example. For instance, you can generate a new image from scratch and use it as the source input. Below is a slightly more complex example that generates an image and then sends it through the same workflow we used before
A more complex example
The prompt of this is: 2 men, lawyers, European, looking at viewer, smiling, masterpiece, in office, wearing a suit. The picture below is the result of the workflow.
Final Image
Important Note: Eric and Robert are not lawyers. They are two of my incredible colleagues with exceptional skills in innovation and business administration. They dedicate themselves fully to helping companies optimize their operations and achieve growth.
I'd love to see your experiments and answer any questions! Share them in the comments and let me know if you want to dive deeper into this topic.
My next article will be about LLMs (Large Language Models). If you're curious about it, follow me!
Subscribe to my newsletter
Read articles from Gianpiero Vecchi directly inside your inbox. Subscribe to the newsletter, and don't miss out.
Written by

Gianpiero Vecchi
Gianpiero Vecchi
Gianpiero Vecchi is a full stack developer with over 25 years of experience in software development, project management, and leading teams. Proficient in a range of technologies like Python, .Net, Swift, React, Java, and Oracle, along with various frameworks and tools, he has a rich background in crafting and overseeing software solutions across multiple sectors, including document management, defense, healthcare, and RFID technologies. Gianpiero is deeply interested in AI and its potential to boost business operations, particularly in areas like improving customer service, content creation, and streamlining access to and analysis of extensive document repositories.


