How to Use rsync for Linux Server Backups
 Ghanatva Thakaran
Introduction to rsync
rsync is a utility for transferring and synchronising files between a computer and a storage drive and across networked computers by comparing the modification times and sizes of files. We will use rsync for creating backups at a remote server because rsync is smart.
Features of rsync:
Efficient Transfer:
rsyncis designed to efficiently transfer files by only sending the differences between source and destination files. This minimises the amount of data transferred, making it faster thanscpfor large files or directories with many unchanged files.Remote Sync:
rsynccan synchronise files between local and remote systems, or between two remote systems. It uses SSH (by default) for secure communication and can operate over any remote shell, includingssh,rsh, orrsyncdaemon.Bandwidth Optimisation: It has options for bandwidth throttling and compression, which can significantly improve transfer speed over slow networks or WAN connections.
Preserve Permissions and Timestamps:
rsyncpreserves file permissions, ownership, timestamps, and symbolic links by default, ensuring that transferred files maintain their original attributes.Partial Transfers: If a transfer is interrupted,
rsynccan resume from where it left off, saving time and bandwidth compared to starting over from scratch.Recursive Sync:
rsynccan recursively synchronise directories and sub directories, ensuring that entire directory trees are replicated accurately.Filtering Capabilities: It supports inclusion and exclusion filters (
--includeand--excludeoptions), allowing fine-grained control over which files and directories are synchronized.Dry Run Mode:
rsynccan simulate file transfers (--dry-runor-noption) to show what would be transferred without actually copying any files, useful for previewing sync operations.
Lab Setup
Before we begin, we need to have two linux machines which can communicate each other. It can be anything VMs on your PC or instances on cloud or Docker containers. I will use docker to set-up our lab (for demonstration) you can pick whatever you like.
Create Network
Create a network name backup using the docker network create command.
docker network create backup
Create volumes
docker volume create main_volume
docker volume create backup_volume
Create Containers and attach them to the network
docker run -it --name main -v main_volume:/container-root ubuntu
#Open another terminal and run the backup container
docker run -it --name backups -v backup_volume:/container-root ubuntu
docker network connect backup main
docker network connect backup backups

#disconnect the containers from default bridge network to isolate the lab
docker network disconnect bridge main
docker network disconnect bridge backups
SSH setup
We need to setup ssh on both containers and allow public key based authorization to use rsync in unattended mode.
Configuring main and backup container by running
apt update -y
apt install rsync
apt install openssh-client
service ssh start
ssh-keygen -t ed25519 -C "email@example.com"
Copy main's public key to backups .ssh/authorized_keys file manually or use the command
ssh-copy-id root@backups
Schedule backups using cron
Let's get some data first, switch to our container root directory and create dummy data, I am cloning one of my repositories to act as dummy data.
Inside main container
cd container-root
apt install git -y
git clone https://github.com/ghanatava/bash_scripts.git
Now that we have our data we will set up a cron for rsync.
apt install cron -y
apt install vim -y #we need a editor to edit chrontab
service cron start
Edit the crontab using below command
crontab -e

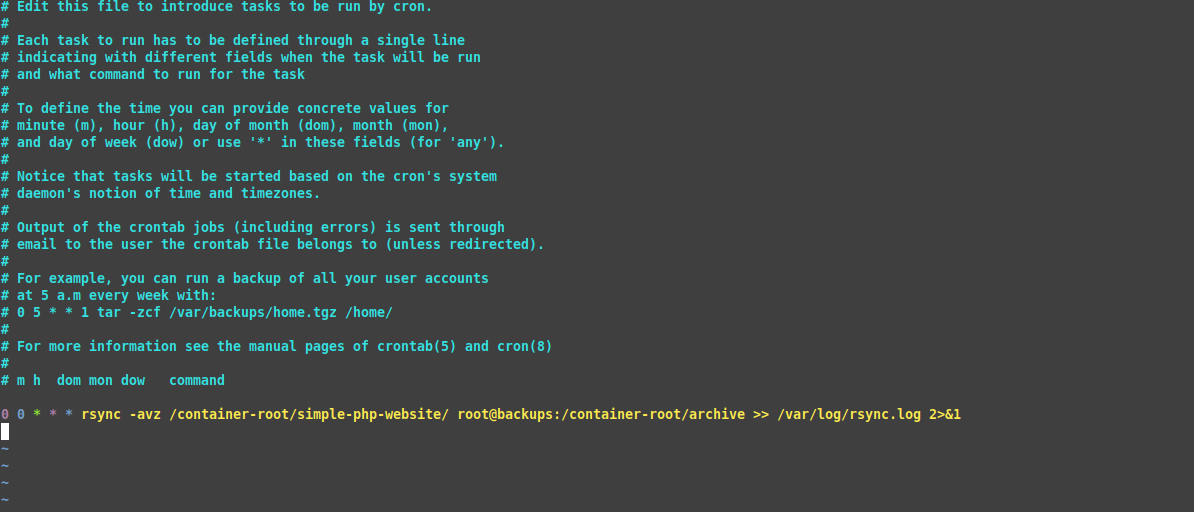
This will open the editor that looks something like the above image. Add the line below to schedule backups to be taken automatically at midnight.
0 0 * * * rsync -avz /container-root/bash_scripts/ root@backups:/container-root/script_archive >> /var/log/rsync.log 2>&1
Let's try to understand what is going on
The options -azv is describe how rsync will transfer the files
-a: Archive mode this will preserve time stamps, ownership and symlinks creating an archive.
-v: Verbose mode.
-z: The z option tells rsync to compress the files before transferring, they will decompressed at the destination.
"/container-root/bash_scripts/" : is the absolute source path where our data is inside main.
"root@backups:/container-root/script_archive": is the absolute path on our remote server
">> /var/log/rsync.log 2>&1": Redirects the standard output and error from rsync to /var/log/rsync.log.
2 > &1
If you want to test the cron just edit the command to run every minute
* * * * * rsync -avz /container-root/bash_scripts/ root@backups:/container-root/script_archive >> /var/log/rsync.log 2>&1
leveraging rsync for server backups provides a powerful and efficient solution for data synchronization. By scheduling regular rsync tasks with cron, you can ensure that your critical data is consistently backed up.with minimal bandwidth usage, all while maintaining file integrity and permissions.
Subscribe to my newsletter
Read articles from Ghanatva Thakaran directly inside your inbox. Subscribe to the newsletter, and don't miss out.
Written by

Ghanatva Thakaran
Ghanatva Thakaran
I am student currently pursuing my Bachelor's in computer science. I have a keen interest in DevOps and LINUX related technologies