Compose Multiplatform Navigation Solutions - Decompose
 Michał Konkel
Welcome to another series in mobile application programming, where we will dive deep into the powerful features of Kotlin Multiplatform and Compose Multiplatform. This series aims to provide a comprehensive understanding of these technologies and how they can be leveraged to build robust mobile applications. In the upcoming posts, I will thoroughly explore several popular navigation libraries that are essential for effective app development.
Before starting any project, one of the critical decisions we need to make is choosing the best approach to navigation. A quick review of the available options can significantly aid in evaluating and selecting the most suitable tool for our specific needs. This series will begin with an in-depth look at Decompose, a library you might have encountered in previous posts on the Fullstack Kotlin Developer.
Following that, we will also examine other notable libraries such as Voyager, Apyx, and Jetpack Compose. Each of these libraries offers unique features and capabilities that can enhance the navigation experience in your mobile applications.
To ensure a practical understanding, we will use a test application to demonstrate the functionalities of these libraries. The basic requirements for the test application are as follows:
Application should allow us to navigate from one screen to another.
Application should allow to pass some parameters from first to second screen.
Application should handle the screen rotation without loosing data.
Application should handle the Tab Navigation.
Application should handle the async operations with coroutines.
The project is available in the GitHub repository.
Dependencies
Base project setup, as always, is made with Kotlin Multiplatform Wizard. This wizard provides a streamlined way to create a multiplatform project, ensuring that we have a solid foundation to build upon. We also need to add some Decompose as it is the core thing that we would like to examine. There is also one thing that we need to add to the project, and that is the Kotlin Serialization plugin.
libs.versions.toml
[versions]
decompose = "3.0.0-beta01"
serialization = "1.6.3"

[libraries]
decompose = { module = "com.arkivanov.decompose:decompose", version.ref = "decompose" }
decompose-compose = { module = "com.arkivanov.decompose:extensions-compose", version.ref = "decompose" }
serialization-json = { module = "org.jetbrains.kotlinx:kotlinx-serialization-json", version.ref = "serialization" }

[plugins]
kotlinSerialization = { id = "org.jetbrains.kotlin.plugin.serialization", version.ref = "kotlin" }
Freshly added dependencies needs to be synced with the project and added to the build file.
build.gradle.kts
plugins {
    alias(libs.plugins.kotlinSerialization)
}

sourceSets {
    androidMain.dependencies {
        ...
        implementation(libs.decompose)
    }
    commonMain.dependencies {
        ...
        implementation(libs.decompose)
        implementation(libs.decompose.compose)
        implementation(libs.serialization)
    }
}
Now we can sync the project and start coding.
Decompose Introduction
Following the Decompose documentation, we can see that the main element of the library is the Component class. This class encapsulates logic and can contain other components, making it a powerful tool for managing complex applications.
Components
Components are lifecycle-aware, which means their lifecycle is automatically managed by the framework. This lifecycle management is very similar to Android’s activity lifecycle, providing a familiar structure for Android developers.
One of the key features of components is that they are independent of the UI. This separation ensures that the UI relies on the components, allowing for a clean architecture where the business logic is kept separate from the presentation layer. The idea is to hold as much code in the shared logic as possible, making the application more modular and easier to maintain.
Components are responsible for holding business logic and managing navigation. The navigation logic is also separated from the UI, which further enforces the separation of concerns. If you are familiar with Android development, you can think of the components as analogous to the ViewModel. This similarity makes it easier for developers to transition to using Decompose.
By following these principles, we can create a robust and maintainable application architecture that leverages the full power of the Decompose library.
Each component should have a ComponentContext that manages its lifecycle, keeps its state (can preserve component state during changes), and handles the back button. The context is passed through the constructor and can be added to the component by delegation.
Because of that, the main point of the app should be a RootComponent, which should be provided with the ComponentContext to determine how it should act on different platforms. Therefore, its context must be created on the platform side itself. For such situations, we can use the DefaultComponentContext(). If we are working on Android, it should be created inside the Composable function, and we should always use the remember() function so the context will not be recreated with every recomposition.
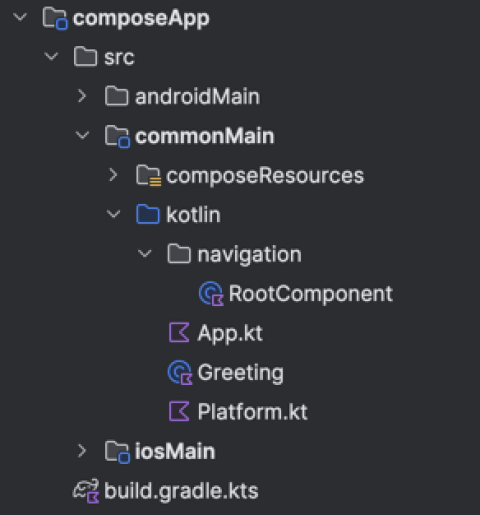
With that covered, we can start to code. Let's create a navigation package in our project with the RootComponent. The RootComponent will live as long as the application.

RootComponent.kt
class RootComponent(
    componentContext: ComponentContext
) : ComponentContext by componentContext {
    // Some code here
}
Configuration
Let’s assume that our application will have two screens: FirstScreen and SecondScreen. Both screens will be represented by the Component class. The FirstScreen will be the initial screen shown to the user, and the SecondScreen will appear after the user clicks a button on the FirstScreen. To manage this navigation, we need to create a Stack within the RootComponent. This stack is provided to the component through the ComponentContext.
To set up the stack, we need to define a Configuration class. This class must be @Serializable because it will represent the child components and contain all the necessary arguments to create them. The Configuration class will help us manage the state and lifecycle of each screen, ensuring that the correct screen is displayed based on user interactions.
@Serializable
sealed class Configuration {
    @Serializable
    data object FirstScreen : Configuration()

    @Serializable
    data class SecondScreen(val text: String) : Configuration()
}
Stack Navigation
The created configuration can now be used to set up the stack, which will manage the navigation between our screens. To achieve this, we should utilize the StackNavigatorinterface. This interface provides a comprehensive set of methods that are essential for handling the navigation process effectively.
private val navigation = StackNavigation<Configuration>()
The definitions of child components are created by the Configuration, but now they also need to create Child Components themselves. Components are organized as trees, where the root component is the main component, and the child components are created by the main component. The parent component only knows about its direct children, ensuring a clear hierarchy and separation of concerns.
Each component can be independently reused anywhere in the app, making the architecture flexible and modular. With the use of navigation, components are automatically created and destroyed as needed. They require a provided component context from the parent to function correctly and handle their lifecycle.
Let’s now focus on linear navigation using the Child Stack approach. This method allows us to manage a stack of child configurations, where each configuration represents a screen in the navigation stack. When a new screen is pushed onto the stack, it becomes the active screen, and when a screen is popped, the previous screen is reactivated. This approach is particularly useful for scenarios where you need to navigate back and forth between screens, maintaining the state and lifecycle of each screen appropriately.
You can find other navigation approaches in the documentation, which might be more suitable depending on the specific requirements of your application.
During the navigation, the child stack compares new configurations with the previous one. There should be only one (the top) component active, others are in the back and stopped or destroyed.
class FirstScreenComponent(
    componentContext: ComponentContext
) : ComponentContext by componentContext {
    // Some code here
}

class SecondScreenComponent(
    componentContext: ComponentContext,
    private val text: String
) : ComponentContext by componentContext {
    // Some code here
}
RootComponent
With new components added, we now need to create them inside the root component – they are called children.
sealed class Child {
    data class FirstScreen(val component: FirstScreenComponent) : Child()
    data class SecondScreen(val component: SecondScreenComponent) : Child()
}
The last thing to do for working navigation is to create the childStack. The childStack requires some parameters to be passed, such as the source of the navigation, the serializer, the initial configuration, the handleBackButton, and the childFactory. The childFactory is a function that creates the child component based on the configuration and component context. The childStack is responsible for creating the child components and managing their lifecycle.
val childStack = childStack(
   source = navigation,
   serializer = Configuration.serializer(),
   initialConfiguration = Configuration.FirstScreen,
   handleBackButton = true,
   childFactory = ::createChild
)
private fun createChild(configuration: Configuration, componentContext: ComponentContext): Child =
   when (configuration) {
      is Configuration.FirstScreen -> Child.FirstScreen(FirstScreenComponent(componentContext))
      is Configuration.SecondScreen -> Child.SecondScreen(SecondScreenComponent(componentContext, configuration.text))
   }
ChildStack cannot be empty; it must always have at least one active (resumed) child component. Components that are not active are always in a stopped state. If we want to use multiple ChildStacks within a single component, each ChildStack must have a unique key associated with it to distinguish them.
When we examine the childStack function, we can see that it returns a Value type. This Value type is crucial because it represents the current state of the ChildStack, including the active child component and any components that are in the back stack. The Value type allows us to observe changes to the ChildStack and react accordingly.
private final val childStack: Value<ChildStack<RootComponent.Configuration, RootComponent.Child>>
The Value is a type that represents a value that can be observed as the Decompose equivalent of Jetpack Compose State. It is also independent of the approach you want to use further in the application. Nevertheless, in the Compose Multiplatform approach, it can (and should) be transformed to the state.
Handling the Linear Navigation
With everything done, we can now handle the actual navigation. Following the documentation, we can handle it in multiple ways – with traditional callbacks or with a more reactive approach using flow or observable. It’s up to you how you want to communicate child components with the root component. You can also create a global navigation object that will be responsible for changing the screens from any place in the app. There is no good or bad practice. For simplicity, I will use the callbacks.
Adjusting components
In the firstScreen, I will add a lambda expression on onButtonClick: (String) -> Unit that will be called when the button is clicked. The lambda will be called with the greetings text, and handled in the RootComponent.
class FirstScreenComponent(
    componentContext: ComponentContext,
    private val onButtonClick: (String) -> Unit,
) : ComponentContext by componentContext {

    fun click() {
        onButtonClick("Hello from FirstScreenComponent!")
    }
}
Now we need to implement the callback and handle the navigation.
@OptIn(ExperimentalDecomposeApi::class)
private fun createChild(configuration: Configuration, componentContext: ComponentContext): Child =
    when (configuration) {
        is Configuration.FirstScreen -> {
            Child.FirstScreen(
                component = FirstScreenComponent(
                    componentContext = componentContext,
                    onButtonClick = { textFromFirstScreen ->
                        navigation.pushNew(Configuration.SecondScreen(text = textFromFirstScreen))
                    }
                )
            )
        }
            ...
    }
The Decompose gives plenty wat of starting new screens:
push(configuration)– pushes new screen to top of the stackpushNew(configuration)– pushes new screen to top of the stack, does nothing if configuration already on the top of stackpushToFront(configuration)– pushes the provided configuration to the top of the stack, removing the configuration from the back stack, if anypop()– pops the latest configuration at the top of the stack.and more, that are described here
The same approach can be used to handle the back button. The handleBackButton parameter in the childStack is responsible for that. If the back button is pressed, the childStack will pop the latest configuration from the stack.
class SecondScreenComponent(
    componentContext: ComponentContext,
    private val text: String,
    private val onBackButtonClick: () -> Unit
) : ComponentContext by componentContext {
    fun getGreeting(): String = text
    fun goBack() {
        onBackButtonClick()
    }
}
@OptIn(ExperimentalDecomposeApi::class)
private fun createChild(configuration: Configuration, componentContext: ComponentContext): Child =
    when (configuration) {
            ...
        is Configuration.SecondScreen -> Child.SecondScreen(
            component = SecondScreenComponent(
                componentContext = componentContext,
                text = configuration.text,
                onBackButtonClick = { navigation.pop() }
            )
        )
    }
Adding the common UI
The navigation is now complete, and it is independent of the UI. It’s pure Kotlin, placed in shared code, and it can be unit-tested. The last thing to do is to create the UI for the screens. It will be as simple as possible, a column with texts and buttons. Each screen will be a @Composable function that takes a component as a parameter.
@Composable
fun FirstScreen(
    component: FirstScreenComponent
) {
    Column(
        modifier = Modifier.fillMaxSize(),
        horizontalAlignment = Alignment.CenterHorizontally,
        verticalArrangement = Arrangement.Center
    ) {
        Text("First screen")
        Button(onClick = { component.click() }) {
            Text("Second Screen")
        }
    }
}
@Composable
fun SecondScreen(
    component: SecondScreenComponent
) {
    Column(
        modifier = Modifier.fillMaxSize(),
        horizontalAlignment = Alignment.CenterHorizontally,
        verticalArrangement = Arrangement.Center
    ) {
        Text("First screen")
        Spacer(modifier = Modifier.height(16.dp))
        Text("Greetings: ${component.getGreeting()}")
        Button(onClick = { component.goBack() }) {
            Text("Go Back")
        }
    }
}
The buttons are invoking functions that are provided via the components. As we remember functions will trigger the navigation in our rootComponent.
Entrypoints
The entrypoint to our application is the App() function where will take the RootComponent as a parameter and handle the navigation events from the childStack. Each platform iOS and Android will create the rootComponent and pass it to the function.
val childStack = rootComponent.childStack.subscribeAsState()
The decompose Value can be transformed to the State by the subscribeAsState() function. To handle upcoming changes in the stack, the library provides a special composable function called Children that takes the stack as a parameter and can be configured using standard modifiers. It also can use different types of transition animations with the StackAnimation. The last parameter of the Children function is a lambda expression that will be called with every new child on the top of the stack. This is where we can specify how to display new components.
@Composable
fun App(rootComponent: RootComponent) {
    MaterialTheme {
        val childStack = rootComponent.childStack.subscribeAsState()
        Children(
            stack = childStack.value,
            animation = stackAnimation(slide()),
        ) { child ->
            when (val instance = child.instance) {
                is RootComponent.Child.FirstScreen ->
                    FirstScreen(instance.component)

                is RootComponent.Child.SecondScreen ->
                    SecondScreen(instance.component)
            }
        }
    }
}
The last thing to do is to create the RootComponent in the platform-specific code. Next pass it to the App() function. For Android, it will be the MainActivity located in the androidMain, and for iOS the MainViewController located in iosMain.
Android
For Android we should use the decomposes retainedComponent() function that will create the RootComponent and retain it during the configuration changes. It also creates the componentContex out of the box.
class MainActivity : ComponentActivity() {
    @OptIn(ExperimentalDecomposeApi::class)
    override fun onCreate(savedInstanceState: Bundle?) {
        super.onCreate(savedInstanceState)

        val rootComponent = retainedComponent { componentContext ->
            RootComponent(
                componentContext = componentContext
            )
        }
        setContent {
            App(rootComponent = rootComponent)
        }
    }
}
iOS
Since the iOS entry point is a composable function, we will need to create componentContext ourselves. Thankfully, Decompose has the proper functions for it. I will use the DefaultComponentContext() that takes the Lifecycle as a parameter, which is also created by part of the Decompose library via the LifecycleRegistry(). To prevent creating new components on each recomposition, we should remember the instantiated component.
fun MainViewController() = ComposeUIViewController {
    val rootComponent = remember {
        RootComponent(
            componentContext = DefaultComponentContext(LifecycleRegistry())
        )
    }

    App(rootComponent)
}
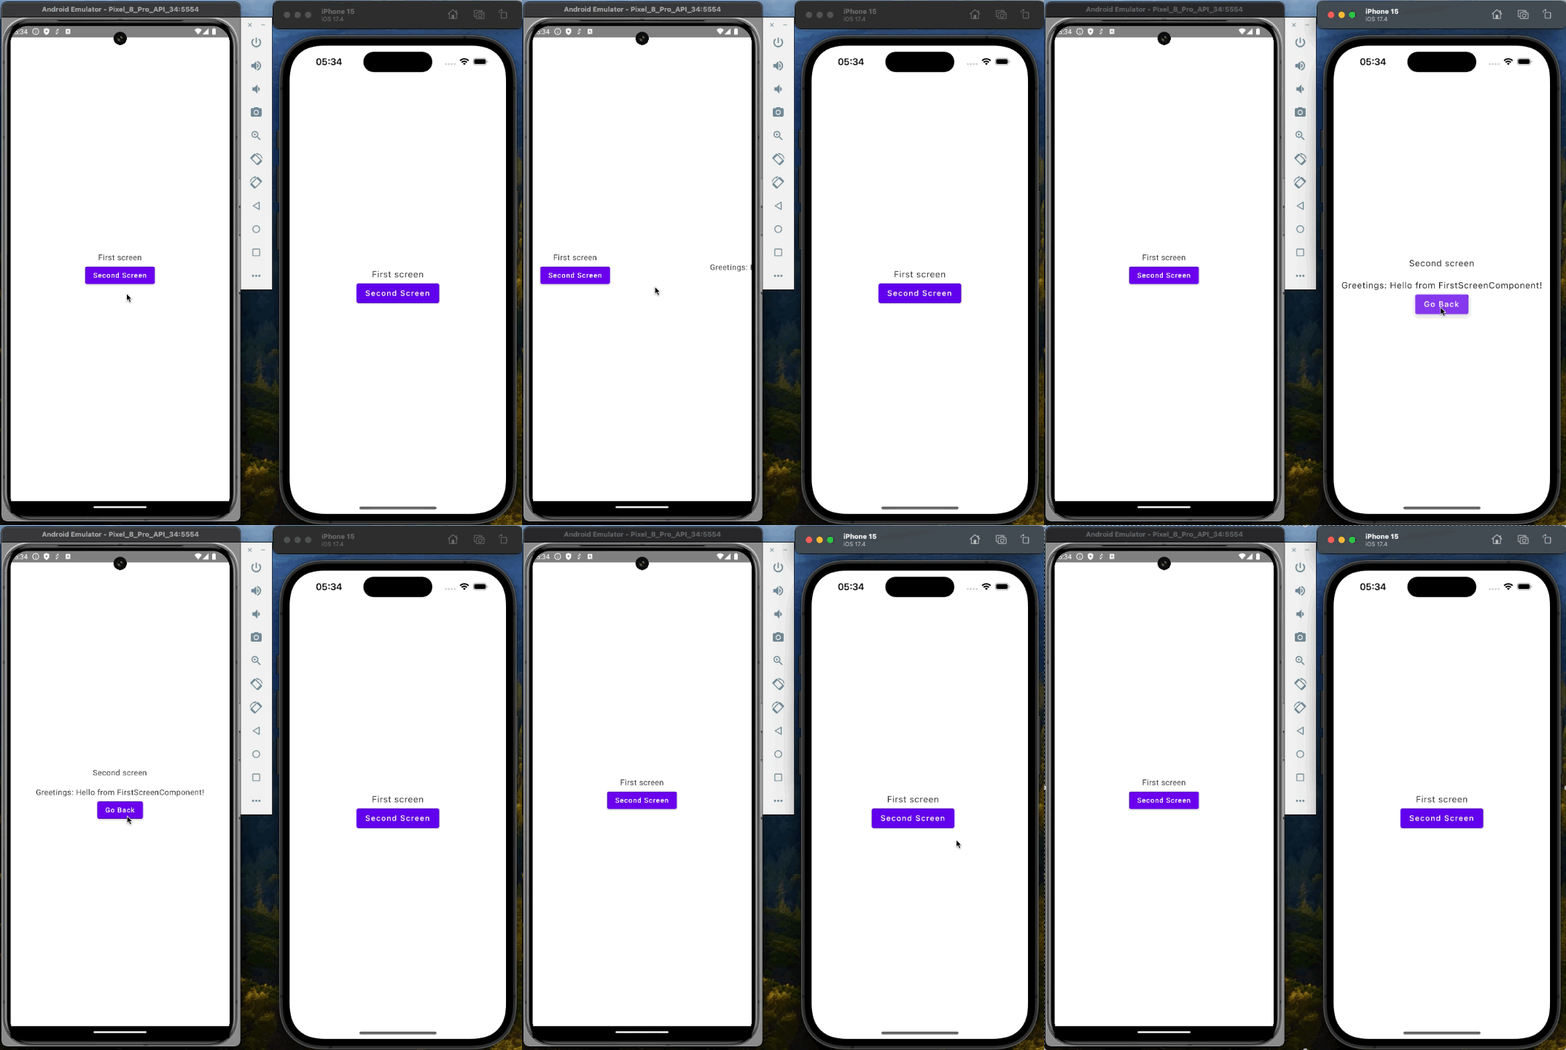
That’s all! We can now run the application on both Android and iOS devices and expect the same behavior! How exciting is that?!

Handling the Tab Navigation
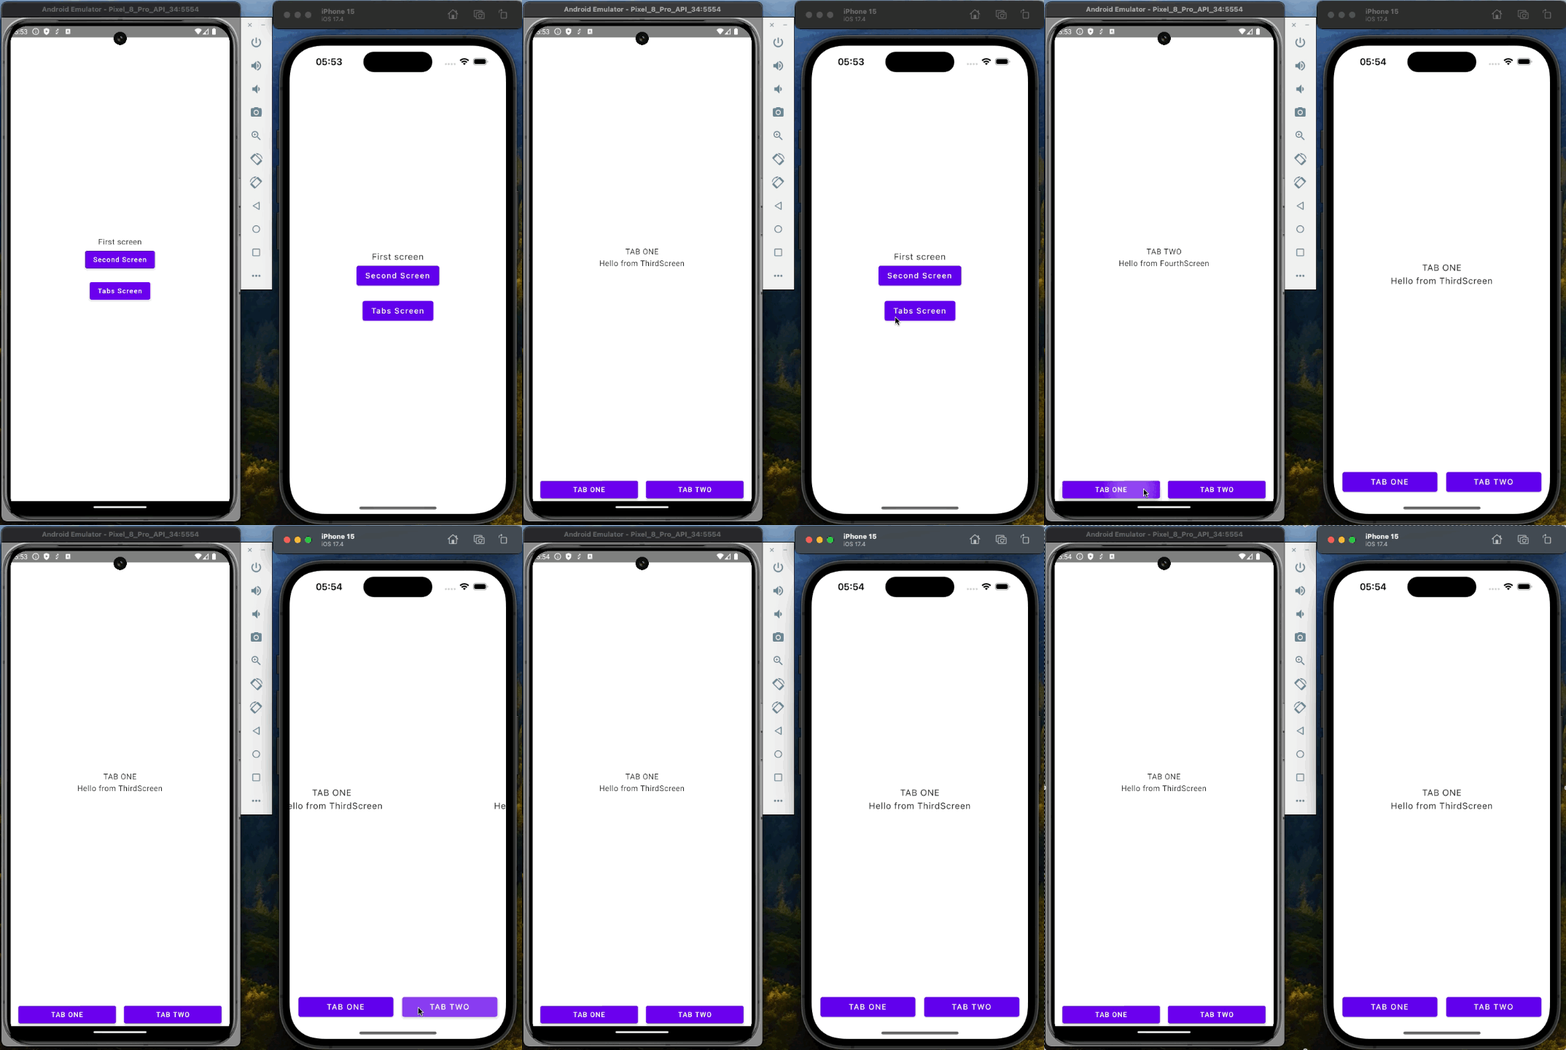
To test the library further, we can now add Tab Navigation to the App. This will allow us to switch between different sections of the app easily. Let's start by creating a new screen that will have its own childStack and an entry point on the firstScreen. The steps we need to follow are similar to what we did before. However, there will be some differences in how we handle the creation and navigation of child components in this new setup.
The TabNavigationScreen will behave in almost the same way as the RootComponent. It will have its own childStack, configuration, and childFactory, and will be responsible for creating the child components and navigating between them.
sealed class Child {
    data class TabOne(val component: ThirdScreenComponent) : Child()
    data class TabTwo(val component: FourthScreenComponent) : Child()
}

@Serializable
sealed class Configuration {
    @Serializable
    data object TabOne : Configuration()

    @Serializable
    data object TabTwo : Configuration()
}
class ThirdScreenComponent(
    componentContext: ComponentContext,
) : ComponentContext by componentContext {
    val text = "Hello from ThirdScreen"
}
class FourthScreenComponent(
    componentContext: ComponentContext,
) : ComponentContext by componentContext {
    val text = "Hello from FourthScreen"
}
We need to remember that each stack within our application should have its own unique key. This is crucial because these keys help in identifying and managing the different navigation stacks independently. When we create a new screen with its own childStack, we must ensure that the keys assigned to these stacks do not overlap with others.
private val navigation = StackNavigation<TabNavigationComponent.Configuration>()

val childStack = childStack(
    source = navigation,
    serializer = navigation.tab.TabNavigationComponent.Configuration.serializer(),
    initialConfiguration = navigation.tab.TabNavigationComponent.Configuration.TabOne,
    handleBackButton = true,
    childFactory = ::createChild,
    key = "TabNavigationStack"
)

@OptIn(ExperimentalDecomposeApi::class)
private fun createChild(
    configuration: TabNavigationComponent.Configuration,
    componentContext: ComponentContext
): TabNavigationComponent.Child =
    when (configuration) {
        is TabNavigationComponent.Configuration.TabOne -> {
            TabNavigationComponent.Child.TabOne(ThirdScreenComponent(componentContext))
        }

        is TabNavigationComponent.Configuration.TabTwo -> {
            TabNavigationComponent.Child.TabTwo(FourthScreenComponent(componentContext))
        }
    }
The TabNavigationComponent is responsible for managing tab clicks within the application. To achieve this, we will use the bringToFront function. This function is essential for ensuring that the selected tab is brought to the forefront of the user interface, providing a seamless and intuitive navigation experience.
fun onTabOneClick() {
    navigation.bringToFront(Configuration.TabOne)
}

fun onTabTwoClick() {
    navigation.bringToFront(Configuration.TabTwo)
}
The last thing to do in the components is to provide a way to run the TabNavigationScreen from the FirstScreen.
class FirstScreenComponent(
    componentContext: ComponentContext,
    private val onGoToSecondScreenClick: (String) -> Unit,
    private val onGoToTabsScreen: () -> Unit,
) : ComponentContext by componentContext {

    fun newScreen() {
        onGoToSecondScreenClick("Hello from FirstScreenComponent!")
    }

    fun tabScreen() {
        onGoToTabsScreen()
    }
}
class RootComponent(...) {

    private fun createChild(...) {
        when (configuration) {
            is Configuration.FirstScreen -> Child.FirstScreen(
                component = FirstScreenComponent(
                    onGoToTabsScreen = {
                        navigation.pushNew(Configuration.TabsNavigation)
                    }
                )
            )
                ...
                Configuration.TabsNavigation
            -> Child.TabsScreen(
                component = TabNavigationComponent(
                    componentContext = componentContext
                )
            )
        }
    }

    sealed class Child {
        ...
        data class TabsScreen(val component: TabNavigationComponent) : Child()
    }

    @Serializable
    sealed class Configuration {
        ...
        @Serializable
        data object TabsNavigation : Configuration()
    }
}
The final step involves managing the changes on the UI layer to ensure that the user interface responds appropriately to the navigation events and state changes. This includes updating the UI components to reflect the current screen and handling any transitions between screens smoothly.
@Composable
fun App(...) {
    ...
    Children() { child ->
        ...
        is RootComponent.Child.TabsScreen ->
        TabsScreen(instance.component)
    }
}
@Composable
fun TabsScreen(
    tabNavigationComponent: TabNavigationComponent
) {
    Scaffold(
        bottomBar = {
            Row(
                horizontalArrangement = Arrangement.Center
            ) {
                Button(onClick = { tabNavigationComponent.onTabOneClick() }) {
                    Text("TAB ONE")
                }
                Button(onClick = { tabNavigationComponent.onTabTwoClick() }) {
                    Text("TAB TWO")
                }
            }
        }
    ) { innerPadding ->
        val childStack = tabNavigationComponent.childStack.subscribeAsState()

        Column(
            modifier = Modifier.padding(innerPadding),
            verticalArrangement = Arrangement.Center,
            horizontalAlignment = Alignment.CenterHorizontally
        ) {
            Children(
                stack = childStack.value,
                animation = stackAnimation(slide()),
            ) { child ->
                when (val instance = child.instance) {
                    is TabNavigationComponent.Child.TabOne ->
                        ThirdScreen(instance.component)

                    is TabNavigationComponent.Child.TabTwo ->
                        FourthScreen(instance.component)
                }
            }
        }
    }
}
If you want, you can use the BottomNavigation control from Jetpack Compose to handle the bottom bar. This will help you manage the state, for example, allowing you to slightly change the color of the selected tab and more...
ThirdScreen and FourthScreen are similar to the previous screens in terms of simplicity and functionality
@Composable
fun ThirdScreen(
    component: ThirdScreenComponent
) {
    Column(
        modifier = Modifier.fillMaxSize(),
        horizontalAlignment = Alignment.CenterHorizontally,
        verticalArrangement = Arrangement.Center
    ) {
        Text(component.text)
    }
}

Coroutine support
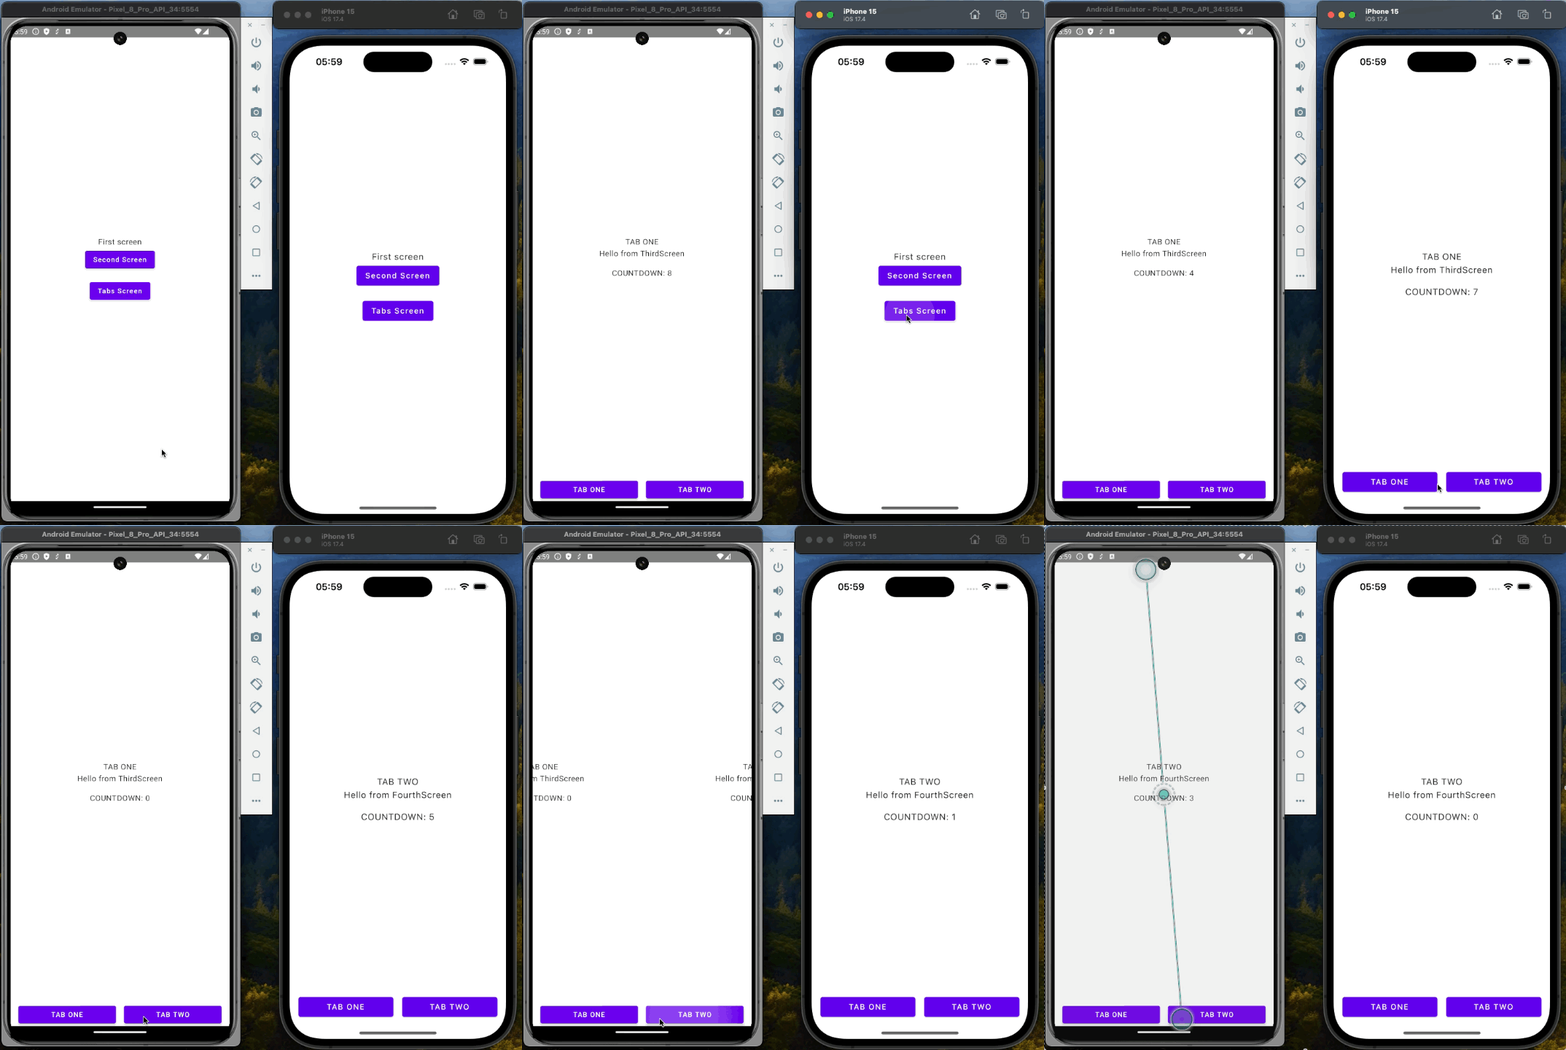
Since every modern mobile application should be reactive and handle asynchronous operations, we can leverage coroutines to achieve this. To implement coroutines in our component, we need to create a CoroutineScope. Unlike the native ViewModel, which provides coroutine support out-of-the-box. WIth Decompose such approach requires a bit more setup but is still straightforward to manage.
First, we define a CoroutineScope within our component. This scope will allow us to launch and manage coroutines effectively. The Component is lifecycle-aware, which means it can automatically handle the cleanup of coroutines when the component is destroyed. This lifecycle awareness is crucial because it helps prevent memory leaks and ensures that coroutines do not continue running after the component is no longer in use.
class ThirdScreenComponent(
    componentContext: ComponentContext,
) : ComponentContext by componentContext {
    val text = "Hello from ThirdScreen"
    val countDownText = mutableStateOf<String>("0")

    init {
        val scope = coroutineScope(Dispatchers.Default + SupervisorJob())
        scope.launch {
            for (i in 10 downTo 0) {
                countDownText.value = i.toString()
                delay(1000)
            }
        }
    }


    private fun CoroutineScope(context: CoroutineContext, lifecycle: Lifecycle): CoroutineScope {
        val scope = CoroutineScope(context)
        lifecycle.doOnDestroy(scope::cancel)
        return scope
    }

    private fun LifecycleOwner.coroutineScope(context: CoroutineContext): CoroutineScope =
        CoroutineScope(context, lifecycle)
}
Or you can use the Decompose compatibility library, which provides the coroutineScope function to handle the lifecycle for you – Essenty.
versions]
essently = "2.0.0"

[libraries]
essently - coroutines = { module = "com.arkivanov.essenty:lifecycle-coroutines", version.ref = "essently" }
commonMain.dependencies {
    ...
    implementation(libs.essently.coroutines)
}
class FourthScreenComponent(
    componentContext: ComponentContext,
) : ComponentContext by componentContext {
    val text = "Hello from FourthScreen"
    val countDownText = mutableStateOf<String>("0")

    //Essently
    private val scope = coroutineScope(Dispatchers.Default + SupervisorJob())

    init {
        scope.launch {
            for (i in 10 downTo 0) {
                countDownText.value = i.toString()
                delay(1000)
            }
        }
    }
}
If u want to support structured concurrency you should pass the mainContext: CoroutineContext to the component instead of using Dispatchers.Default inside it.

Sumary
The Decompose library is a powerful tool for composing multiplatform applications that support Android, iOS, WEB, and Desktop. It separates the UI code and handles it with common shared logic. It’s straightforward, easy to use, and can be customized to fit your needs. However, it is strongly tied to the library’s internal concepts, such as Components, which force you to design the app in a specific way and limit possibilities. In my view, the biggest advantage of this approach is the clear boundary between UI and Navigation. Navigation becomes part of your business logic, not just the way you build your views, and can be easily tested and reused.
To sum things up, Decompose is a great library that can be used to compose multiplatform projects, and the approach proposed by the creators of the library suits me well. It is a great way to separate the navigation from the UI. If you are looking for a navigation library for your compose multiplatform project, you definitely should give it a try!
If you are interested in how it works in a bit bigger application, take a look at my GitHub for the GameShop application.
This series explores Kotlin Multiplatform and Compose Multiplatform, focusing on navigation libraries to enhance mobile application development. Starting with an in-depth look at Decompose, we cover setting up a test application, handling lifecycle, navigation, and async operations using coroutines. This approach separates navigation from UI, providing a modular and testable architecture. Subsequent posts will examine Voyager, Apyx and JetpackCompose Navigation, comparing their features and suitability. Check the GitHub repository for a practical example.
Subscribe to my newsletter
Read articles from Michał Konkel directly inside your inbox. Subscribe to the newsletter, and don't miss out.
Written by
