Automate Docker Builds and Pushes with Jenkins: A Step-by-Step Guide
 Navya A
Pre-requisites:
Jenkins Master is up and running.
Jenkins slave is set up with Docker installed.
Docker and Docker Pipeline plugins are installed in Jenkins.
Docker Hub account is set up at Docker Cloud.
Step 1: Validate Jenkins Docker Setup
Ensure Jenkins can run Docker builds by validating the following pre-requisites:
Jenkins is running.
Jenkins has Docker installed.
Docker and Docker Pipeline plugins are installed in Jenkins.

Step 2: Create Credentials for Docker Hub
Go to Jenkins UI:
- Open Jenkins in your web browser.
Click on Credentials:
- Navigate to Manage Jenkins > Manage Credentials.
Click on Global credentials:
- Click on the
(global)domain.
- Click on the
Click on Add Credentials:
Click on the Add Credentials button on the left menu.

Create Docker Hub Credentials:
Set Kind to Username with password.
Enter your Docker Hub username and password.
Set ID to
dockerhub.Click OK to save.

Step 3: Create Maven3 Variable under Global Tool Configuration
Go to Global Tool Configuration:
- Navigate to Manage Jenkins > Global Tool Configuration.
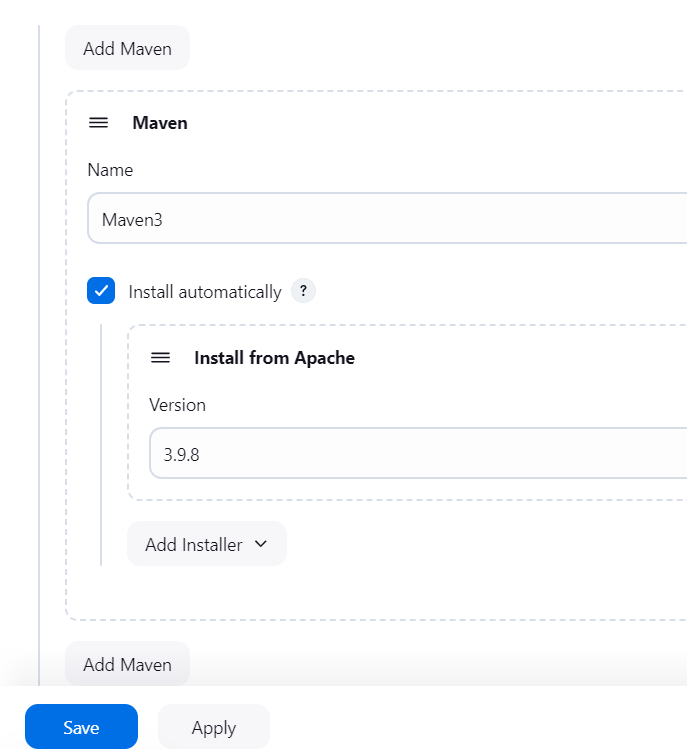
Add Maven Installation:
Under Maven, click on Add Maven.
Set the Name to
Maven3.Set Install automatically if Maven is not already installed.
Save the configuration.

Step 4: Create a Pipeline in Jenkins
Create New Pipeline Job:
Go to Jenkins dashboard.
Click on New Item.
Enter a name for your pipeline job.
Select Pipeline and click OK.
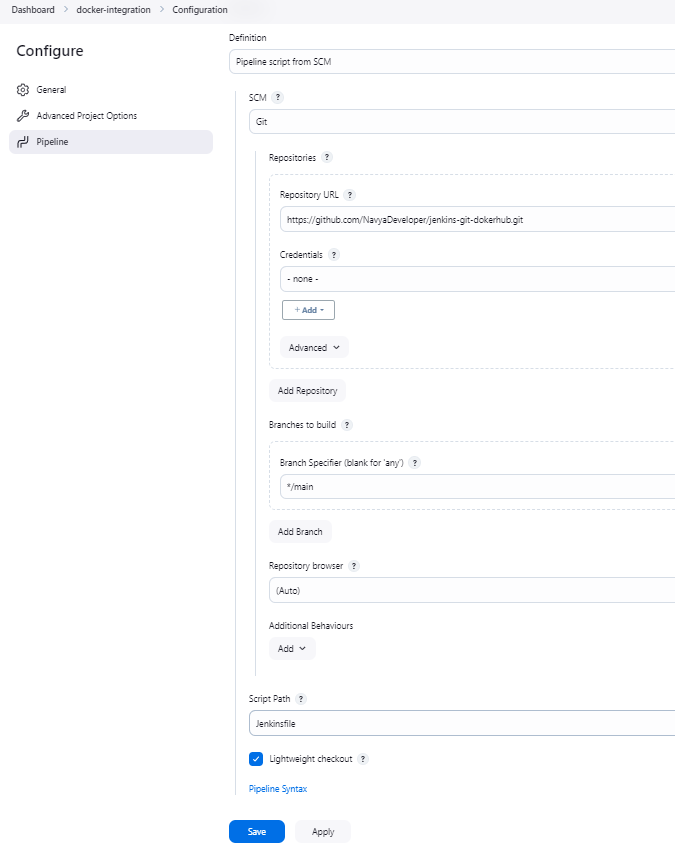
Configure Pipeline from SCM:
In the Pipeline section, select Pipeline script from SCM.
Set SCM to Git.
Enter your repository URL:
https://github.com/NavyaDeveloper/jenkins-git-dokerhub.git.Set Credentials to your GitHub credentials ID.
Set Branch to
*/main.Set the Script Path to
Jenkinsfile.
Jenkinsfile Configuration:
- Ensure your
Jenkinsfilein the repository contains the following script
- Ensure your
pipeline {
    environment {
        imagename = "your-dockerhub-username/your-Dockerhub-public-repo"
        dockerImage = ''
        containerName = 'my-container' #container name
        dockerHubCredentials = 'dockerhub' #name of the credentialid stored int he Jenkins console
    }

    agent any

    stages {
        stage('Checkout') {
            steps {
                checkout([$class: 'GitSCM', branches: [[name: '*/main']], doGenerateSubmoduleConfigurations: false, extensions: [], submoduleCfg: [], userRemoteConfigs: [[credentialsId: 'your-bitbucket-credentials-id', url: 'https://github.com/your-repo.git']]])
            }
        }

        stage('Build') {
            steps {
                script {
                    sh 'mvn -f pom.xml clean install'
                }
            }
        }

        stage('Building Image') {
            steps {
                script {
                    dockerImage = docker.build("${imagename}:${BUILD_NUMBER}", ".")
                }
            }
        }

        stage('Running Image') {
            steps {
                script {
                    sh "docker run --rm -d --name ${containerName} ${dockerImage.imageName()}"
                }
            }
        }

        stage('Stop and Remove Container') {
            steps {
                script {
                    sh "docker stop ${containerName} || true"
                    sh "docker rm ${containerName} || true"
                }
            }
        }

        stage('Deploy Image') {
            steps {
                script {
                    withCredentials([usernamePassword(credentialsId: dockerHubCredentials, usernameVariable: 'DOCKER_USERNAME', passwordVariable: 'DOCKER_PASSWORD')]) {
                        sh "docker login -u $DOCKER_USERNAME -p $DOCKER_PASSWORD"
                        sh "docker push ${dockerImage.imageName()}"
                    }
                }
            }
        }
    }
}
Step 5: Build the Pipeline
Run the Pipeline:
After creating the pipeline and adjusting the values, go to the pipeline job page.
Click on Build Now to start the pipeline.
Monitor the Build:
- You can monitor the build progress in the Build History and Console Output sections.

Result:
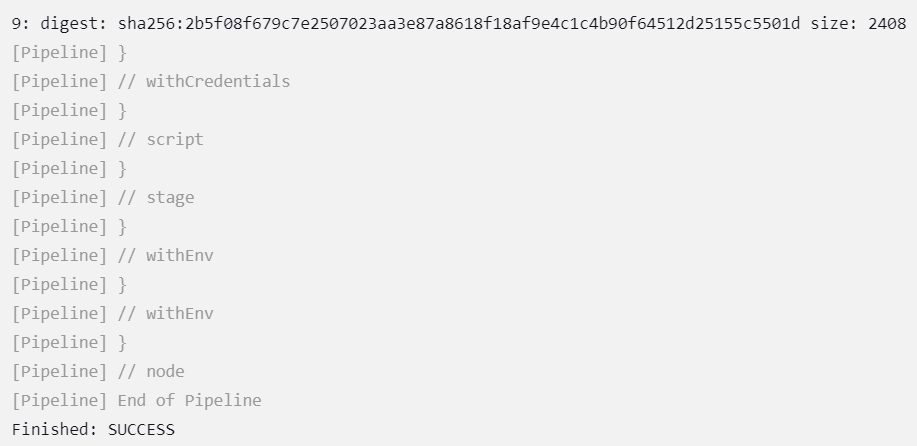
After the pipeline completes, your Docker image will be built and pushed to Docker Hub with the build number as the tag. You can verify this by logging into Docker Hub and checking your repository navyaani14/pubrepo.

Note: If you face "permissions denied" while trying to connect to /var/run/docker.sock,

you can resolve it by running the following command in the Jenkins Instance:

This command changes the permissions of the Docker socket, allowing all users to access it. However, be cautious with this approach, as it can expose your Docker daemon to security risks.
Conclusion:
By following these steps, you will have set up a Jenkins pipeline to automatically build a Docker image from your code, run tests, and push the image to Docker Hub. This automation simplifies your CI/CD process and ensures consistent, reliable Docker builds.
The example repository containing source code, Jenkinsfile, and Dockerfile is available at NavyaDeveloper/jenkins-git-dokerhub.
Subscribe to my newsletter
Read articles from Navya A directly inside your inbox. Subscribe to the newsletter, and don't miss out.
Written by

Navya A
Navya A
👋 Welcome to my Hashnode profile! I'm a passionate technologist with expertise in AWS, DevOps, Kubernetes, Terraform, Datree, and various cloud technologies. Here's a glimpse into what I bring to the table: 🌟 Cloud Aficionado: I thrive in the world of cloud technologies, particularly AWS. From architecting scalable infrastructure to optimizing cost efficiency, I love diving deep into the AWS ecosystem and crafting robust solutions. 🚀 DevOps Champion: As a DevOps enthusiast, I embrace the culture of collaboration and continuous improvement. I specialize in streamlining development workflows, implementing CI/CD pipelines, and automating infrastructure deployment using modern tools like Kubernetes. ⛵ Kubernetes Navigator: Navigating the seas of containerization is my forte. With a solid grasp on Kubernetes, I orchestrate containerized applications, manage deployments, and ensure seamless scalability while maximizing resource utilization. 🏗️ Terraform Magician: Building infrastructure as code is where I excel. With Terraform, I conjure up infrastructure blueprints, define infrastructure-as-code, and provision resources across multiple cloud platforms, ensuring consistent and reproducible deployments. 🌳 Datree Guardian: In my quest for secure and compliant code, I leverage Datree to enforce best practices and prevent misconfigurations. I'm passionate about maintaining code quality, security, and reliability in every project I undertake. 🌐 Cloud Explorer: The ever-evolving cloud landscape fascinates me, and I'm constantly exploring new technologies and trends. From serverless architectures to big data analytics, I'm eager to stay ahead of the curve and help you harness the full potential of the cloud. Whether you need assistance in designing scalable architectures, optimizing your infrastructure, or enhancing your DevOps practices, I'm here to collaborate and share my knowledge. Let's embark on a journey together, where we leverage cutting-edge technologies to build robust and efficient solutions in the cloud! 🚀💻