Modernizing a 2013 Bitcoin Solution with 2024 Web Technologies
 Mohd Zaid
Hello readers, recently I secured a summer internship called "Summer of Bitcoin," which is another great story I will talk about in another blog. Continuing, after I wrote a proposal for a project named "Create new Web User Interface for Gocoin client," I have to convert this project's interface using new technologies like React and similar libraries. Now let's understand what the project is, how it's functioning, what is the purpose of this project? why we need to modernize it? With all these questions let's get started.
Overview & Purpose
The project we are discussing is a full Bitcoin solution, a complete package you need to run and communicate with Bitcoin. Whether it is sending your Bitcoin to others or receiving it in your account, it can do both. Besides that, you can monitor Bitcoin in real-time. There are Dashboard, Wallet, Transaction, Network, Blocks, and Miners pages, each with its own functionality and use. We will break down each one of them quickly below for a better understanding of the project, or maybe it will be helpful for you if you are working on a similar project :)
Dashboard
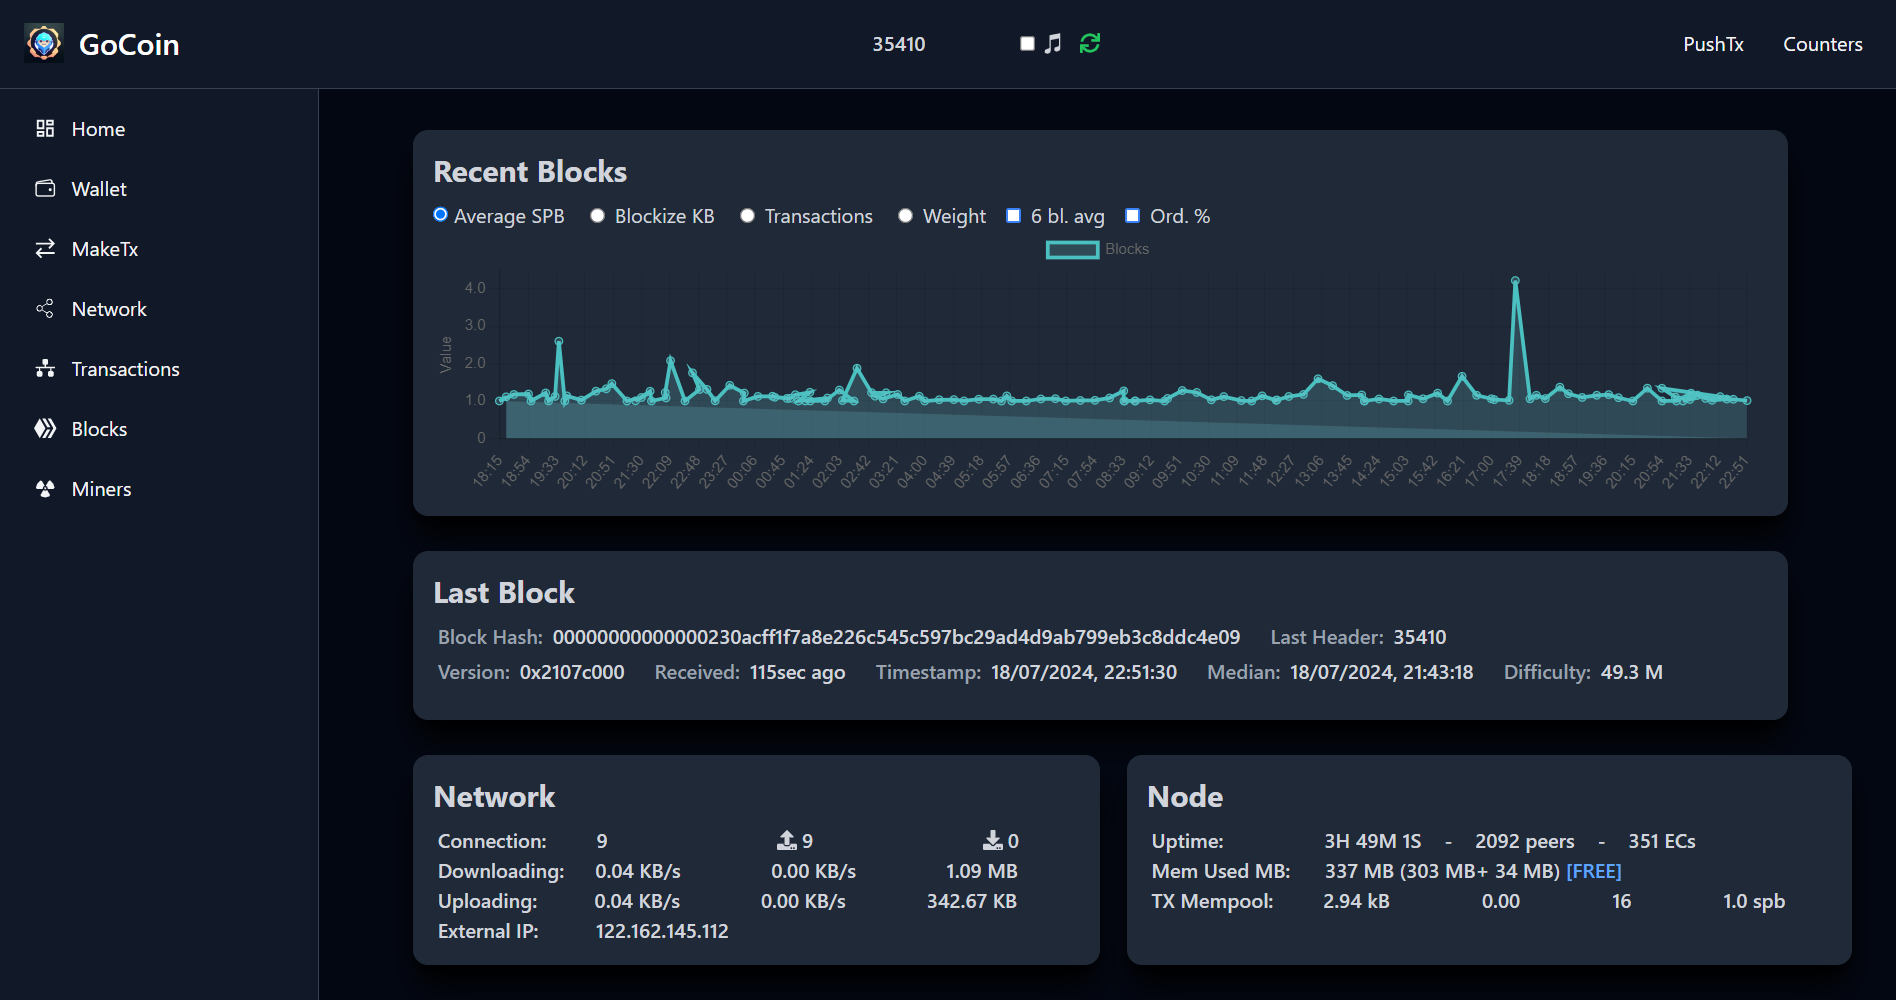
Well, if you know and interact with any crypto wallets, you will know that dashboards are the most complex and necessary part. In this, you can see many details of information that are necessary for you to monitor and keep track of things. In the project I have been given, the dashboard is a whole package of information. It consists of a real-time graph of transactions, and in the graph, you can also sort the relevant details like:
Average Satoshis per Byte: The Bitcoin network charges transaction fees based on the size of the transaction in bytes, not on the amount of Bitcoin being sent. The SPB (Satoshis per Byte) rate helps users determine the appropriate fee to include for their transaction to be processed in a timely manner.
Block KB: Is a key metric that helps understand the capacity and efficiency of the Bitcoin network, influencing transaction fees and confirmation times.
Weight: Refers to a measurement used to determine the size of a block in terms of its resource consumption.
6 Block Average fee: To calculate a 6 block average, you sum up the values of the metric for the last 6 blocks and then divide by 6. For example, if you are calculating the 6 block average transaction fee:
$$6 Block Average Fee= (Fee1+Fee2+Fee3+Fee4+Fee5+Fee6)/6$$

Now, the next part of the dashboard is the information about the current block I'm receiving, such as the block hash, version, last time it was received, the median of the block, and the difficulty target.

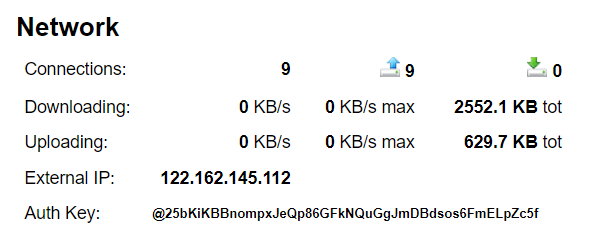
And then there is a Network tab where you can see the number of active connections and categorize them as outgoing or incoming. Additionally, it shows the downloading and uploading speeds, along with the total downloaded and uploaded data, followed by your IP address and Auth key.
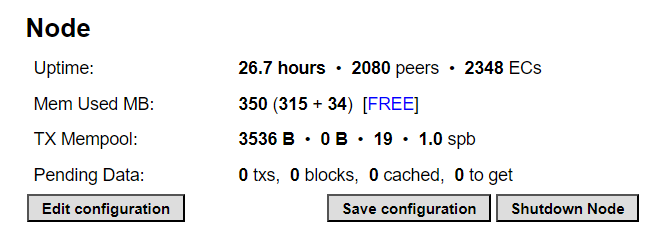
And lastly, there was a Node tab, where you can see information regarding your node, including the uptime (from when the node is active) and the peers. It also shows how much memory is being used, transaction mempool data, and any pending data if there is some.
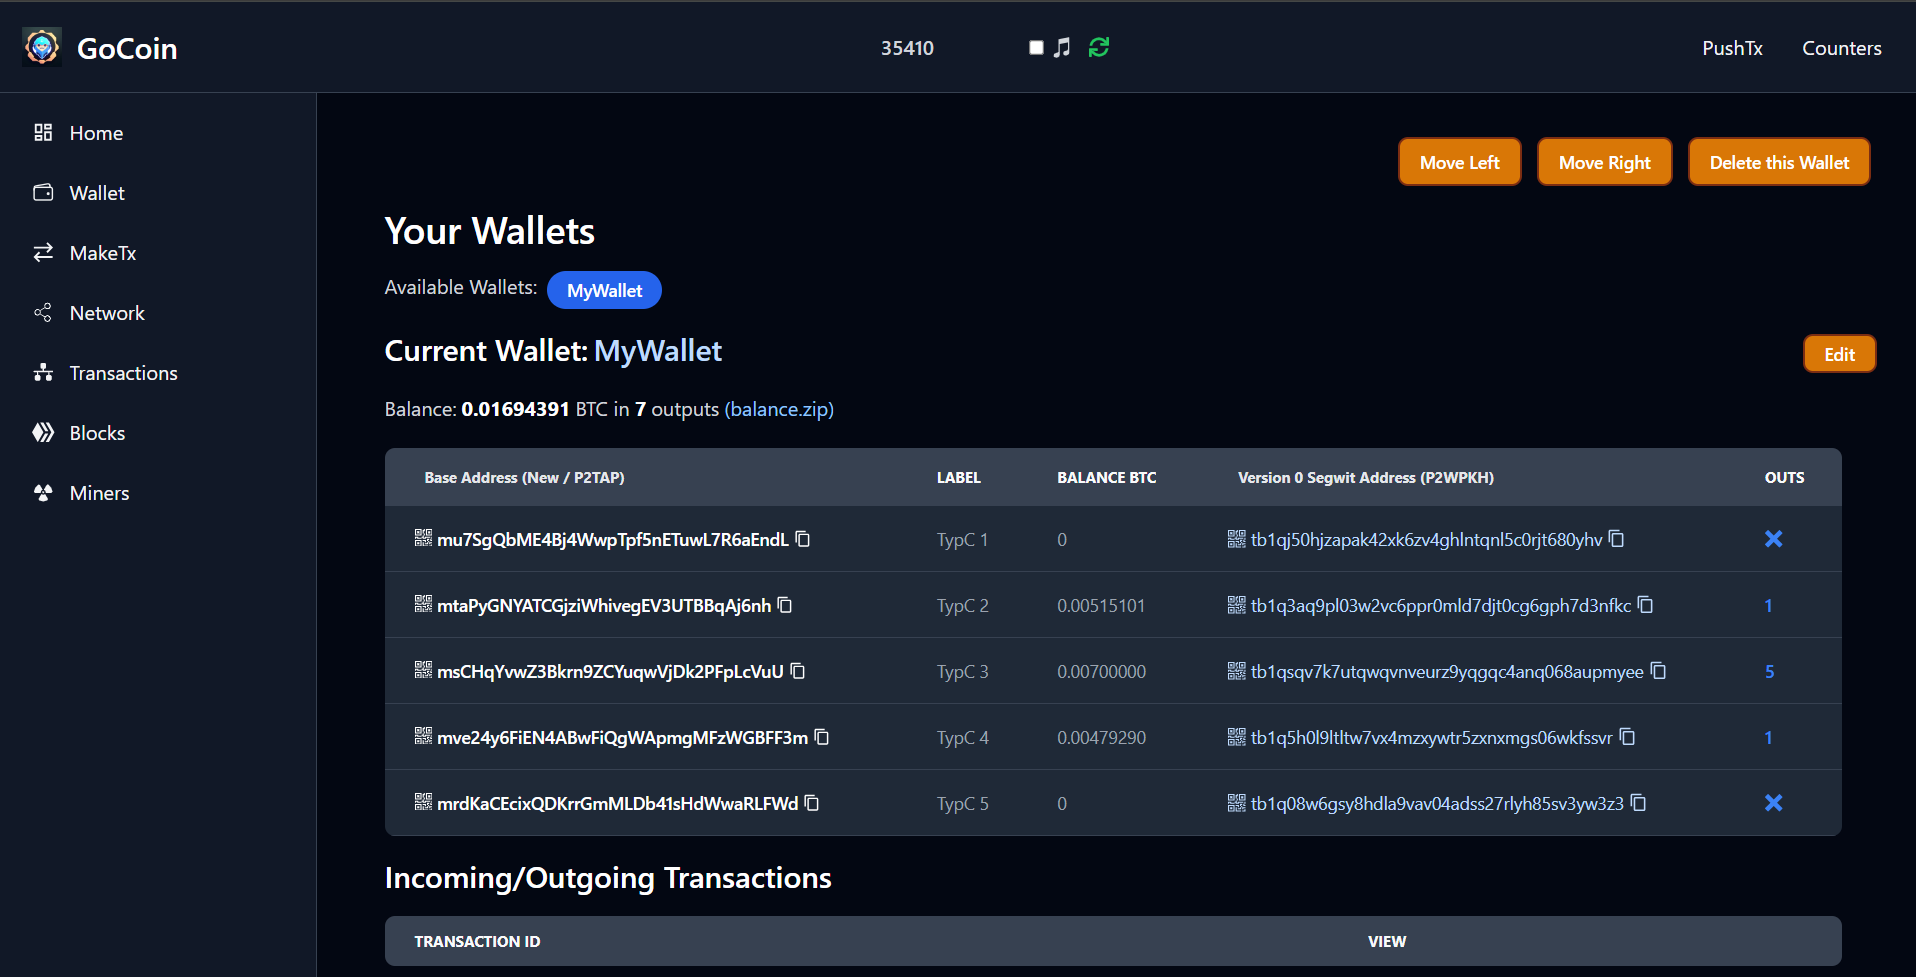
Wallet
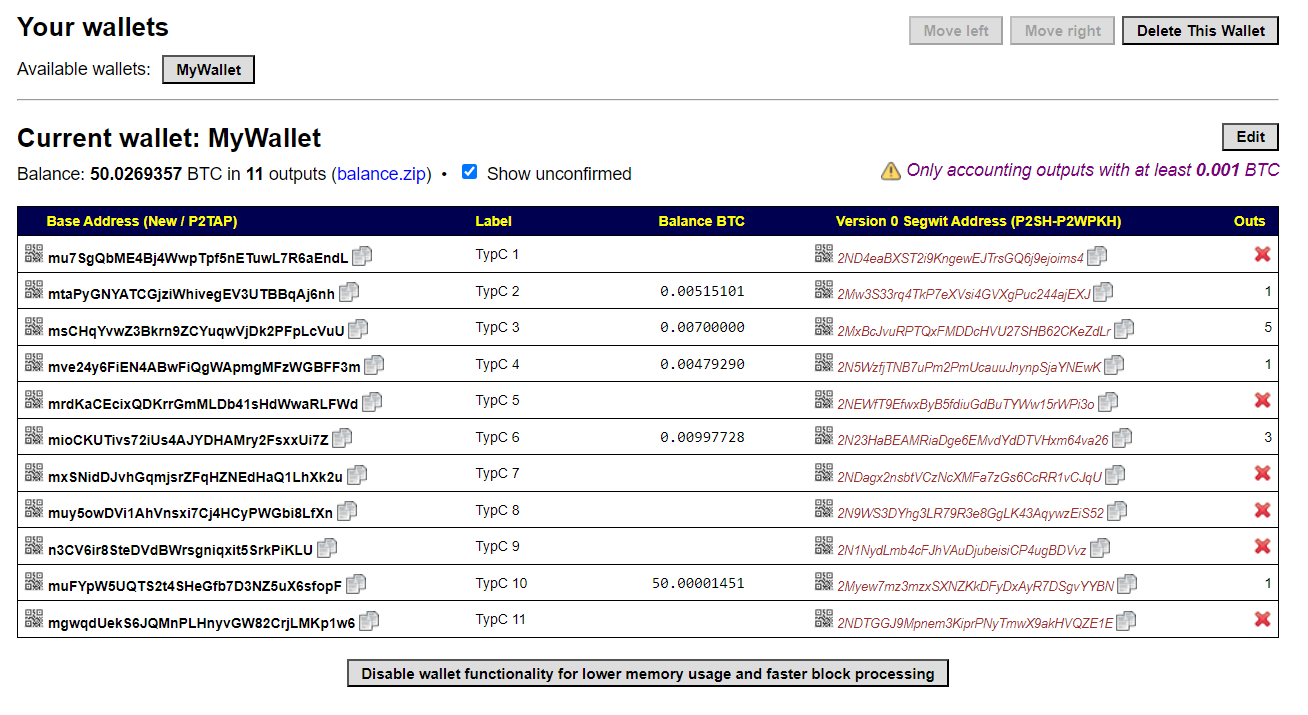
This is the wallet User Interface where you can create, edit, and delete wallets. It supports multiple wallets (you can create as many wallets as you like). This section is divided into smaller pieces of information, as there are many address types you can get on the wallet page, whether it is "Segwit" or "non-Segwit" or if it's P2SH and P2WPKH. It can provide all types of address translations. You can copy the address and generate a QR code for the particular address you want, and then scan the QR code to pay to that address.
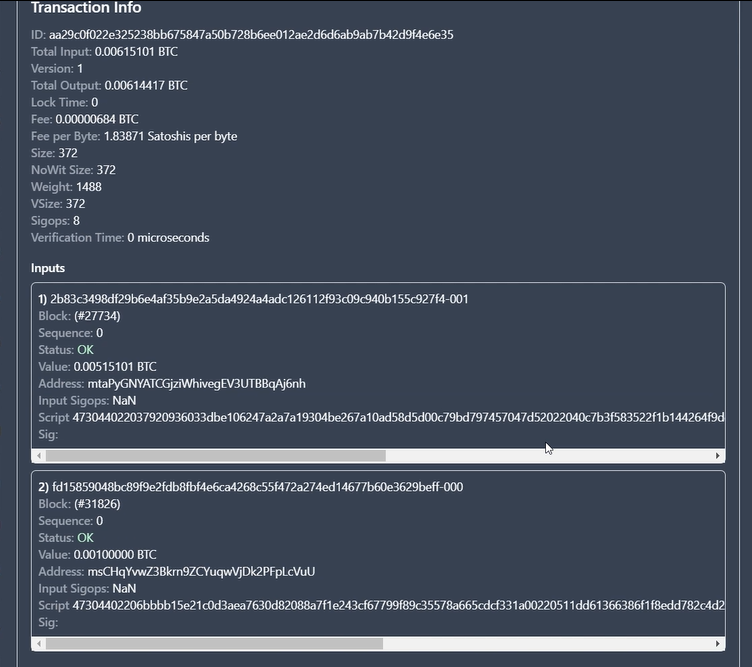
I also created a new functionality on the wallet page, so when any outgoing or incoming transaction is taking place, you can see all the details for that particular transaction separately. I categorized each transaction with their transaction IDs (txid), and in each transaction, you can see information like the inputs and outputs in the transaction, the total spending and receiving amount, time, status, weight, size, etc.
Make Transaction
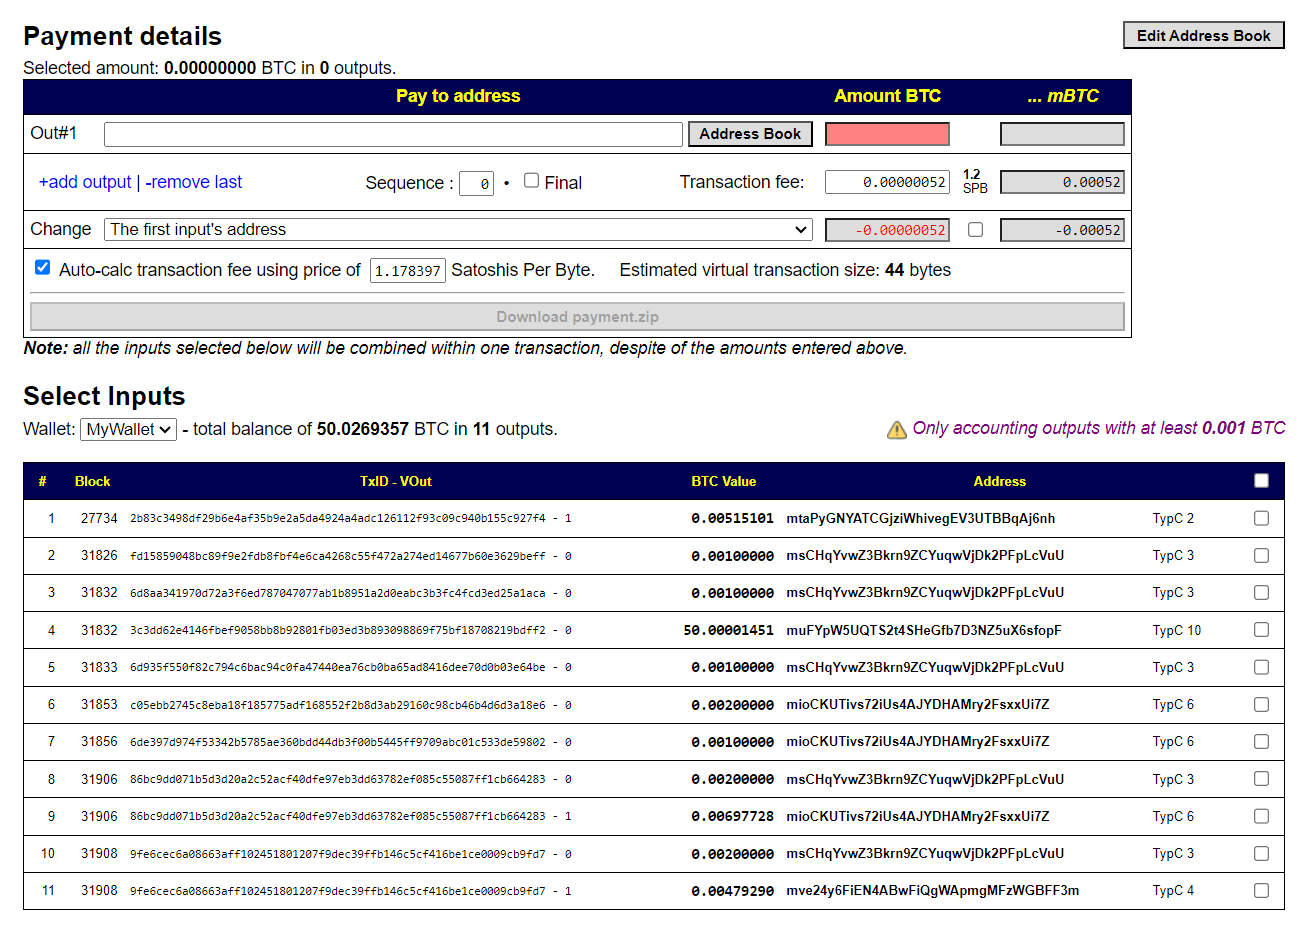
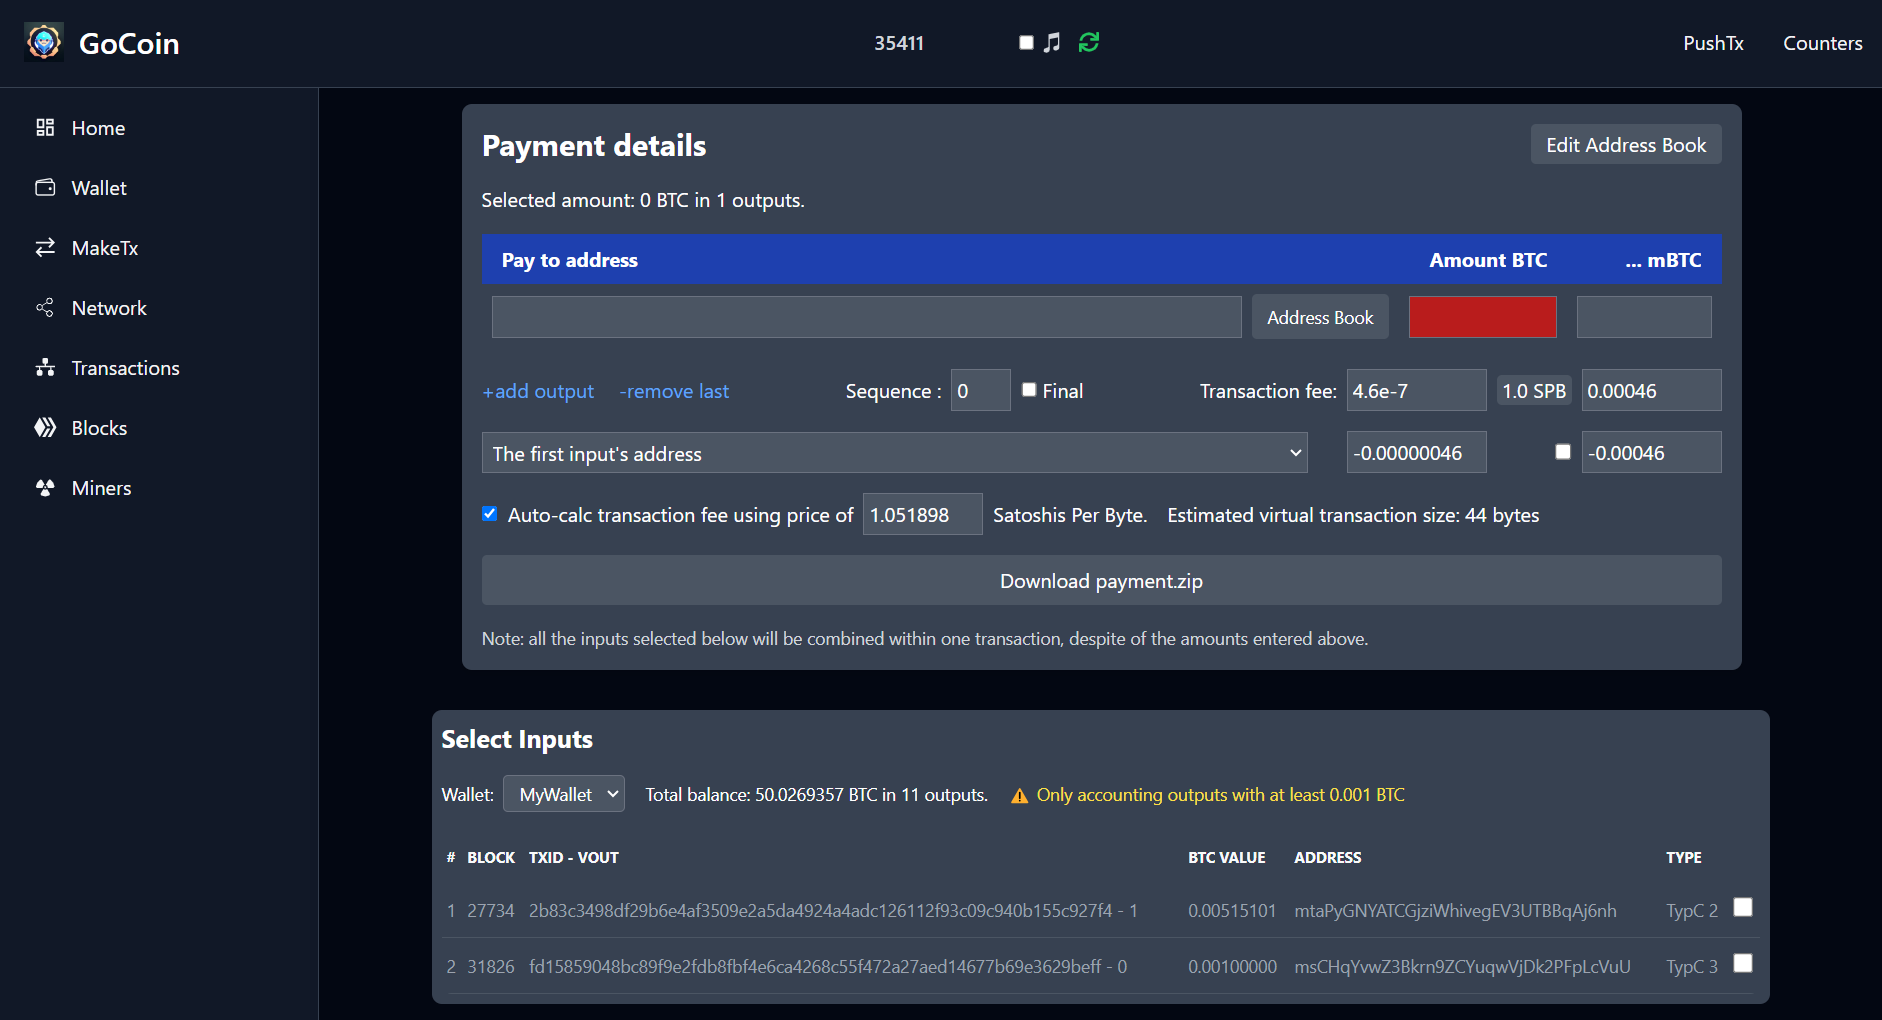
And there is a page in which you can create a transaction by selecting the multiple outputs and the addresses, and you can also select the transaction fee by your own if you want otherwise it can be calculated automatically. And then you can create the transaction file and you have to download this file and using cmd your wallet will generate the hex transaction, then you can use this to broadcast your transaction into the server.
Network
The Network Connections tab in the Bitcoin wallet dashboard provides an insightful overview of the wallet's interactions with the Bitcoin network. Here’s a breakdown of the key elements displayed on this page:
Connection Overview:
IP Address and Port: Displays the wallet’s current IP address and port number, indicating the endpoint for network connections.
Active Connections: Shows the number of active incoming and outgoing connections.
Connection Status: Indicates whether the wallet is actively listening for incoming TCP connections and allows toggling this feature on or off.
Data Transfer:
Download/Upload Rates: Provides real-time statistics on data being downloaded and uploaded, with a graphical representation showing the average and instantaneous rates over the past few minutes.
Bandwidth Usage Graph: The graph visually represents the data transfer rates, helping users monitor network activity and detect any anomalies.
Peer Information:
ID: A unique identifier for each connected peer.
Age: The duration for which the connection with the peer has been active.
Peer Address: IP address and port number of the peer.
Ping: Round-trip time for data packets to travel to the peer and back, indicating network latency.
Total In/Out: Total amount of data sent and received from each peer.
Node Version: The software version of the connected node, including protocol capabilities.
Blocks and Transactions: Number of blocks and transactions relayed by the peer.
Additional Features:
Control Options: Buttons to manage peers, such as editing friend lists, unbanning peers, or connecting to a new peer.
Table Customization: Options to freeze, hide, or display specific columns in the table for a customized view.
Node Version Legend:
- Capabilities: The legend explains the different node capabilities such as serving the complete blockchain, limited network functionality, supporting compact blocks, and Segregated Witness functionality.

Others
Others include the Transaction page to broadcast transactions into the network and a separate Blocks page where all details of the current and previous blocks are shown to the user. Lastly, there is a Miner page to show information about current active miners and their percentage in the network.
Now, with all of these basic introductions to my project, I think we are good to go further. Next, I will explain some technical structures of my codebase and how my thought process will go on to implement this website.
Basic Codebase Understanding
As all of the functionality of this project was written in two stacks differs from backend to frontend. In backend all the implementation logic was written in "Go" including the APIs and frontend using HTML, CSS, JQuery. And to show graphs it uses some prebuild javascript library.
Now the main challenge for me is to understand the codebase, as it uses a stack I'm not familiar with and it's not widely used now (like jQuery). I approached the project from the first page, like the page head or the landing page. Then, I analyzed the whole code line by line, tried to comment on some lines of code, then ran the project to see what changed on my browser window (yes!! that icon/header is gone now, which means this is the code for this functionality). This is how I test something if I don't know its purpose. Maybe you can try that if it works for you.
Now, after gaining a basic understanding of the codebase or a particular page, you can move forward to create the first component with your favorite language. Lets, get started.
Choosing a programming language
You can start your work on any language you like, but I sugguest to choose the stack in which you are familiar and you did some work before. No matter whether it's React or Anguler, you can choose either of these based on your previous engagement with the framework (well most of the javascript frameworks code is converted into the native javascript in the end, so it does'nt matter which one you choose).
But I chose React because this is what I knew previously and I'm comfortable with. Well, there is something I want to share with you all: it's not necessary to be a master of the framework you choose, but if you have basic knowledge of it, like how basic components are written, how data transfers between components, and how it manages state variables across the webpage, that's crucial. Some knowledge about state management libraries (Redux, Recoil, etc.) is necessary, but you don't need too much understanding of these things. It's enough if you know how they work. You will learn as you go.
Choosing the styling library
Yes, you need to style your components so they look good from the user's perspective. There are many ways to do it, but it depends on you. If you want to spend 60% of your time designing those components, you can go with basic CSS styling (jokes aside, I don't want to hurt any CSS lovers' feelings here, but I'm focusing on productivity). If you have time and interest, you can freely choose CSS. The best advice is to choose a prebuilt styling library like Tailwind. Literally, I saved so much time styling the components with this and spent my time on logic building and creating new functionality. You can also use this, and it will increase your efficiency 10x. If you are using Tailwind for the first time, it might feel weird that these small phrases will change your code completely, or you have to memorize some of the keywords, but I promise that it is worth spending some time on this.
With all of this, you're ready to tackle your project.
Now, I will share some of the problems I faced and how I tackled them. Maybe you will find some of these problems similar to yours.
Problem 1: Finding a new library that serves the same purpose
When you working on your project which requires you to migrate the very old code into the new one you often find some library this not available right now and its in the old project. So you will think then what's the solution for that kind of problem? Well there is a solution, and the solution is you have to work a little to find its alternatives. As, in my project there is a chart library which is used in my project but now that libraray is unmaintained and last update on that is like 5 yeas ago. So we need to find a way to change this and introduced something which is more newer and popular. Well I want to share a insight on this while choosing the alternative things, always choose the library which is the most populer at that time and has greater user base, and it's open source (I strongly suggest to choose a library which is open source).
Also, look at user feedback for that library. For example, in my case, there are two widely famous chart libraries: "chart.js" and "recharts." Both are great, open-source, and have high weekly downloads. But after careful examination, I found that "chart.js" is more memory efficient and uses less space in memory while re-rendering. On the other hand, "recharts" has great visuals and looks more steady and visually appealing, but it is laggy if you want to show real-time data that updates every second. So, choose wisely.
After finding the right library, you can start the implementation work. Just watch some videos or documentation for that library, and you will learn how to integrate it and work with your data.
Problem 2: Writing the Component Logic
Sometimes converting old logic to new can be challenging, whether you're struggling with the framework's concepts or finding methods that perform the same operations as the old ones. I faced this issue many times while writing my code because I was working in a completely different language. There are different ways to solve problems, but the key is to learn more about your language or framework. There might be concepts you haven't learned yet that could be useful for the problem you're facing. For example, I once had an issue where my website was using too much CPU. After some research, I discovered hooks like "useMemo" and "useReducer" that helped reduce power consumption.
So, this is the time to learn while working on your project. Search the internet for the problem you're facing, and I'm sure you will find a solution. This is the best way to learn anything because you understand why you're using it in your code. Please spend some time learning these things; it will greatly enhance your knowledge in the specific domain.
Updates on My Work
With all of my above considerations I able to build the new user interface for my project (my project is still going on and I will provide you some of my work artifacts). So here is the new dashboard
And the wallet page

And the Make transaction page
At the time of writing this blog, this is what I have done so far. I will continue on this journey, and I hope you will also do great in your project. Thank you for reading this blog; it's my first time writing one, and I tried to connect with you personally while sharing real insights in the most beginner-friendly language possible. You can connect with me through any medium. Thank you.
Happy coding ;)
Subscribe to my newsletter
Read articles from Mohd Zaid directly inside your inbox. Subscribe to the newsletter, and don't miss out.
Written by

Mohd Zaid
Mohd Zaid
Hello, my name is Mohd Zaid. I am currently a "Summer of Bitcoin" 2024 intern with a strong interest in development, security, and cloud technologies. In my current role, I am working on an exciting project to modernize a 2013 full Bitcoin solution by creating a new user interface using the latest technologies. Through my blog, I aim to share my journey, insights, and the challenges I face while working on this project and stuff related to the bitcoin architecture