Create A Whitelisting Application
 Buidl On Base
Many projects, whether it is for an NFT mint or for an airdrop for a token offering, whitelisting of approved wallet addresses is employed. We are going to create an application that whitelists connected wallets.
The Smart Contract
To start go to this repository on github and clone the repository
git clone https://github.com/projectbuidlonbase/buidl-on-base-starter
Once the repository has been cloned rename it to whitelist-app
Open the folder. You will notice that the folder has 2 sub directories
hardhat
web
Open a terminal window inside the hardhat subdirectory and run the following commands to initialize a node.js project and install hardhat after the initialization
npm init --yes
npm install --save-dev hardhat
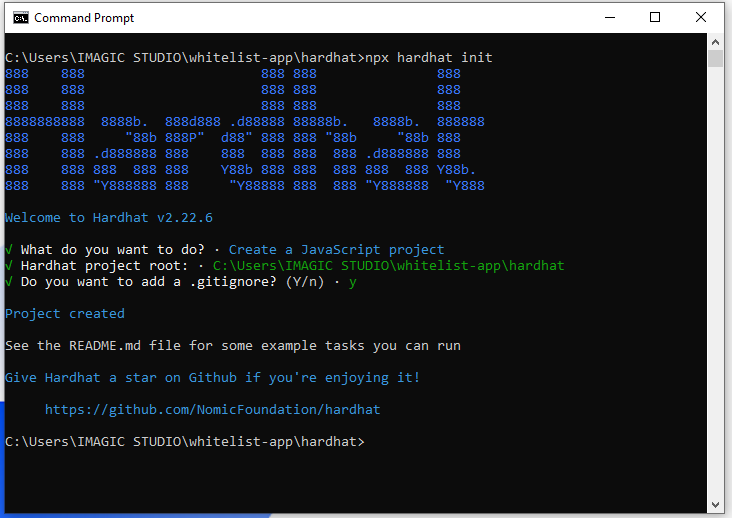
Once the installation of hardhat is completed, type this in the terminal
npx hardhat
When prompted
Select
Create a Javascript projectPress enter for the already specified
Hardhat Project rootPress enter for the question on if you want to add a
.gitignorePress enter for
Do you want to install this sample project's dependencies with npm (@nomicfoundation/hardhat-toolbox)?
Open the project directory with your code editor and navigate to the /hardhat/contracts/ folder. Delete the Lock.sol file in the folder and create a new file Whitelist.sol
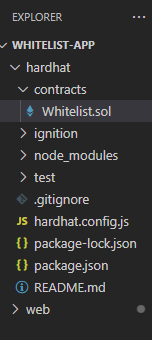
Inside this file, paste the following code
//SPDX-License-Identifier: Unlicense
pragma solidity ^0.8.0;


contract Whitelist {

    // Max number of whitelisted addresses allowed
    uint8 public maxWhitelistedAddresses;

    // Create a mapping of whitelistedAddresses
    // if an address is whitelisted, we would set it to true, it is false by default for all other addresses.
    mapping(address => bool) public whitelistedAddresses;

    // numAddressesWhitelisted would be used to keep track of how many addresses have been whitelisted
    // NOTE: Don't change this variable name, as it will be part of verification
    uint8 public numAddressesWhitelisted;

    // Setting the Max number of whitelisted addresses
    // User will put the value at the time of deployment
    constructor(uint8 _maxWhitelistedAddresses) {
        maxWhitelistedAddresses =  _maxWhitelistedAddresses;
    }

    /**
        addAddressToWhitelist - This function adds the address of the sender to the
        whitelist
     */
    function addAddressToWhitelist() public {
        // check if the user has already been whitelisted
        require(!whitelistedAddresses[msg.sender], "Sender has already been whitelisted");
        // check if the numAddressesWhitelisted < maxWhitelistedAddresses, if not then throw an error.
        require(numAddressesWhitelisted < maxWhitelistedAddresses, "More addresses cant be added, limit reached");
        // Add the address which called the function to the whitelistedAddress array
        whitelistedAddresses[msg.sender] = true;
        // Increase the number of whitelisted addresses
        numAddressesWhitelisted += 1;
    }

}
Before we can deploy this contract we need to install the dotenv package to handle enviroment variables
Return to the terminal, make sure it is still in the hardhat subdirectory and run this command
npm install dotenv
Now create a .env file inside the hardhat folder and paste the following code
WALLET_KEY= {DEPLOYER_PRIVATE_KEY}
Replace {DEPLOYER_PRIVATE_KEY} with the actual private key from the wallet address you are using to deploy the contract. Ensure that the wallet has base sepolia eth to deploy the contract.
Now create a folder in the hardhat folder called scripts, and create a file deploy.js in this folder
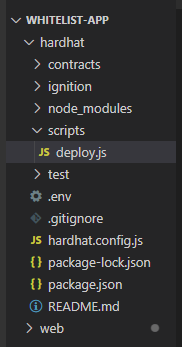
Paste this code in the newly created file
const hre = require("hardhat");

async function main() {
  /*
  DeployContract in ethers.js is an abstraction used to deploy new smart contracts,
  so whitelistContract here is a factory for instances of our Whitelist contract.
  */
  // Deploy the Whitelist contract with a maximum of 10 whitelisted addresses
  const whitelistContract = await hre.ethers.deployContract("Whitelist", [10]);

  // Wait for the contract to be deployed
  await whitelistContract.waitForDeployment();

  // Log the address of the deployed contract
  console.log("Whitelist Contract Address:", whitelistContract.target);
}

// Call the main function and handle any errors
main()
  .then(() => process.exit(0))
  .catch((error) => {
    console.error(error);
    process.exit(1);
  });
Now open the hardhat.config.js file and replace it's contents with this code
require('dotenv').config();
require('@nomicfoundation/hardhat-toolbox');

module.exports = {
  solidity: {
    version: '0.8.23',
  },
  networks: {
    // for mainnet
    'base-mainnet': {
      url: 'https://mainnet.base.org',
      accounts: [process.env.WALLET_KEY],
      gasPrice: 1000000000,
    },
    // for testnet
    'base-sepolia': {
      url: 'https://sepolia.base.org',
      accounts: [process.env.WALLET_KEY],
      gasPrice: 1000000000,
    },
    // for local dev environment
    'base-local': {
      url: 'http://localhost:8545',
      accounts: [process.env.WALLET_KEY],
      gasPrice: 1000000000,
    },
  },
  etherscan: {
    apiKey: {
      "base-sepolia": process.env.ETHERSCAN_API_KEY_SEPOLIA
    },
    customChains: [
      {
        network: "base-sepolia",
        chainId: 84532,
        urls: {
          apiURL: "https://api-sepolia.basescan.org/api",
          browserURL: "https://sepolia.basescan.org"
        }
      }
    ]
  },
  defaultNetwork: 'hardhat',
};
Now type npx hardhat compile in the terminal. Once your contract is compiled, you deploy your contract by running this command
npx hardhat run scripts/deploy.js --network base-sepolia
You should get an output similar to this in your terminal
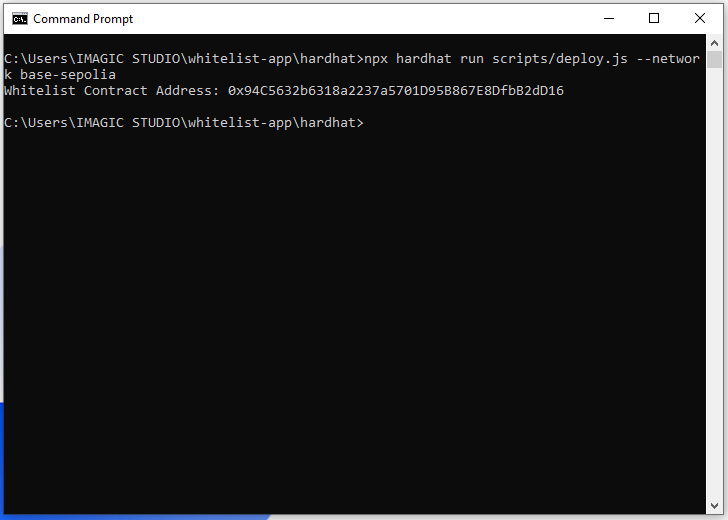
Copy the Whitelist Contract Address and store it somewhere, we are going to use it in our front end.
The Front End
Now in your code editor, open the web folder and create a new file constants.ts in the /src/app/ folder

Inside this newly created constants.ts file paste this code
export const WHITELIST_CONTRACT_ADDRESS = "0xYourContractAddress";
export const abi: any[] = [
  // Your contract ABI here
];
In the "0xYourContractAddress" space paste the address of your deployed contract that was shown in your terminal.

ABI stands for Application Binary Interface. It is a data encoding scheme used in Ethereum for working with smart contracts. You can find the abi for your smart contract by going to the /hardhart/artifacts/contracts/Whitelist.sol/Whitelist.json file
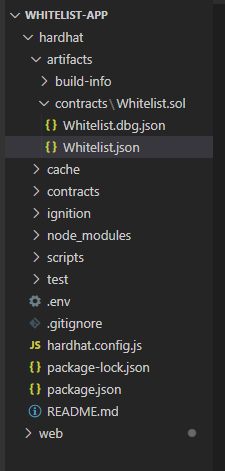
Copy the abi and paste it in the constants.ts file.
Now open the page.tsx file inside you /web/src/app folder
We already have our Header component imported. We need to add a couple more imports that we will be using
import { useState } from "react";
import { useAccount, useWalletClient, useWriteContract } from 'wagmi';
import Header from './Header';
import Footer from './Footer';
import { WHITELIST_CONTRACT_ADDRESS, abi } from './constants';
We will be using the imports from wagmi to interact with the smart contracts
import { useAccount, useWalletClient, useWriteContract } from 'wagmi';
We also are importing the contents of the constants.ts file as we will be using them in the code.
We will be adding a footer to the page, for aesthetic purposes so that has been imported and will be created in due course.
We start by declaring 3 constants on the page
  const { address, isConnected } = useAccount();
  const { data: walletClient } = useWalletClient();
  const [isWhitelisted, setIsWhitelisted] = useState<boolean>(false);
The first constant checks for the address and whether the wallet is connected, using the useAccount hook from wagmi library.
The second is also a wagmi library hook which checks for the wallet client in use by the user
the third utilizes useState to determine if the connected addres is whitelisted or not
Next we create a method to initialize our final hook imported from the wagmi library, useWriteContract
const { writeContract } = useWriteContract();
This ensures a wallet will be written to the smart contract on successful whitelisting
We are now going to create function that handles the whitelisting process
const addToWhitelist = async () => {
    if (!walletClient) {
      alert("Please connect your wallet first");
      return;
    }

    if (!address) {
      alert("No address found. Please make sure your wallet is connected.");
      return;
    }

    try {
      await writeContract({
        address: WHITELIST_CONTRACT_ADDRESS,
        abi: abi,
        functionName: 'addAddressToWhitelist',
        args: [address],
      });
      setIsWhitelisted(true);
    } catch (error) {
      console.error("Error adding address to whitelist", error);
    }
  };
The first part of this function checks to see if a wallet is connected and to ensure the address is read before trying to add the address to the whitelist.
The second part uses the writeContract method defined previously to add the address to the whitelist smart contract.
Next we are going to edit the JSX on the page to render a button which allows anyone to add their wallet to the whitelist after connecting.
<div className="flex items-center flex-col flex-grow">
        <div className="card bg-base-100 w-180 shadow-xl m-10 p-10">
  <figure>
    <img
      src="https://images.unsplash.com/photo-1488590528505-98d2b5aba04b?q=80&w=1470&auto=format&fit=crop&ixlib=rb-4.0.3&ixid=M3wxMjA3fDB8MHxwaG90by1wYWdlfHx8fGVufDB8fHx8fA%3D%3D"
      alt="Turned on grey laptop" />
  </figure>
  <div className="card-body">
    <h2 className="card-title">
    Welcome to Buidl On Base!

    </h2>
    <p>It's an NFT collection for developers building apps on Base</p>
    {isWhitelisted
              ? <div className="badge badge-secondary">"You have been whitelisted!"</div>
              : "Join the whitelist now!"}
    <div className="card-actions justify-end">
    <button onClick={addToWhitelist} disabled={!isConnected || isWhitelisted} className="btn btn-accent"> {isWhitelisted ? "Whitelisted" : "Add to Whitelist"}</button>
    </div>
  </div>
        </div>
      </div>
Using daisyUI, I added a card component and a button to the page to spruce things up. The card has an image imported from unsplash, and a button. The button is disabled when the wallet is not connected, or the address is alreadu on the whitelist.
Finally create a file Footer.tsx inside the /src/app/ folder
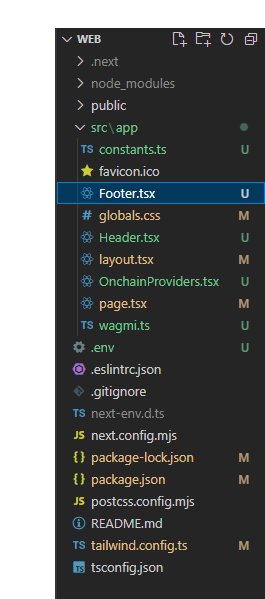
On this page add the following code
export default function Footer(){
return(
<>
<footer className="footer footer-center bg-base-300 text-base-content p-4">
<aside>
<p>Copyright © {new Date().getFullYear()} - Made with ❤ by Project Buidl On Base</p>
</aside>
</footer>
</>
)
}
The code has already been imported into our file, so the only thing left is to add it to our page by using the the <Footer /> tag
The page.tsx should look like this
"use client";
import { useState } from "react";
import { useAccount, useWalletClient, useWriteContract } from 'wagmi';
import Header from './Header';
import Footer from './Footer';
import { WHITELIST_CONTRACT_ADDRESS, abi } from './constants';

export default function Home() {
  const { address, isConnected } = useAccount();
  const { data: walletClient } = useWalletClient();
  const [isWhitelisted, setIsWhitelisted] = useState<boolean>(false);

  const { writeContract } = useWriteContract();

  const addToWhitelist = async () => {
    if (!walletClient) {
      alert("Please connect your wallet first");
      return;
    }

    if (!address) {
      alert("No address found. Please make sure your wallet is connected.");
      return;
    }

    try {
      await writeContract({
        address: WHITELIST_CONTRACT_ADDRESS,
        abi: abi,
        functionName: 'addAddressToWhitelist',
        args: [address],
      });
      setIsWhitelisted(true);
    } catch (error) {
      console.error("Error adding address to whitelist", error);
    }
  };

  return (
    <>
      <Header />
      <div className="flex items-center flex-col flex-grow">
        <div className="card bg-base-100 w-180 shadow-xl m-10 p-10">
  <figure>
    <img
      src="https://images.unsplash.com/photo-1488590528505-98d2b5aba04b?q=80&w=1470&auto=format&fit=crop&ixlib=rb-4.0.3&ixid=M3wxMjA3fDB8MHxwaG90by1wYWdlfHx8fGVufDB8fHx8fA%3D%3D"
      alt="Turned on grey laptop" />
      <div className="align-bottom align-right">
        <p className="text-white font-bold">Get Lost in Mountains</p>
    </div>
  </figure>
  <div className="card-body">
    <h2 className="card-title">
    Welcome to Buidl On Base!

    </h2>
    <p>It's an NFT collection for developers building apps on Base</p>
    {isWhitelisted
              ? <div className="badge badge-secondary">"You have been whitelisted!"</div>
              : "Join the whitelist now!"}
    <div className="card-actions justify-end">
    <button onClick={addToWhitelist} disabled={!isConnected || isWhitelisted} className="btn btn-accent"> {isWhitelisted ? "Whitelisted" : "Add to Whitelist"}</button>
    </div>
  </div>
        </div>
      </div>
      <Footer />
     </>
  );
}
All thats is left is to open up the terminal and run this command
npm run dev
Then point your browser to http://localhost:3000 to view the completed site
The complete code for this tutorial can be found on my Github, here
Subscribe to my newsletter
Read articles from Buidl On Base directly inside your inbox. Subscribe to the newsletter, and don't miss out.
Written by
