Using NAT Instance on AWS
 Min Htet San
ကျွန်တော်တို့တွေဟာ AWS ပေါ်မှာ private instance တွေ internet ကို သွားဖို့ လိုအပ်လာပြီဆိုရင် NAT Gateway တစ်ခု တည်ဆောက်ပြီးတော့ အသုံးပြုလေ့ ရှိပါတယ်။ ဒါပေမယ့် ကိုယ်က cost efficient ဖြစ်ချင်လို့ပဲ ဖြစ်ဖြစ် တစ်ခြားနည်း တစ်ခုကို သုံးချင်တယ် ဆိုရင်တော့ နောက်ထပ် တစ်နည်း ရှိနေပါသေးတယ်။ အဲ့တာကတော့ EC2 instance တစ်ခုကို NAT Gateway တစ်ခု အနေနဲ့ သုံးလိုက်တာပါ။ ဒီနည်းလမ်းကို on-premise တစ်ခုမှာ လိုအပ်ချက်တစ်ခု အရတော့ အရင်က ကျွန်တော် လုပ်ခဲ့ဖူးပါတယ်။ အခုတော့ ကျွန်တော် aws ပေါ်မှာ စမ်းပြသွားမှာ ဖြစ်ပါတယ်။
NAT Instance ကို သုံးလိုက်ရင် ဖြစ်သွားမယ့် traffic flow ကတော့ အောက်က ပုံလို ဖြစ်သွားမှာ ဖြစ်ပါတယ်။
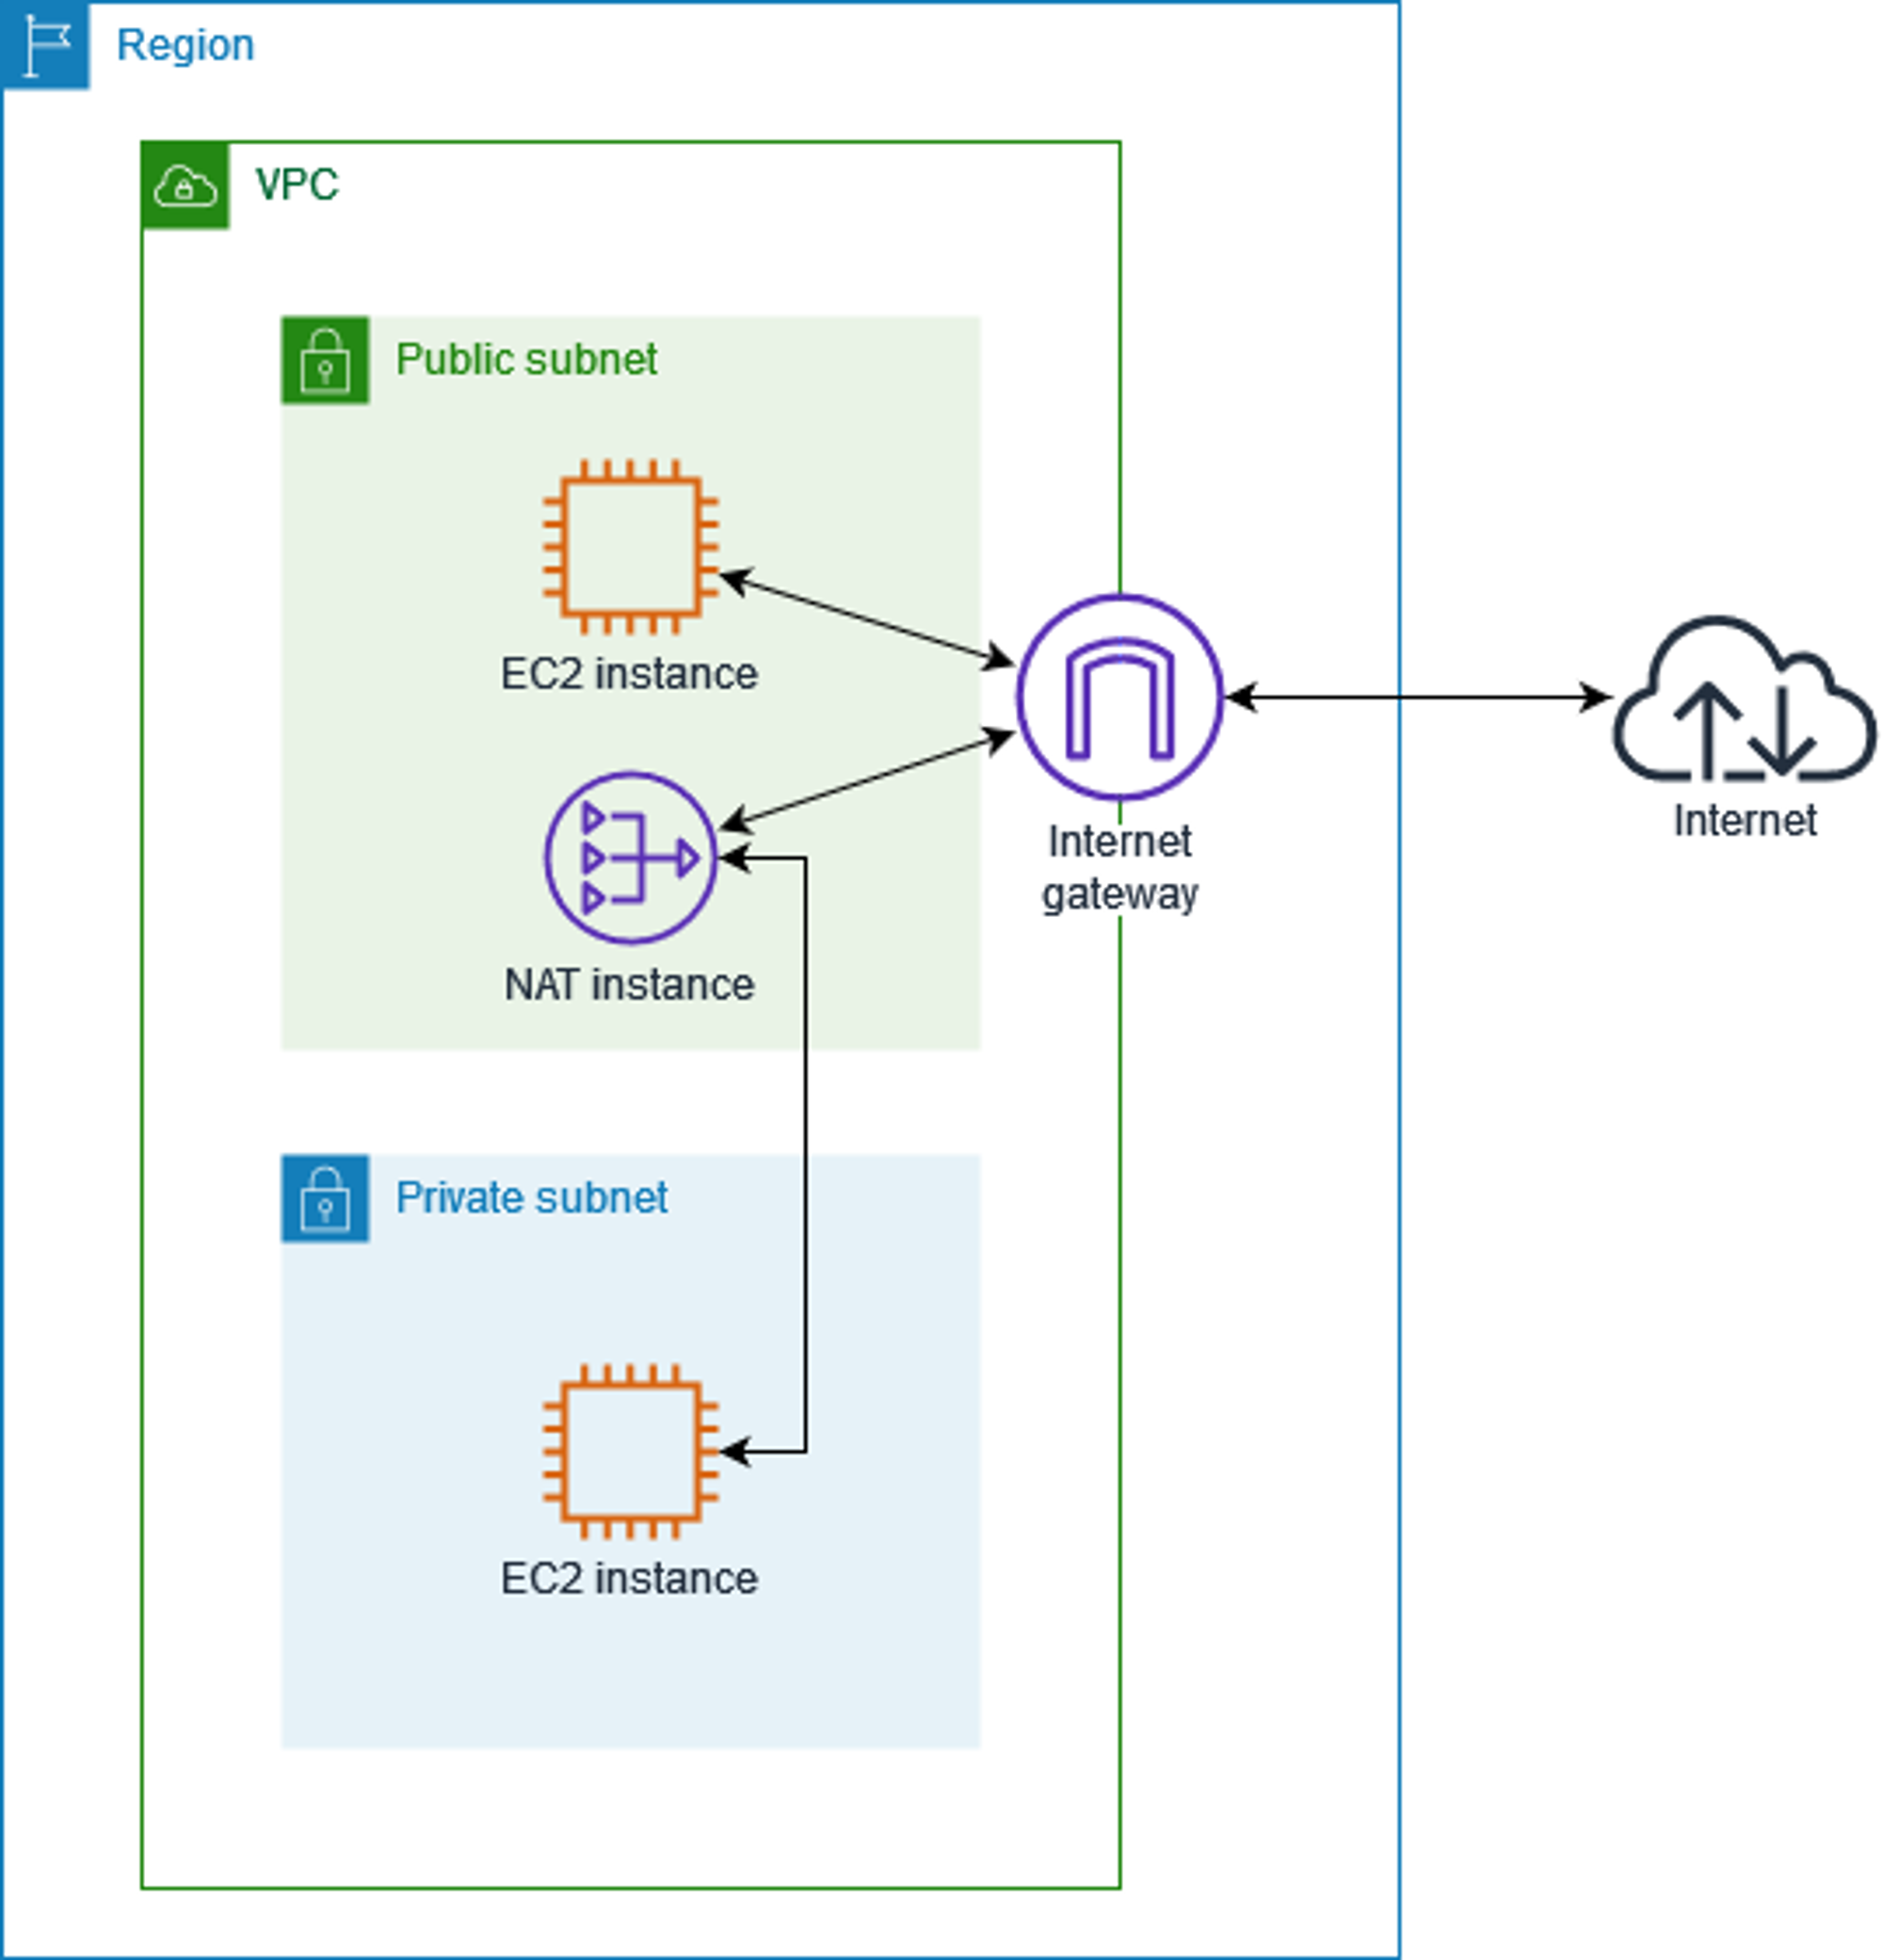

ဒီပုံလေးကတော့ ကျွန်တော် example အနေနဲ့ စမ်းပြသွားပေးမယ့် VPC လေးရဲ့ ပုံစံ ဖြစ်ပါတယ်။
Private Subnet က တော့ NAT Gateway မထည့်ထားသေးလို့ internet သုံးလို့ မရသေးပါဘူး။
ဒါဆိုရင် ပထမဆုံး အနေနဲ့ NAT AMI တစ်ခုကိုဆောက်ပါမယ်။ NAT AMI အတွက်တော့ အခု presentation မှာတော့ Amazon Linux ကိုပဲ သုံးပြထားပါတယ်။
ဒီနေရာမှာ NAT Instance အတွက် အရေးကြီးတဲ့ အရာလေးတွေကို တစ်ချက် ပြောပြချင်ပါတယ်။
NAT Instance သည် Public Instance ထဲမှာ ရှိရပါမယ်။
Elastic IP address တစ်ခု ရှိရပါမယ်။
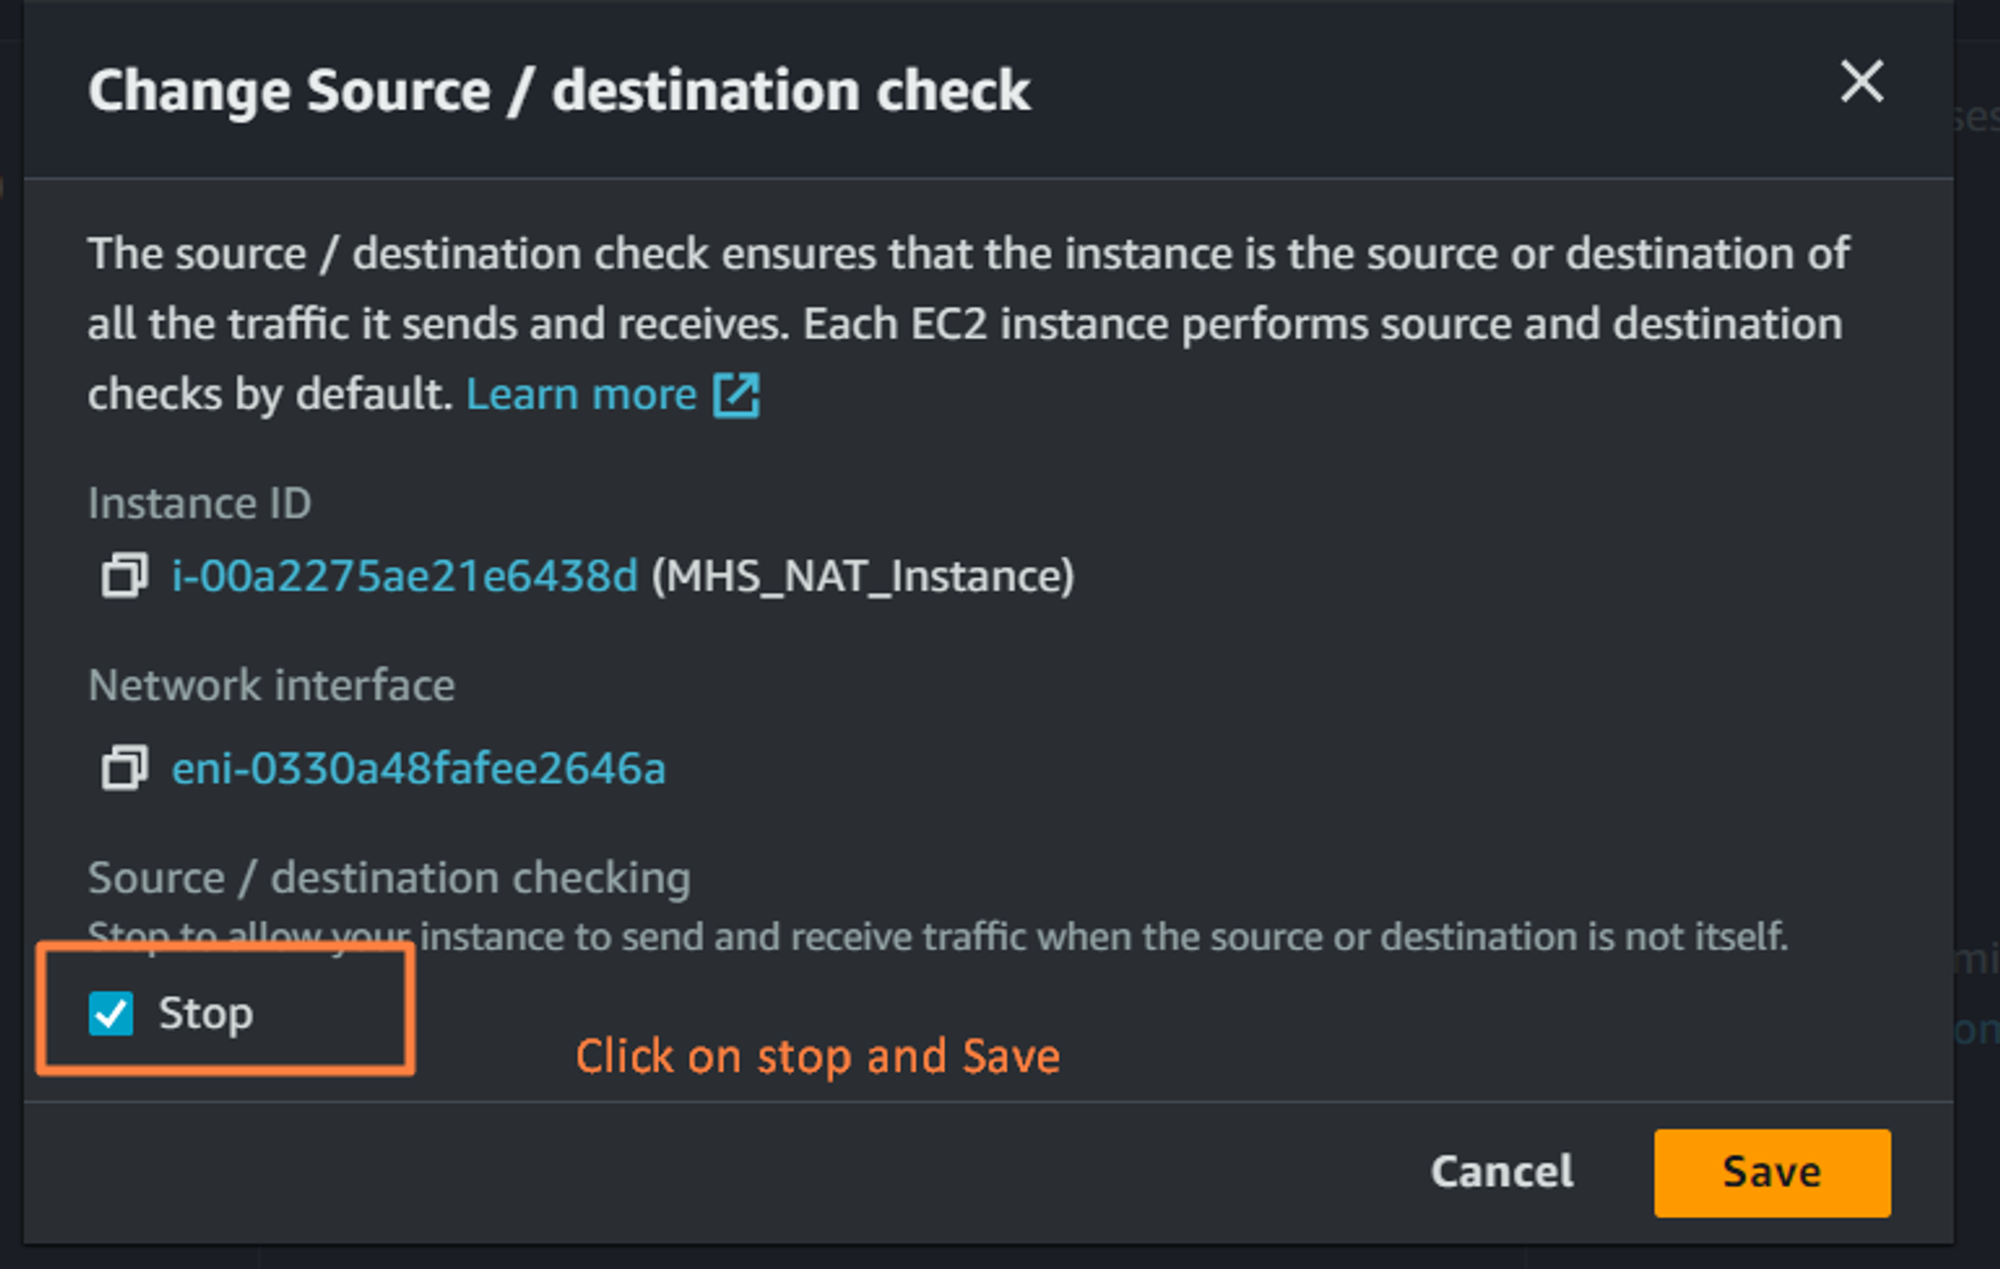
အရေးကြီးဆုံးကတော့ Source/Destination Check ကို off ထားဖို့ လိုပါတယ်။နောက်မှာဆက်ပြီး ပြောပြပါမယ်။
ဘာဖြစ်လို့ Source/Destination Check ကို NAT Instance မှာ off ဖို့လိုပါတယ်။ ပုံမှန် default ဆိုရင်တော့ instance တစ်ခုက internet traffic တွေအတွက် တာဝန်မရှိပါဘူး။ NAT Instance အနေနဲ့ ဖြစ်လာပြီ ဆိုရင်တော့ source and destination တွေကို မှန်မှန် ပြန်ပေးဖို့ လိုအပ်လာပါပြီ။ သူကိုယ်တိုင်တင် မဟုတ်ပဲ သူ့ကို Gateway အနေနဲ့ သုံးမယ့် instance တွေရဲ့ traffic တွေကိုပါ ပို့ပေးဖို့ လိုအပ်ပါတယ်။ အဲ့တာကြောင့် Source/Destination Check ကို off ထားဖို့ လိုပါတယ်။
NAT Instance တွေမှာတင် မဟုတ်ပဲ AWS ပေါ်မှာ Firewall ထားပြီး Firewall ကနေ ဖြတ်မယ့် traffic တွေ, NAT Instance လိုပဲ အလားတူ NAT Device တွေ အတွက်လဲ Source/Destination Check ကို off ထားဖို့ လိုပါတယ်။
အခု ကျွန်တော် NAT Instance ကို ဆက်ပြီး ဆောက်သွားပါ့မယ်။
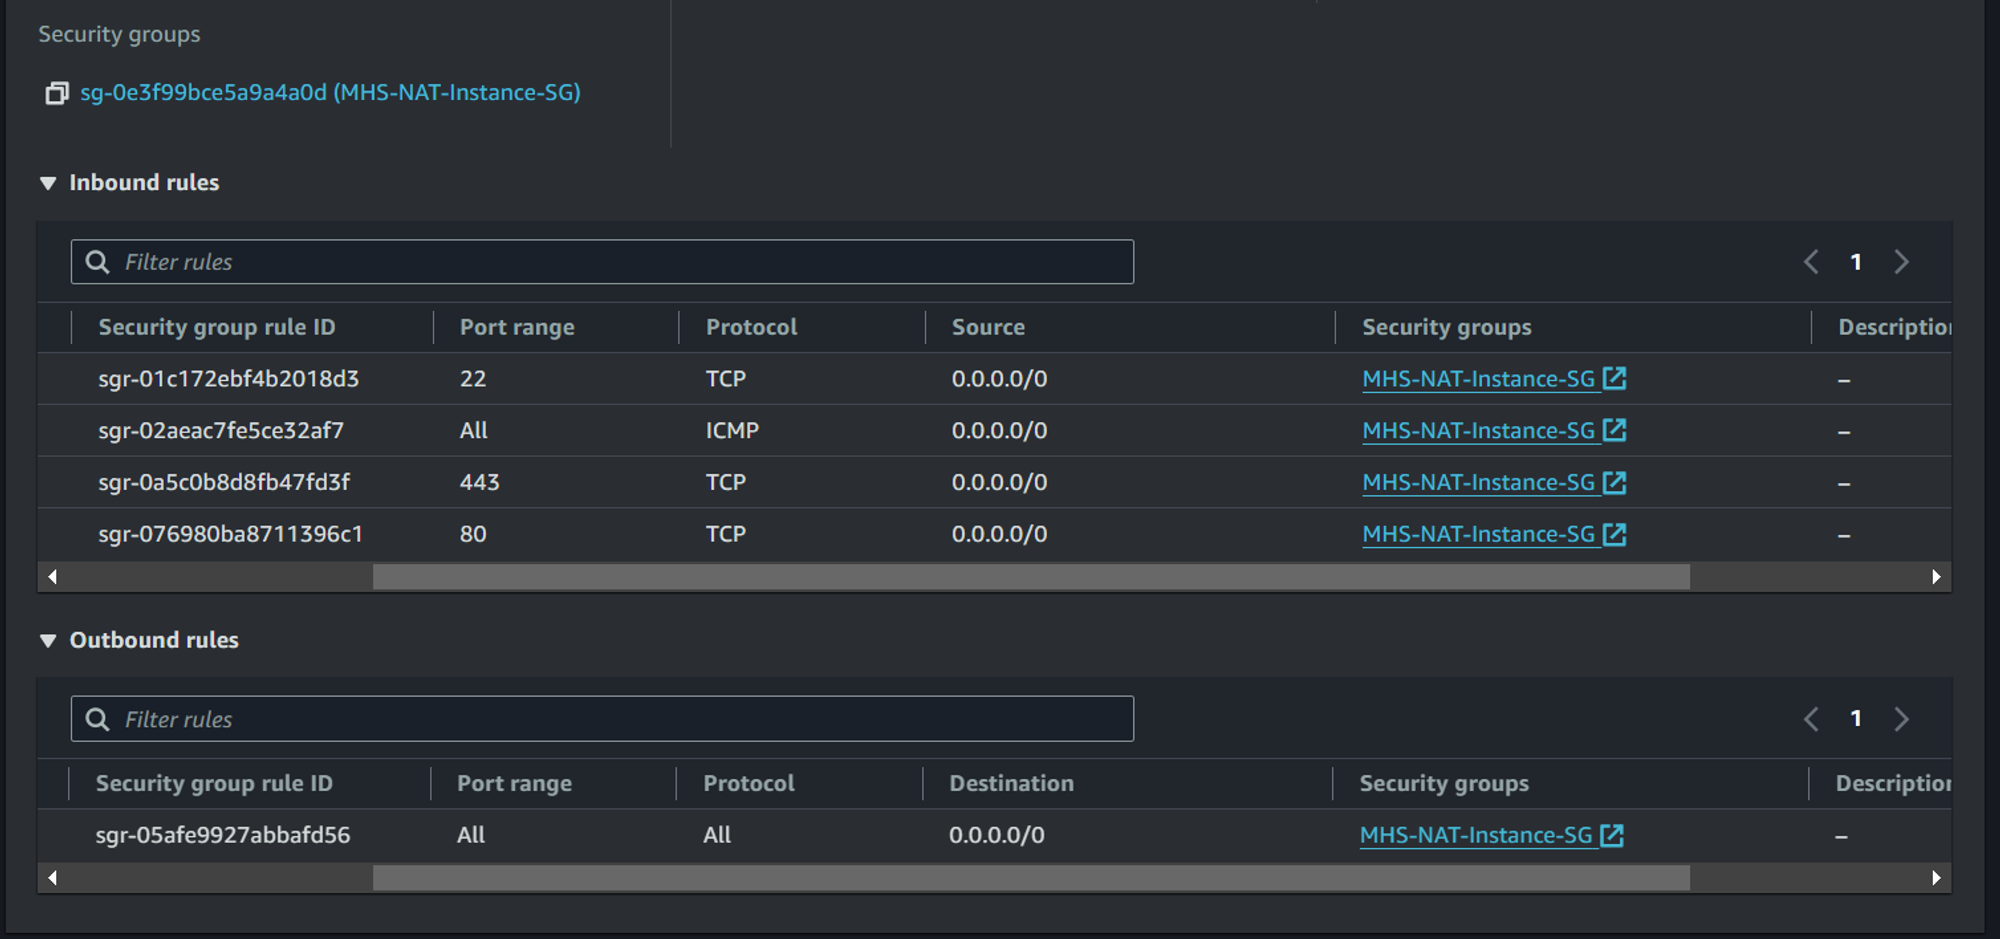
NAT Instance အတွက် Security Group ကိုတော့ http/https traffic တွေ allow ပေးထားပါတယ်။
အခုဆိုရင်တော့ ကျွန်တော် Public Subnet ထဲမှာ NAT Instance တစ်ခုလုပ်ဖို့ ရည်ရွယ်ထားတဲ့ ec2 instance တစ်ခု ဆောက်ထားပါတယ်။ အရေးကြီးတဲ့ src/dst check ကို off ပါမယ်။
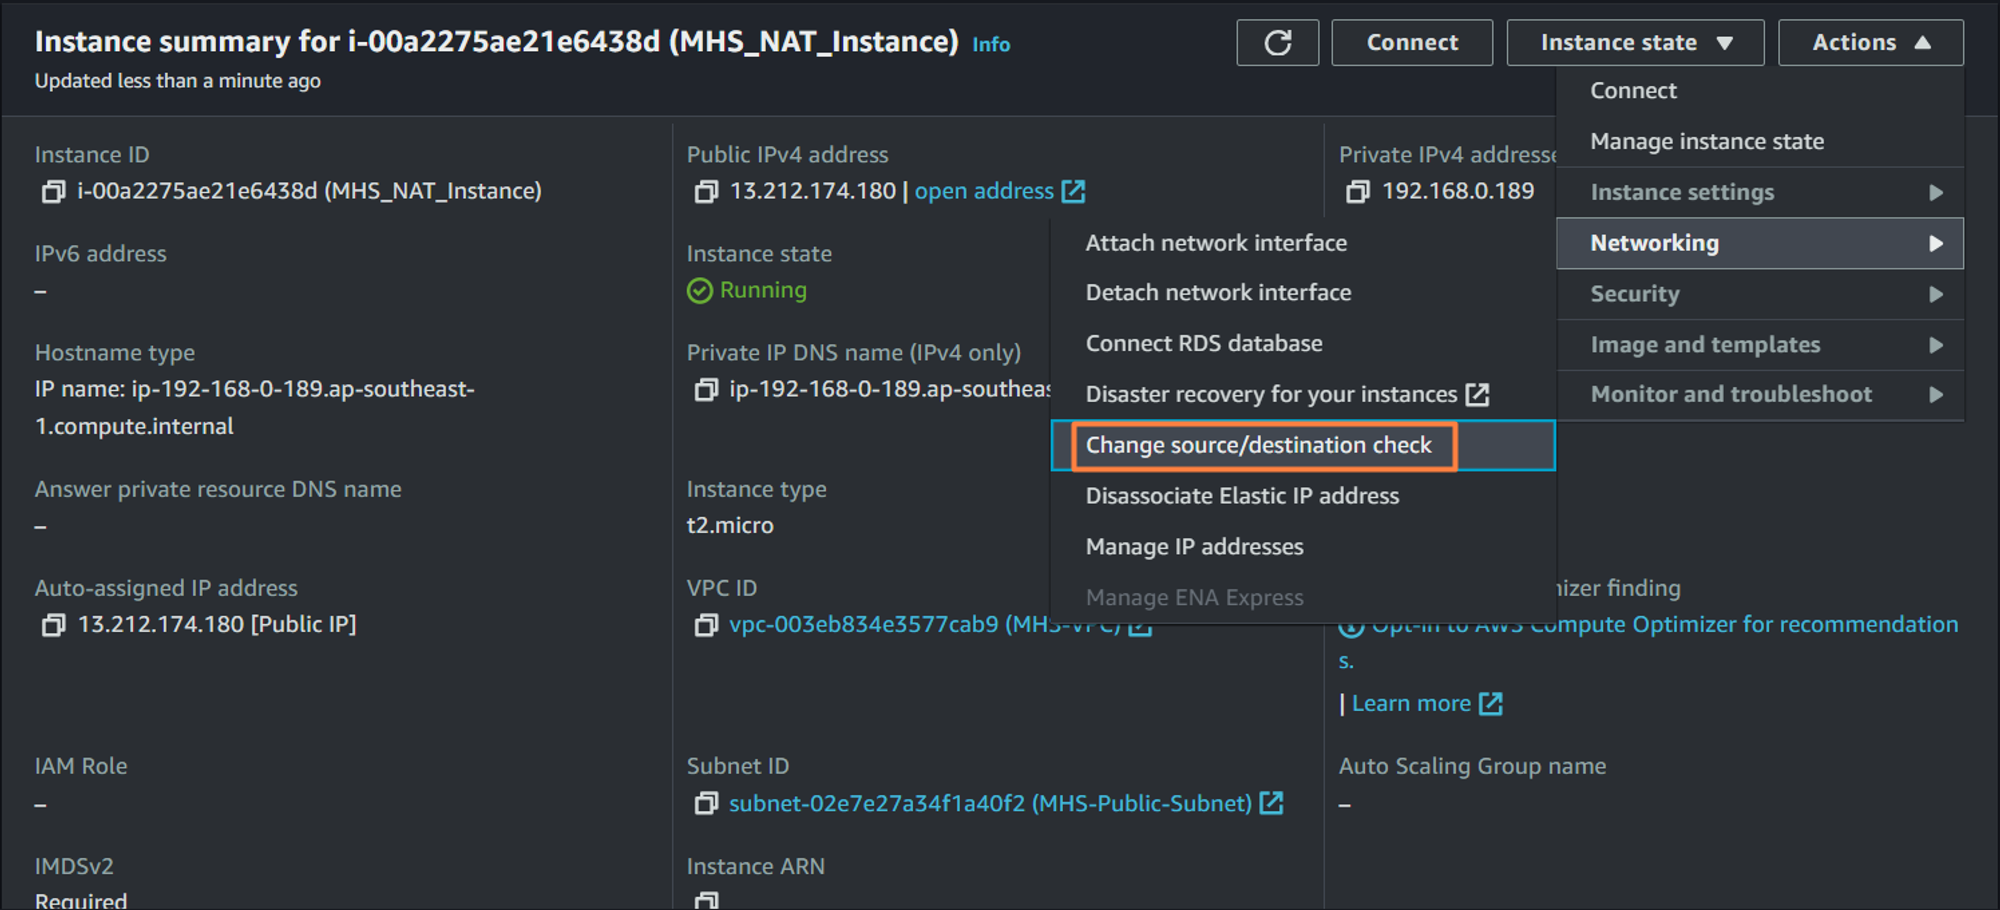
ဆက်ပြီးတော့ NAT အနေနဲ့ အလုပ်လုပ် ဖို့ ဆက်လုပ်သွားပါ့မယ်။
sudo yum install iptables-services -y
sudo systemctl enable iptables
sudo systemctl start iptables
ပြီးရင်တော့ nano or vim text editor တစ်ခုကို သုံးပြီး လိုအပ်တဲ့ config တစ်ခုကို ပြင်ပါမယ်။
sudo nano /etc/sysctl.d/custom-ip-forwarding.conf
## and Add the following line to the configuration file
net.ipv4.ip_forward=1
## and save and exit
## run following command to apply configuration file
sudo sysctl -p /etc/sysctl.d/custom-ip-forwarding.conf
ပြီးရင်တော့ NAT Instance ရဲ့ primary interface ကို စစ်ပါမယ်။ primary network interface ကို iptables service မှာ ပြန်သုံးဖို့ ဖြစ်ပါတယ်။
[ec2-user@ip-192-168-0-189 ~]$ netstat -i
Kernel Interface table
Iface             MTU    RX-OK RX-ERR RX-DRP RX-OVR    TX-OK TX-ERR TX-DRP TX-OVR Flg
enX0             9001    21459      0      0 0          3016      0      0      0 BMRU
lo              65536       12      0      0 0            12      0      0      0 LRU
[ec2-user@ip-192-168-0-189 ~]$
ကျွန်တော့် ဆီမှာတော့ Iface က enX0 ဆိုပြီး ပြနေပါတယ်။ enX0 မဟုတ်ပဲ တစ်ခြားတစ်မျိုး ပြနေခဲ့ရင် ပြတဲ့ interface ကို အောက်က command တွေမှာ အစားထိုးသုံးပေးပါ။
sudo /sbin/iptables -t nat -A POSTROUTING -o enX0 -j MASQUERADE
sudo /sbin/iptables -F FORWARD
sudo service iptables save
ဒါဆိုရင် ကျွန်တော်တို့ private instance တစ်ခု ဆောက်ပြီး NAT Instance အလုပ် လုပ်/မလုပ် ကို စမ်းလို့ ရပါတယ်။ တစ်ခုရှိတာကတော့ ကျွန်တော်တို့ private subnet နဲ့ associate လုပ်ထားတဲ့ rtb မှာတော့ 0.0.0.0/0 ဆိုရင် NAT Instance ဆိုပြီး edit ပေးရပါမယ်။
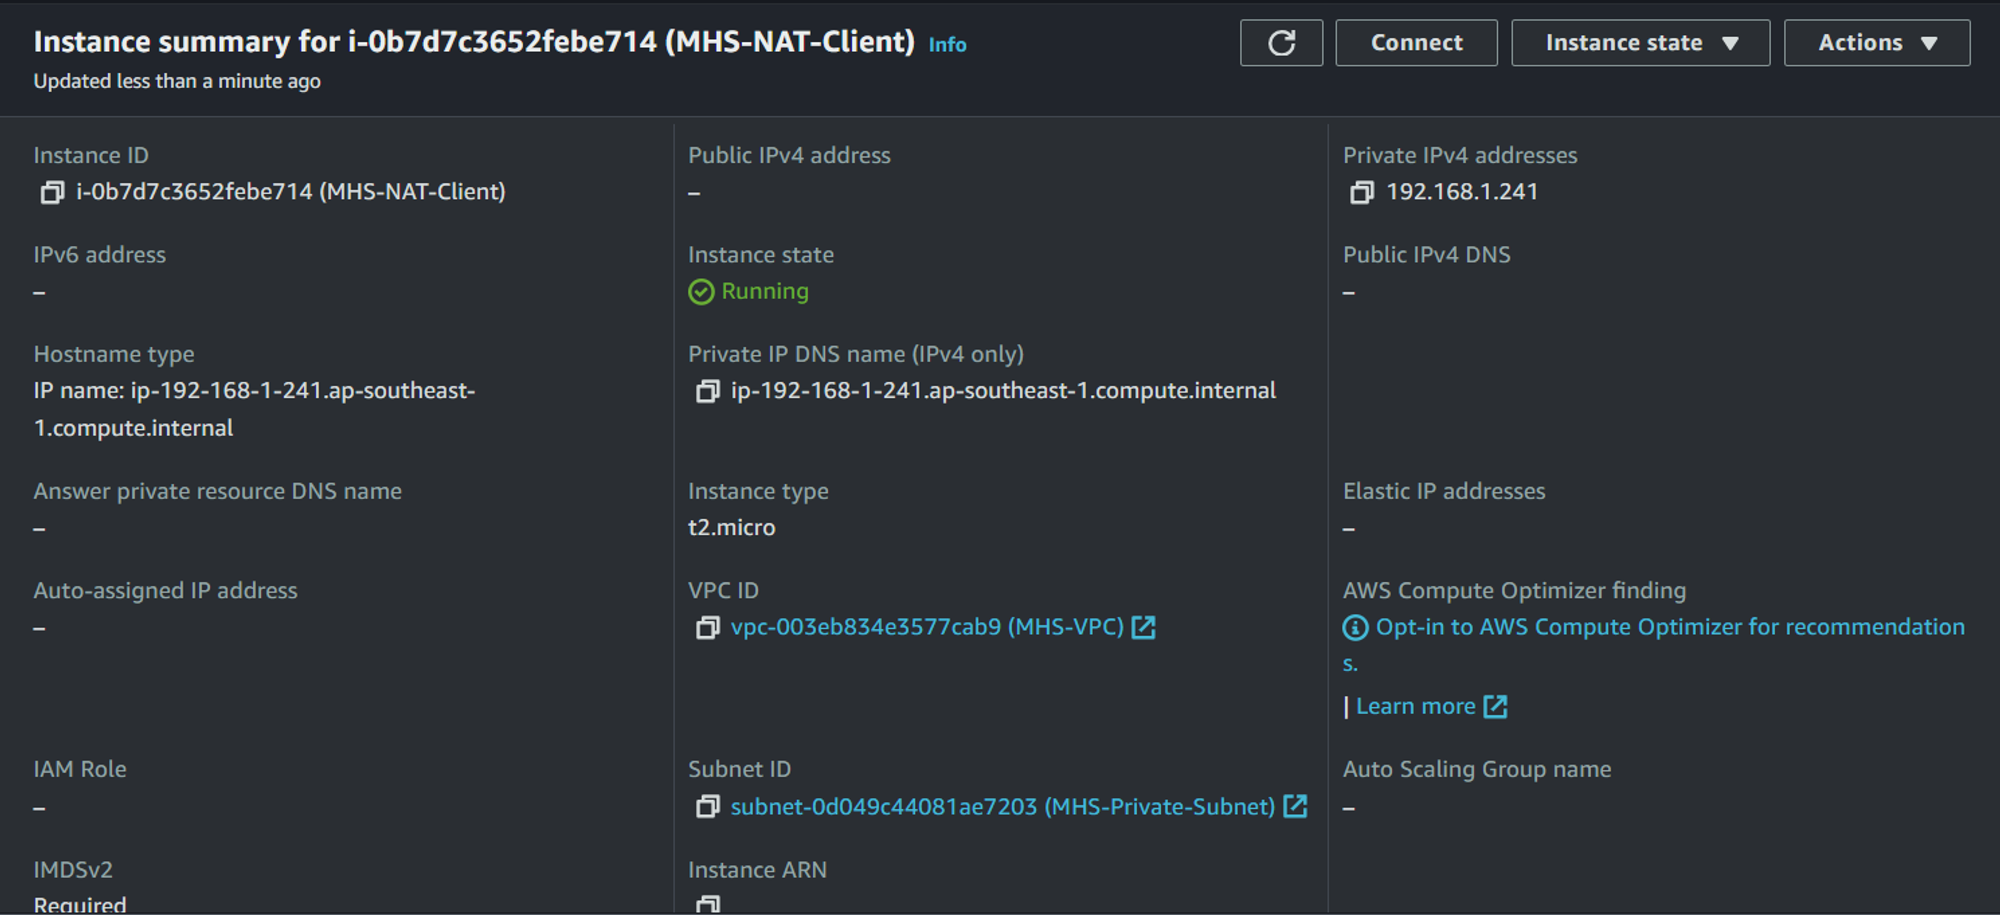

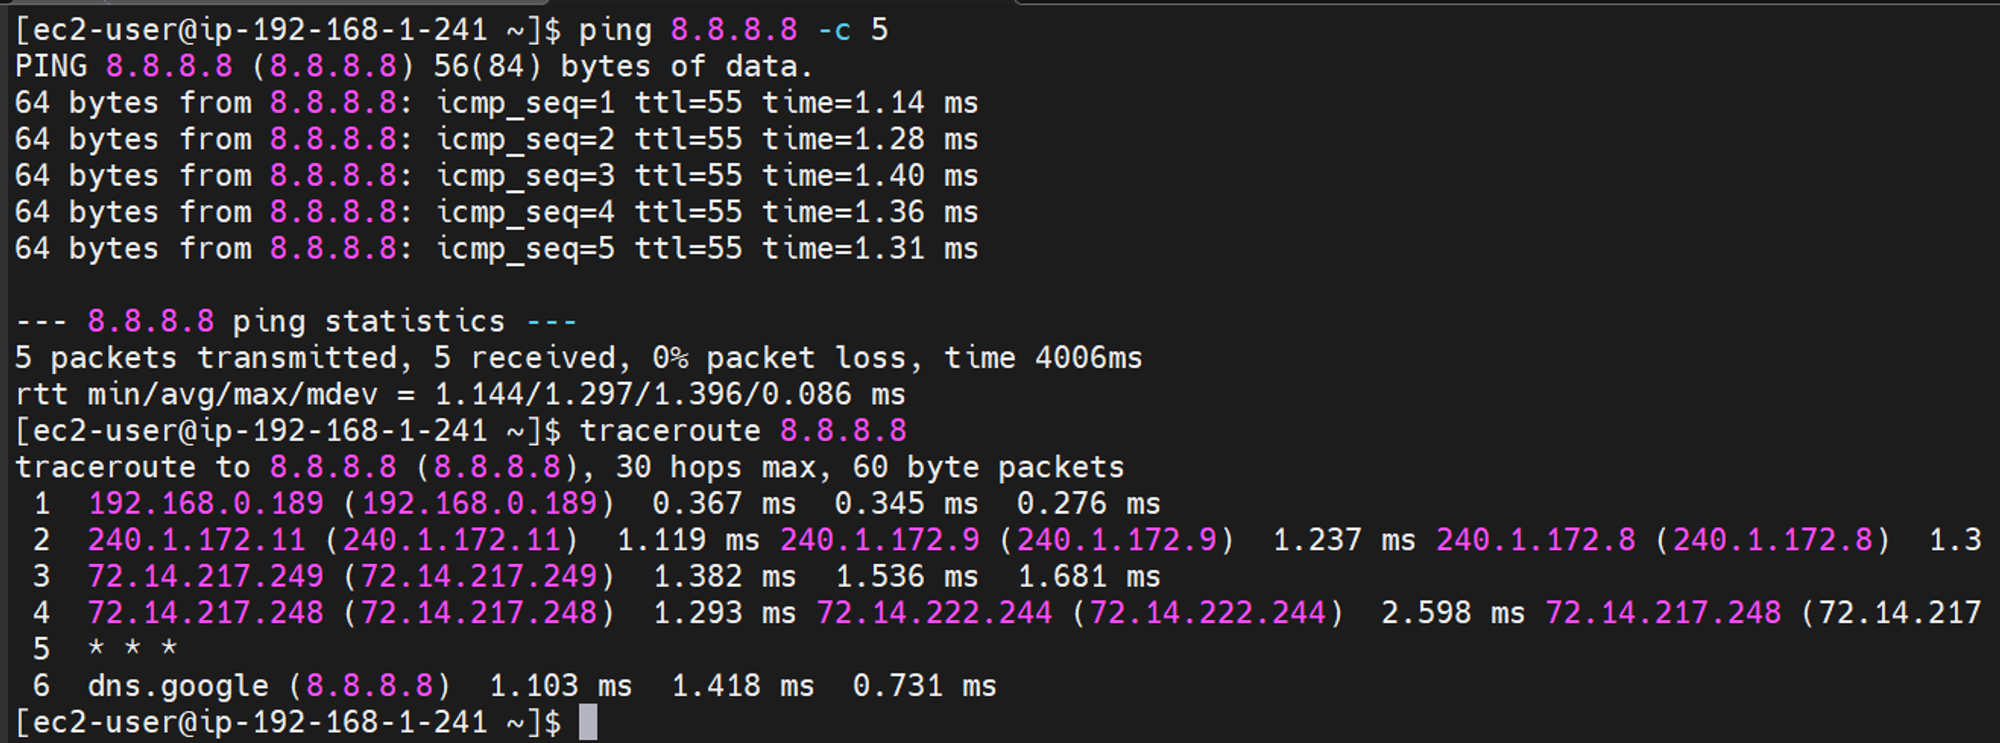
ဒါဆိုရင် NAT Instance အတွက် လိုအပ်တာတွေ အကုန်ပြီးပြီ ဆိုတော့ private instance ထဲကို ဝင်ပြီး Internet ကို စမ်းကြည့်ပါမယ်။ အခုဆိုရင် တော့ NAT Instance ကနေ တစ်ဆင့် Private Instance က Internet ကို သွားနေပြီ ဖြစ်ပါတယ်။
Thanks for reading.
#the-art-by-makisam
Subscribe to my newsletter
Read articles from Min Htet San directly inside your inbox. Subscribe to the newsletter, and don't miss out.
Written by

Min Htet San
Min Htet San
I'm Security and Cloud Support Engineer at KBZ Bank. I'm tying to be a Cloud Native Engineer......