How to start with git! using Visual Studio Code?
 ganesh mondal
I am assuming Git and VS Code are already installed on your system.
Open VS Code

Navigating the Git Repository
To create a fresh new project, go to Files and select Open Folder.
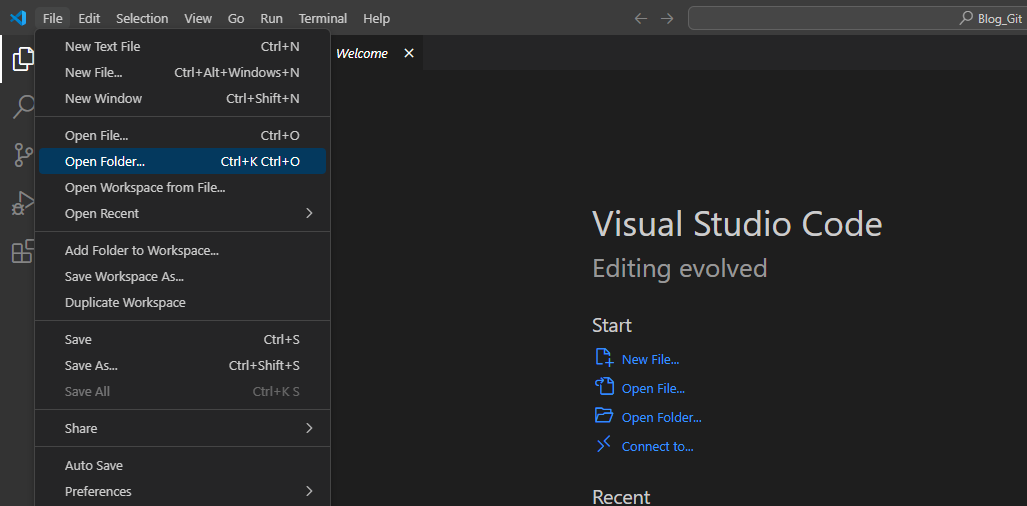
Select the folder where you want to store your projects/repositories. This folder will be called your present work directory.
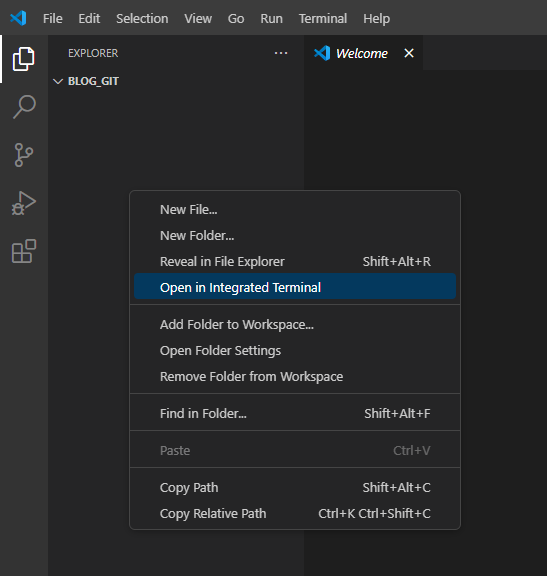
- Right-click and open the Integrated Terminal.
- Check the Git version installed on your system and verify the installation:
git --version
If the installed Git version on your system is old and you want to update it, you can skip this step if you have done a fresh installation:
git update
- Configure Your Git
Why do you need to configure your Git?
It is very important to configure your Git locally with basic details like username and email address so that when you contribute to any of your open-source or office projects, anyone can easily understand who has contributed to that particular assignment/task.
How to check what details are configured?
git config --list
git config --global user.name "Your Name"
git config --global user.email "your_email@example.com"
Another way, if you have already set up your configuration file in Git, you can open and edit the file. You can skip this step if you have done a fresh installation. 🛠️
git config --global --edit
a) Now you are inside the "Vi editor/terminal". Use insert mode and make the changes in the configuration file.
Press 'i' to enable editing:
b) Enter or modify the user details:
For example:
user.name = Ganesh Mondal
user.email = ganeshm@abc.com
c) To save the details, press Esc, then type :wq. It will save and quit the terminal.
d) Verify the configurations by listing existing configurations:
git config --list
Main task is done. Now, we will create our first version for Git code.
- Understand the Flow of Git
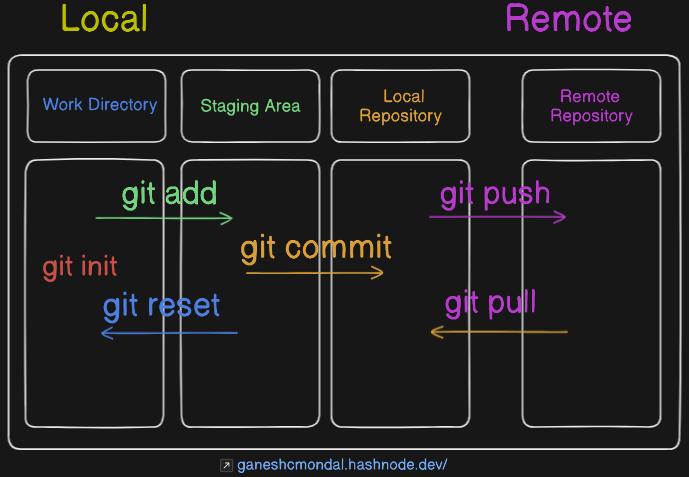
a) Work Directory: Where your files and code are stored on the local machine.
b) Staging Area: Where the files and code are staged after git add. You can still revert your changes as they are not yet committed. The staging area is denoted with green color.
c) Local Repository: After commit, code/files are now versioned. Commit changes cannot be reverted. If really needed, you can go back to a previous version.
d) Remote Repository: This area is a remote server, such as GitHub, GitLab, etc. For code collaboration. The remote repository is important as sharing and making the code public/private will be easy. Others can clone and fork the repository to contribute to enhancing the code functionality.
When any repository is added from local to remote, it is known as a Push request. Similarly, if anyone contributes any functionality to your code, that person needs to send a Pull request so that the project owner can verify the changes and accept/reject the contribution.
- Initialize the Repository
Always initialize the folder/directory. Once initialized, Git versioning will start after that.
git init
A .git hidden directory will be created in your selected folder. Never delete any files from there; else, it will result in corrupting your Git repository's version history.
- Add Files to the Staging Area
.- Denotes all the files and folders in the present directory.<filename>- If only one file needs to be staged, then provide that file name.*- Denotes all the files, a wildcard character.
git add .
or
git add <filename>
or
git add *
- Commit the Changes to Create a Version ✍️
-m - Denotes the message to the commit.
The git commit command will automatically pick the latest staged files in green:
git commit -m "Initial commit"
- Check the Status of Your Repository
git status
- Check Logs of Your Commit for All the Versions
git log
or
git log --oneline
Wonderful! You have successfully made your first commit to Git. Learn with simplicity.
What Coming Next
In the upcoming blogs,
We will disscuss more on "impact of Git on an Open source projects".
Why students should adopt this tool early from college days?
How a Git can be useful in crowd sourcing?
We will start an open-source mini project for all students to contribute.
and much more to explore...
Hope you find this blog informative and helpful. If you have any questions or need further assistance with Git, feel free to drop a comment below! Happy coding! 💻😊
This Blog is sponsored by KhojiLabs.com. Khoji Labs provides all the necessary free guidance to college students to help them grow in their careers.
Subscribe to my newsletter
Read articles from ganesh mondal directly inside your inbox. Subscribe to the newsletter, and don't miss out.
Written by
