Integrating MPESA Daraja API - NodeJS, ExpressJS and Typescript
 Samoina
Let's do a little catchup :-)
I last wrote on Hashnode early in the year. I had every intention of making this a regular thing and publishing the posts sitting in my drafts. But as it always does, life happens. In between then and now, I lost a contract and got another remote one after two months. Sadly, that ended too owing to a significant breakdown in communication.
A few weeks later I landed my first role as a frontend software developer for a local company. In the few months I have been here, I have had the wonderful opportunity to work alongside an incredibly talented team, including backend developers. This is what piqued my interest in backend development. One of the projects we worked on necessitated the integration of MPESA. In my learnings, I came across this resourceful article by Mary M, a skilled frontend developer I have had the pleasure of working with. I challenged myself to share my takeaway plus a beginner-friendly guide of my understanding on the same.
I must admit, however, that the MPESA Daraja API documentation is not well articulated. I struggled to understand certain aspects in the website explanation, so reaching out to Mary and the rest of my teammates helped quite a bit. I also found Rizwan Hamisi's simplified (unofficial) Daraja API documentation incredibly helpful.
NOTE: This is me learning in public and building up on my backend knowledge. I have also written this post with beginners like me in mind - what I wish I would have found explained.
Introduction
Kenya's mobile money sector has grown in leaps and bounds. For many businesses and clients, it is ubiquitous to 'Lipa na Mpesa' - whether at the local duka, for matatu fare, online transactions or for utility bills. It is for this reason that businesses with an online presence need to integrate these services for a smooth user experience. More specifically, Safaricom's MPESA has provided an array of APIs that include, but are not limited to:
Business to Business (B2B)
Customer to Business (C2B)
Business Paybill
M-pesa Express
Prerequisites
A basic understanding of Express-JS and Node-JS
An account at Safaricom Developer Portal to get Daraja API credentials
NodeJS installed
Postman for testing purposes
Initialize the project
Initialize a new Node.js project to get the package json using npm init.
Install Typescript using npm install --save-dev typescript ts-node @types/node this command installs Typescript and Node.js type definitions as dev dependencies
Initialize a new TS configuration file as it contains configuration options for the TS compiler npx tsc --init. To set the configurations for Typescript, add the below to the tsconfig.json file.
{
  "compilerOptions": {
    "target": "es6",
    "module": "commonjs",
    "moduleResolution": "node",
     "allowJs": true,
    "outDir": "./dist",
    "strict": true,
    "esModuleInterop": true,
    "skipLibCheck": true,
  },

}
Once this is done, install the required packages:
ExpressJS - minimalist web framework for NodeJS. Run this command to add types
npm i --save-dev @types/expresscors - This is a middleware package that helps manage cross-origin sharing. Run this command to add types:
npm i --save-dev @types/corsdotenv - manage the configuration for environment variables so as to store the configuration separate from the code. Fun fact: I learned that this is based on the Twelve-Factor App methodology
axios - used for making HTTP requests
nodemon - to automatically restart the node application when file changes in the directory are detected.
morgan - which is a HTTP request logger middleware for node.js (remember to add types:
npm i --save-dev @types/morgan)ngrok - that allows us to expose local servers to the internet. In one of the functions we shall have, Safaricom requires that one has a Callback URL. this URL does not accept local server links,
http://localhost:5000for instance. This is where ngrok comes in.dayjs - minimalist JS library for date manipulation.
Create a src folder to contain the main entry which will be the index.ts. Add folders: controllers and middleware as in the image below.
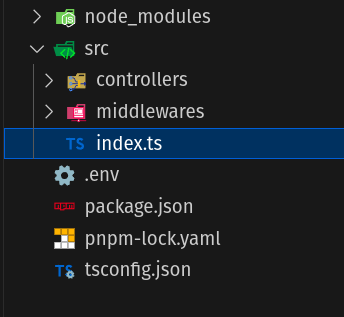
In ExpressJS, controllers typically handle the logic within the routes of the application. This logic may include receiving requests, processing data, handling responses as well as errors that may arise. Middleware on the other hand, refers to functions with access to the request and response objects as well as the next function (typically denoted by req ,res and next() respectively) in the request-response cycle of the app.
Within the package.json file, add the scripts below so that starting the server and watching for changes is easier - made possible by nodemon we installed above.
"scripts": {
    "test": "echo \"Error: no test specified\" && exit 1",
    "build": "npx tsc",
    "start": "node dist/index.js",
    "dev": "npx nodemon src/index.ts"
  },
Create an app on Safaricom Daraja
Head over to this link and create an account if you do not have one already. This blogpost covers for testing development as Safaricom provides a sandbox environment so that you can easily create and test your code.
Create an app under the 'My Apps' tab, select 'CREATE NEW APP' and give it the name that you prefer. I called mine BLOGPOST TEST APP. You can check all of the options provided.
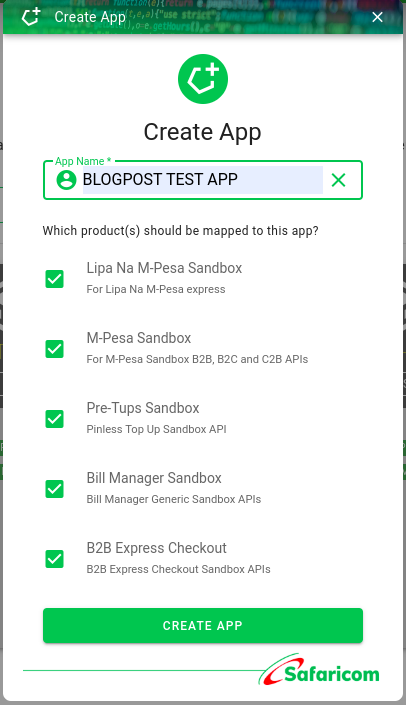
From the app you have just created, click on the 'Show credentials' as this is where we shall get the Consumer Key and the Consumer Secret from. Copy these values as we shall need them later.

Click on the APIs tab and navigate to MPESA EXPRESS then click on 'Simulate'. Choose the app you just created on your right and scroll to the bottom where you will see the computer-like icon. When you hover over this icon, it shows 'Test Credentials' as below. Click the icon to copy the Passkey.

With these three values, we should now be able to delve into the code. Woop woop!
Let's write the code!
STK (Sim Toolkit) Integration
With Lipa na MPesa Online, Safaricom makes it possible for merchants to trigger transactions from their platforms. The most fundamental aspect of this process is that, for the transaction to be completed successfully, the client receives an STK (SIM ToolKit) push for them to confirm the transaction and enter their MPESA PIN. Here's the summarized process, which also guides our code.
The online business partner (Merchant in this case) sets the parameters and creates the API request.
The request is received then validated. At this point, a response is sent. This is merely an acknowledgement response and does NOT mean that a successful transaction is complete.
The client receives an STK Push request on the provided phone number. This MUST be a registered MPESA number.
They then confirm the request by putting in their MPESA PIN.
MPESA confirms that the client's PIN is correct, deducts the amount from their MPESA account and adds funds to the online business partner/ Merchant account.
When this is done successfully, the Results are sent to the MPESA API, and then to the merchant. This is made possible by the callBack URL provided in the request.
The client receives a message notifying them of the payment made.
This form of payment has several advantages, chief among them, reducing the chance of using the wrong details. This is because the initiator is the organization/online platform the client is using, and on making a payment, the client themself get to confirm their own details.
Before we interact with this Authorization API for step 1, let us create the .env and main entry files.
Create the .env file
Before doing this, we need to create a .env to store the Consumer Key, Consumer Secret and Passkey associated with this app. Remember the standard format for writing in a .env file is key/value pairs in CAPS, separated by an '=' sign with no spaces between. These values will then be loaded to the app using dotenv.config().
# .env
PORT=choose_a_server_port

CONSUMER_KEY_SANDBOX=paste_your_consumer_key
CONSUMER_SECRET_SANDBOX=paste_your_consumer_secret
PASSKEY_SANDBOX=paste_your_passkey
Create the main entry file index.ts
In the code below, I import the following dependencies first: cors, dotenv, morgan and express. The first thing to do is to instantiate the Express app so as to set up the server, load the environment variables and set the port for the server to listen on. In the latter case, it uses the PORT environmental variable if available, else it defaults to 5000. I also set up the middleware: set up cors to accept all incoming requests, allow HTTP requests logging in the dev format and also enable parsing of incoming JSON request bodies. I also define a simple home route for and start the server.
import express, {Request, Response} from 'express'
import cors from 'cors'
import dotenv from 'dotenv'
import morgan from 'morgan'

const app=express();
dotenv.config();
const port = process.env.PORT || 5000;

//middleware
app.use(cors());
app.use(morgan('dev'));
app.use(express.json());

//define a home route
app.get('/', function(req: Request, res: Response){
    res.send('Home reached')
    console.log('Home page reached')
});

app.listen(port, function(){
    console.log(`Server running on port ${port} 🚀🌟`)
})
Authorization API
The Authorization API generates an access token which is required for ALL subsequent API calls, making it the first API you must engage with. This information is on this link on the Daraja API docs.
The token generated expires in 3600 seconds and once it has expired, you would need to generate another fresh token before making a request. To go around this, we shall create a function that generates this token so that it is invoked when interacting with any of the other APIs/ before making any subsequent requests.
Generate Token Function
Here's the pseudo code for this function. The request will include:
The Base-64 encoding of both the Consumer Key and the Consumer Secret in this format: `Consumer Key + ':' + Consumer Secret`
Create a GET request and set an Authentication header with the value as
Basicplus the encoded value from step1 in a try catch block. Use the endpoint provided in this link.Call the
next()function, which in this case, would be to handle the stkPush.
Here's the function:
//generateToken.ts

import axios from "axios";
import { Response, Request, NextFunction } from "express";

//this is a TS intersection type
//extend Request to allow for the addition of the token to the req body
export type RequestExtended = Request & {token? : string}

export const generateToken = async (
    req: RequestExtended,
    res: Response,
    next: NextFunction
) => {
    const consumerKey = process.env.CONSUMER_KEY_SANDBOX;
     const consumerSecret = process.env.CONSUMER_SECRET_SANDBOX;
     const authLink = "https://sandbox.safaricom.co.ke/oauth/v1/generate?grant_type=client_credentials"

     const auth = Buffer.from(`${consumerKey}:${consumerSecret}`).toString('base64');

     try {
        const response = await axios(authLink, {
            headers: {
                Authorization: `Basic ${auth}`
            }
        })

        req.token = response.data.access_token;
        next();
     } catch (error:any) {
        throw new Error (`Failed to generate access token: ${error.message}`)
     }
}
Worth Noting: I kept getting an error only to realize that I was making a POST request instead of a GET request. I got this response. On the Authorization API page, there's a tab that includes errors, but these two cover Invalid grant type/Invalid Authentication.
//error from using a POST request instead of a GET request
data: {
    requestId: '1c5b-4ba8-815c-ac45c57a3db01617180',
    errorCode: '404.001.03',
    errorMessage: 'Invalid Access Token'
   }
STKPush (Lipa na MPESA) API
To facilitate the STKPush, we need to create a function that handles this business logic, and so the function will be created in the controllers folder. To understand what we need to make this request, it helps to look at the structure of the Request Body as provided in the API docs.
{
   "BusinessShortCode": "174379",
   "Password": "MTc0Mzc5YmZiMjc5ZjlhYTliZGJjZjE1OGU5N2RkNzFhNDY3Y2QyZTBjODkzMDU5YjEwZjc4ZTZiNzJhZGExZWQyYzkxOTIwMTYwMjE2MTY1NjI3",
   "Timestamp":"20160216165627",
   "TransactionType": "CustomerPayBillOnline",
   "Amount": "1",
   "PartyA":"254708374149",
   "PartyB":"174379",
   "PhoneNumber":"254708374149",
   "CallBackURL": "https://mydomain.com/pat",
   "AccountReference":"Test",
   "TransactionDesc":"Test"
}
To break this down properly:
Business Short Code refers to the merchant's shortcode. For this sandbox environment, we use 174379. In Production environment, this code would ideally need to be in the .env() file.
The Password is obtained by getting the Base64 of the following combination: Business shortcode + Passkey + Timestamp.
The timestamp represents the time of the transaction in this format: YYYYMMDDHHmmss
The Transaction Type, in this case Customer Paybill Online
Amount represents the money the client pays.
Party A is the phone number sending the money, often the same as Phone Number.
Party B is the merchant organization.
Callback URL is used to get notifications from the MPESA API. This cannot be a localhost link so we shall use
ngrokin order to expose the link to the internet.Transaction Description represents any extra information that can be sent alongside the request.
//handleSTKPush.ts

import dayjs from "dayjs";
import { Response } from "express";
import { RequestExtended } from "../middlewares/generateToken";
import axios from "axios";

const handleSTKPush = async (req: RequestExtended, res: Response)=>{
//destructure the phone and amount from the request body
    const { phone, amount } = req.body;

    //first get the timestamp using dayjs
    const year = dayjs().format("YYYY");
    const month = dayjs().format("MM");
    const date = dayjs().format("DD");
    const hour = dayjs().format("HH");
    const minute = dayjs().format("mm");
    const seconds = dayjs().format("ss");

    const timestamp = year + month + date + hour + minute + seconds;

    //create the PW using shortcode, passkey and timestamp in that order
    // without adding 'as string' causes it to be undefined
    const shortCode = process.env.SHORT_CODE_SANDBOX as string;
    const passKey = process.env.PASSKEY_SANDBOX;

    //Get the base64 of the combination
    const dataToEncode = shortCode + passKey + timestamp;
    const password = Buffer.from(dataToEncode).toString('base64');

    //create the CB URL, this would ideally be done on the index.ts file
    //I created the route '/api/callback-mpesa' which in full would be `http://localhost:3000/api/callback-mpesa`
    //but these needs to be exposed bcz safaricom will not take a localhost link. i would need to use 'ngrok'. after ngrok, this part will change - http://localhost:3000 to the forwarding URL  https://fccb-41-90-64-57.ngrok-free.app . to do this, create an account to establish ingress for the app on this link -https://dashboard.ngrok.com/get-started/setup/linux - then use the command `ngrok http http://localhost:8080` if its listening on port 8080
    //note that the server must be on, and then open a new terminal window.

    const callbackURL = 'https://cdb1-41-90-64-57.ngrok-free.app/api/callback-mpesa'

    //create the payload
const payload = {
    BusinessShortCode: shortCode,
    Password: password,
    Timestamp: timestamp,
    TransactionType: "CustomerPayBillOnline",
    Amount: amount,
    PartyA: phone,
    PartyB: shortCode,
    PhoneNumber: phone,
    CallBackURL: callbackURL,
    AccountReference: "Samoina Test",
    TransactionDesc: "Payment",
}

try {
    const response = await axios.post('https://sandbox.safaricom.co.ke/mpesa/stkpush/v1/processrequest',
        payload,
        {
            headers : {
                //Remember the token we created? this is where we shall use it
                Authorization: `Bearer ${req.token}`
            }
        }
    )

    console.log(response.data)
    res.status(201).json({
        message: true,
        data: response.data
    })
} catch (error: any) {
    console.log(error);
    res.status(500).json({
        message: 'failed',
        error: error.message
    })
}

}
export default handleSTKPush;
Creating the Callback URL
Admittedly, I found the creation of my own callback URL a little tricky. With some help from one of my team mates, I was able to follow these steps and understand what was going on.
I first created a route for the callback URL on the main entry file
index.ts. Here's the code for the route I created, which in full would behttp://localhost:3000/api/callback-mpesawhere 3000 represents the port you have chosen. When a post request is sent to this URL, the handler function extracts the body of the incoming request into acallbackDataconstant, and sends a response, ideally to the MPESA API.... api.post('/api/callback-mpesa', (req: Request, res: Response) => { const callbackData = req.body; console.log('here is the callback data!', req.body) res.json({ status: 'success' }) } ...In the step above, the full link would be
http://localhost:3000/api/callback-mpesa. But there is a challenge with this because The MPESA API would need a live URL for the callback. This is why the localhost link will not work. To workaround this, I used ngrok to open a live tunnel to the localhost port. To do this, first create an account to establish ingress for the app using this link (if you're on Linux). I set up mine on the Free Plan.Once you have setup the account, run the command below where
3000represents the port you have chosen.ngrok httphttp://localhost:3000. Note that the server must first be on, and then open a new terminal to run the ngrok command. Copy the link that is pre-appended by 'Forwarding'. Here's a screenshot of the ngrok Terminal:

To view the traffic on the URL, open the link pre-appended by 'Web Interface'.
Creating the route to debit the client and credit the merchant
To put all of this together, I added the code below to the index.ts file.
//define a lipa route with the middleware Fn and then the controller Fn
app.post('/lipa', generateToken, handleSTKPush)
...
I defined an endpoint called /lipa to handle POST requests, upon which the generateToken() middleware function will be invoked. This function creates the authentication token used for all subsequent API requests. This then calls the handleSTKPush, a controller function which handles the logic of initiating the MPESA transaction.
Here's the full code for the index.ts file:
//index.ts
import express, { Request, Response } from 'express'
import cors from 'cors'
import dotenv from 'dotenv'
import morgan from 'morgan'
import { generateToken } from './middlewares/generateToken'
import handleSTKPush from './controllers/handleSTKPush'

const app = express();
dotenv.config();
const port = process.env.PORT || 5000;

//middleware
app.use(cors());
app.use(morgan('dev'));
app.use(express.json());

//define a home route
app.get('/', function (req: Request, res: Response) {
    res.send('Home reached')
    console.log('Home page reached')
});

//define a lipa route with the middleware Fn and then the controller Fn
app.post('/lipa', generateToken, handleSTKPush)

app.post('/api/callback-mpesa', (req: Request, res: Response) => {

    const callbackData = req.body;
    console.log('here is the callback data!', req.body);

    res.json({ status: 'success' });
})

app.listen(port, function () {
    console.log(`Server running on port ${port} 🚀🌟`)
})
Testing on Postman
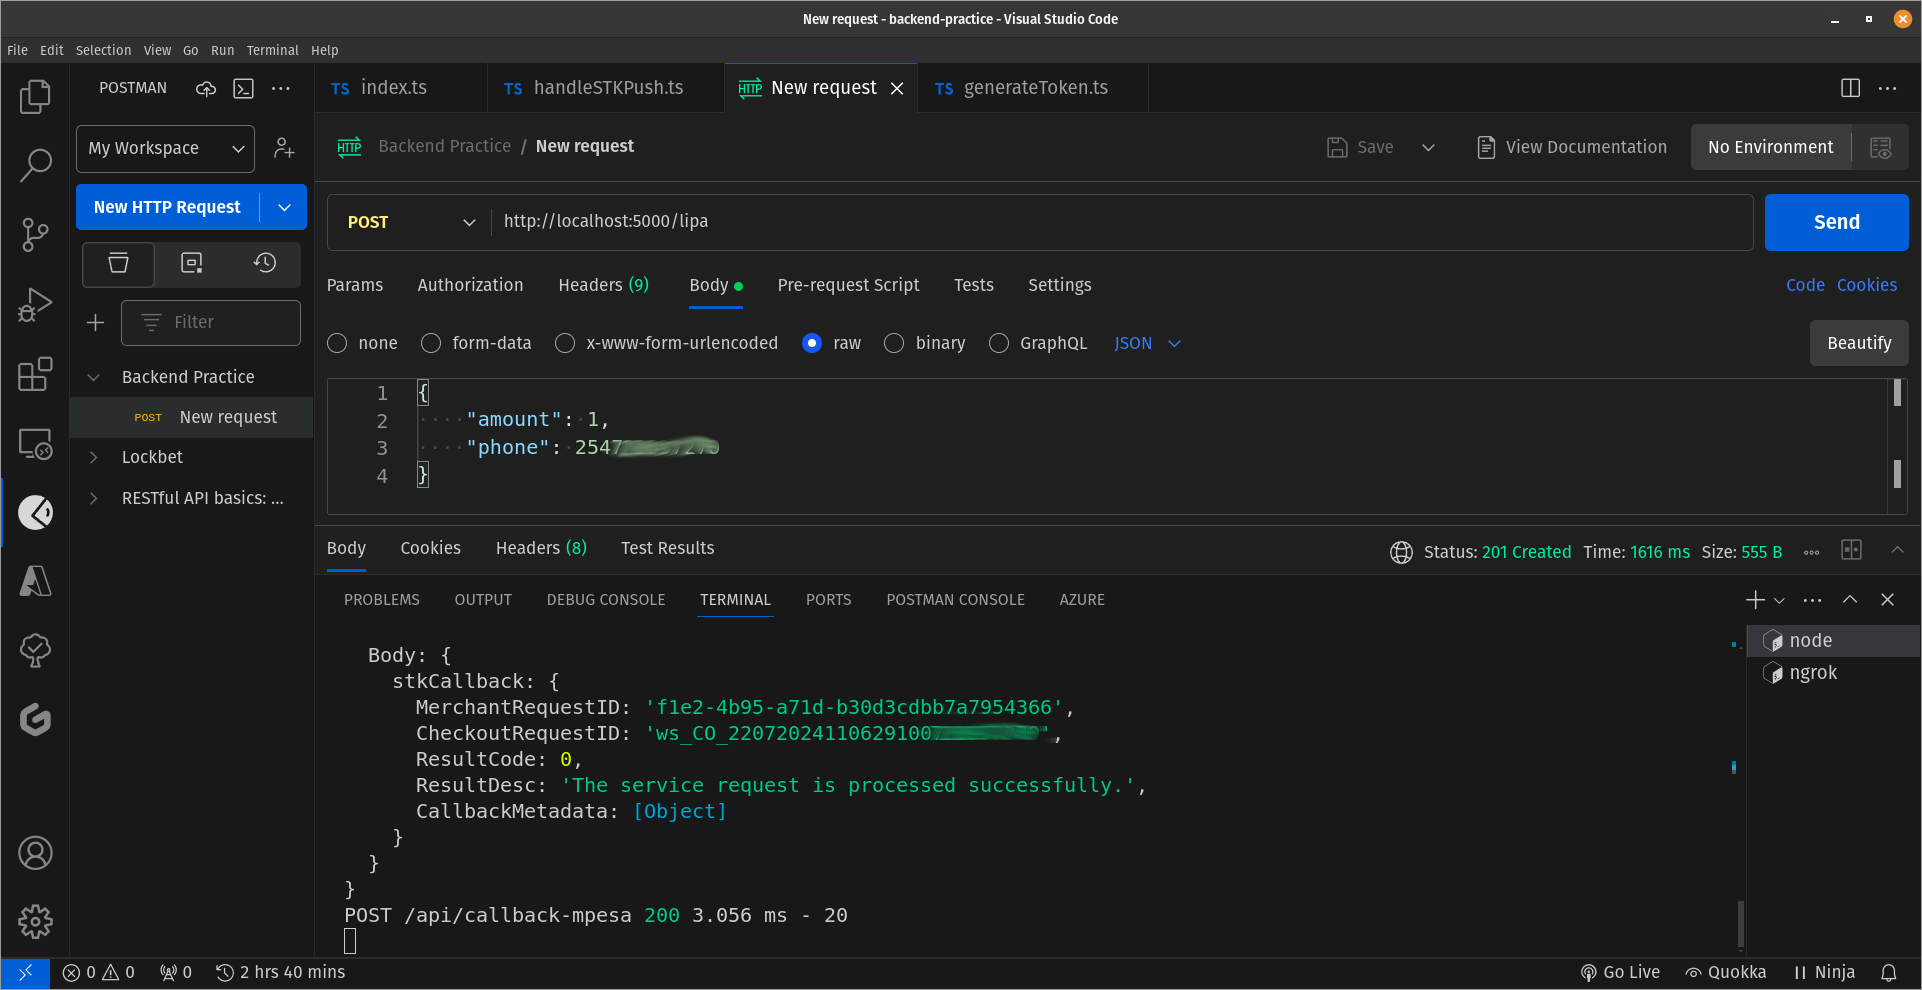
Head over to Postman, create a new POST request to the /lipa endpoint. Under 'Body`, select 'raw' to allow sending data in a specified format, and then choose 'JSON' from the dropdown menu on the right. In the request of the body, create the JSON object to include the amount and phoneNumber to which the MPESA request will be made. Once the request is made, it should prompt the client whose phoneNumber was entered to put in their PIN to validate the transaction. Here's a couple of screenshots of the same, alongside the acknowledgement response from the MPESA API (step 2 of STK Integration above) in the first screenshot. Details of the phone number are blurred out for obvious reasons.
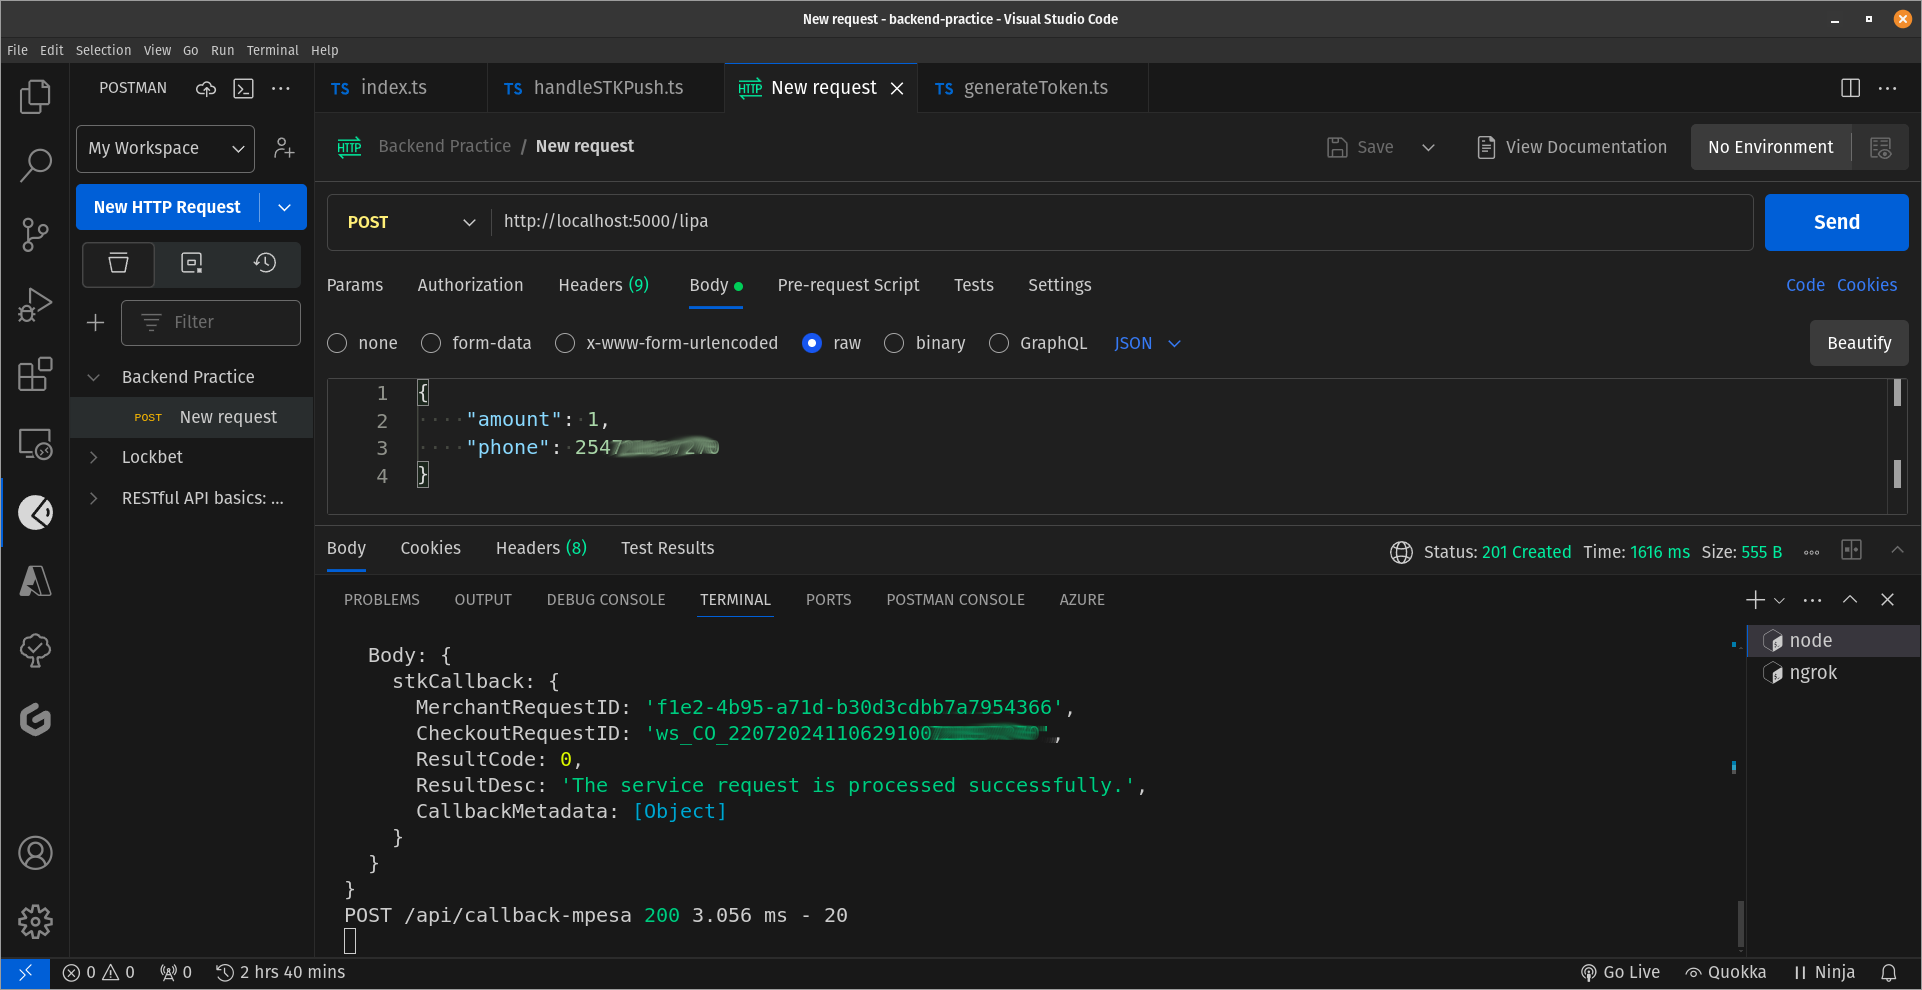
The screenshot below shows the result body after a successful transaction. Note that unlike the acknowledgement response body above, the result body contains an object called CallbackMetadata. As a follow up, your code can check for the presence of this object in the result body to ascertain a successful transaction.
Here's the push request I got on my phone:

Conclusion
Writing the code for this article was an eye-opener just in terms of how the backend works and a good start to learning how to integrate MPESA in the development environment. I tried to make the post as beginner-friendly as possible and look forward to hearing your feedback. Again, thanks to Mary and Rizwan for the great pointers!
Here's the link to the Github repo that contains this code.
Thanks for reading, and happy coding!
Subscribe to my newsletter
Read articles from Samoina directly inside your inbox. Subscribe to the newsletter, and don't miss out.
Written by
